Get Started
Thank you for purchasing our app
Please read the documentation carefully , and if you have any question check us . Most pages are accompanied by a video tutorial , it's recommended to check both , the video and the written Documentation .
Must Read this:
After purchase if you run the project and test the build in phone it will not work becuase you have to setup the Web API first then app will be works fine.Web API is in PHP 7.0 and it will work on any kind of hosting packages
Quick Setup Web API Configuration
Step 1 - You have to upload the API files which we have provided in your downloaded package from codecanyon
Step 2 - Login in your hosting cpanel Navigate to File Manager and Create a folder "admin" and upload the admin.zip files , then extract it
Step 3 - For API configuration You have to go http://domain.com/API/
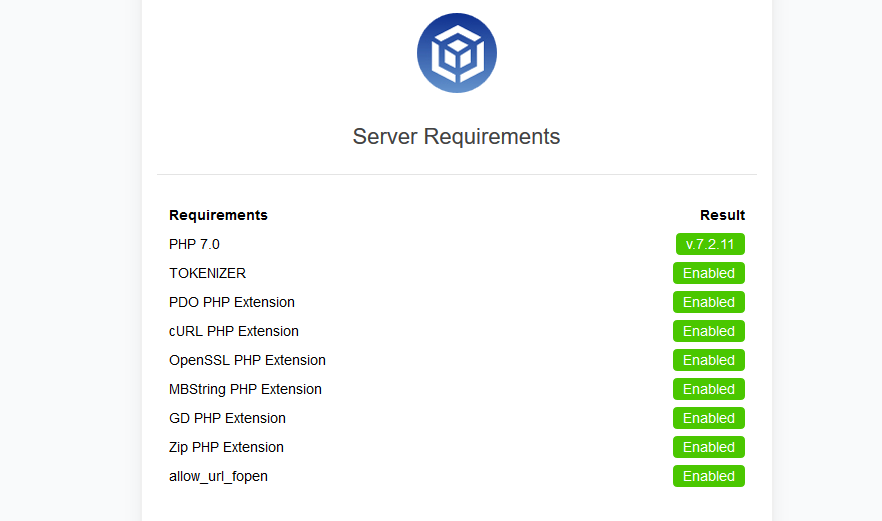
Step 4 - Make sure All the Server requirement are enabled
Step 5 - Fill the required information and submit
Step 6 - You can get firebase database url from there , Follow Screenshot Click to view screenshot
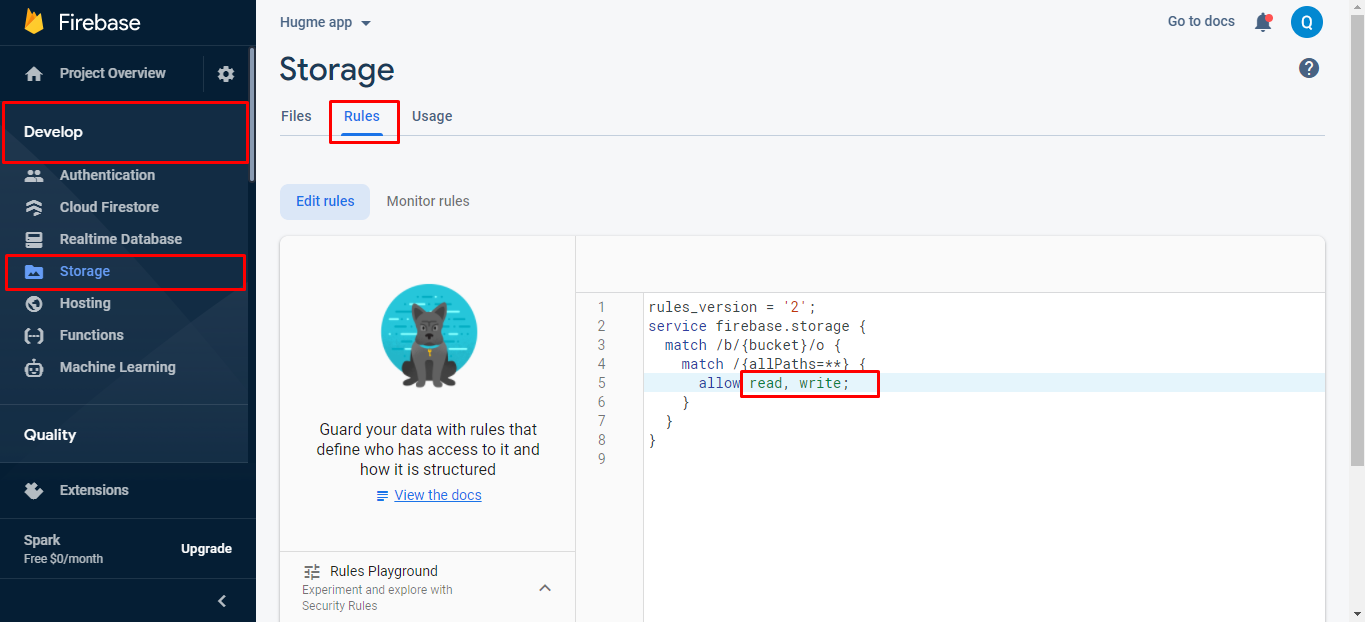
Make sure firebase real time database permission is allow Click to view screenshot
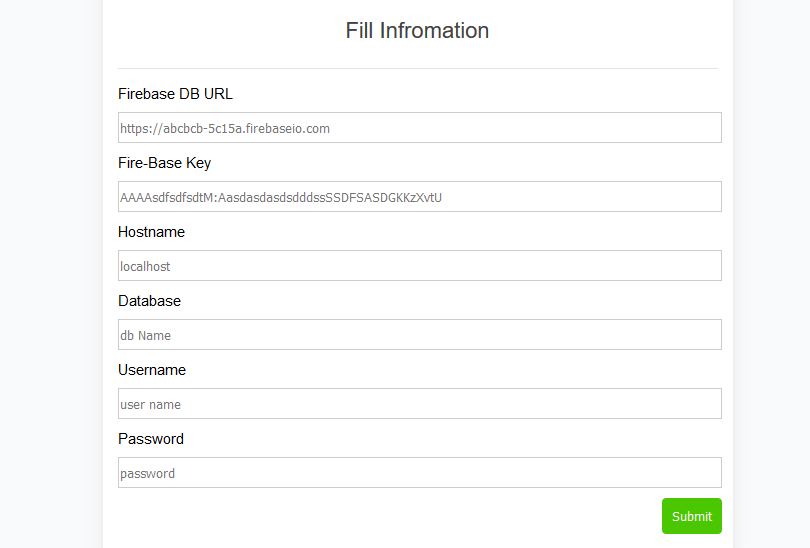
If you fill any thing wrong which is not correct , fields color will be red

How to setup Database
installing Binder PHP API is an easy process and we will guide you through it .
Before getting started, please make sure your web server meets all the requirements:
- Latest PHP Version 7.0
- MySQL extension (enabled on all hosts by default)
Step 1
Make a folder on your hosting "API" and upload API-Code files in it

Step 2
Upload Files in "API" folder

Step 3
- Create Database in mysql databases ( in cPanel ) with the name of "Binder" you can write what ever you want

- Create a new user

- Assign that user to database

Step 4
How to import Sql database & user in phpmyadmin
Quick Setup Admin Panel Configuration
Step 1 - You have to upload the Admin panel files which we have provided in your downloaded package from codecanyon
Step 2 - Login in your hosting cpanel Navigate to File Manager and Create a folder "portal" and upload the portal.zip files , then extract it
Step 3 - For configuration You have to go http://domain.com/API/
Step 4 - Make sure All the Server requirement are enabled
Step 5 - Replace the code that is mentioned in screenshot
Step 6 - Open domain.com/portal in your browser and login with "email:admin@admin.com" & "password:123456"
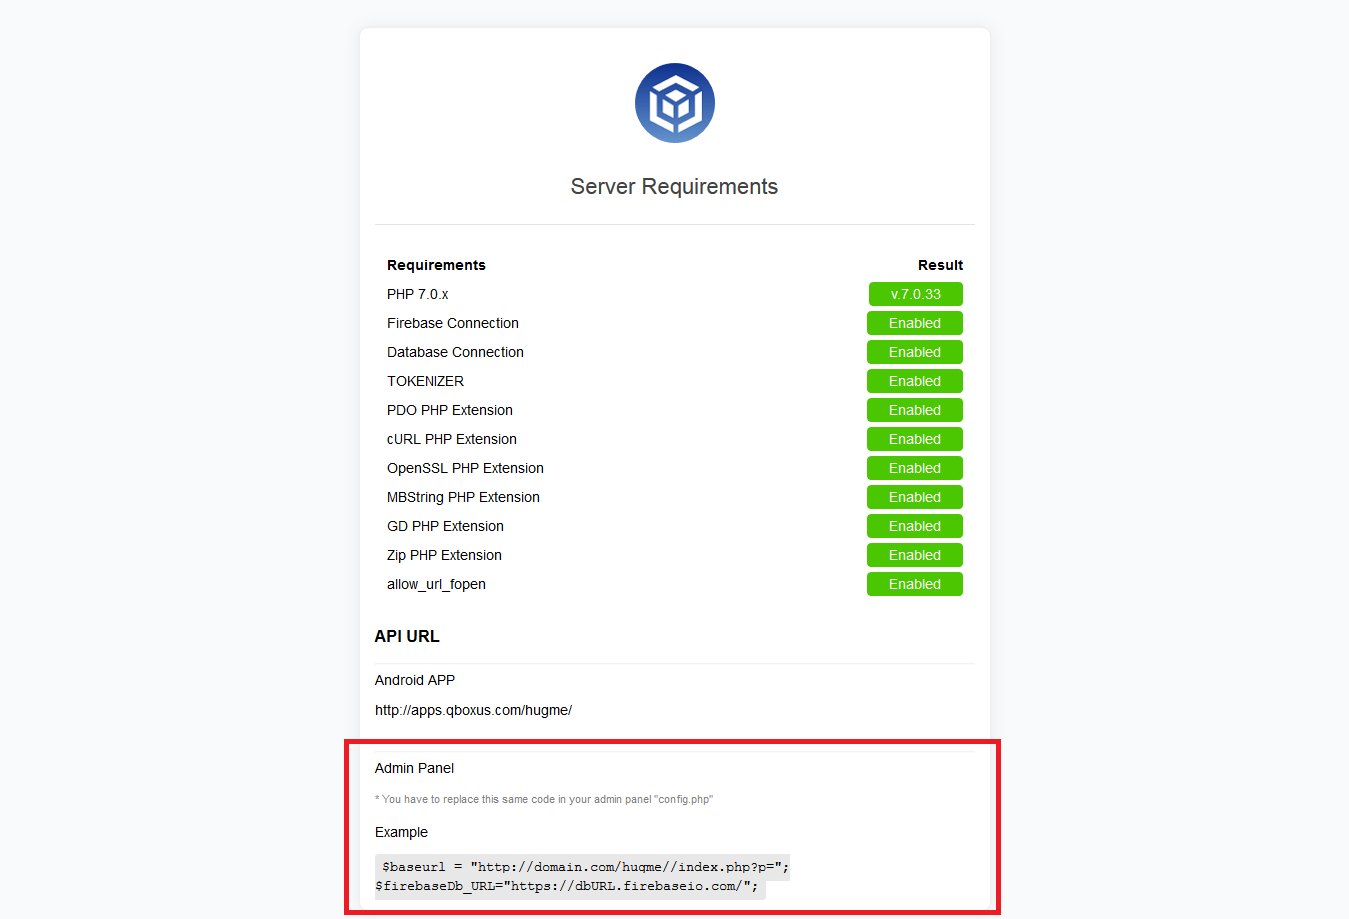
Configuration Portal Chat
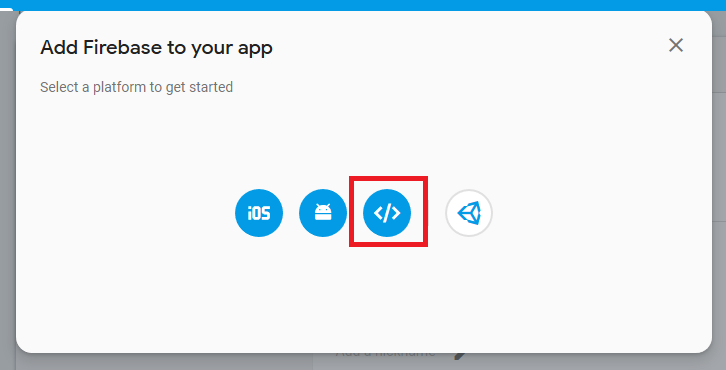
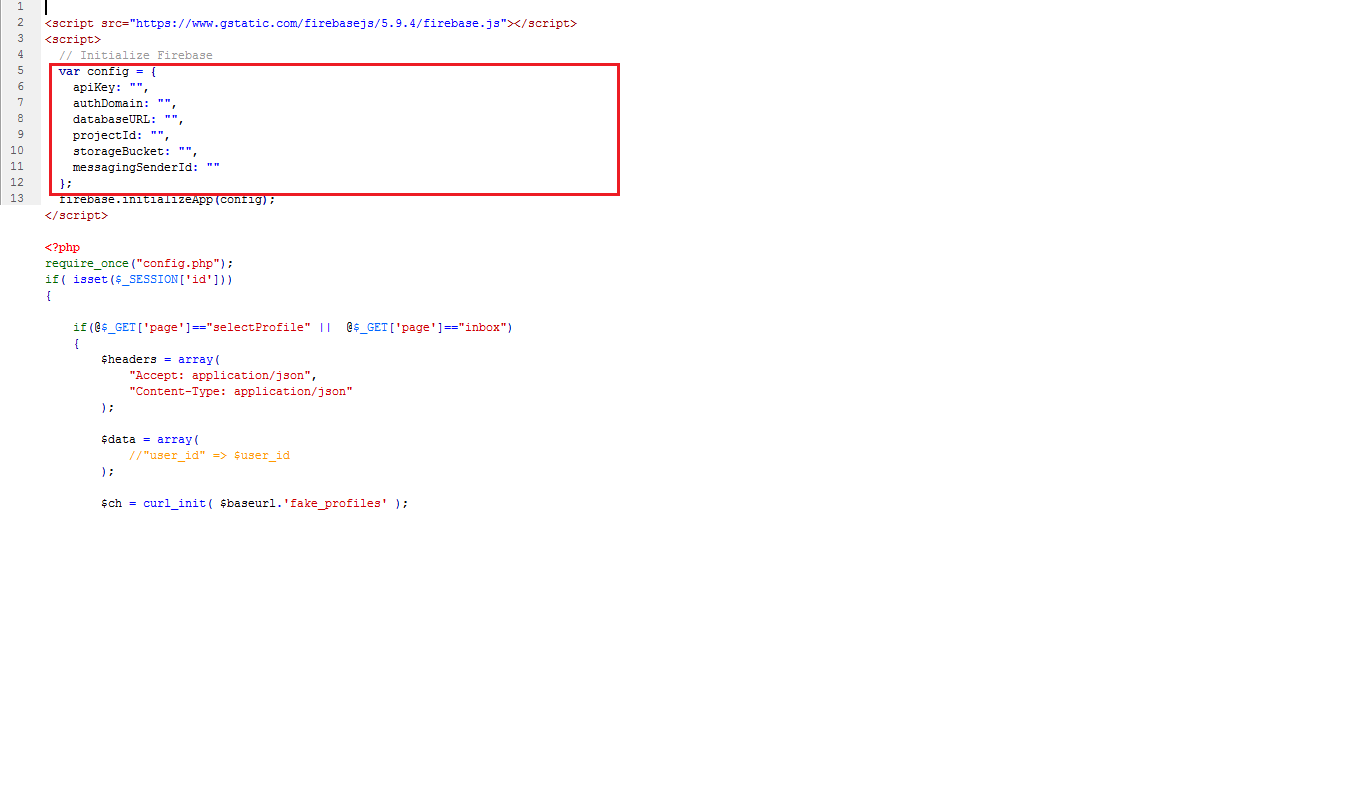
- Open Firebase and follow 1st and 2nd screenshot and copy the code and paste in portal/inbox.php
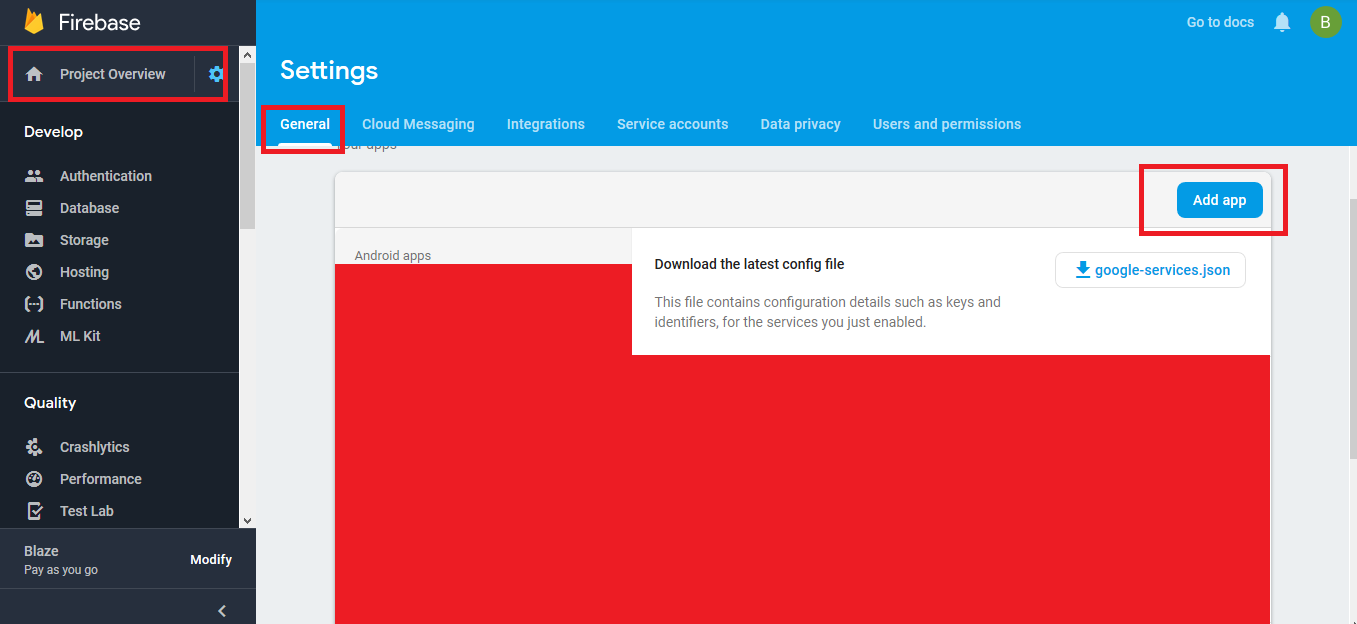
edit portal/inbox.php and setup the firebase auth
Android Configuration:
In order to start configuring , you need to install Android studio and the 'Java SE Development Kit'. First download the android studio from here Android Studio
SDK Manager
The installer , as also shown in the video should automatically download and install all required components . if you want to do manual setup , download at least the following components using the SDK manager
- SDK tools
- SDK platform Tools
- SDK Build Tools
- Google Play Services
- Android Support Library
- Google Repository
- Google USB Driver
You can download these SDK , if not installed already , using the SDK manager SDK Manager After you're done, you can open Android Studio and continue.
*Note: After successfully installing the Android Studio please make a sample app project to install necessary files into computer by android studio.
Importing Android Project and Change Package Name
To import the app, simply open Android Studio and import/open the template. Make sure to wait for all the processes (the Gradle Build) to complete before continuing to the next step
Addition steps
Addition steps Sometimes, the Gradle Build fails. In some cases additional components are needed, Android Studio will ask you to do download these additional SDK components in the 'messages' tab, simply follow the instructions provided to install and download the additional components.
Change App Name
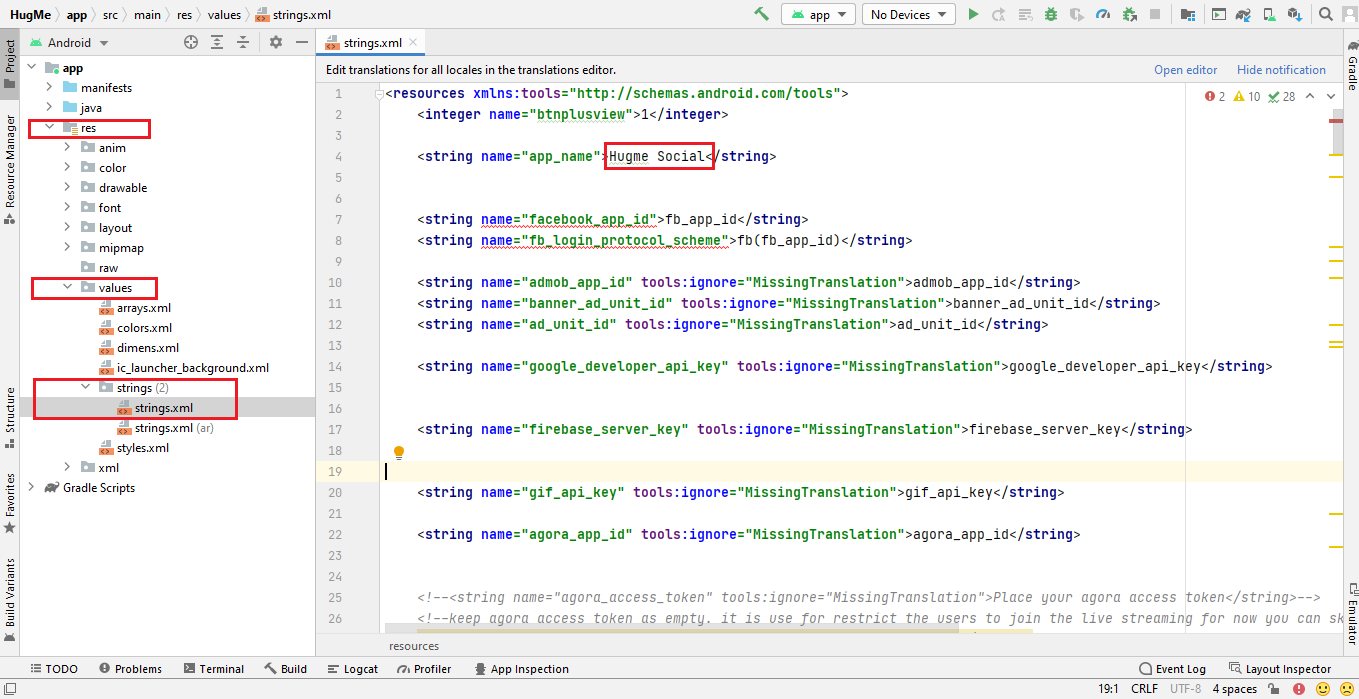
Below is illustrated how you can change the name of the application.
Go to app->res->values->strings (2)->strings.xml
Change Color Scheme
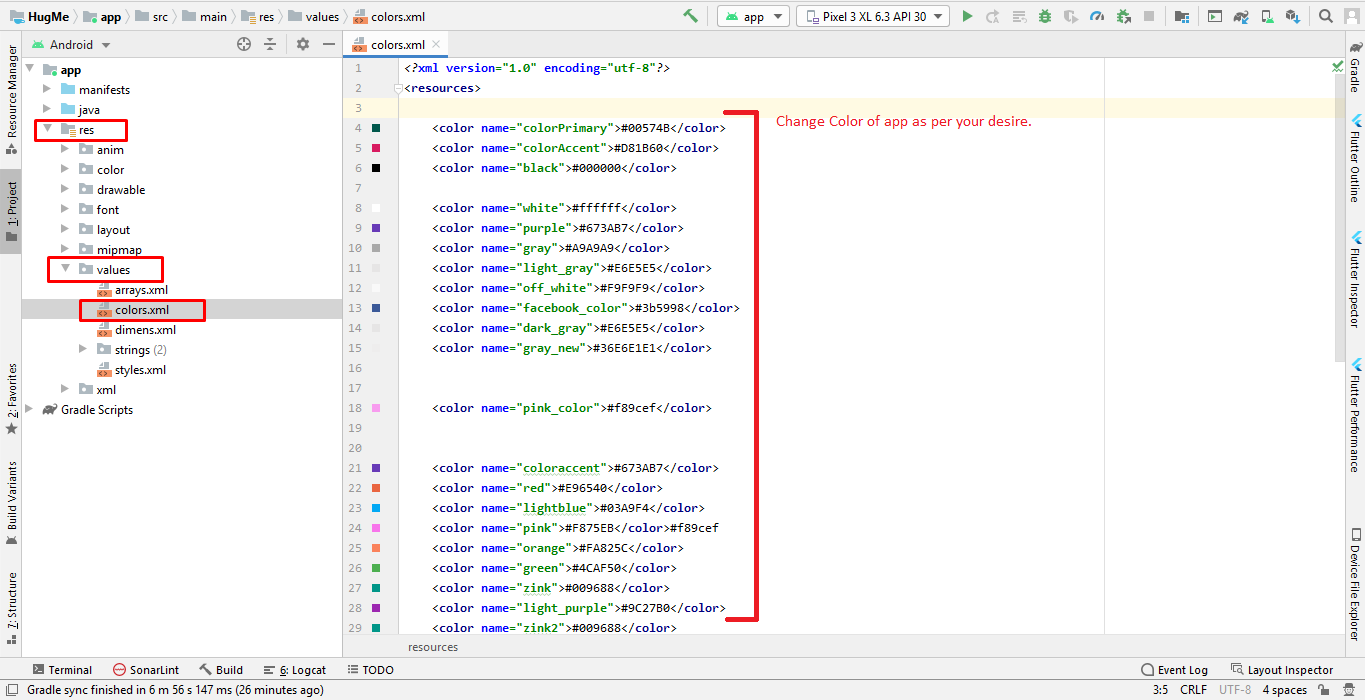
Below is illustrated how you can change the color of the application.
Go to app->res->values-> colors.xml
You can change your apps colors to create a custom look. The primary color is the color of the Toolbar, some buttons and headers. The primary dark color is used for e.g. the status bar. get more color from here material.io
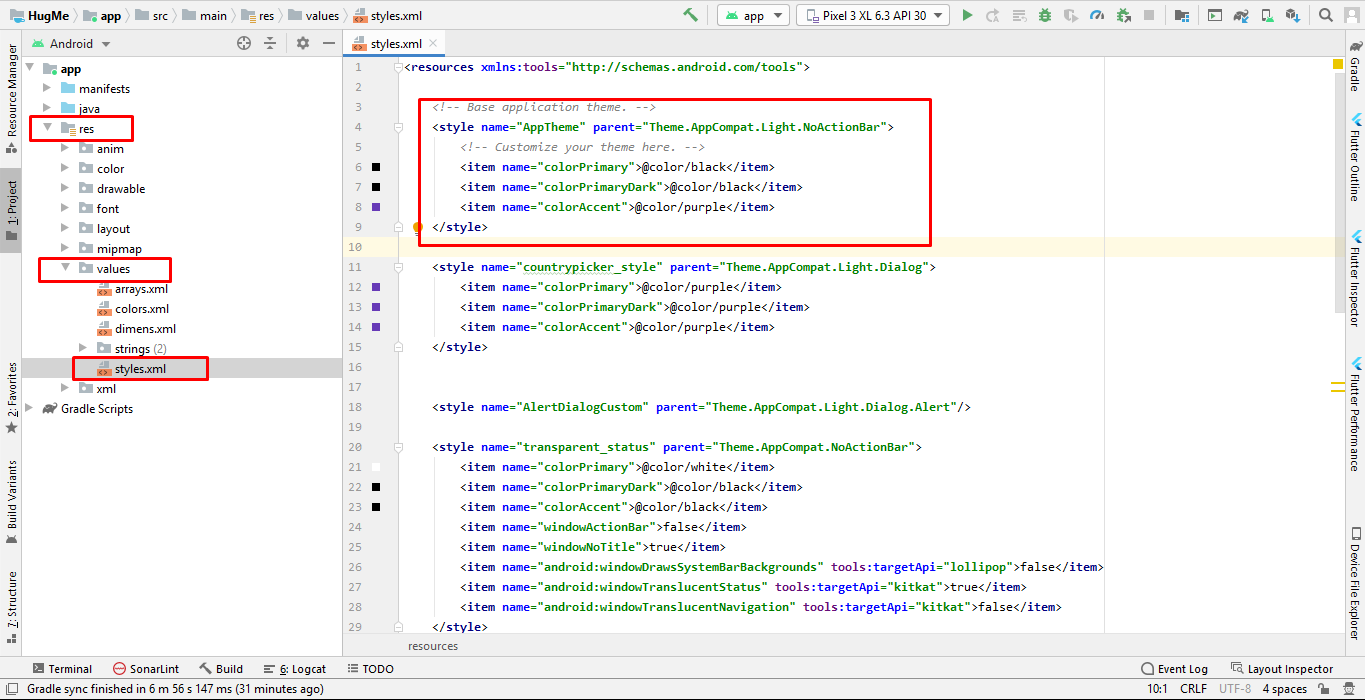
Change Theme of Application
Change App icon
Change Splash Screen
We need to put a png file with named ' ic_splashscreen' in the following folder:
Go to project location->Hugme->app->src->main->res->drawable
Change API Links
Your Complete API URL should be http://domain.com/API/hugme/index.php?p=
Click on app->java->com.packagename.appname-> Volley_Package-> Api_Links ->line no#. 9 approximately
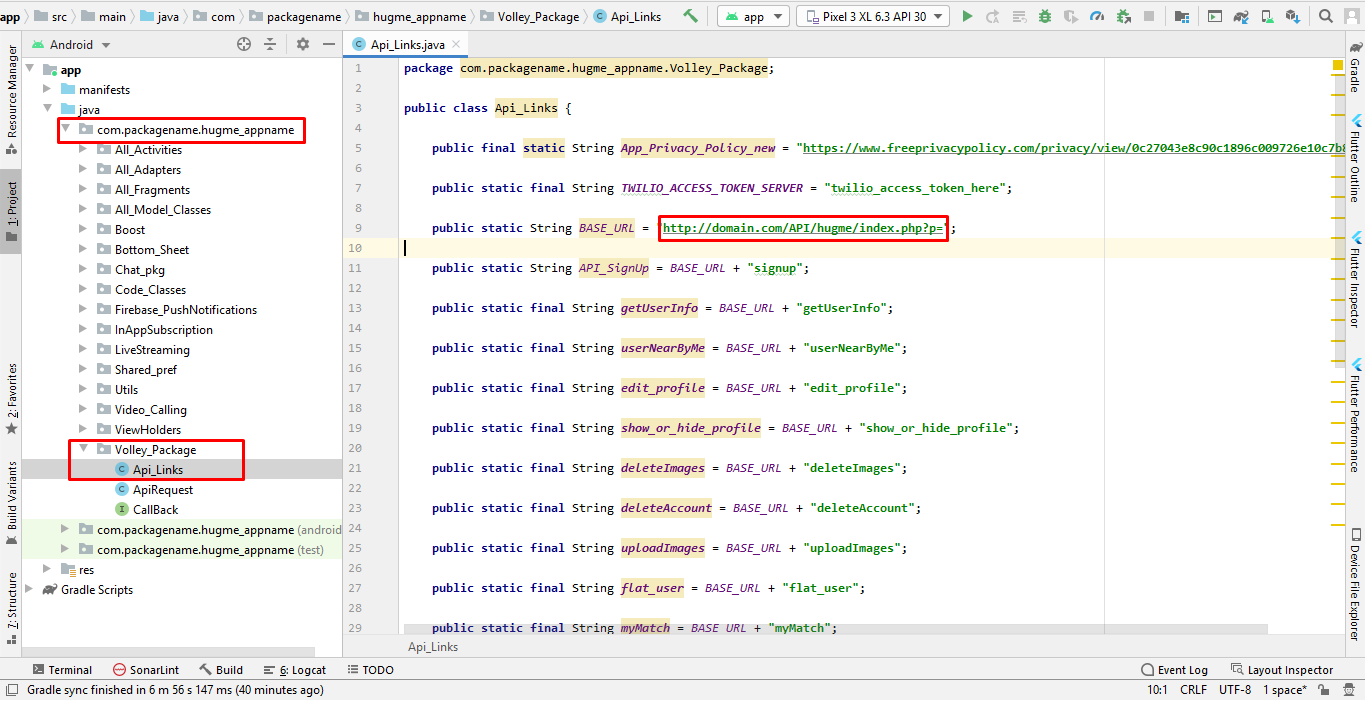
Above is illustrated how you can change the Rest Api link of the application.
Setup Ad Mob
For Ad Mob setup you need ad mob id's which you get from your ad mob account. If you have no ad mob account then go to this URL: https://admob.google.com/home/ make an account, get id's and paste in app as mentioned below.
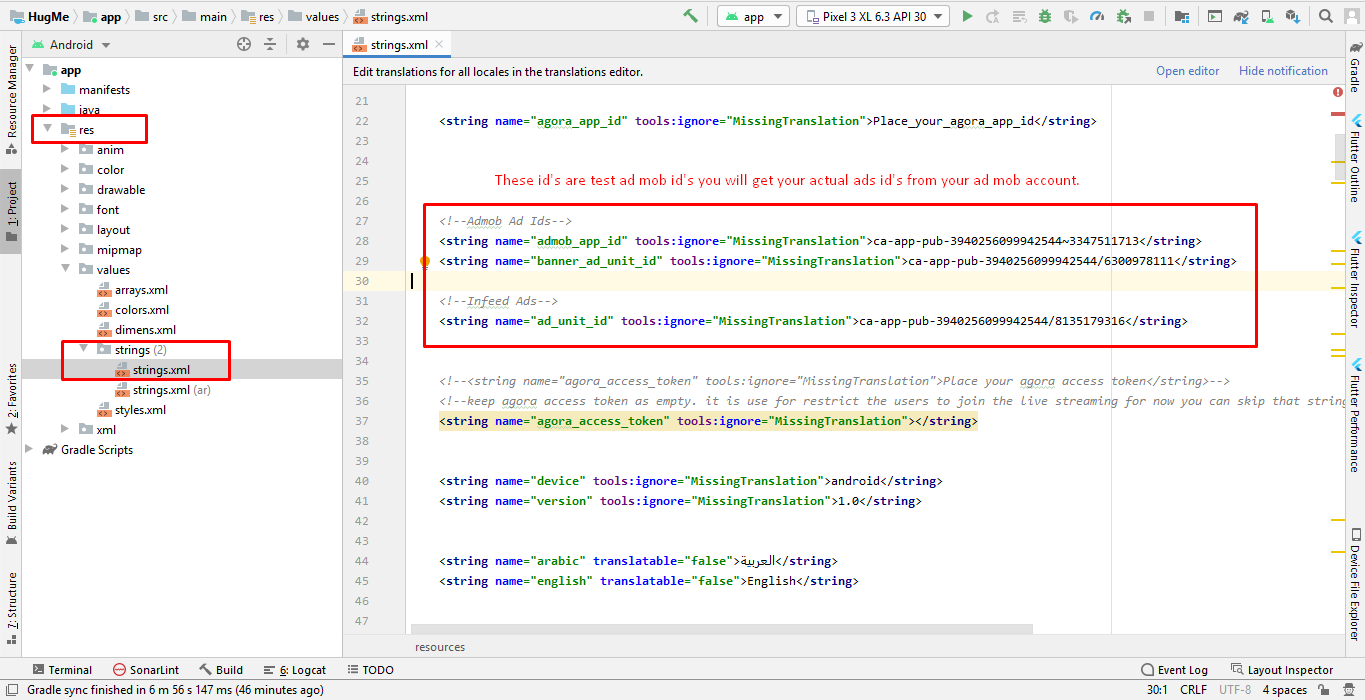
Above is illustrated how you can change the Rest Api link of the application.
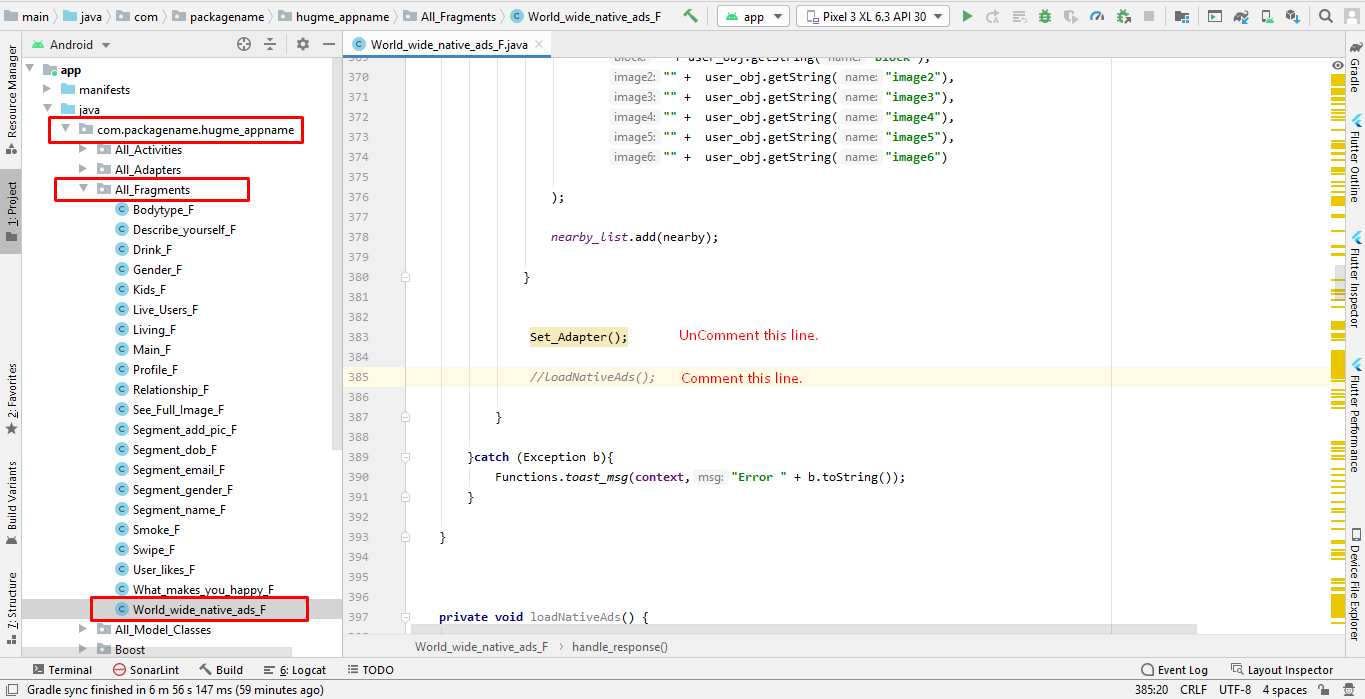
Remove Ad Mob ads
If you want to remove ads from Recyclerview then follow the below screenshot.
In-app Purchases
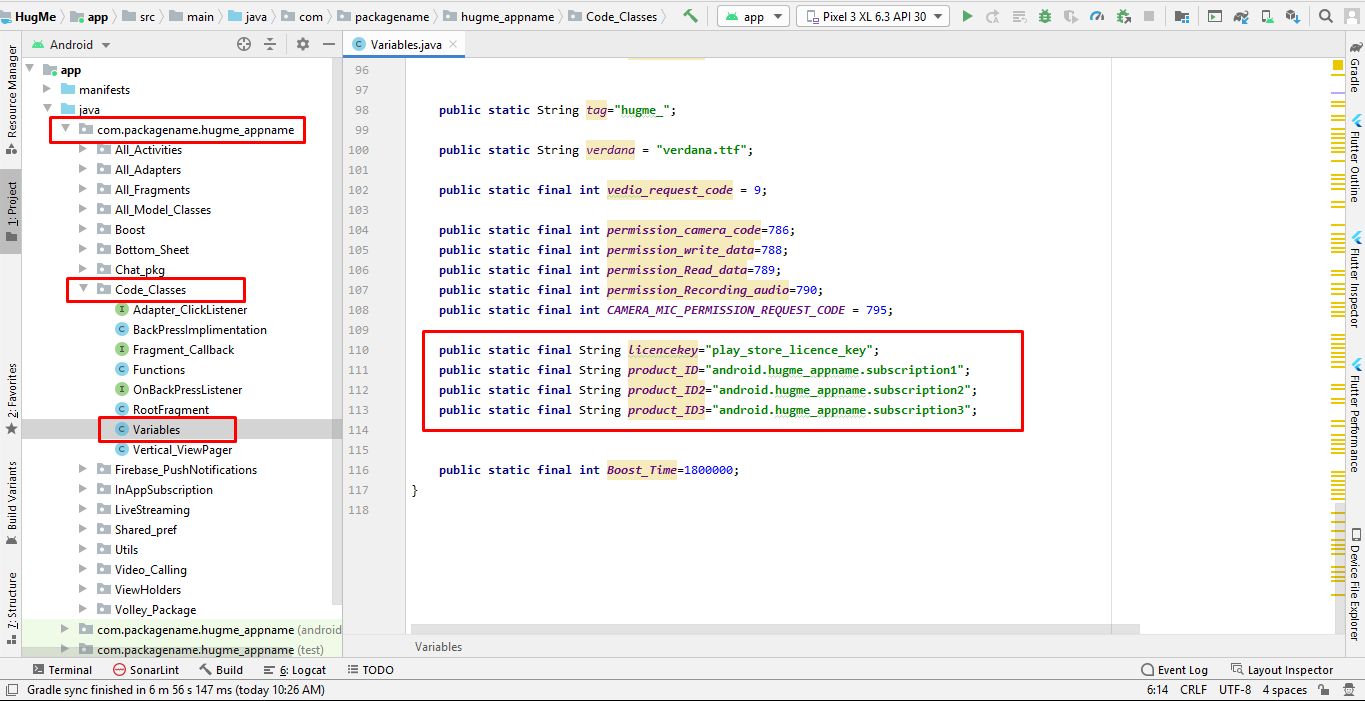
Remove/Disable Premium Feature
If you want to remove/disable Premium Feature then follow Screenshot.
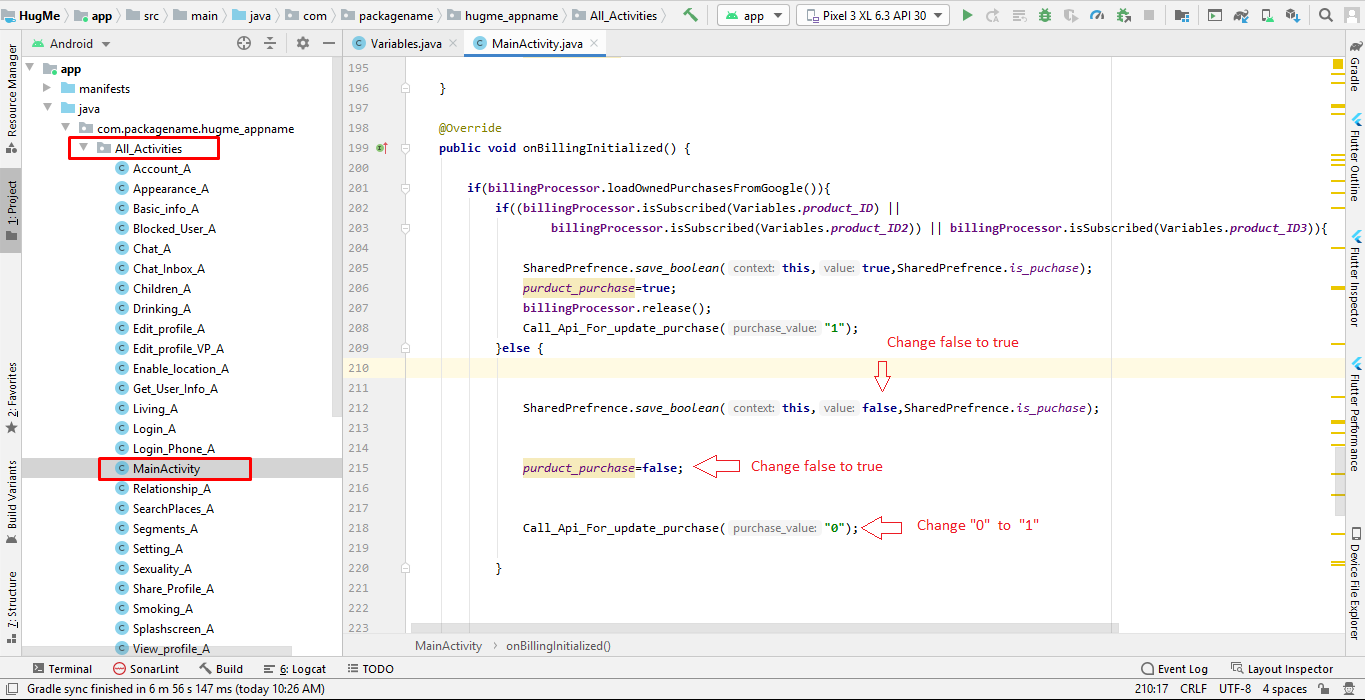
Remove/Change Streaming and Video Call Limit
If you want to remove/change live streaming and video calling limit dialog then follow Screenshot.
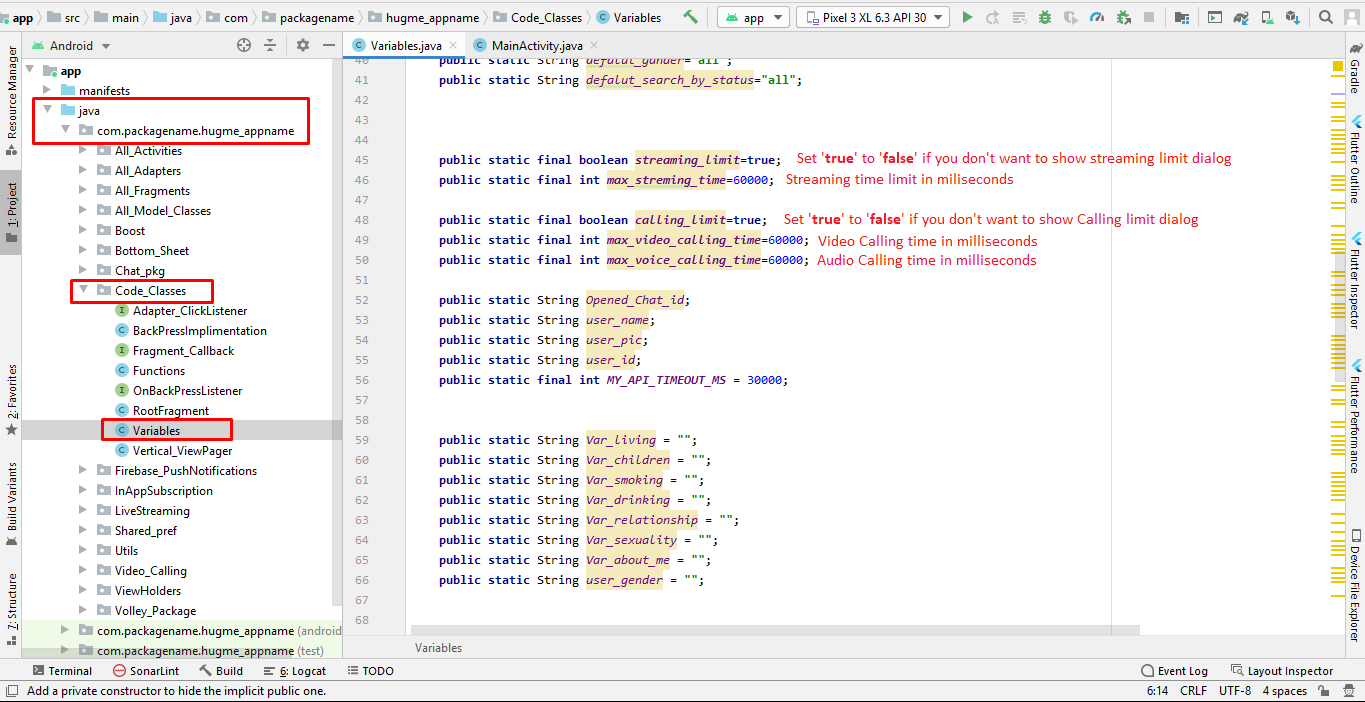
Firebase Configuration
Face Verification (Deepengin.com)
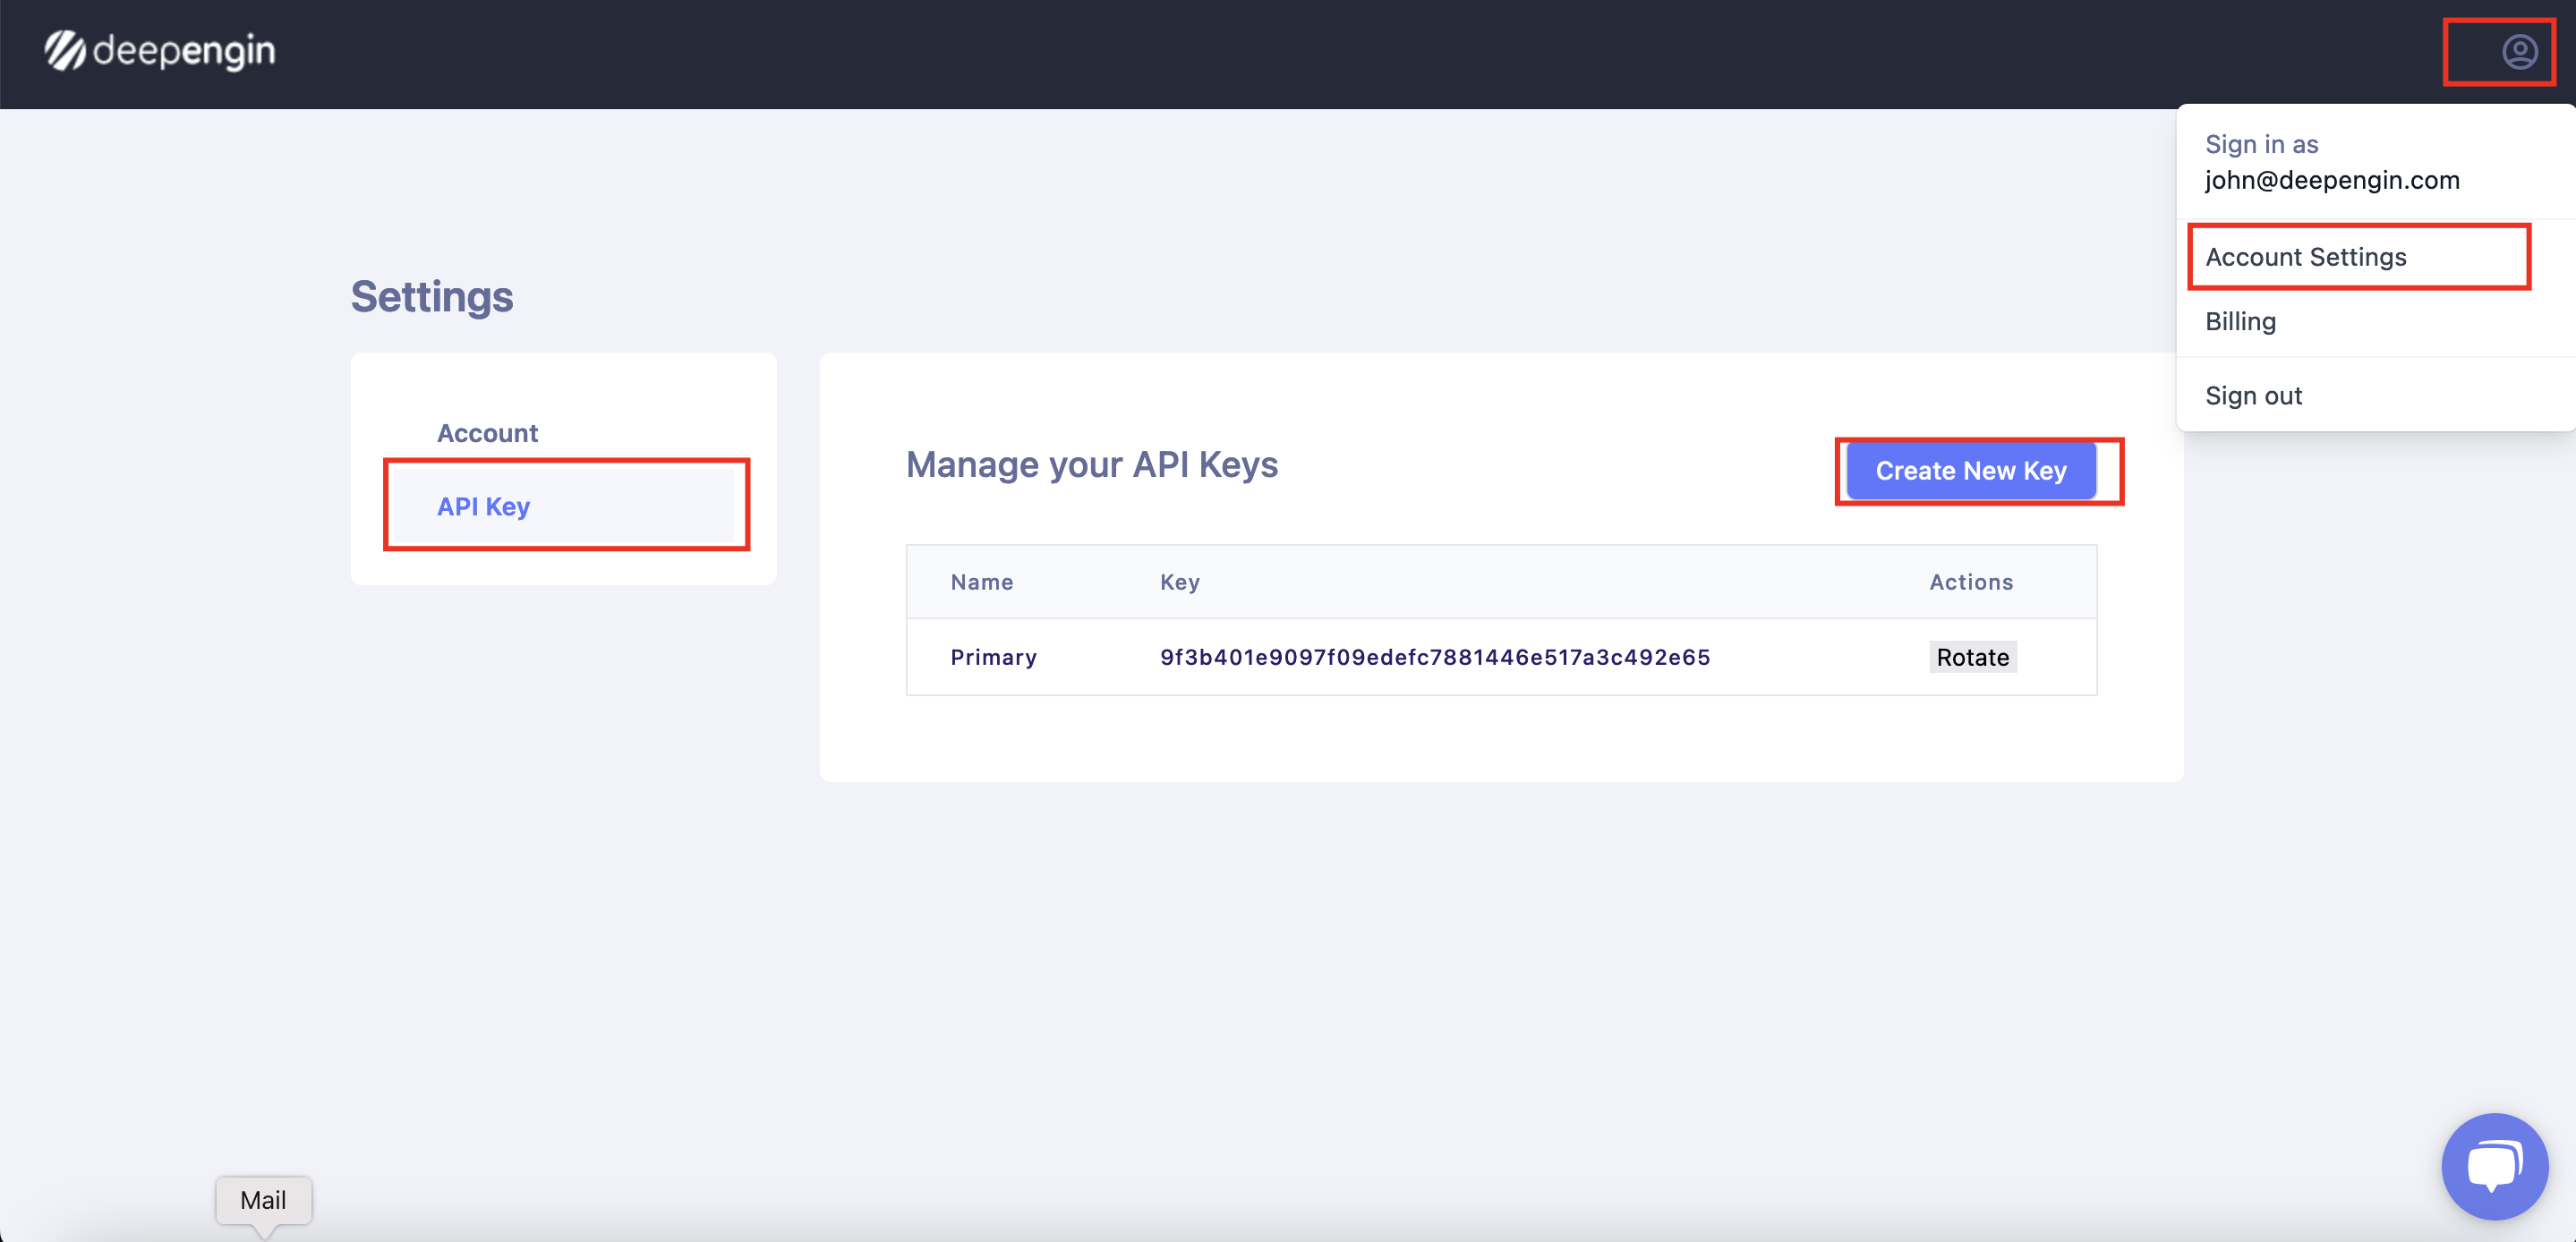
Deepengin Configration
Add your Deepengin key in your config.php file
define('DEEPENGIN_KEY', 'Key Here');
define('DEEPENGIN_URL', 'https://images.deepengin.com/v1/verifyFace');
Change Firebase Database Rules

if you have not provide the SHA1 key into the firebase project then phone login and google login will not work. You have to add your SHA1 key for both debug and live mode.
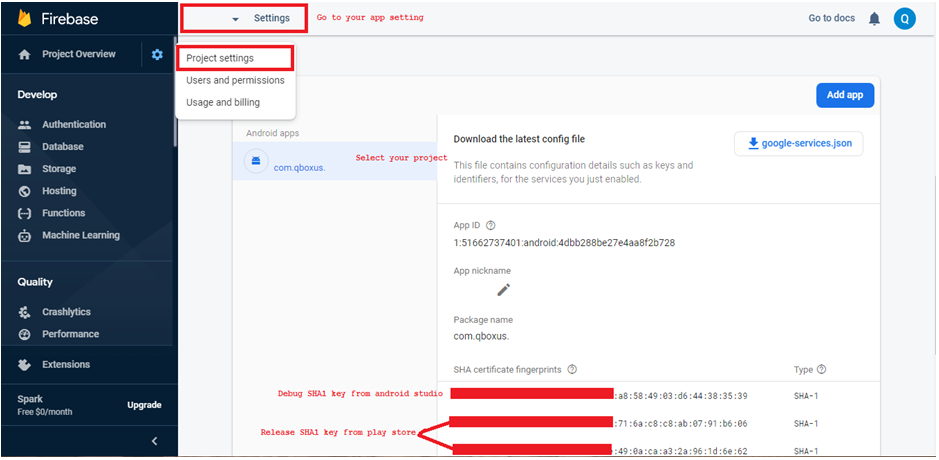
Debug and Release Key
Before going to next you have to learn about the SHA1 key for both debug and release. if you are in the development mode then you will use the debug SHA1 key but when you going to publish the app on play store then you will have to use the SHA1 key of Release key.

Method 1 How to get the SH1 key for the published app (Signed or release key)
To get realese sh1 contains two step.
Step1: you will generate your own app signing key Create signing key
Step2: Get the Sh1 key of app signing key
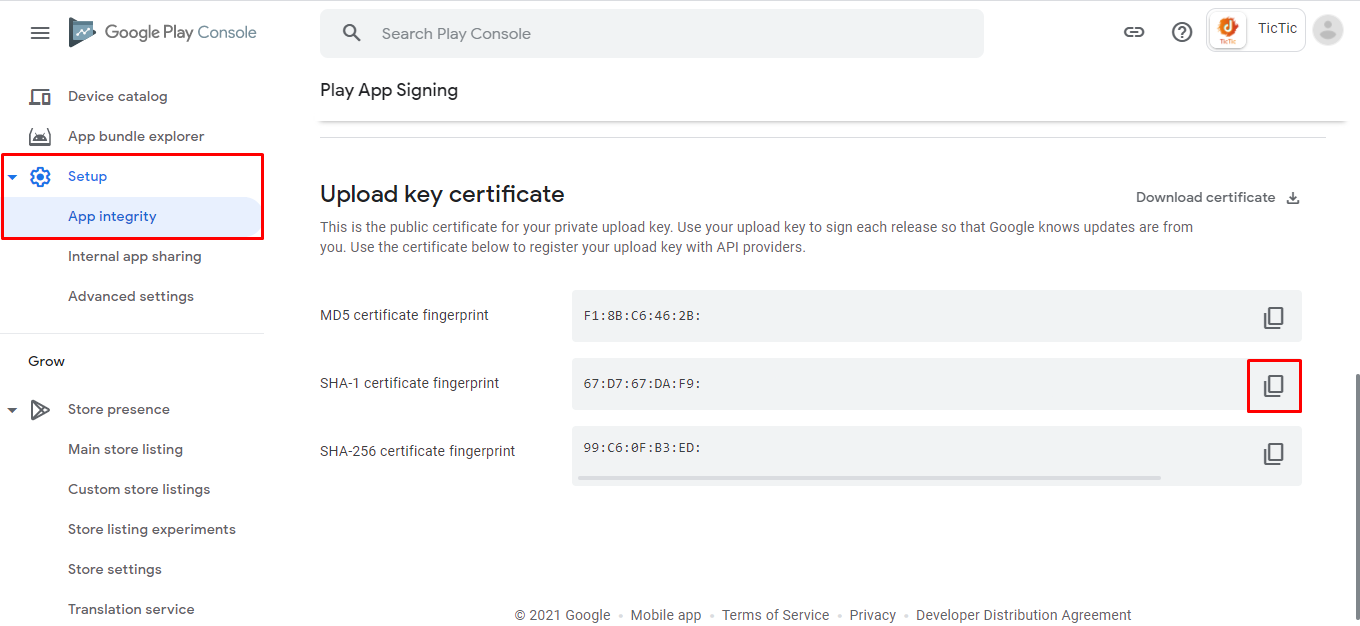
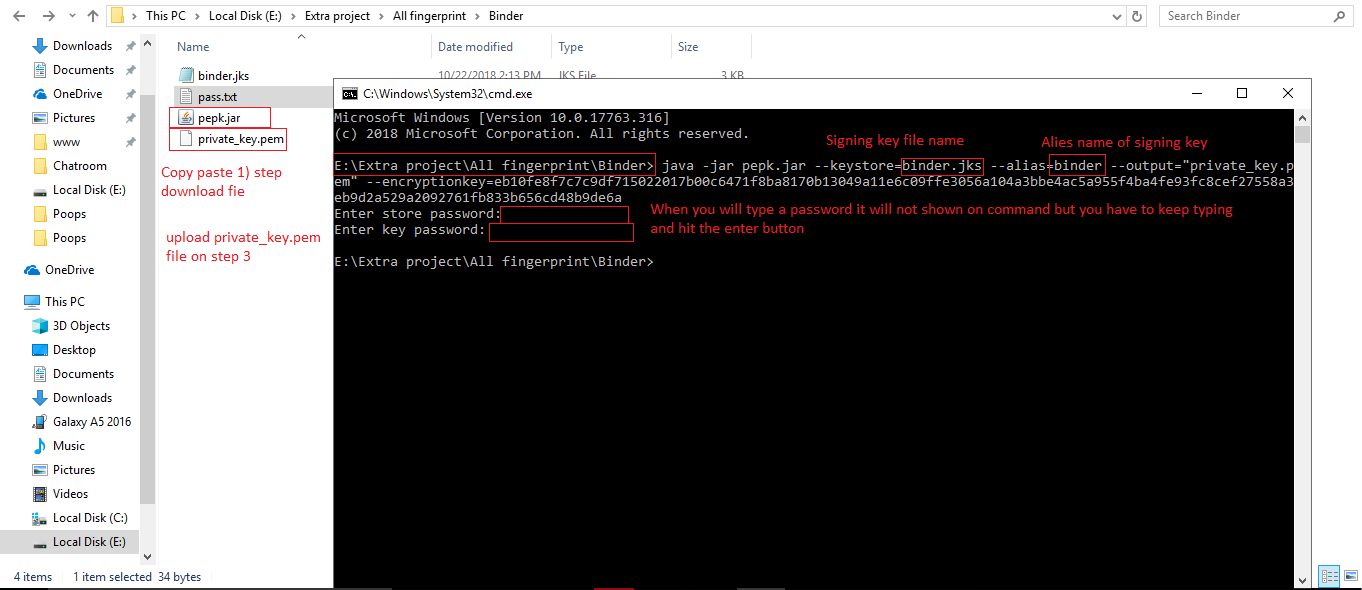
Get the Sh1 key. Run the below command on Command Promt
Method 2 How to get the SH1 key for the published app (Signed or release key)
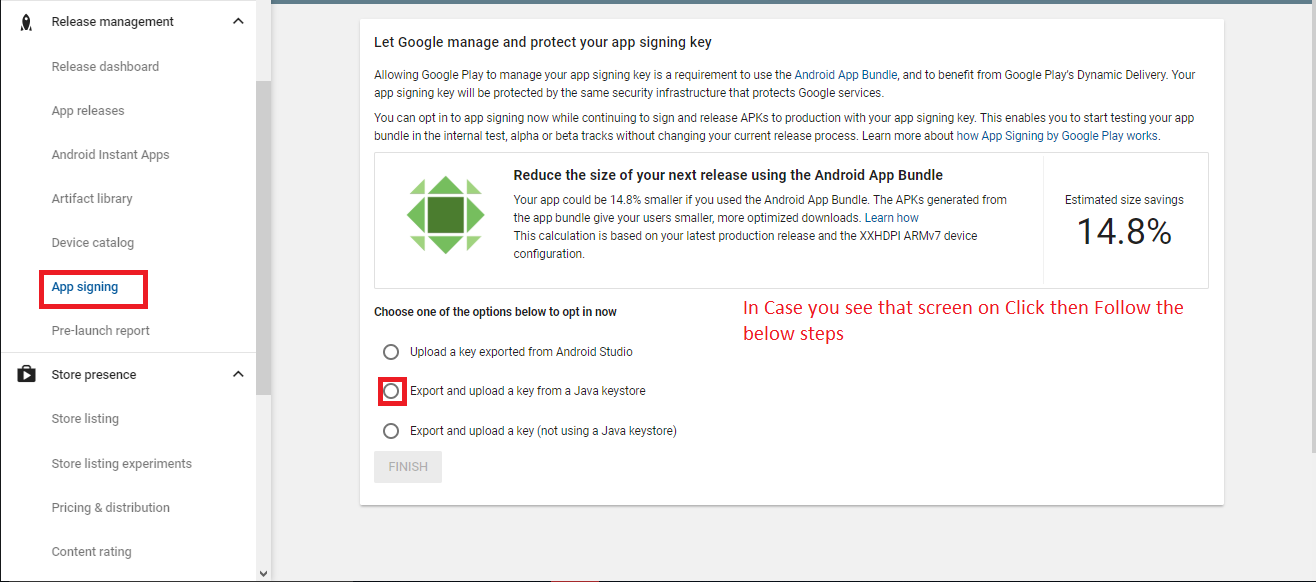
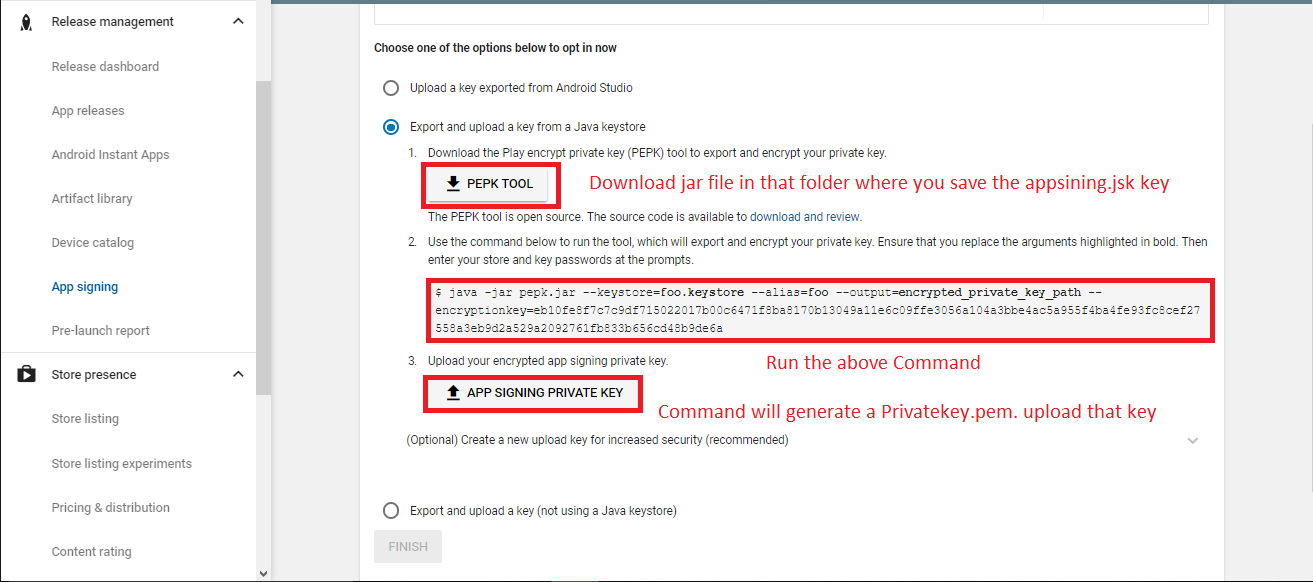
Follow the steps
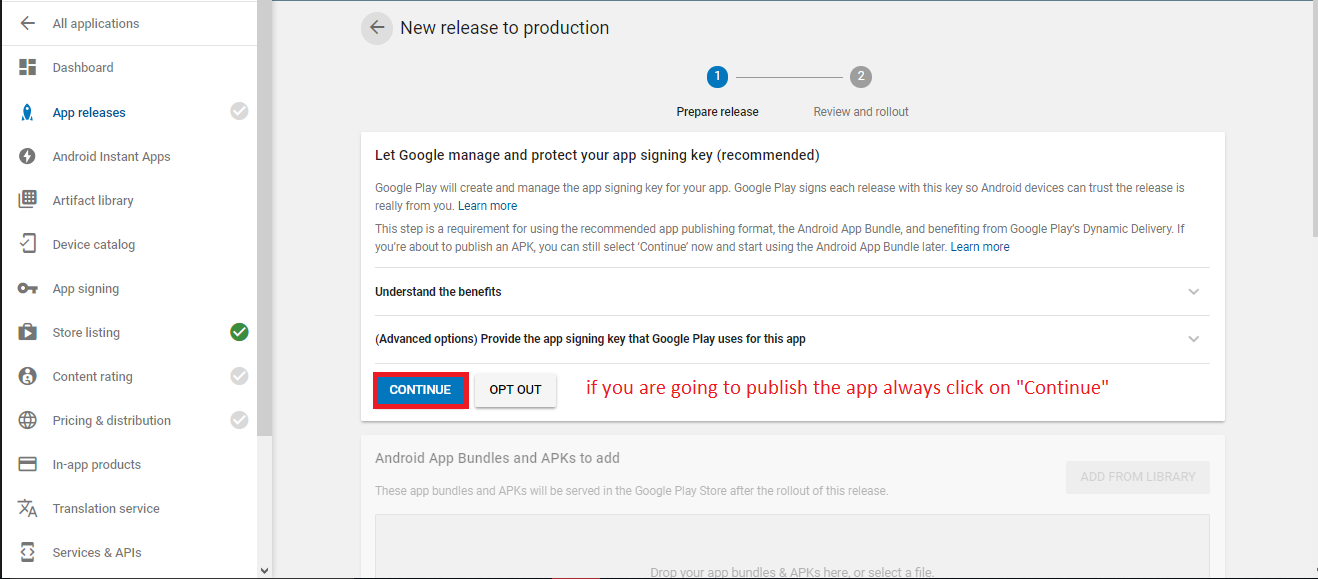
If you are see this screen that means you have the SS1 keys
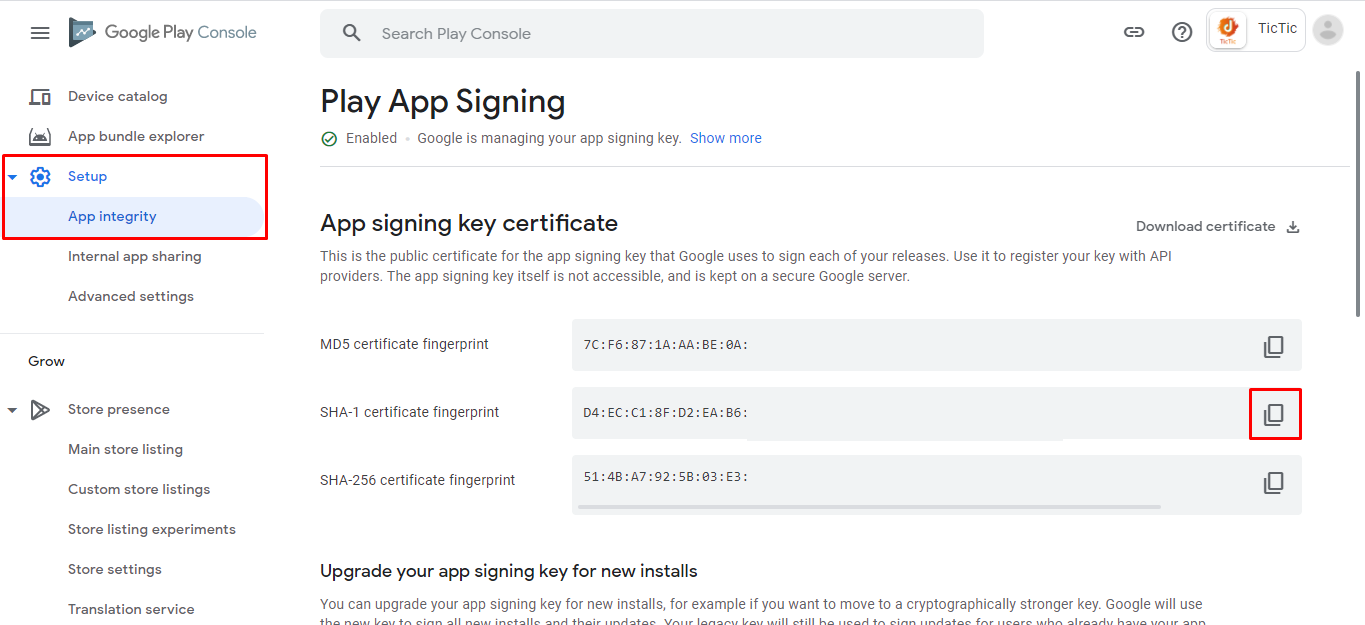
If you already have keys then you have to follow the phone number login step
Google Map Configuration
Make sure you have add the firebase first then you project on Google Api console will automatically show, means you don't need to create the project on Google api console if you created the firebase project
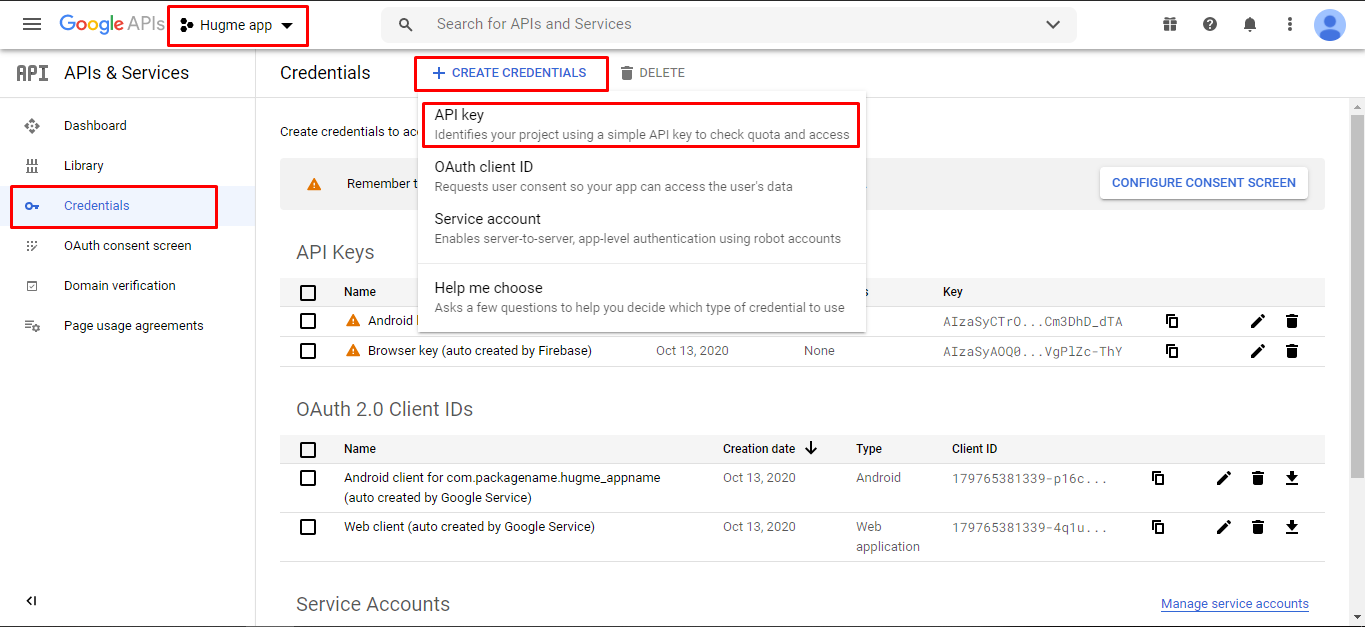
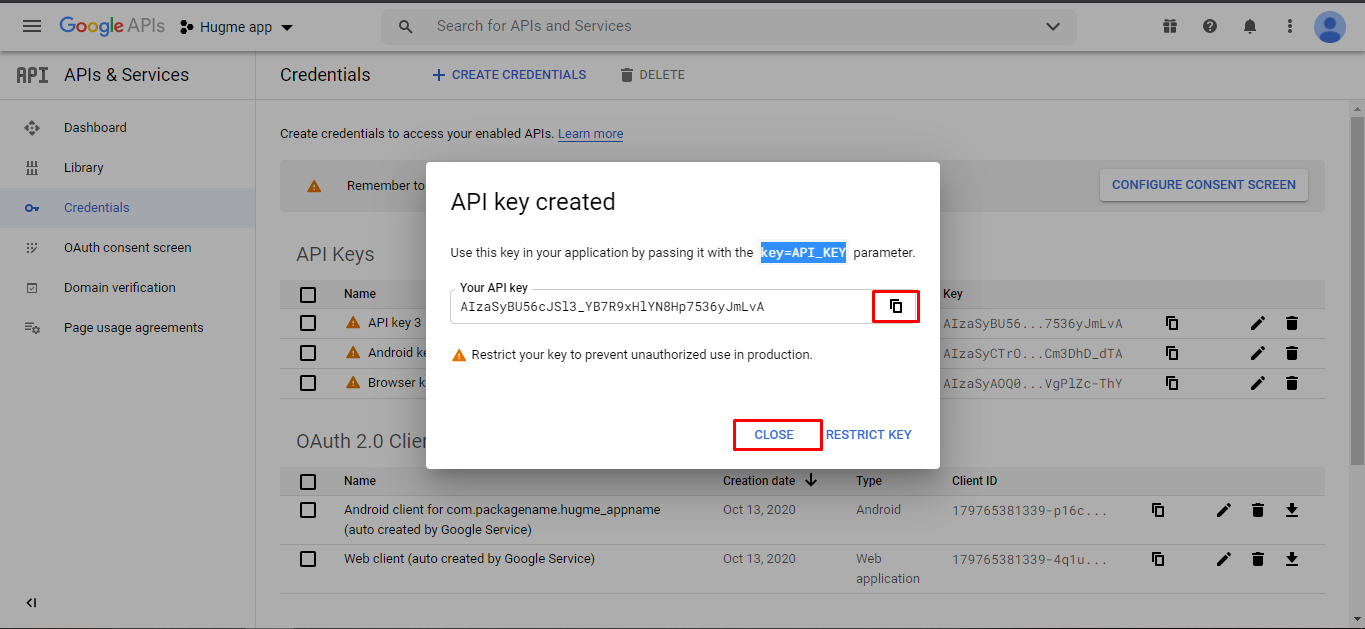
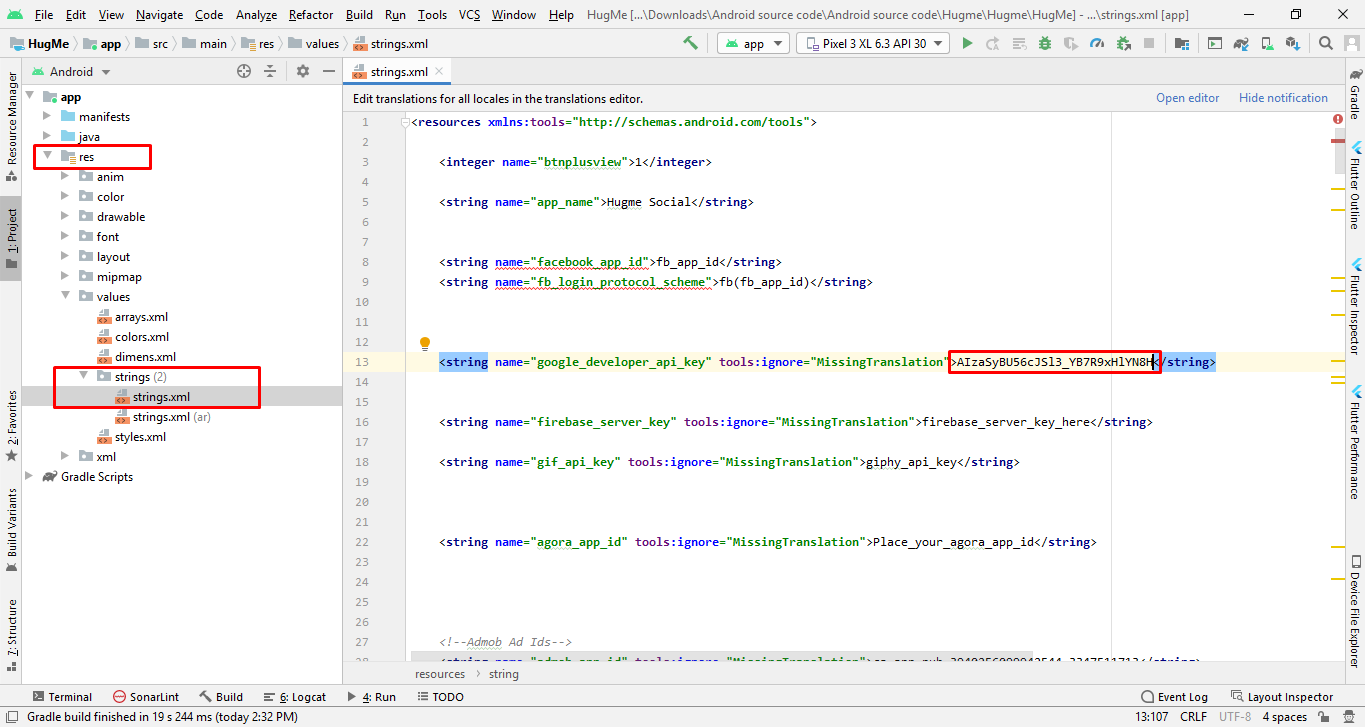
Copy key and Paste into your project
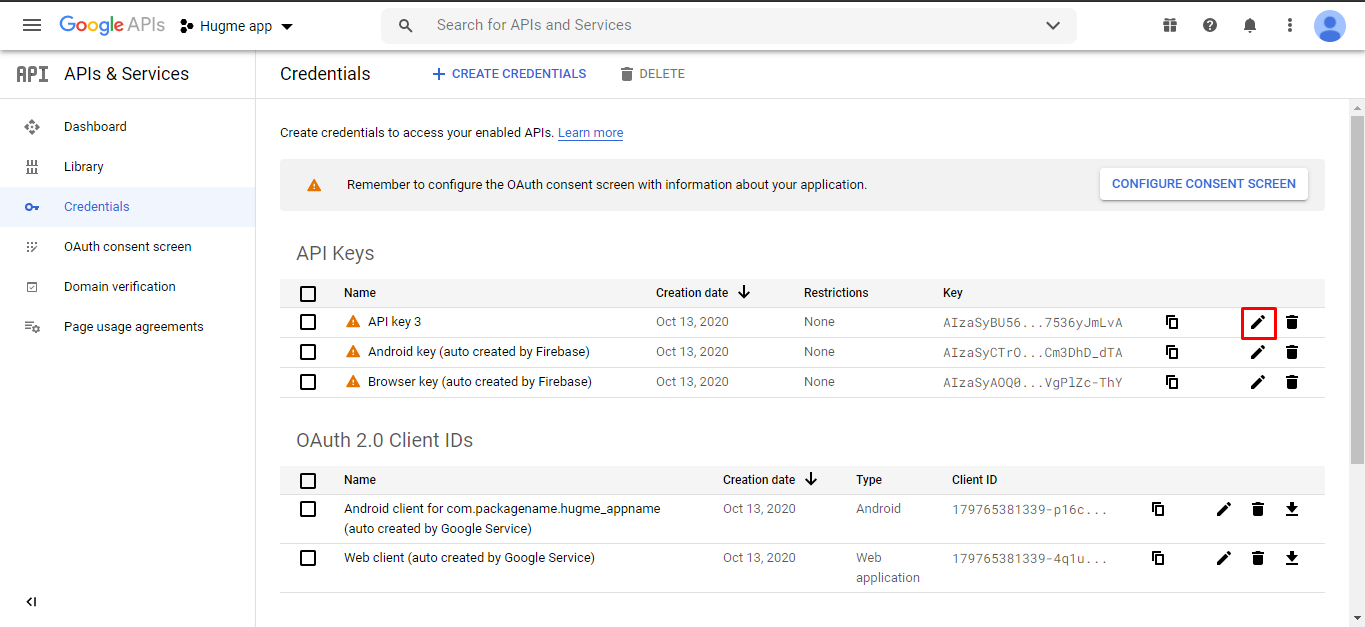
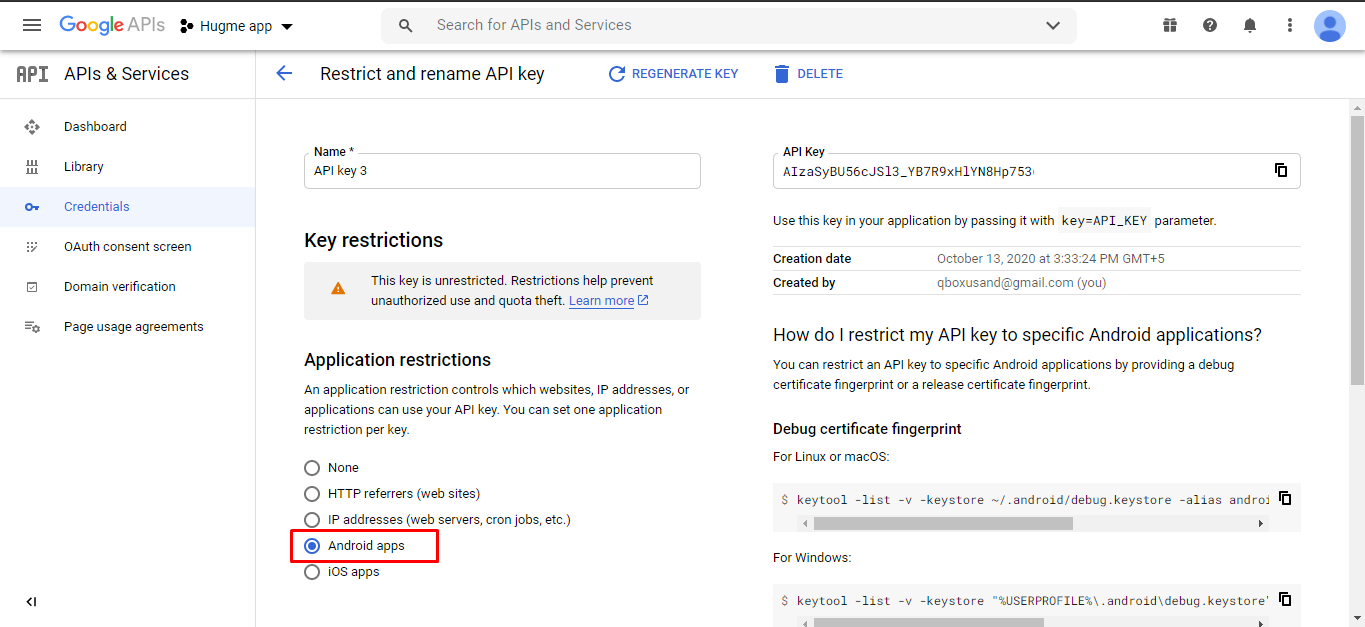
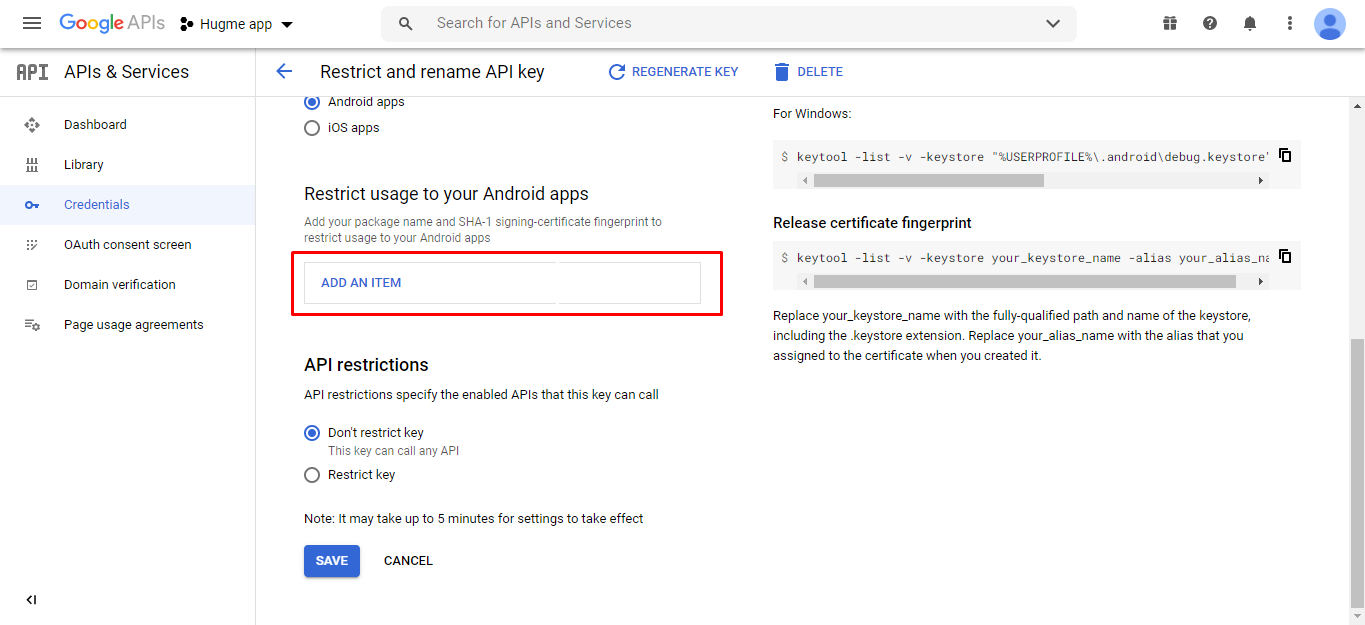
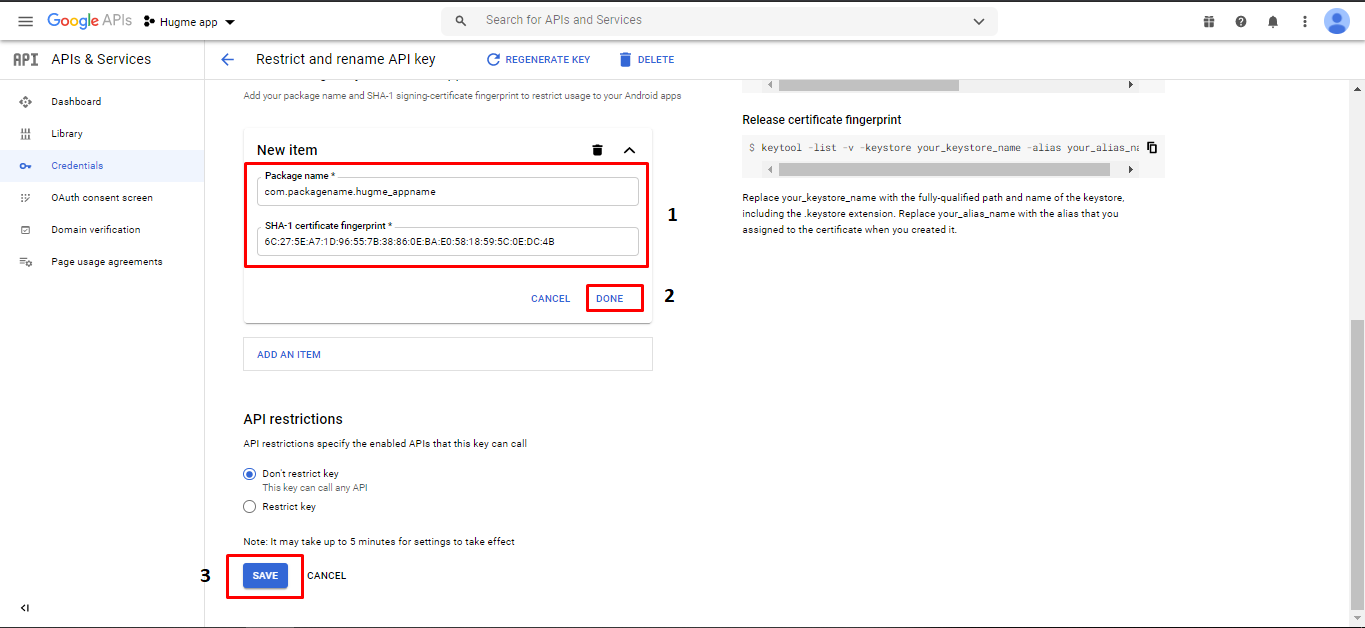
Now if you want to publish your app then you have to get the release key. To get the release API key you need SHA1 key. We have tell you in above how you can get SHA1 key. After getting SHA1 key you have to follow below pics:
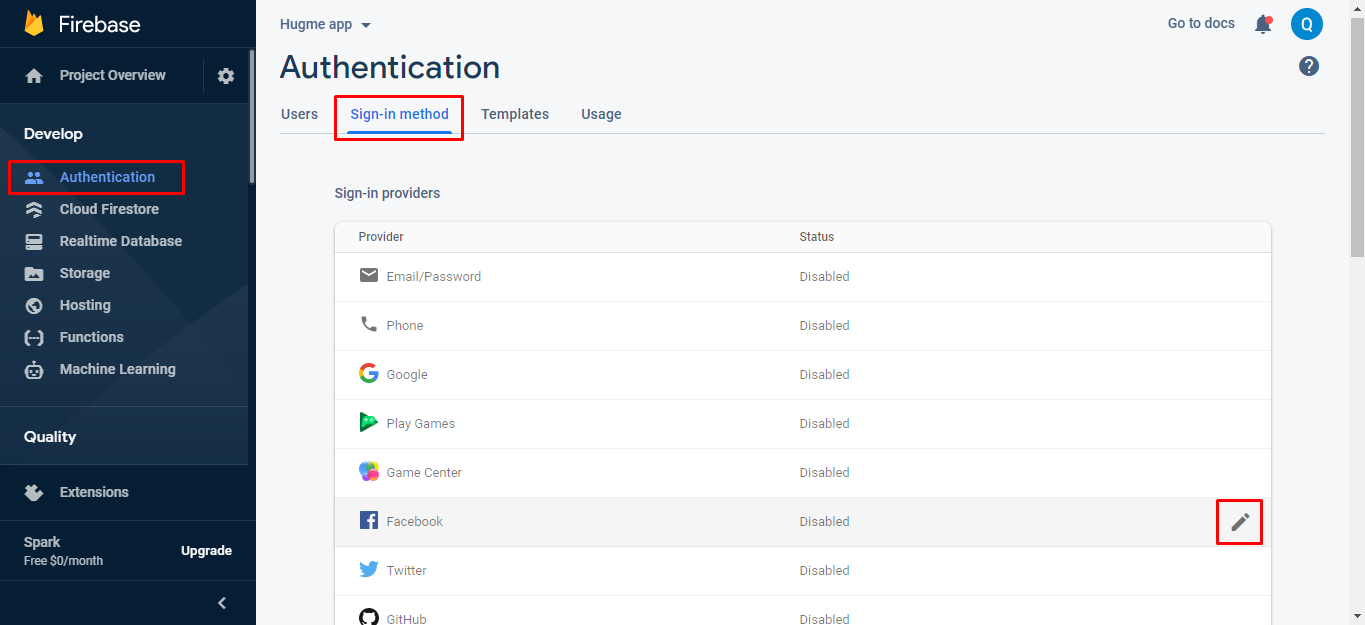
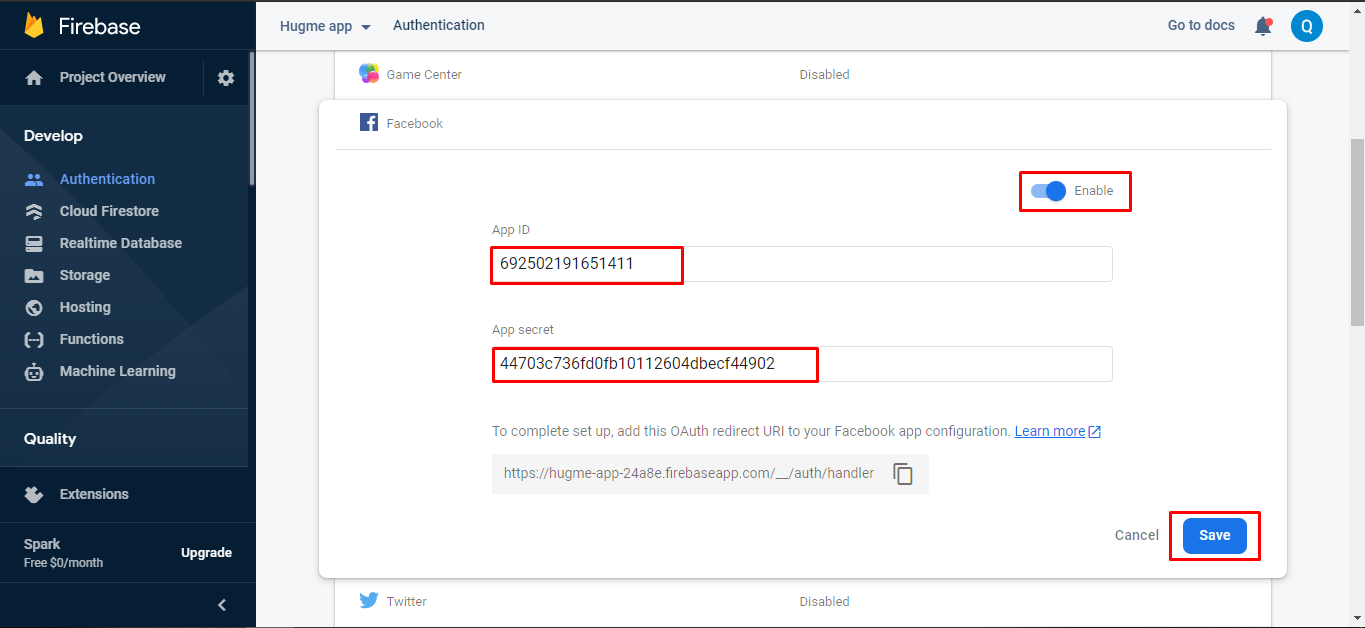
Facebook Login
You have to follow the steps
Here is the Helping video for setup facebook login
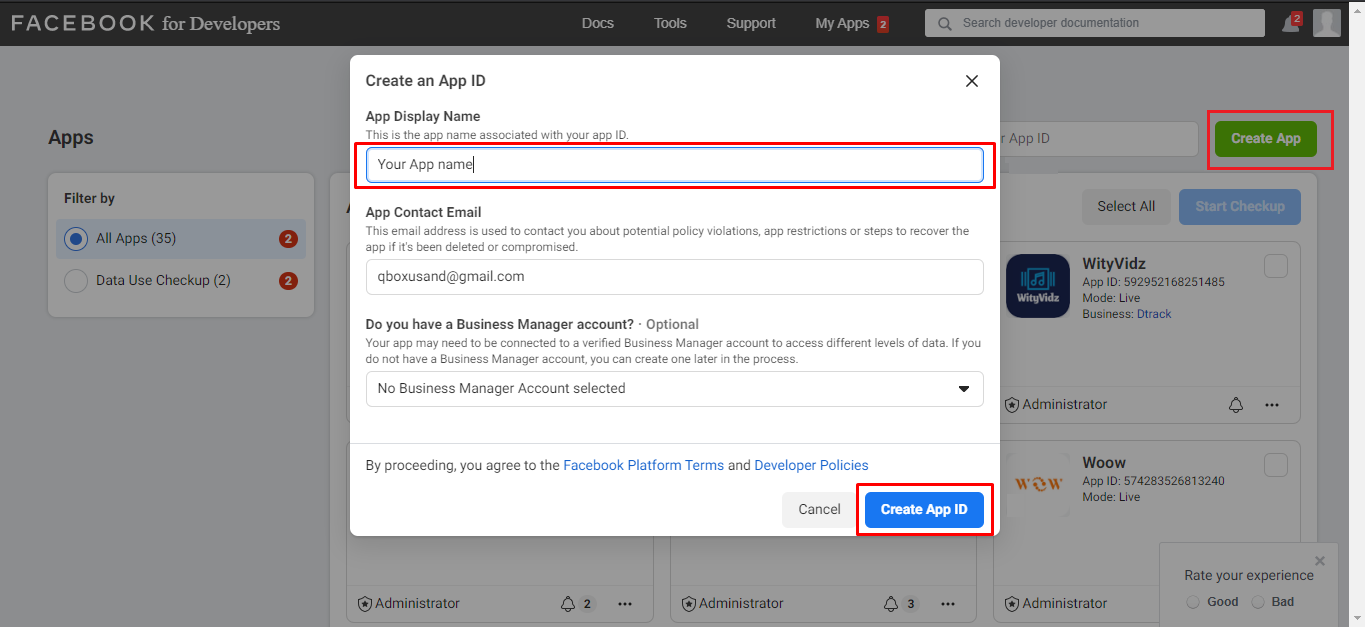
Step 1
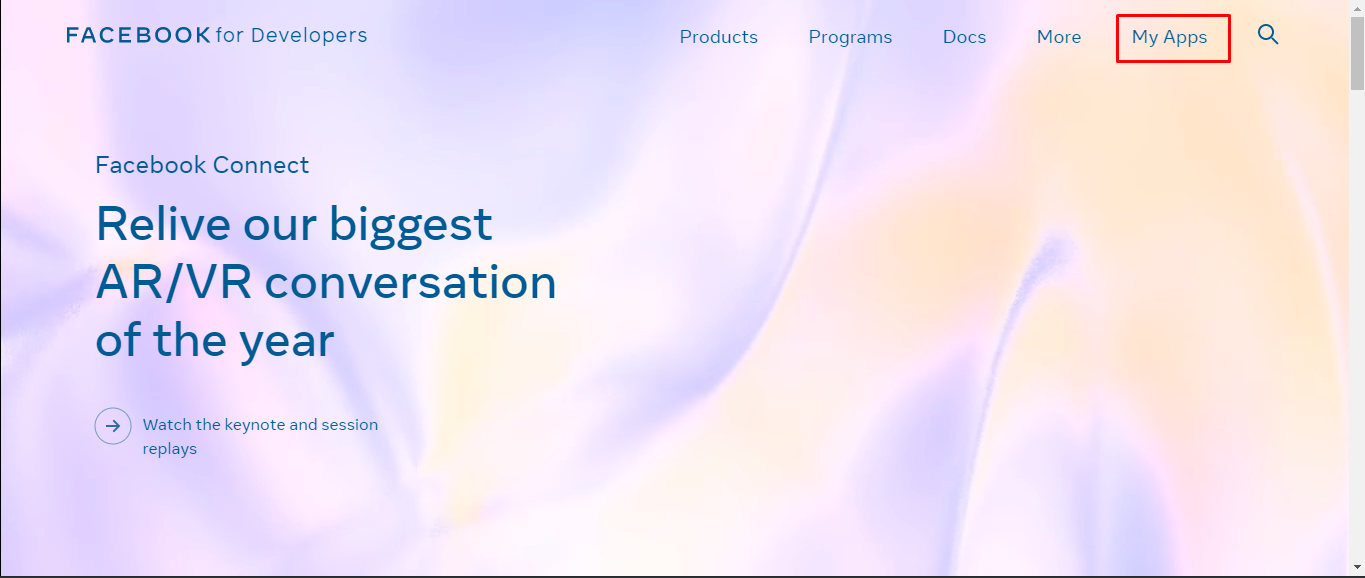
Go to "facebook Developer" the link is given developers.facebook.com and Create a new app
Step 2
Go to "facebook Developer" the link is given developers.facebook.com and Create a new app
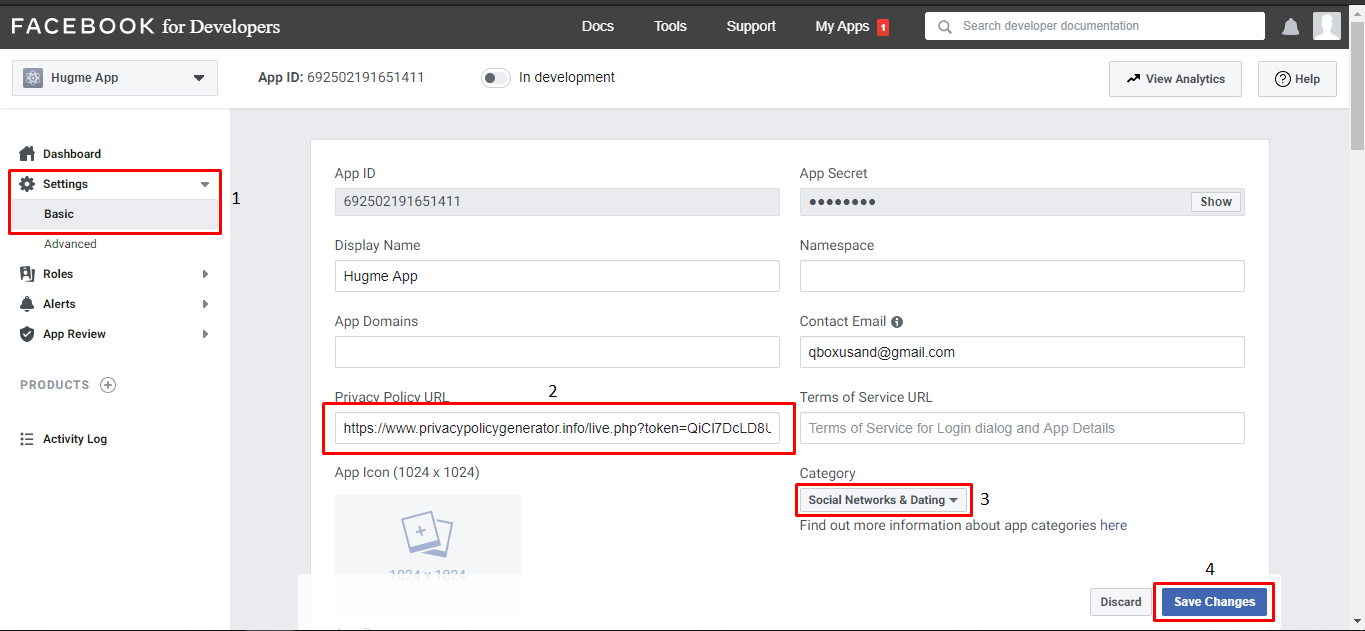
Step 3
Then Go in Setting > Basic Fill privacy policy and application nature/cateogry and press save
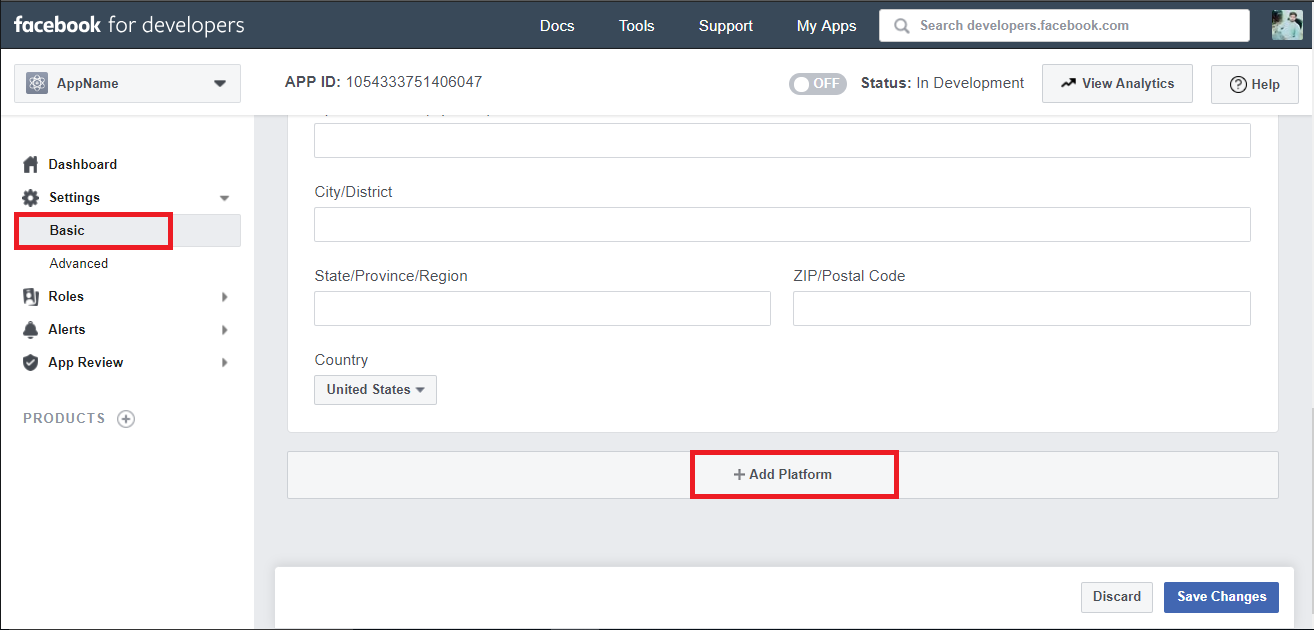
Step 4
Then Go in Setting > Basic Add development palatform
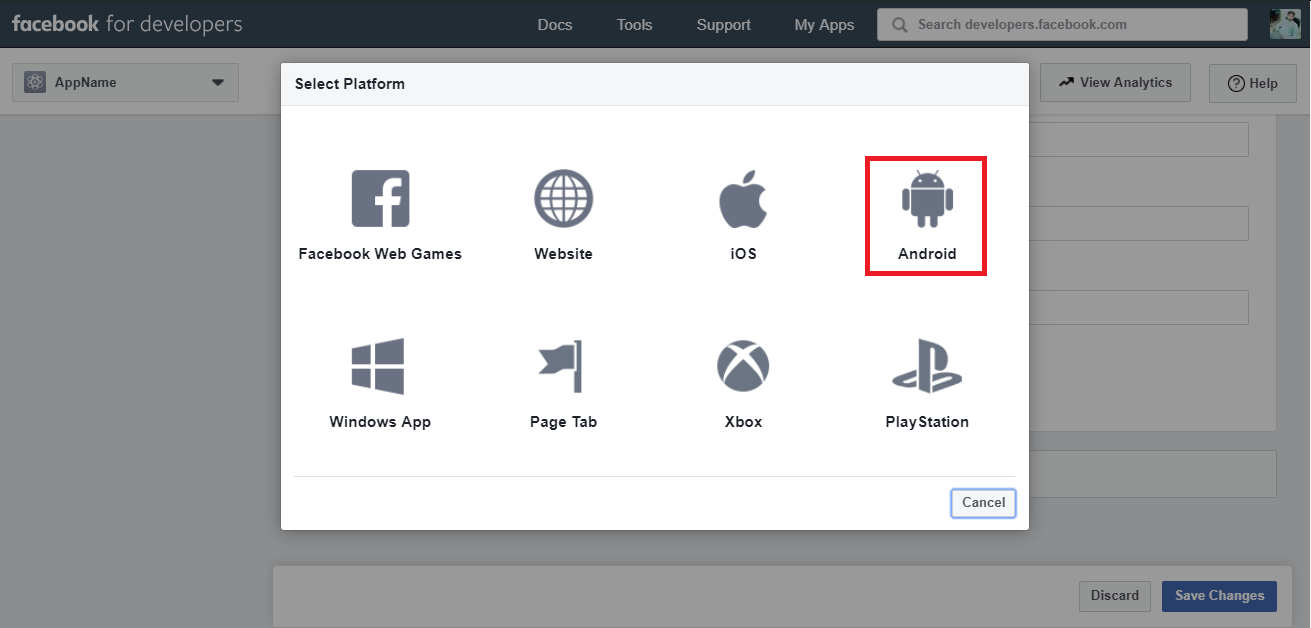
Step 5
Then Go in Setting > Basic > development platform Select Android
Step 6
Follow screenshot
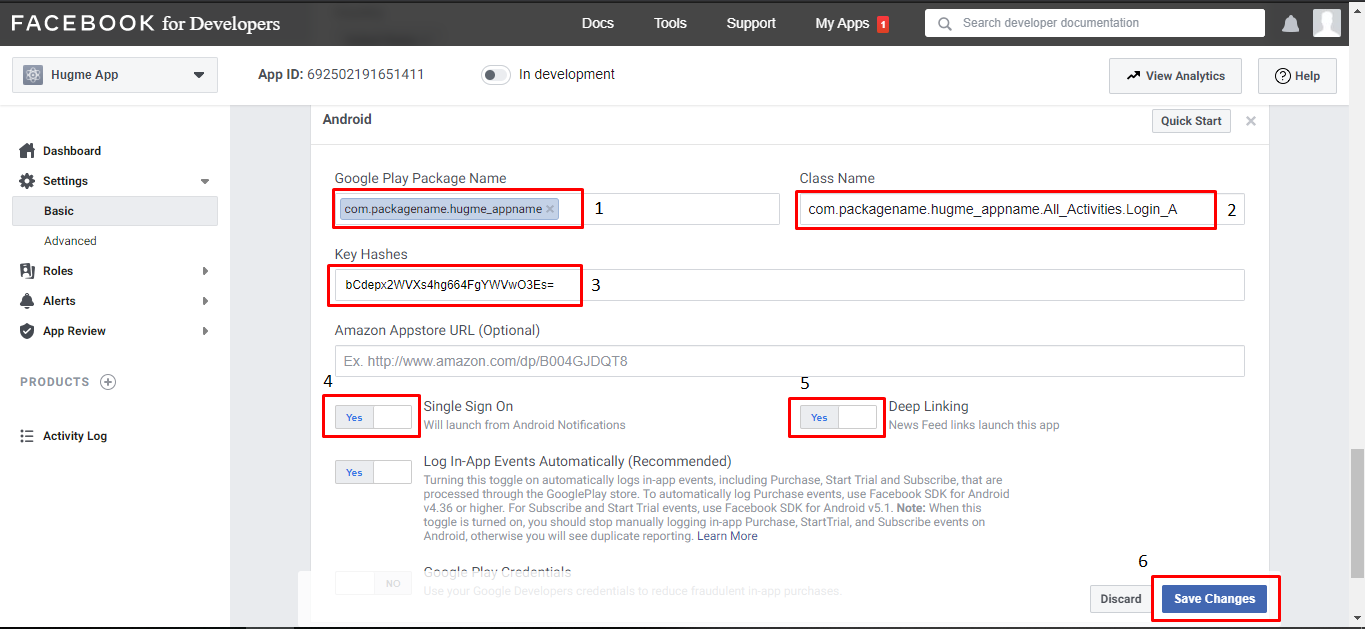
We have already told you in above how to get package name from project. So you will just copy the package name and paste at under Google Play Package Name.
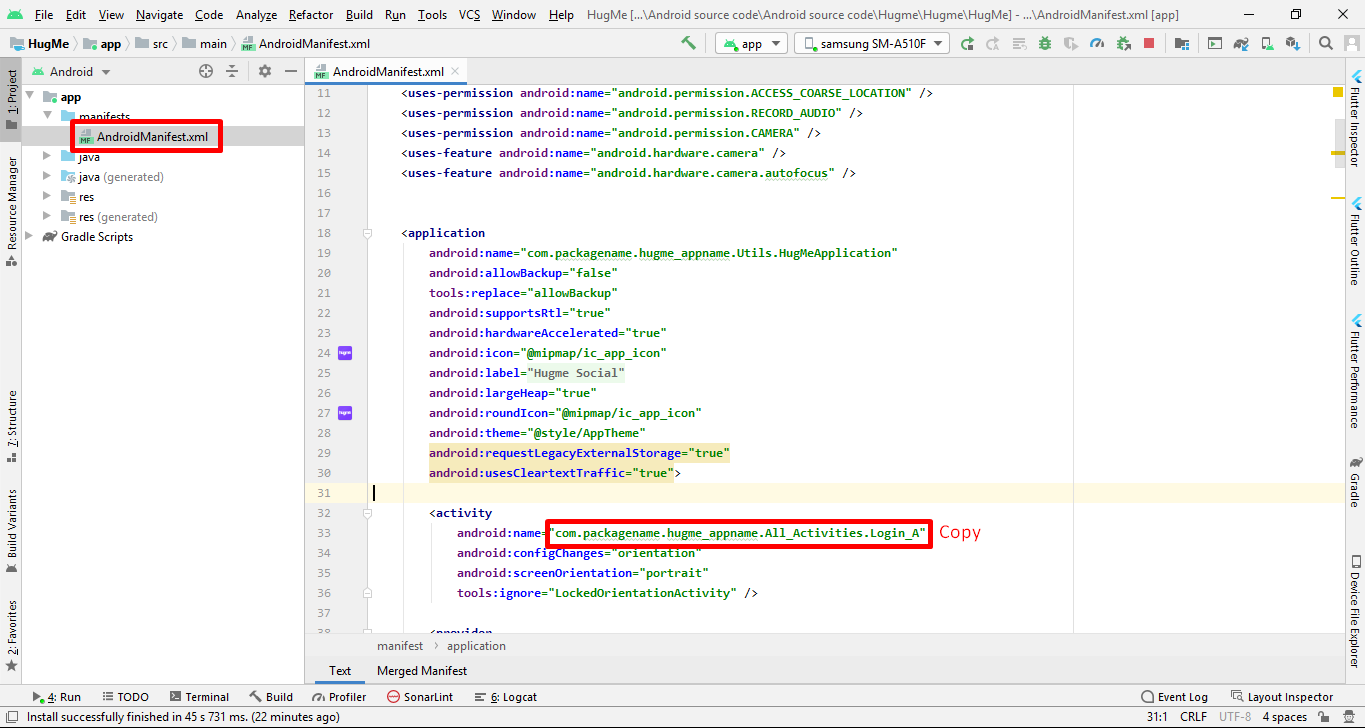
To get the Class name Follow screenshot
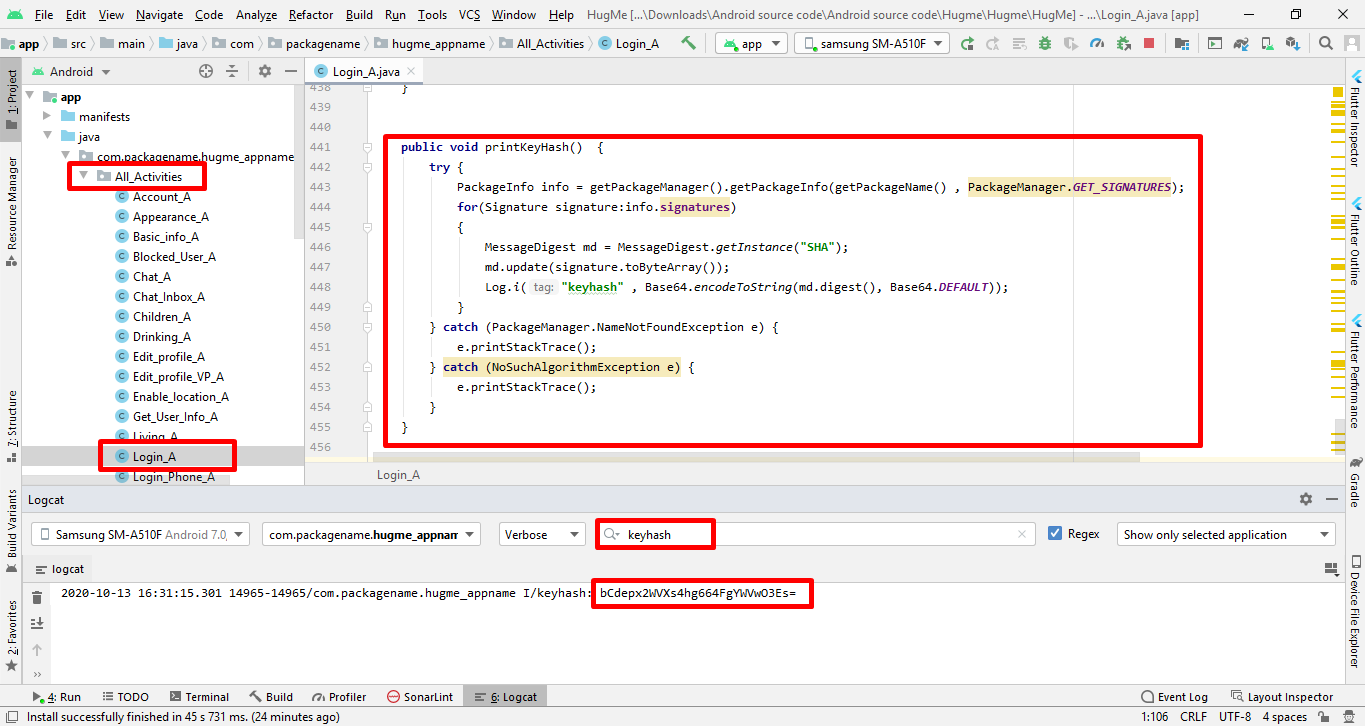
For Keyhash you have to run your app on your emulator or real device. When your app will successfully run at your emulator or real device then Keyhash will automatically generated you just have to follow the below screenshot.
When you publish the app on playstore you have to add another Keyhash in facebook developer account. For getting that keyhash you have to just install the app from playstore and attach the mobile with your PC and search the keyhash by same process.
Step 7
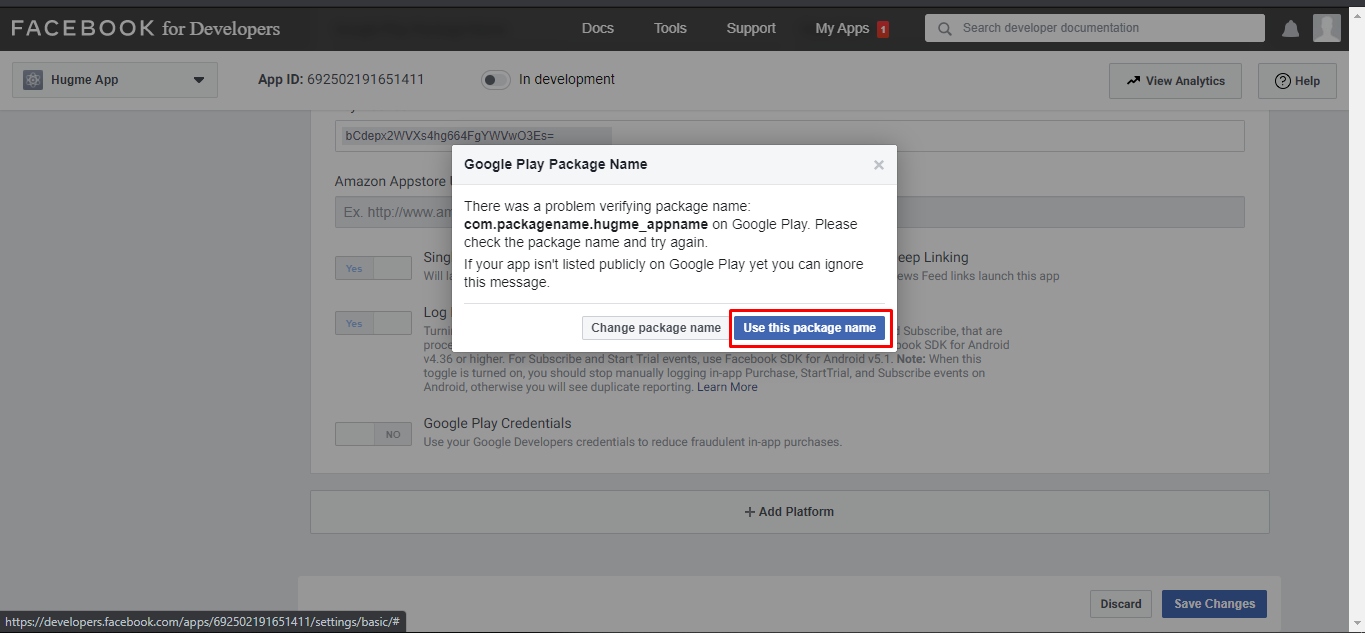
Follow screenshot
Step 8
Follow screenshot
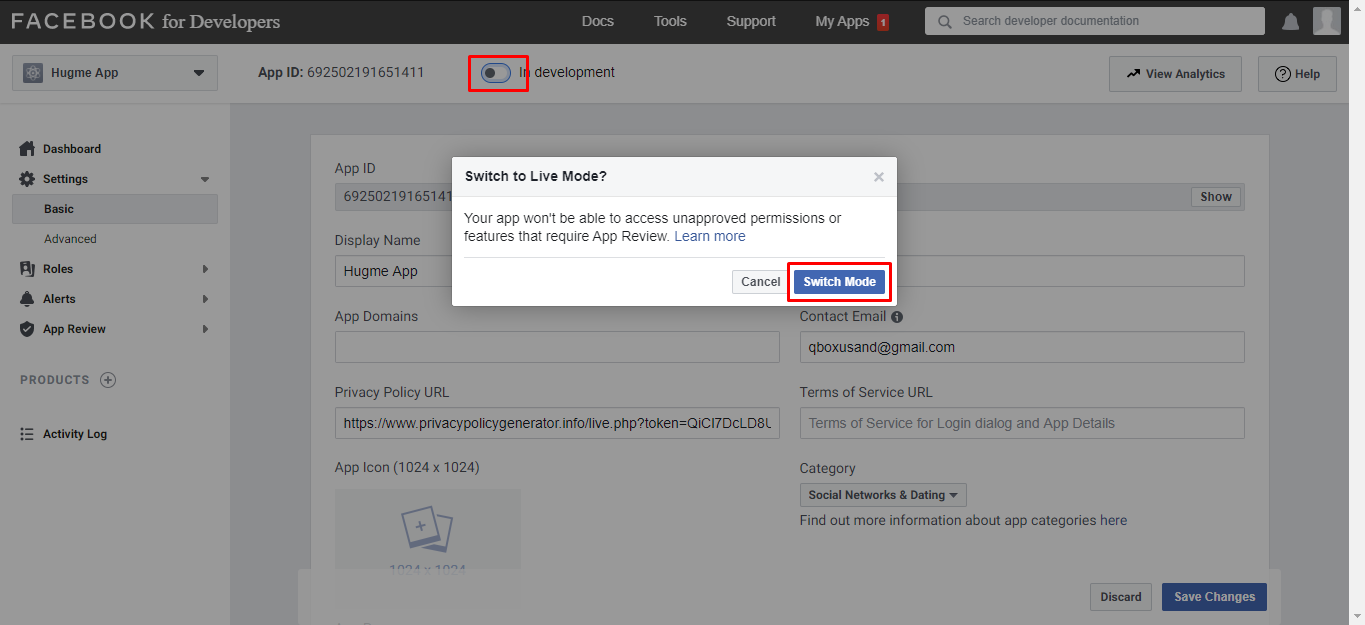
Step 9
Follow screenshot
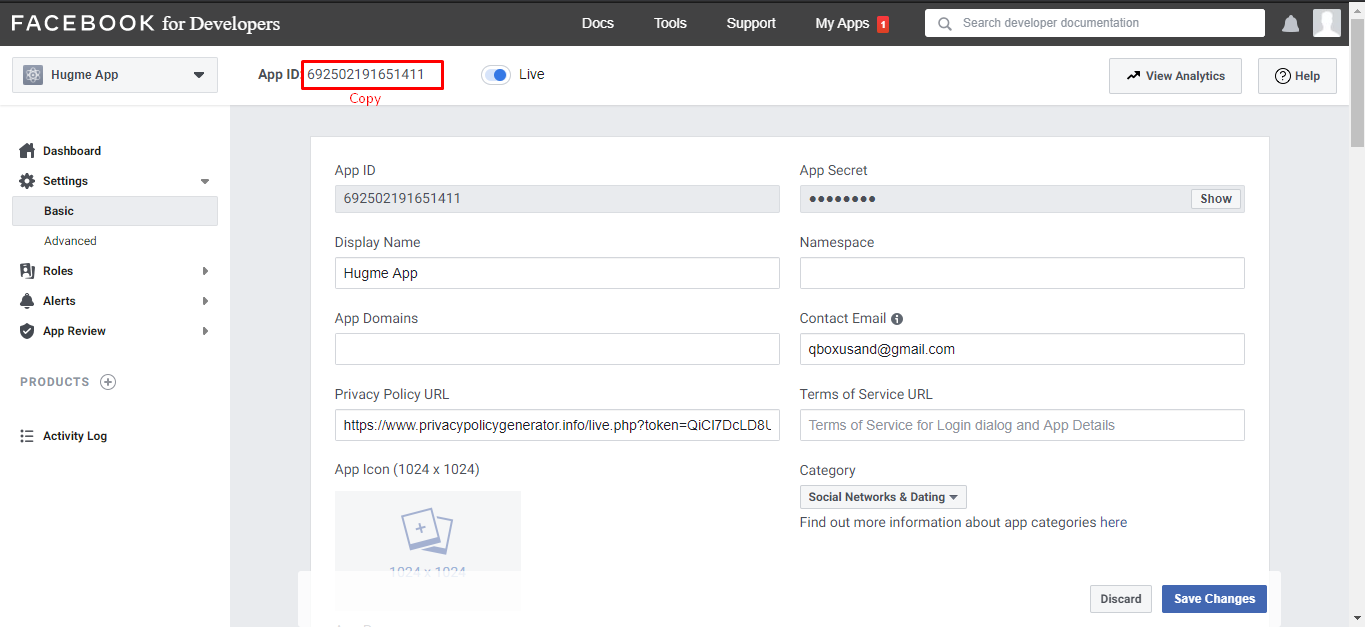
Step 10
Follow screenshot
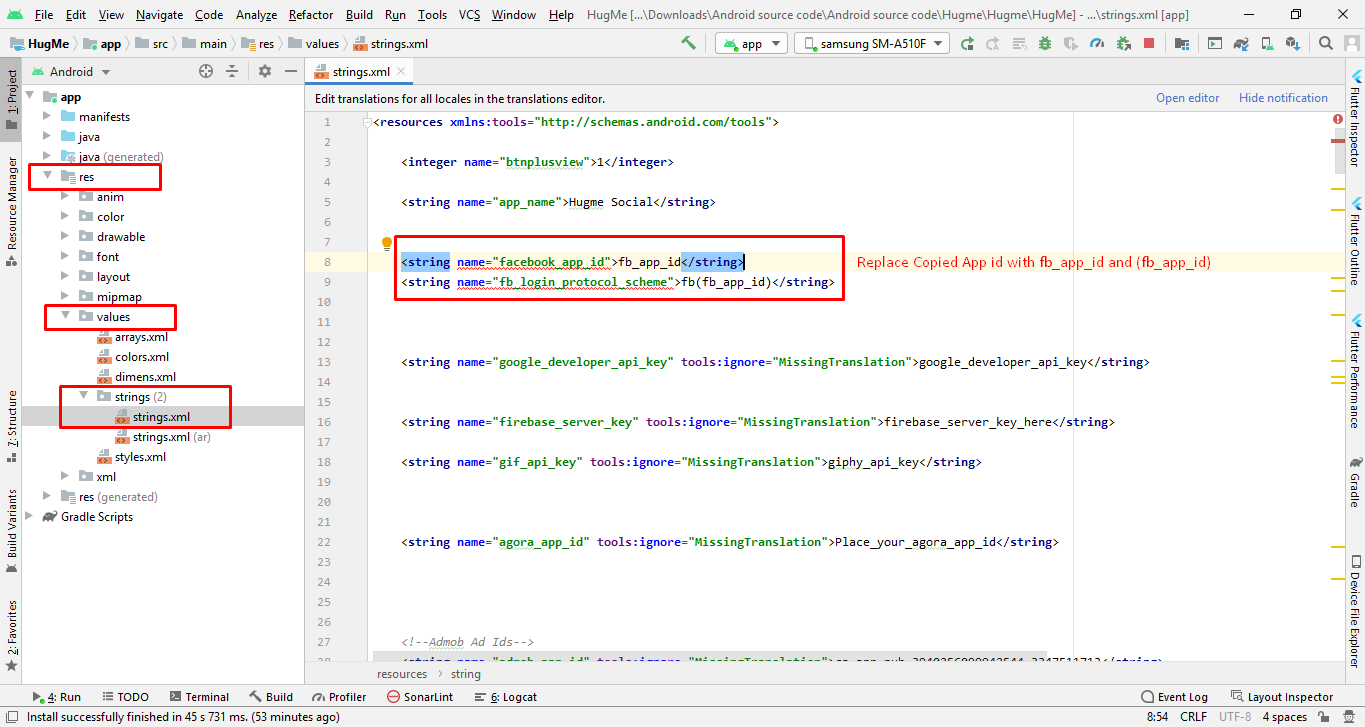
Step 11
Copy APP ID & APP Secret Follow screenshot
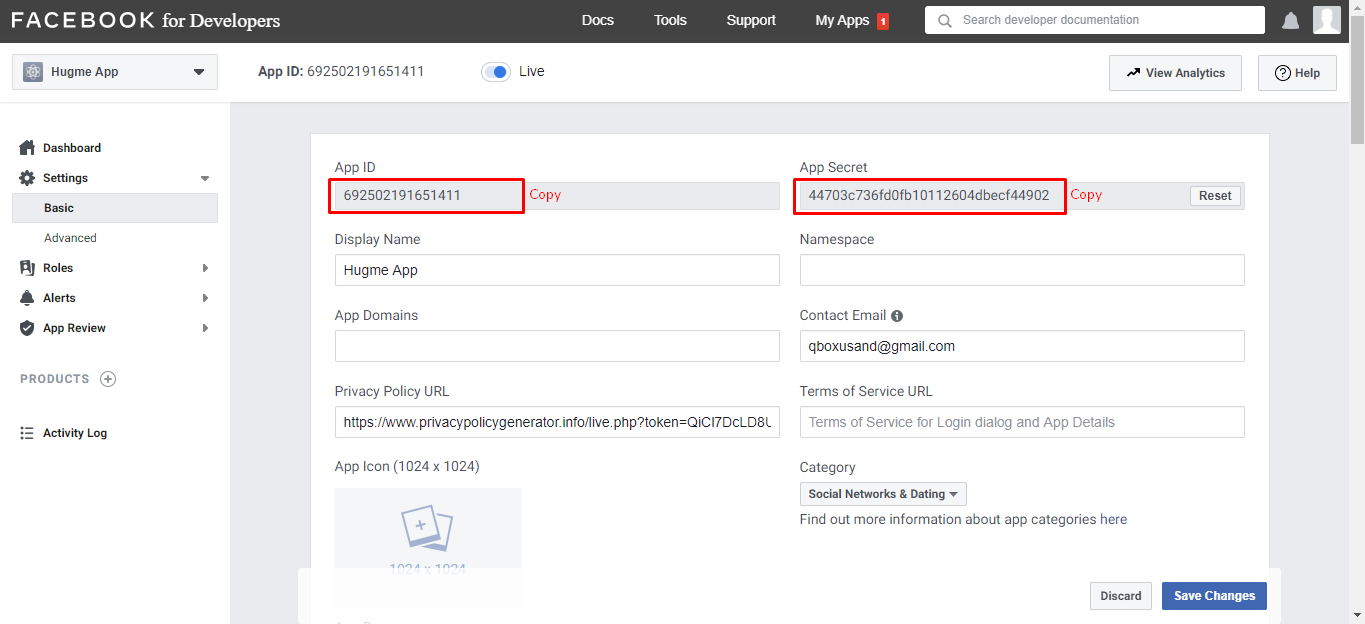
Step 12
Follow screenshot
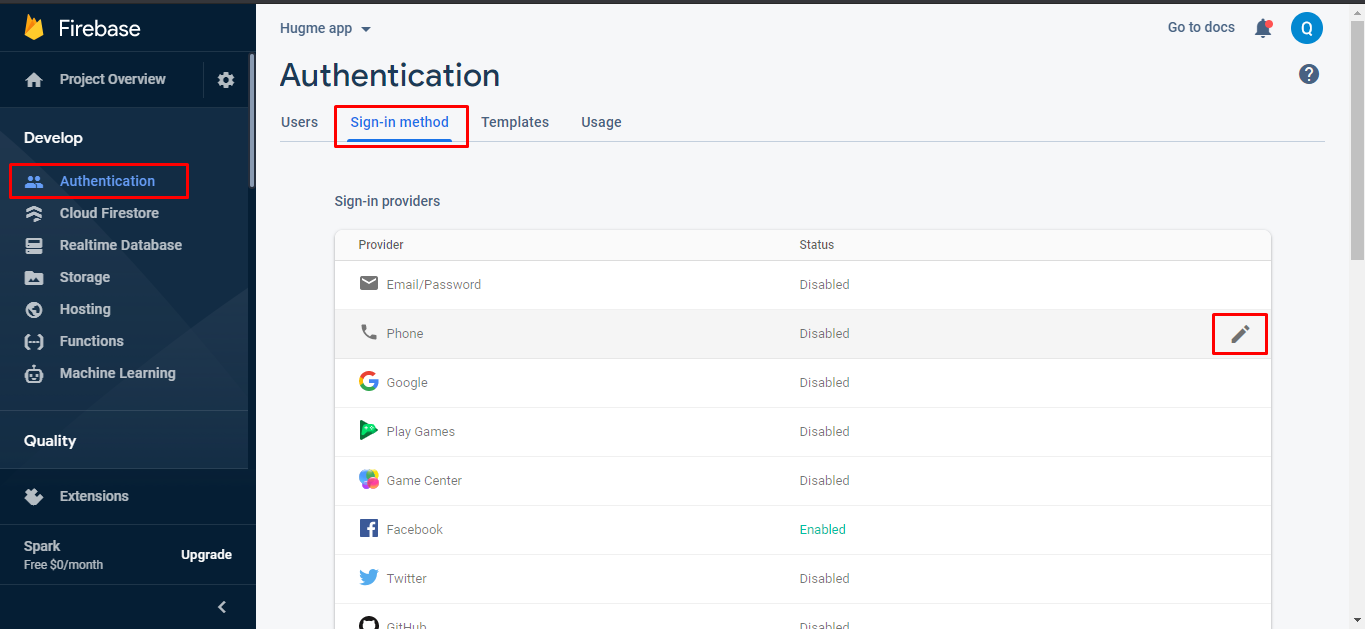
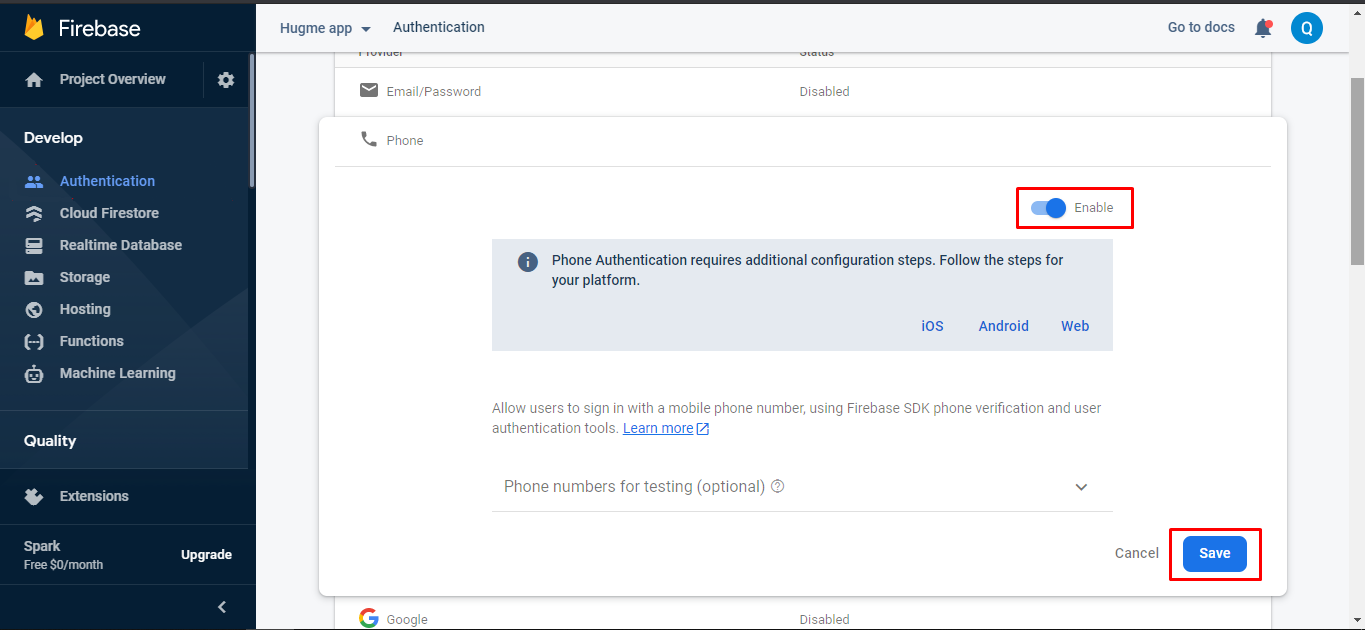
Phone Login Configuration
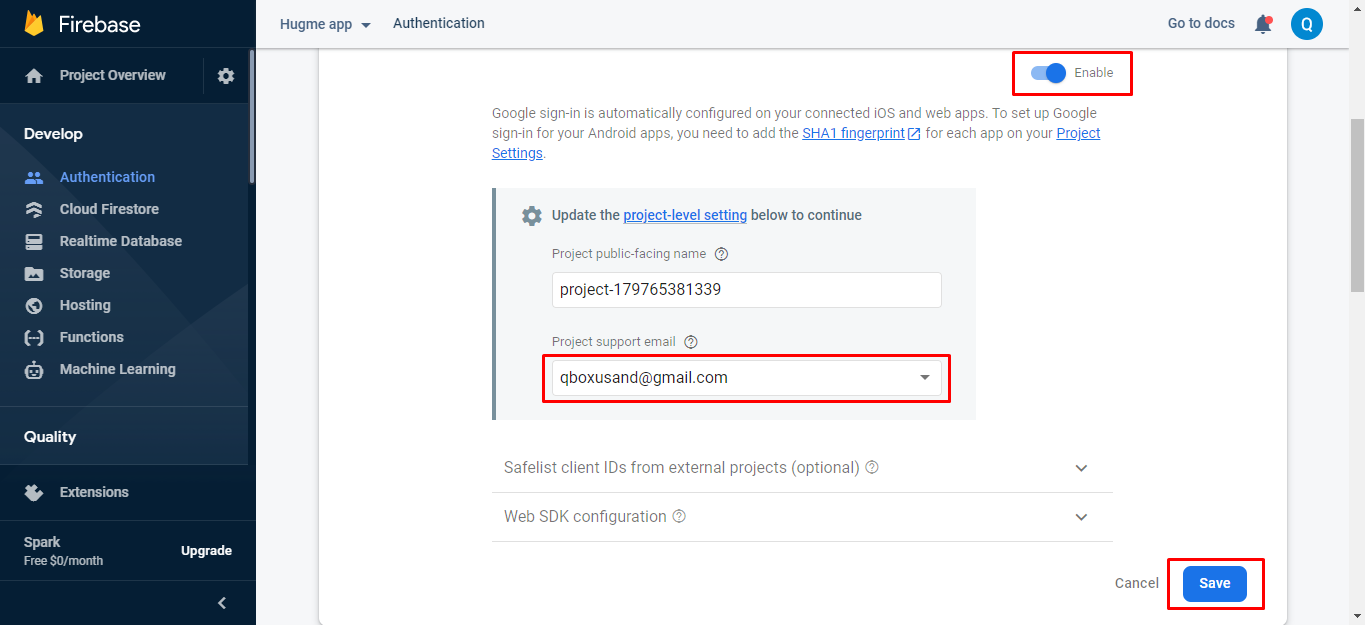
For "login with phone number" you have to enable the settings from firebase
Google Login Configuration
You have to follow the steps
Here is the Helping video for setup google login
Step 1
Go to this link: https://developers.google.com/identity/sign-in/android/start-integrating
Follow screenshot
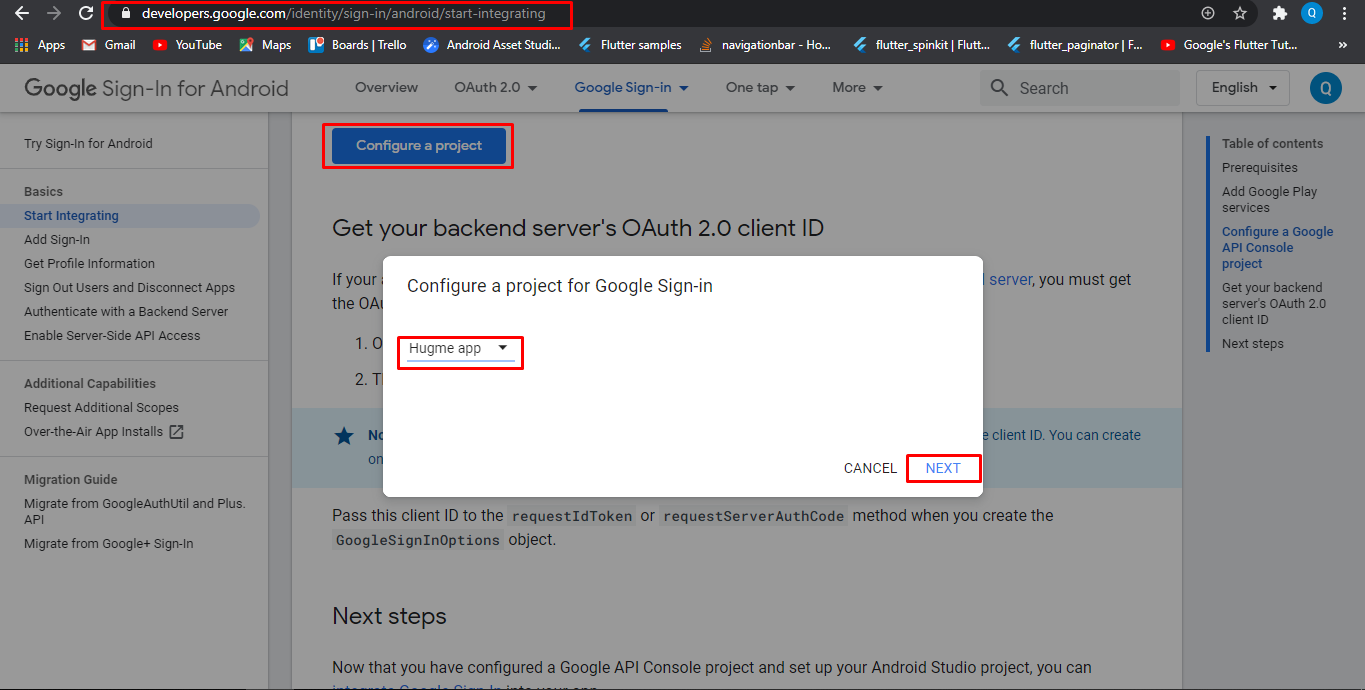
Step 2
Follow screenshot
below we are putting our Package name and SHA1 key into Configure your OAuth Client dialog. We have already mentioned above how you can get Package name or SHA1.
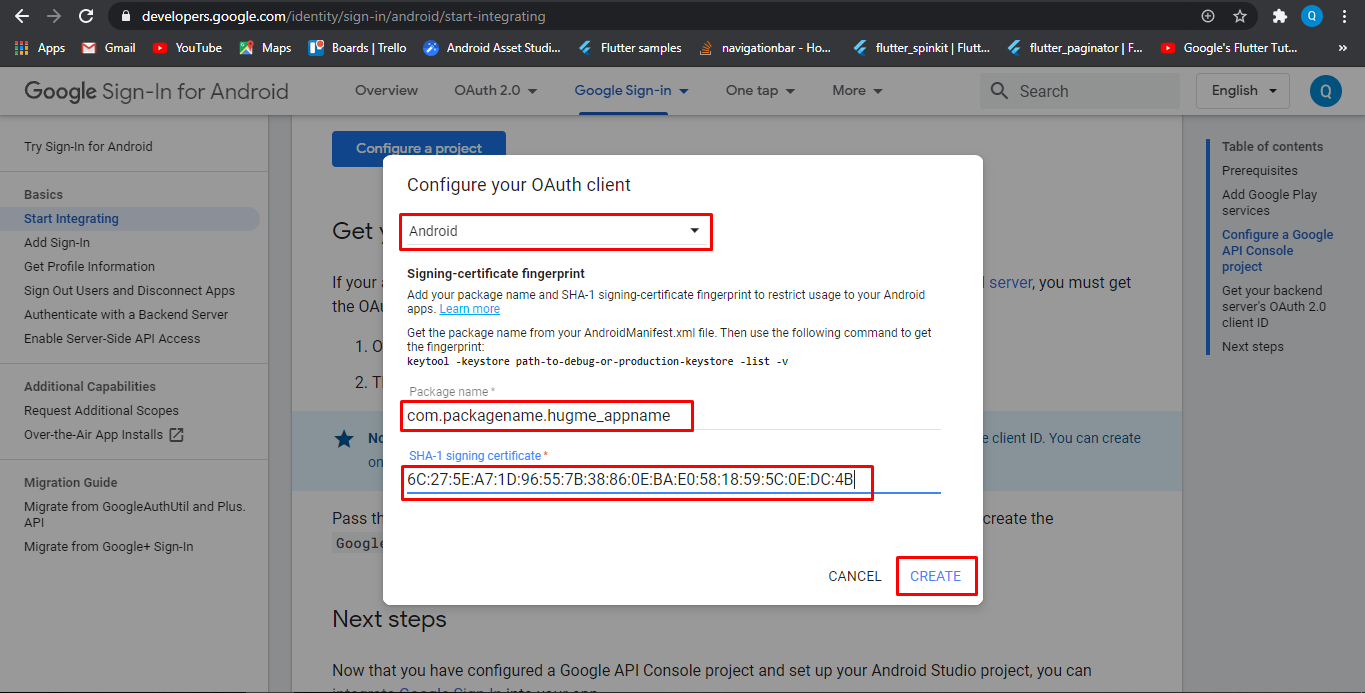
Step 3
Follow screenshot
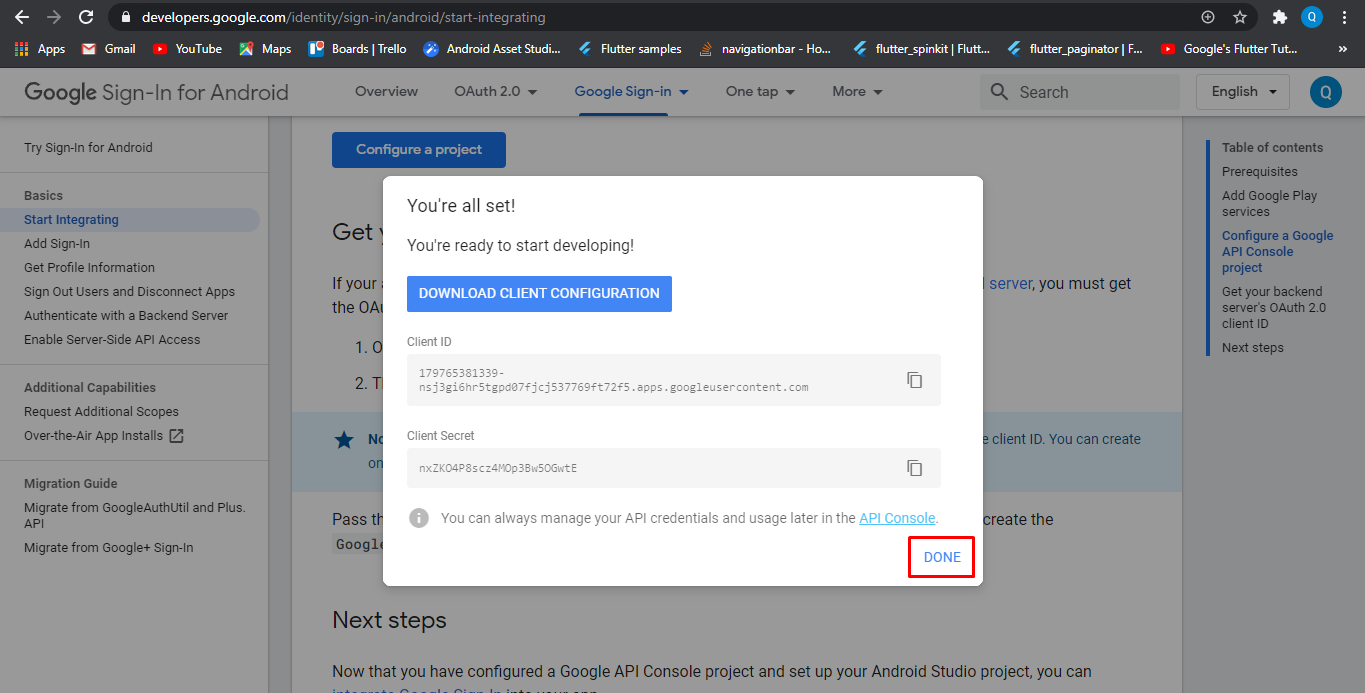
Step 4
Follow screenshot
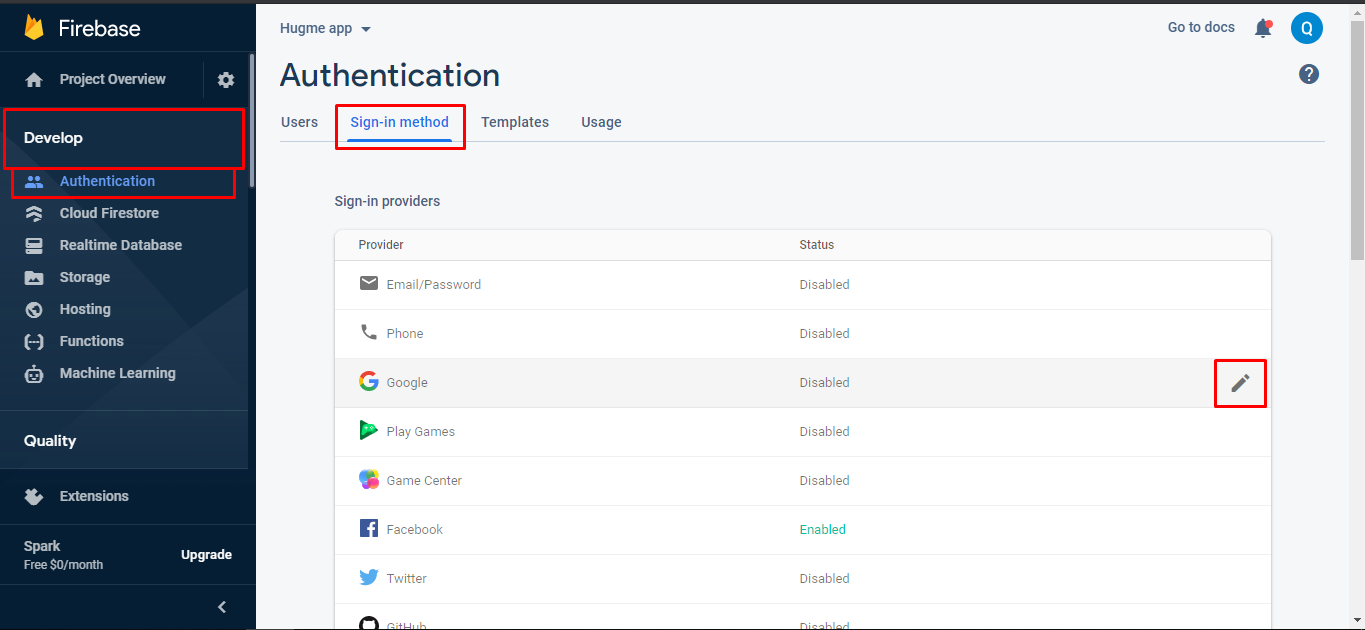
Step 5
Follow screenshot
Hide Any Social Media Button
if you want to disable Facebook or google login button you have to hide the mentioned View/Button just add
android:visibility="gone"
Giphy API & Integration
If you Here is the helping video for setup Giphy API
Click on developers.giphy.com . "Create an Account" and then "Create an App" then you get the API key "Copy the key" and paste at mentioned place in following screenshot.

Voice & Video Calling
Twilio configuration
Twilio is use for audio and video call in the project.In the below steps we will tell you have to create a link for getting the access token which will use for audio and video calling.
Step 1 - Go to https://www.twilio.com/ and signup. After signup you will see the dashboard.
After click on menu option you will see this all option now click on the highlighted option


Step 3 - After that go to tools and then create the api key.


Step 4 - Save both the credentials in separate text file because it will use in next process and if you click on done button it will not show you again. So copy that.

Step 6 - First declare the api key and secrete here which will use in functions code.


Step 7 - Now start to create a function for getting the access token which will use for calling.


									exports.handler = function(context, event, callback)

									{


									const AccessToken = require('twilio').jwt.AccessToken;

									const VideoGrant = AccessToken.VideoGrant;


									const identity = event.identity;

									const roomname =event.roomname;


									// Create Video Grant

									const videoGrant = new VideoGrant({

									room: roomname,

									});


									// Create an access token which we will sign and return to the client,

									// containing the grant we just created

									const token = new AccessToken(context.ACCOUNT_SID, context.Voice_API_KEY,
									context.Voice_API_SECRET);


									token.addGrant(videoGrant);


									token.identity = identity;


									callback(null,{token: token.toJwt()});


									};
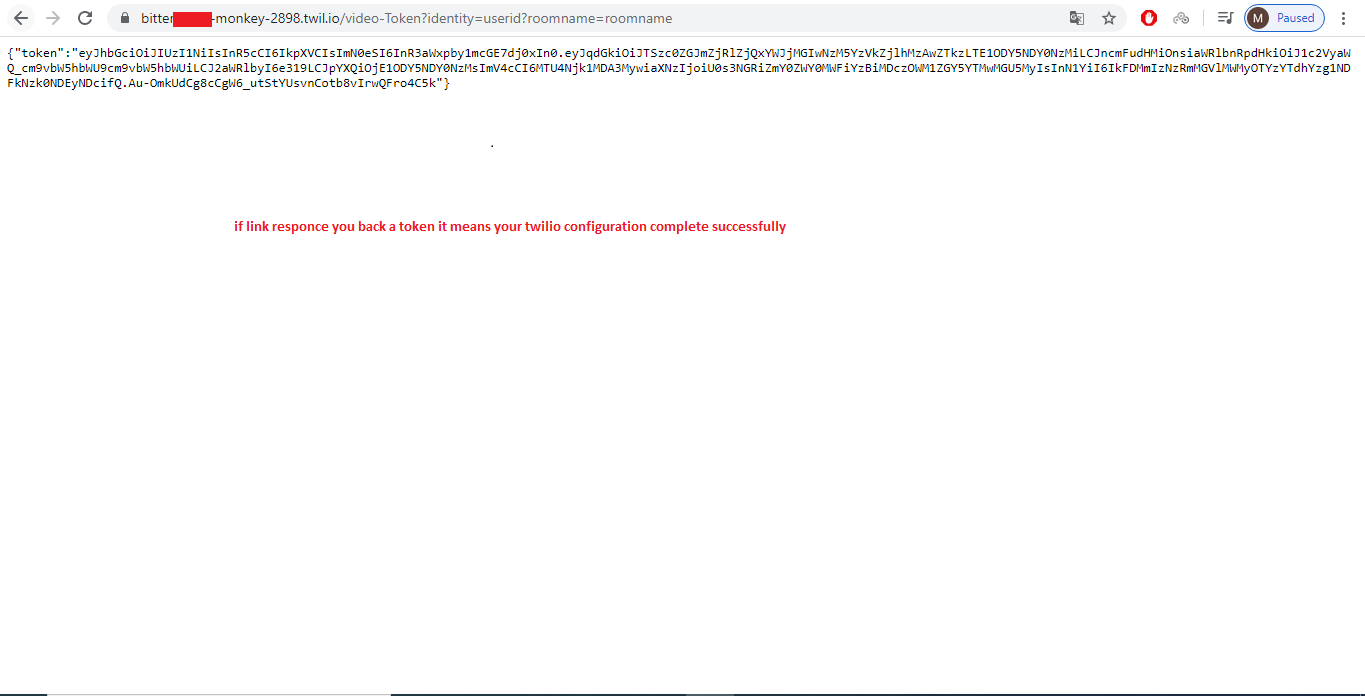
Step 8 - Place the about generated link here.

Agora Configuration
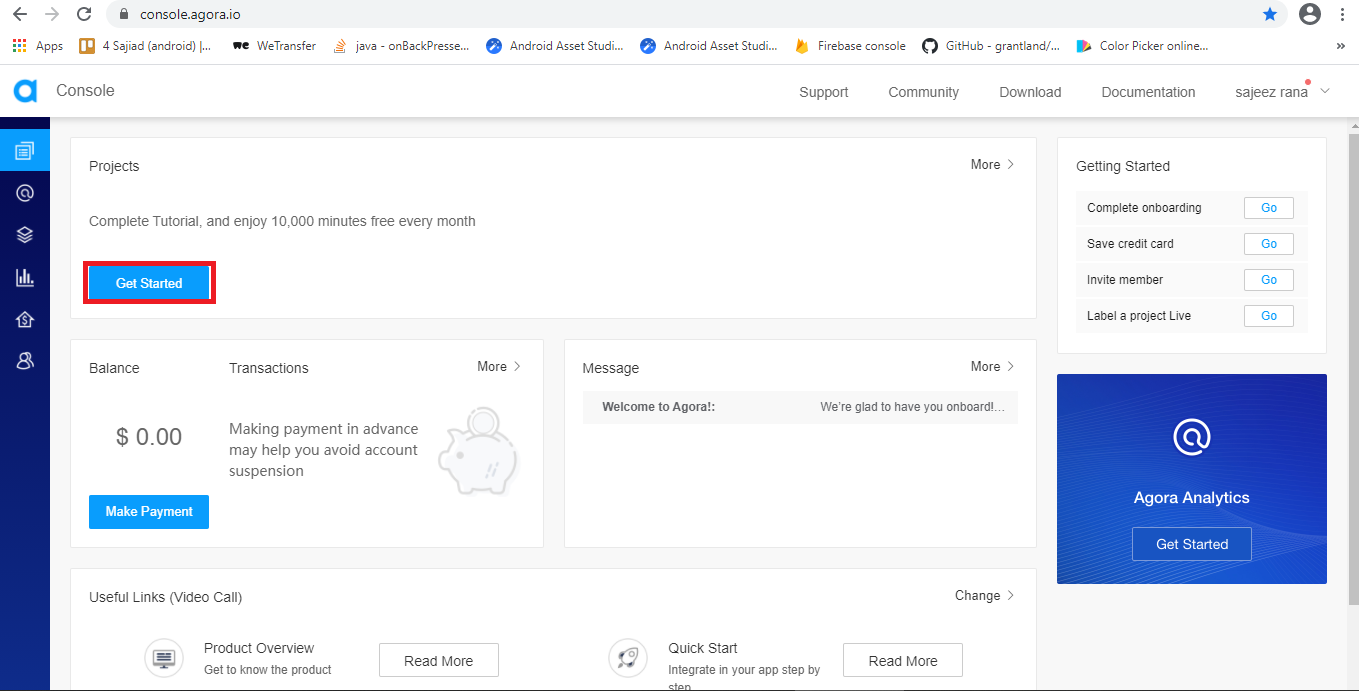
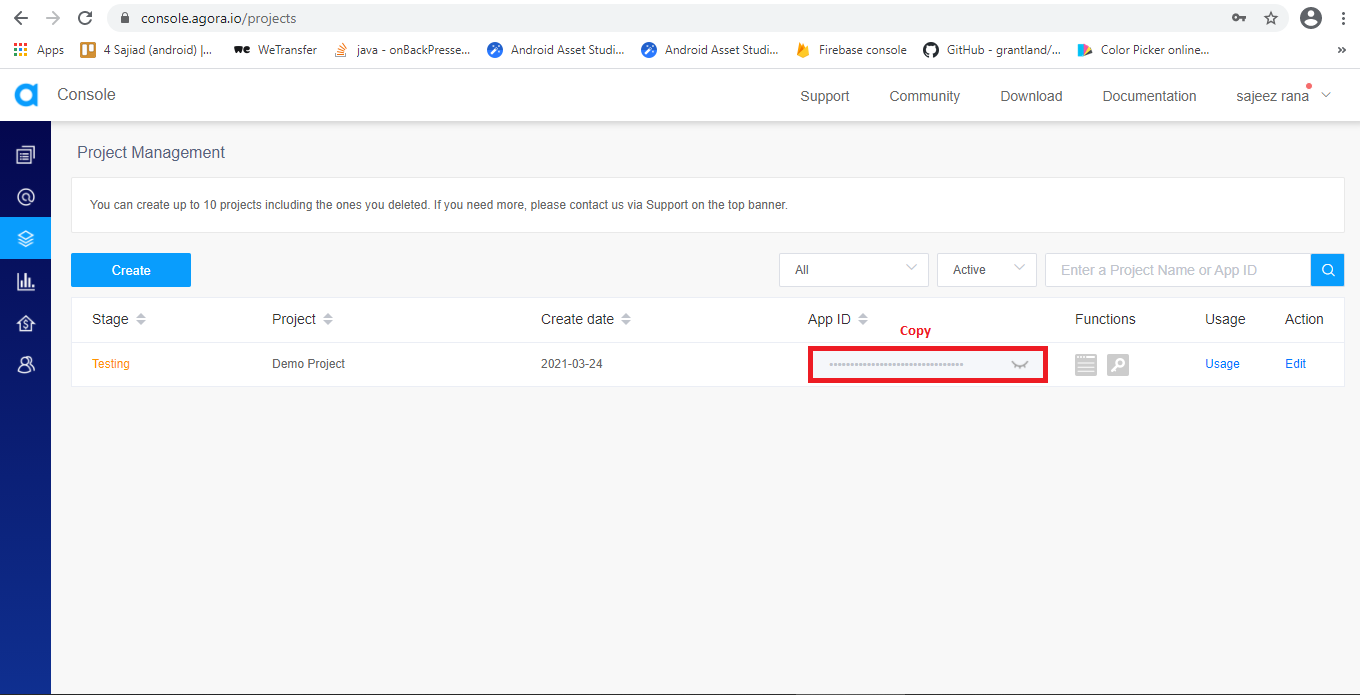
For live streaming video we have use the agora SDK. So in below we will tell you which action you have to done for run live streaming in to your project
Step 1
Go to https://sso.agora.io/v2/signup then sign up.
Step 2
After login you will go to agora dashboard their you can create your project


In-app Purchases
Follow below steps to make product Id for In App Purchase


Generate Debug APK
Step 1
Follow screenshot

Enable Firebase Push Notification
To setup firebase push notificaton you have to follow these steps , also mention in this video Youtube Video
- edit the API files "API/config.php" and update firebase_key key
You can get api server key from here follow screenshort
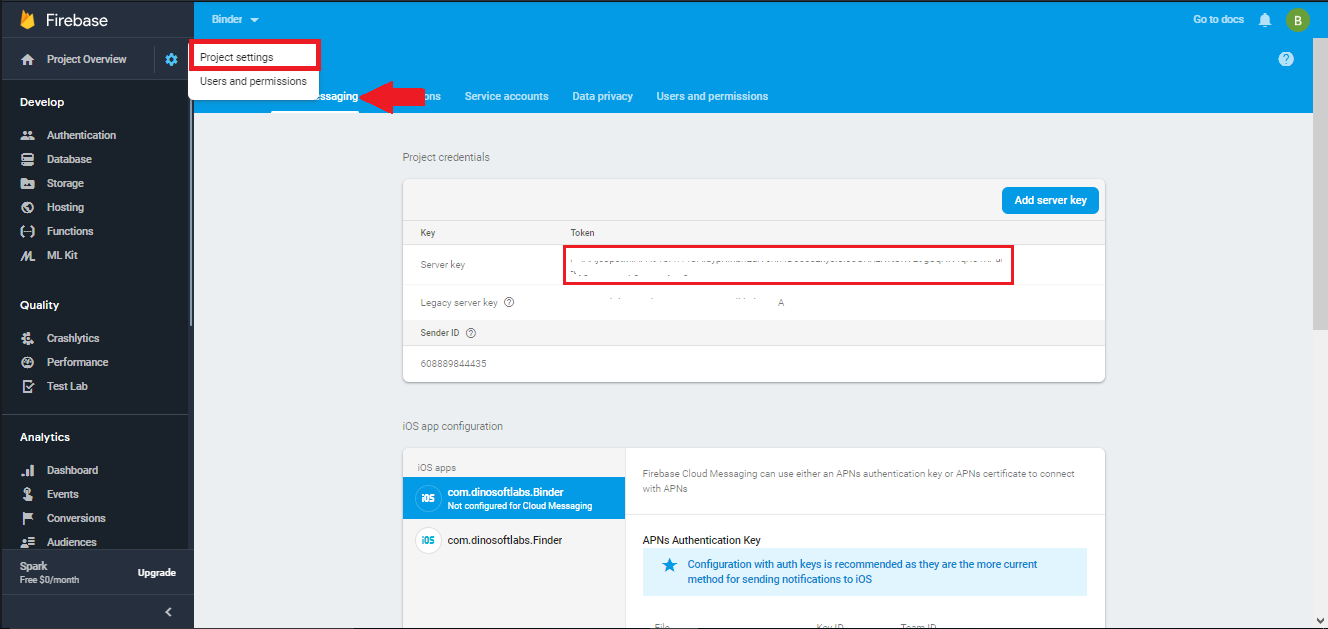
You have to update firebase_key key in API/config.php here see screenshort

Thank you & Support
I'd like to thank you again for your purchase and I hope you where able to successfully install the app and using it in your future business . If you need support or have some questions. You can visit our support resources here at hello@qboxus.com
What support does include- Answers to (technical) questions about the item's features
- Assistance with reported bugs and issues
- Answers to questions about importing and setting up the item as is described in the docs.
- Customization & adding new features
- Installation Services
- Support for 3rd party software and/or plugins
- Content related rejections and violations from Google
FAQ
App Develope in native or not?
Yes app is in native coding
Which PHP version?
it will work on PHP 7.0 or more then 7.0
Which Database You are using?
We are using mysql database
Does Demo Data included (Demo users like on our app)?
Yes Test/Demo users profiles are inlucded in the package
Does it have 3rd party services?
Yes , It has Firebase Thrid party for real time chat and send push notifications, Which is free but limited , after lot of users and usages you have to buy their packages there are have 3 packages Free , $25 monthly , Pay As you go See Firebase packages
Does it have Admin panel
Yes It has admin panel as well which is in HTML/CSS and connected with datbase via PHP API
Does it have Documentation
Yes it has Documentaion about android , web api setup , admin panel setup , firebase push notification setup