Get Started
Thank you for purchasing our app
Please read the documentation carefully , and if you have any question check us . Most pages are accompanied by a video tutorial , it's recommended to check both , the video and the written Documentation .
Must Read this:
After purchase if you run the project and test the build in phone it will not work becuase you have to setup the Web API first then app will be works fine.Web API is in PHP 7.0 and it will work on any kind of hosting packages

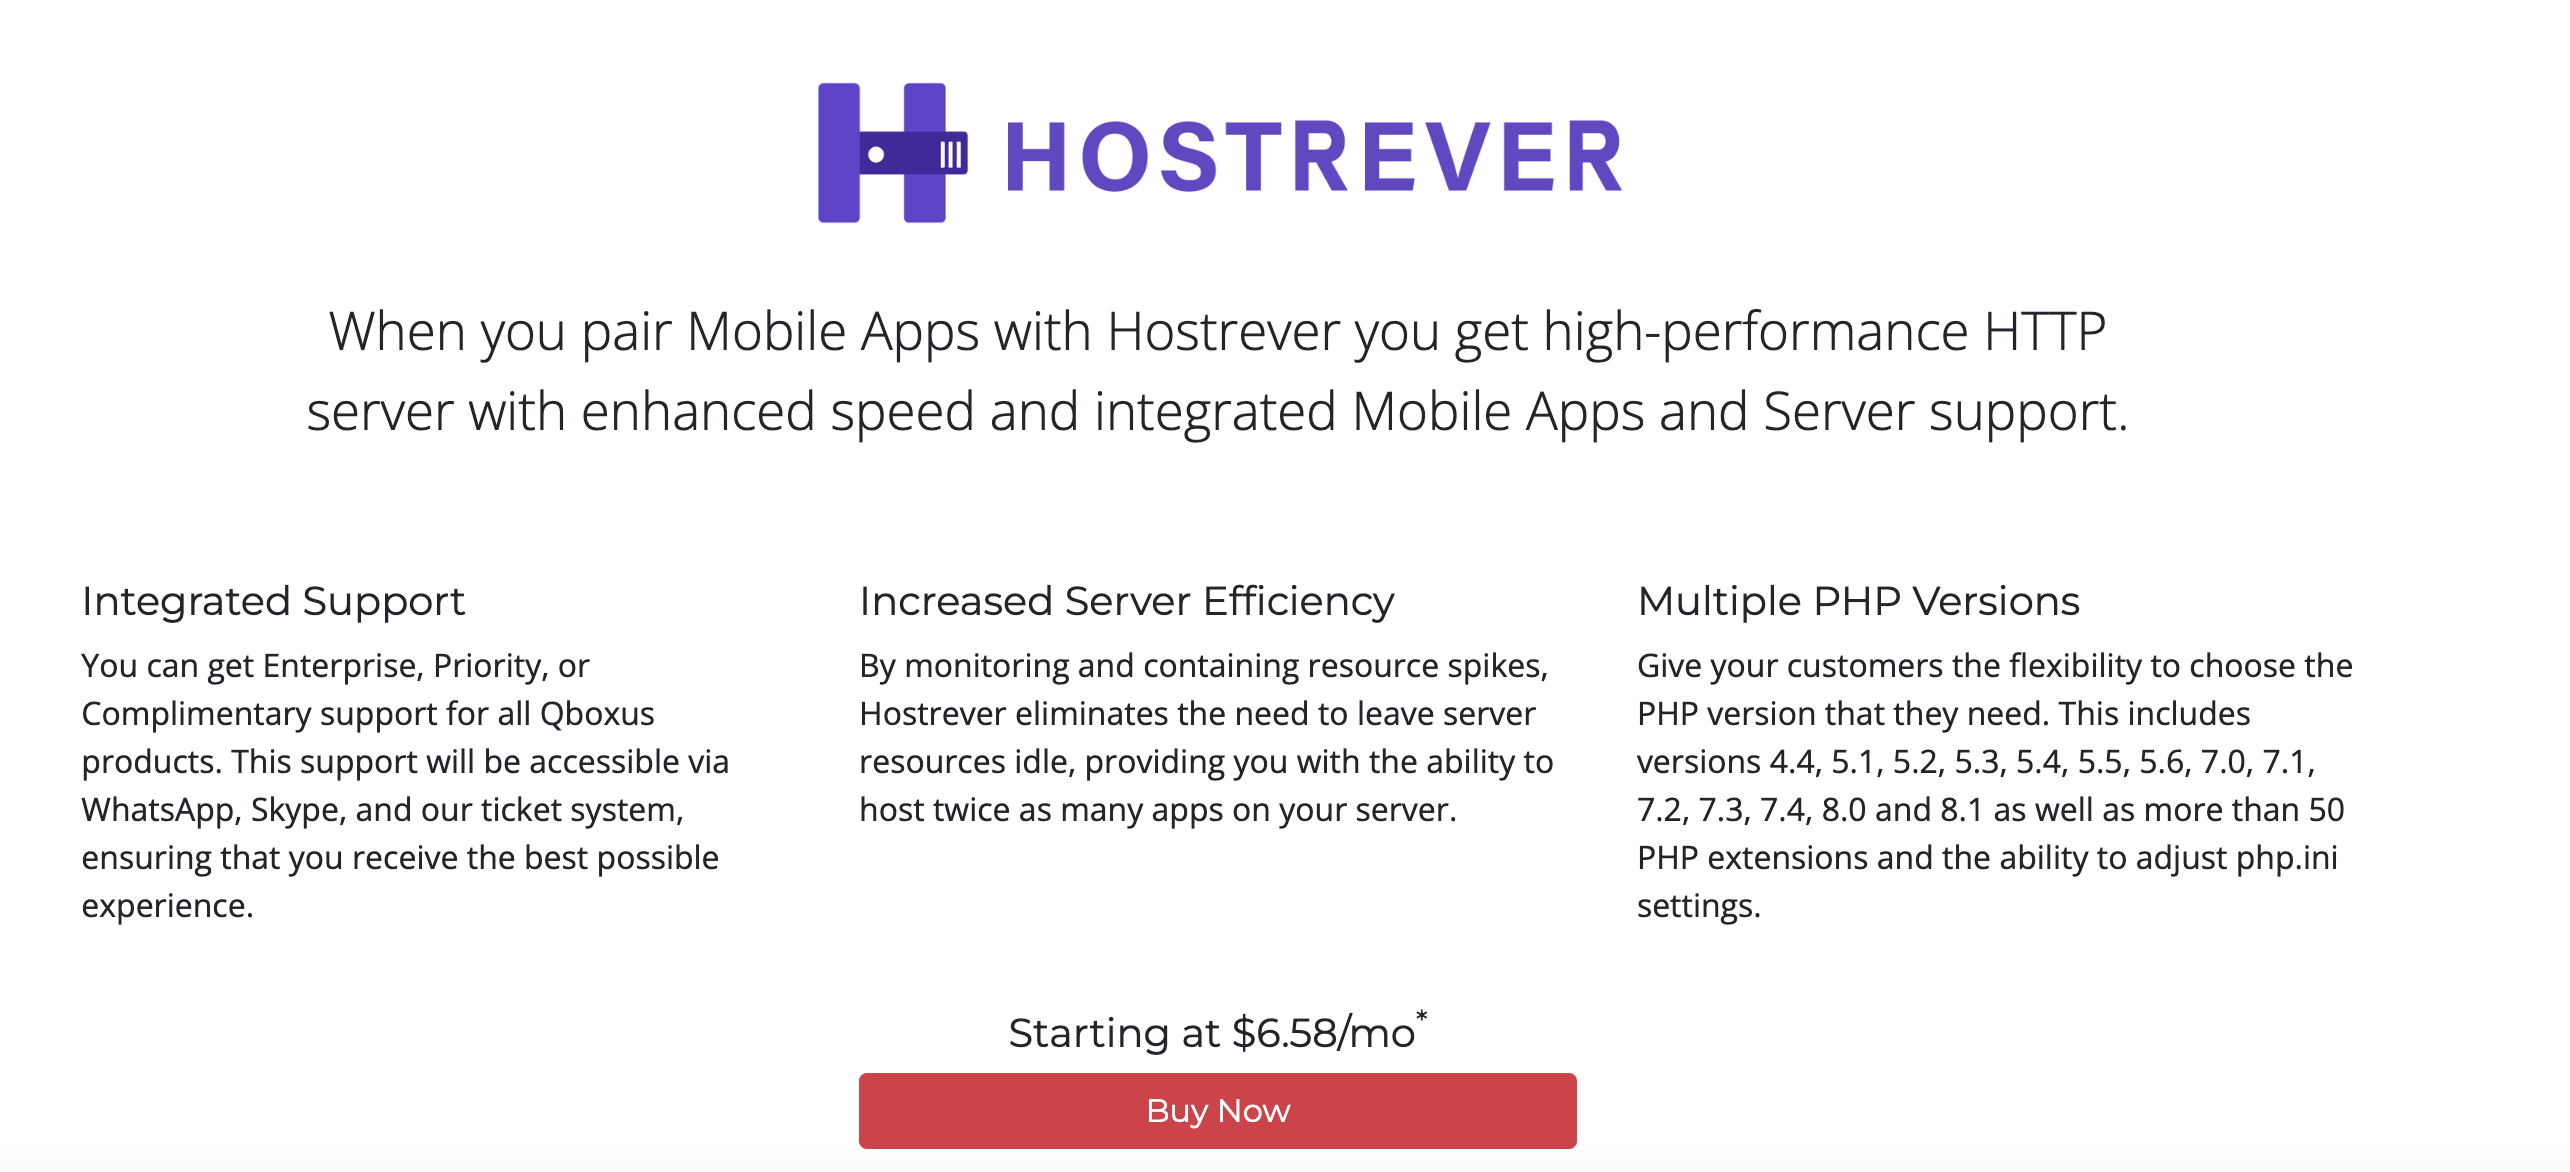
Recommended Hosting (Free Life Time Support)
Customers who host their files with hostrever.com will receive free support for life
By opting for our partner hosting, you can enjoy the following benefits
- Lifetime free support
- Lifetime free upgrades
- Lifetime free bug resolution
- Support through WhatsApp and Skype instead of ticketing
- Improved speed, as the server has been customized to fit your needs

Server Requirements
We have added some advance functions into our product. We try to keep our product simple but unfortunately due to greater no of request we are forced to upgrade our product and we had to use a FFMPEG Library.
- Php 8.0 - 8.3
- VPS/Cloud: The code will not work on Shared hosting.
- Ffmpeg v3.4.7 should be installed
- Redis should be installed
- Curl should be enabled
- memory_limit should be 500M View Attachment
- 4 Core processor + 8/16GB Ram
If you face any issue in video upload or it takes time in uploading video to server that might be because of your server. Sometimes server gives this error if you check your error log file
Allowed memory size of 33554432 bytes exhausted (tried to allocate 15756752 bytes)
If you see this error then you would need to upgrade your server or increase Php memory limit by going into php.ini file. you need to google about where this file is. This file resides in different locations in different servers
Step 1
First thing which is very important is that you need to either use VPS or cloud Hosting. This FFMPEG won't work on shared hosting and you need a terminal access to install ffmpeg
Step 2
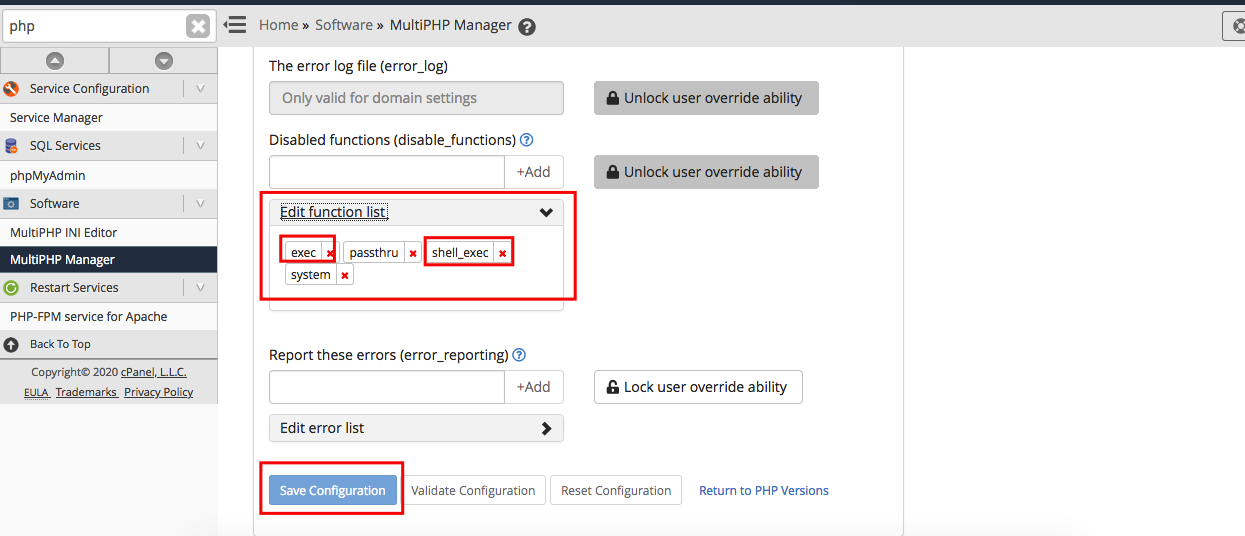
Make sure that your server does not block shell exec , or exec. You have to remove it from WHM and save the settings
Step 3
Increase your upload limit
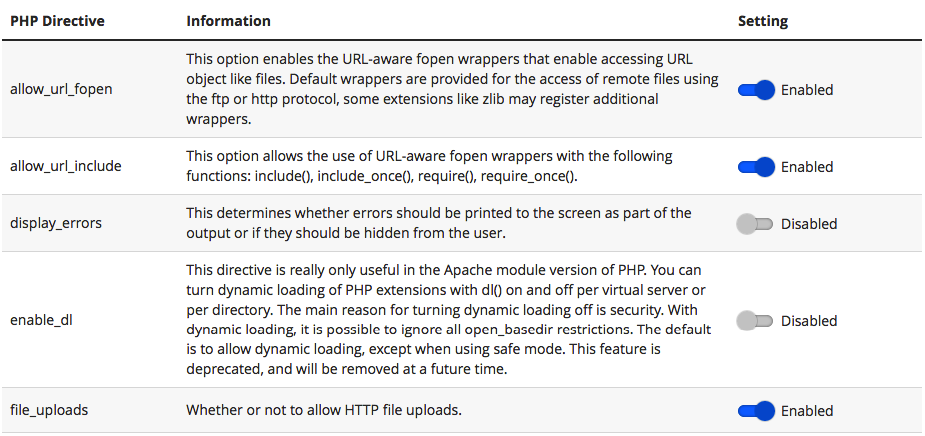
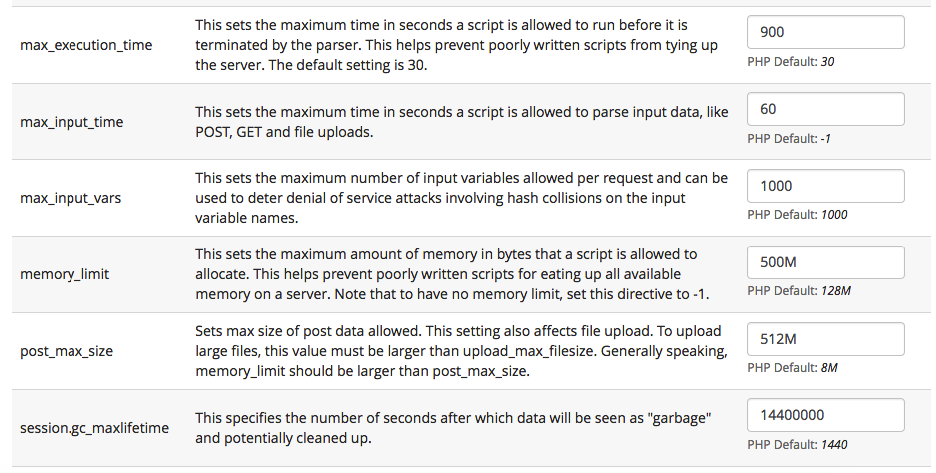
One last thing you need to do is increase your post_max_size and upload_max_filesize.
Note: We have tested this on Hostgator VPS. Terminal we accessed from whm. Operating system was CENT OS 7.8
Android Configuration:
In order to start configuring , you need to install Android studio and the 'Java SE Development Kit'. First download the android studio from here Android Studio
SDK Manager
The installer , as also shown in the video should automatically download and install all required components . if you want to do manual setup , download at least the following components using the SDK manager
- SDK tools
- SDK platform Tools
- SDK Build Tools
- Google Play Services
- Android Support Library
- Google Repository
- Google USB Driver
You can download these SDK , if not installed already , using the SDK manager SDK Manager After you're done, you can open Android Studio and continue.
*Note: After successfully installing the Android Studio please make a sample app project to install necessary files into computer by android studio.
Register Bundle ID
Most Important Step
You have to register your mobile app bundle id at your Support Account
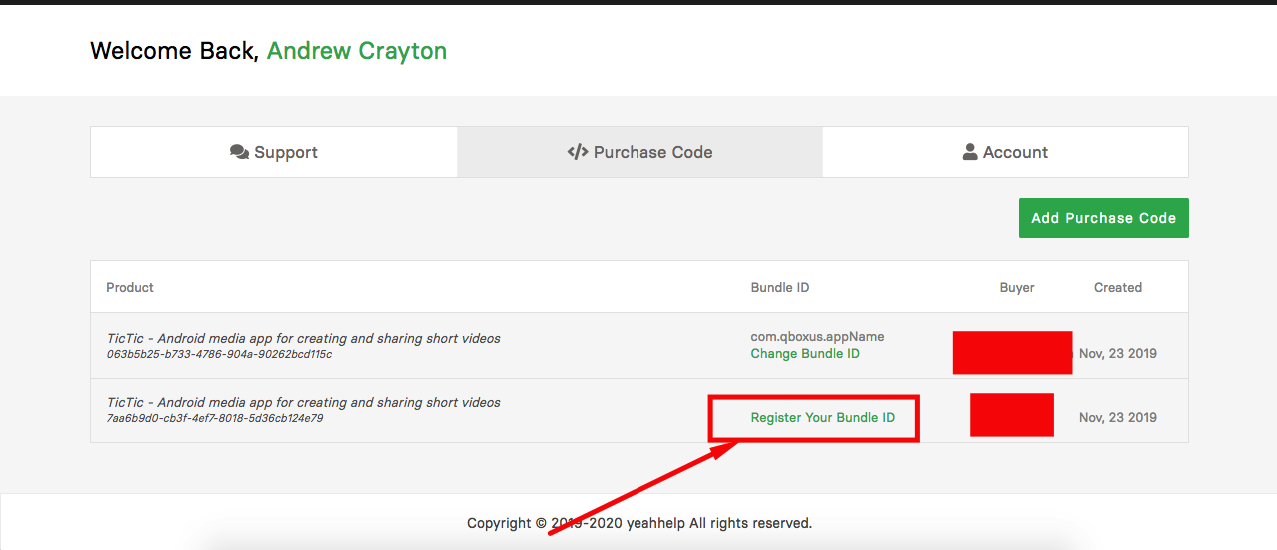

Importing Android Project and Change Package Name
To import the app, simply open Android Studio and import/open the template. Make sure to wait for all the processes (the Gradle Build) to complete before continuing to the next step
Addition steps
Sometimes, the Gradle Build fails. In some cases additional components are needed, Android Studio will ask you to do download these additional SDK components in the 'messages' tab, simply follow the instructions provided to install and download the additional components.
Change App Name
Below is illustrated how you can change the name of the application.
Go to app->res->values->strings.xml
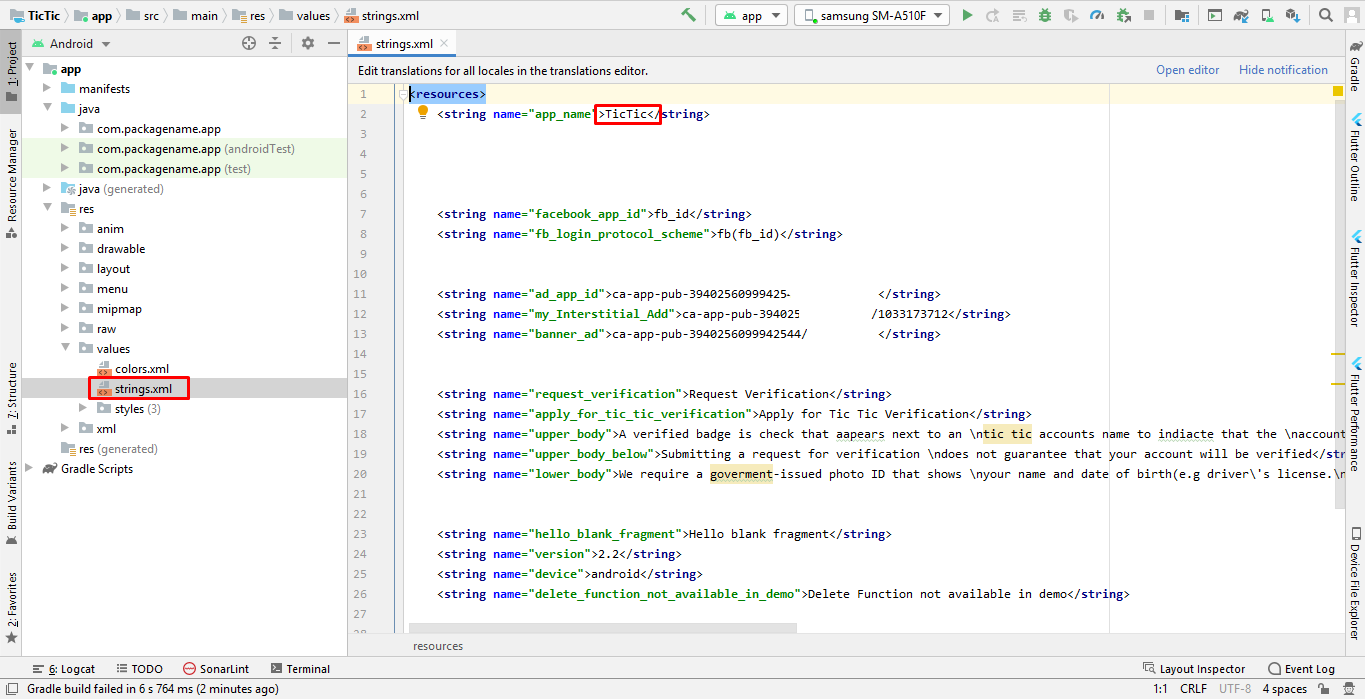
Change Color Scheme
Below is illustrated how you can change the color of the application.
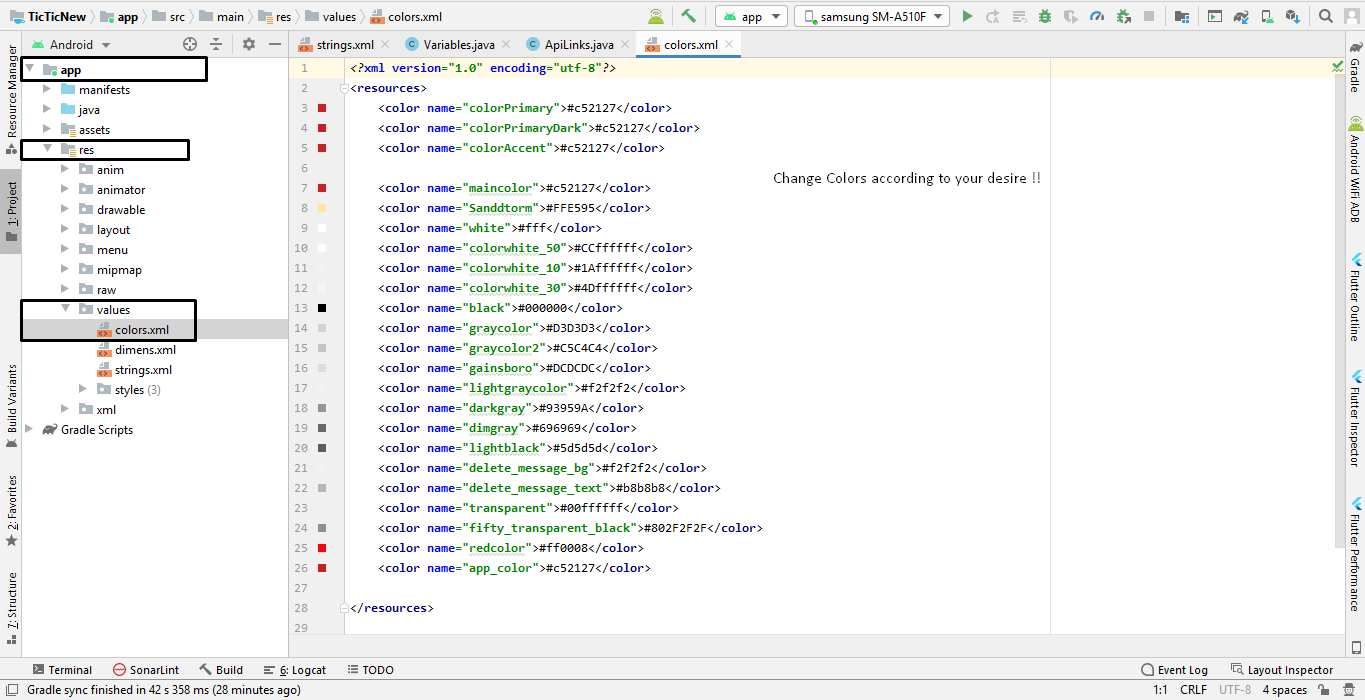
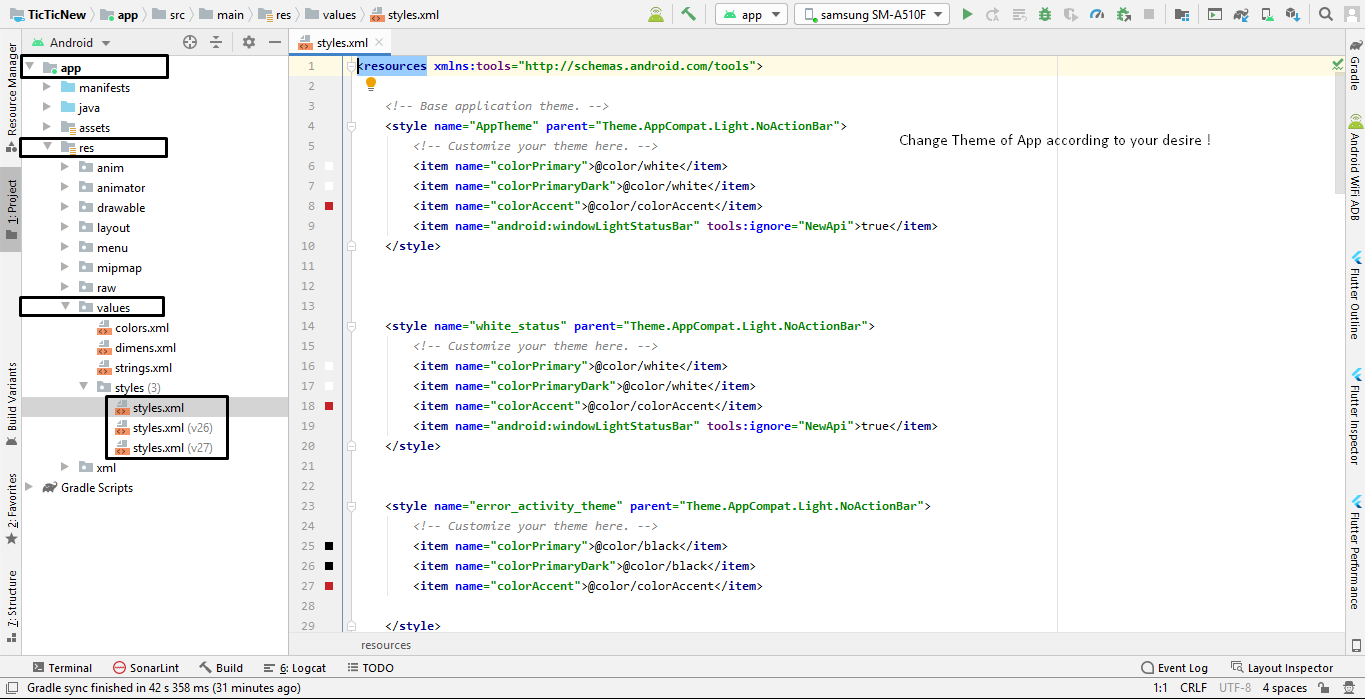
Change Theme of Application
Below is illustrated how you can change the theme of the application.
Go to app->res->values->styles
Change App icon
Change Splash Screen
We need to put a png file with named 'splash.png' in the following folder:
Go to project location->Android source code->TicTic->app->src->main->res->drawable
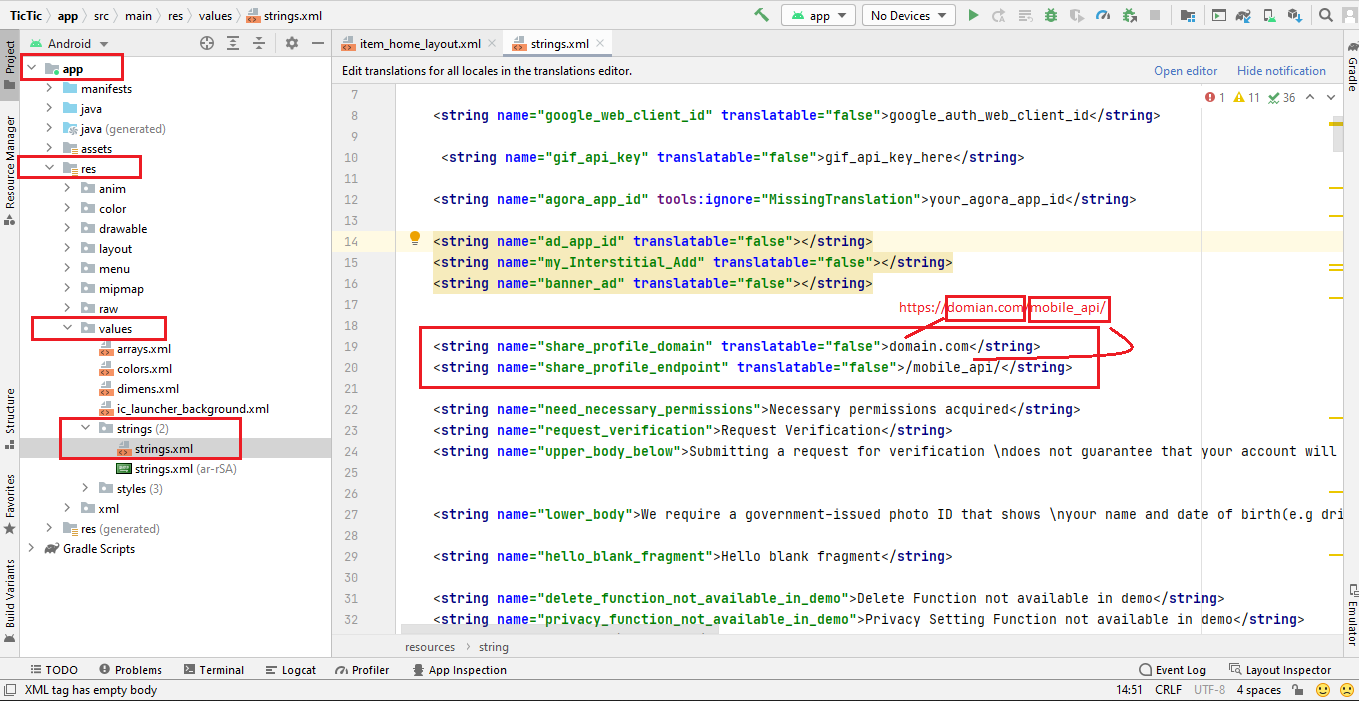
Change API Links
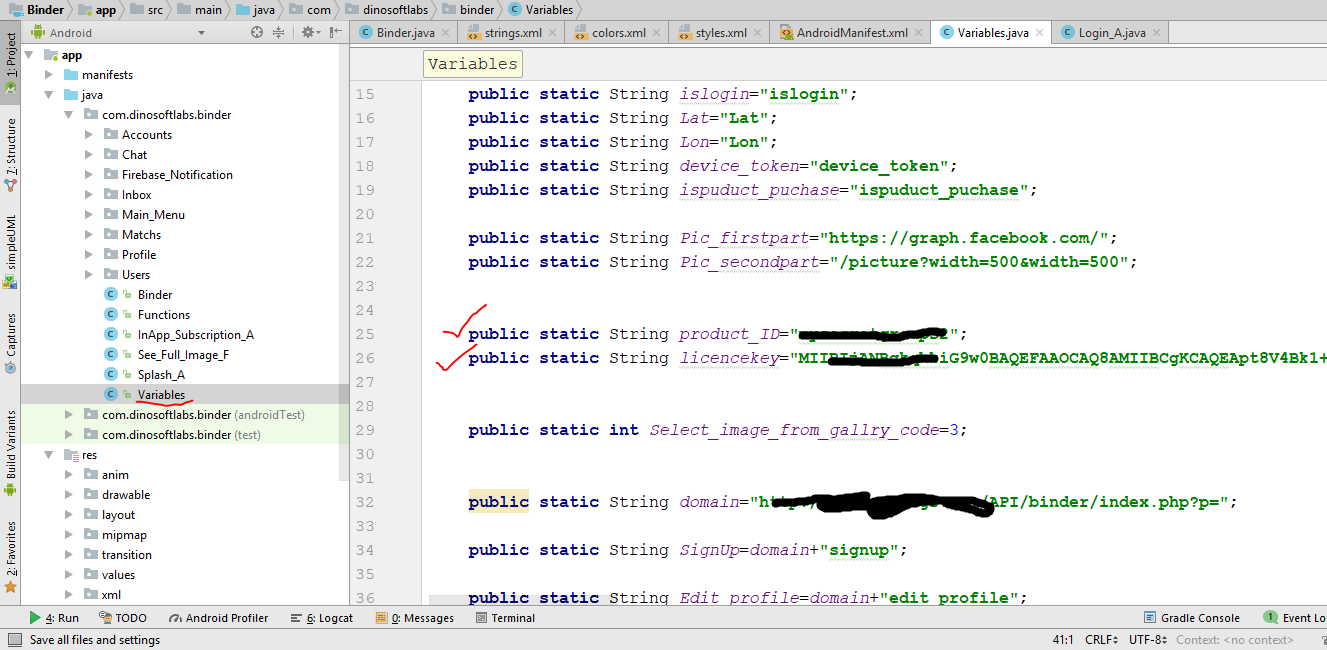
Open your API URL and copy the Android Config code "http://domain.com/mobileapp_api/" and replace with the code that we highlight in screenshot.
Click on app->java->com.packagename.appname->Constants
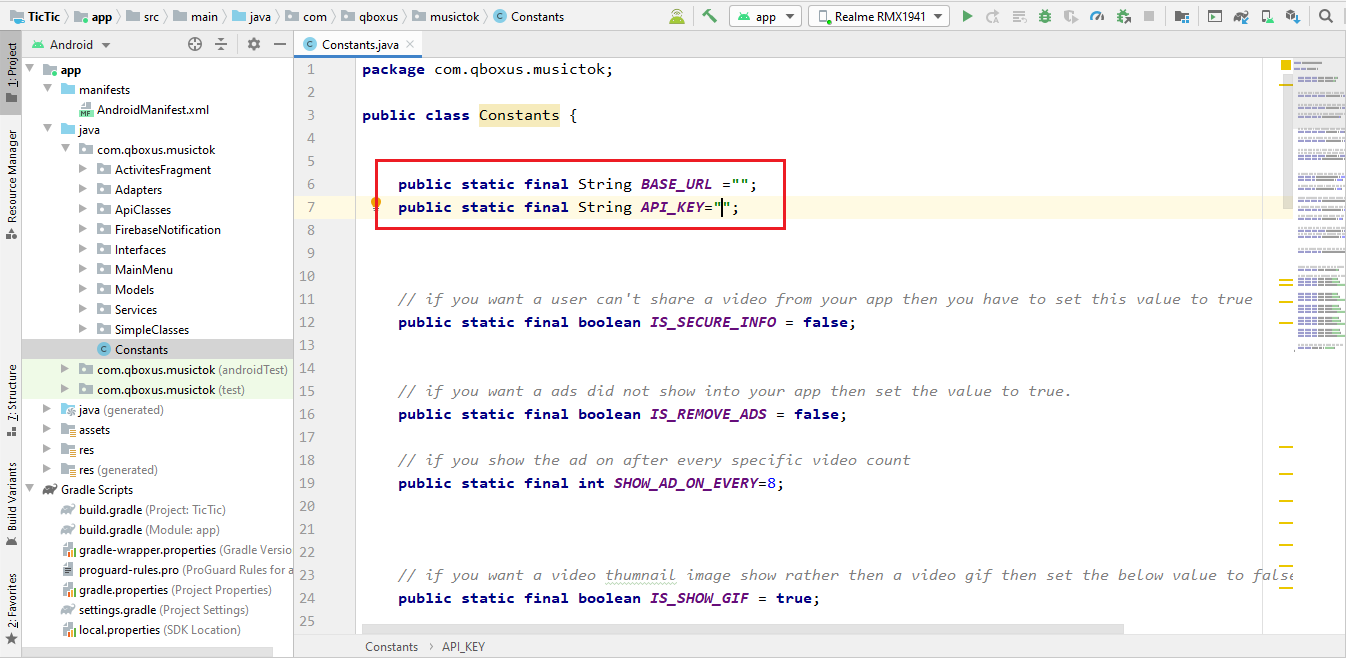
Above is illustrated how you can change the Rest Api link of the application.
change the max & min video recording
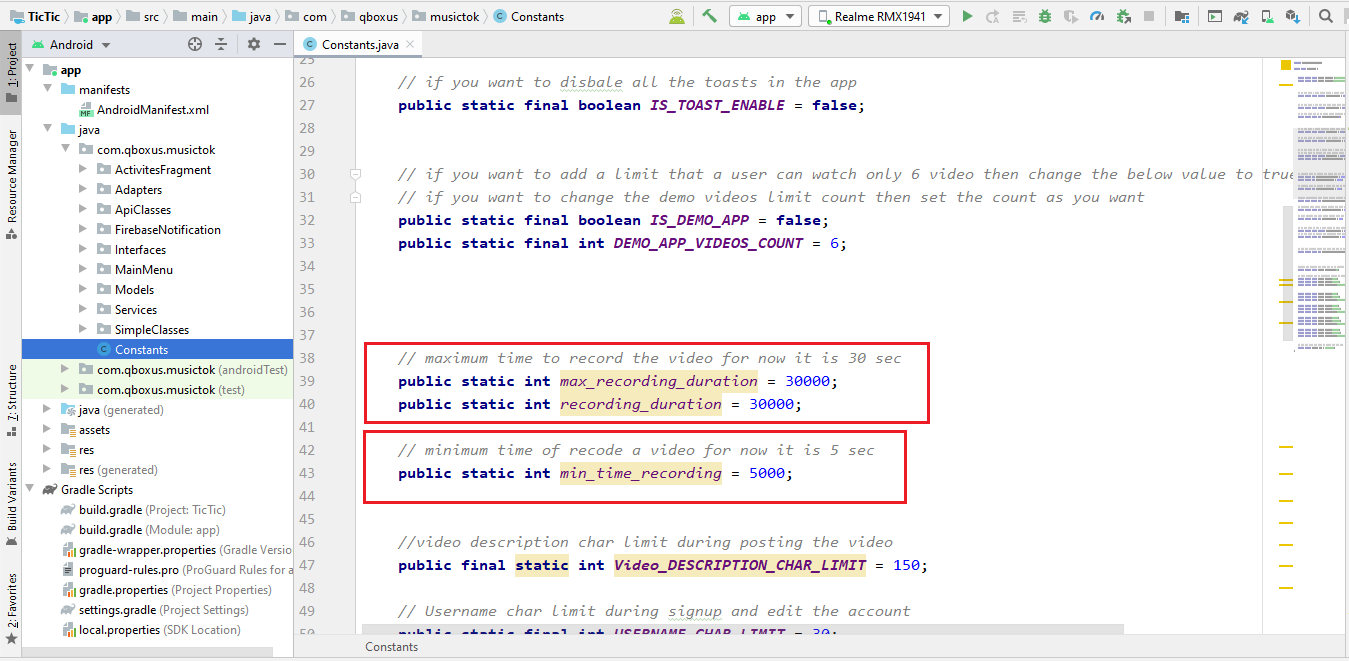
if you want to change the maximum and minimum video recording time then follow these instructions
Click on app->java->com.packagename.appname->Constants
and in Constants class go to line no.# 39 approximately
Setup Ad Mob
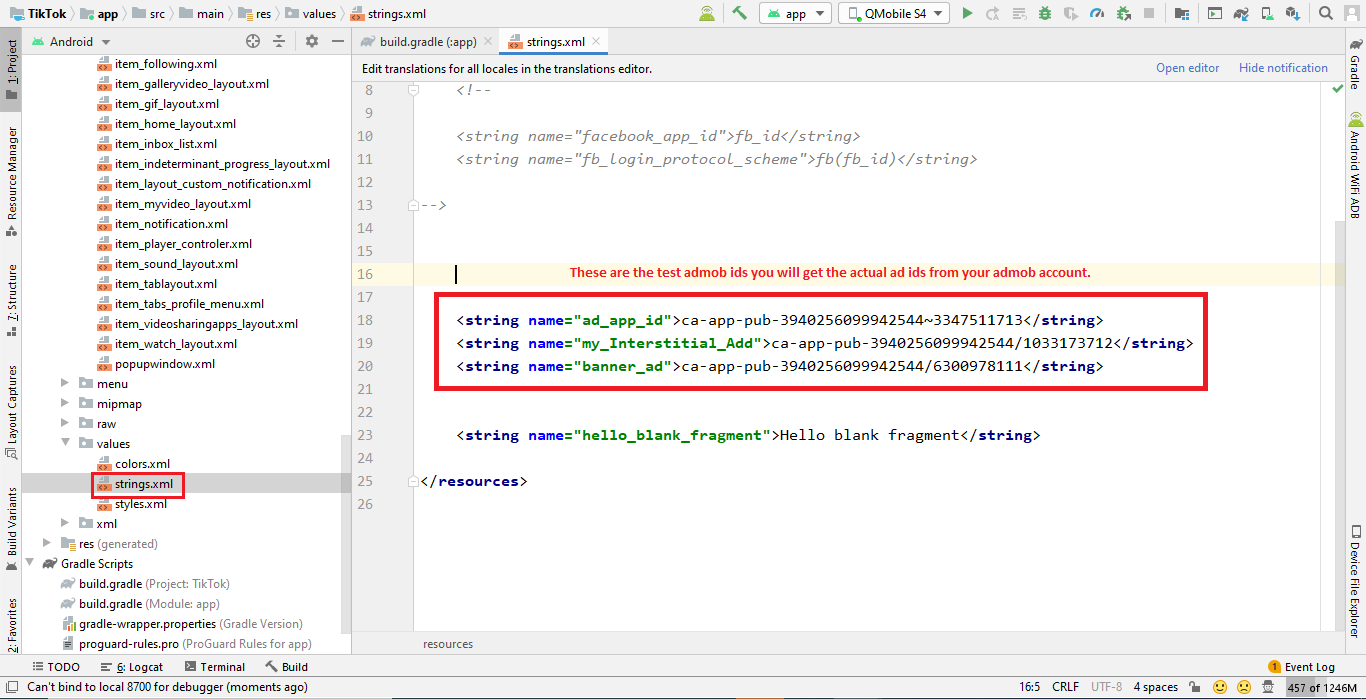
For Ad Mob setup you need ad mob id's which you get from your ad mob account. If you have no ad mob account then go to this
URL: https://admob.google.com/home/ make an account, get id's and paste in app as metioned below.
Click on app->res->values->strings.xml
Remove Ad Mob Ads
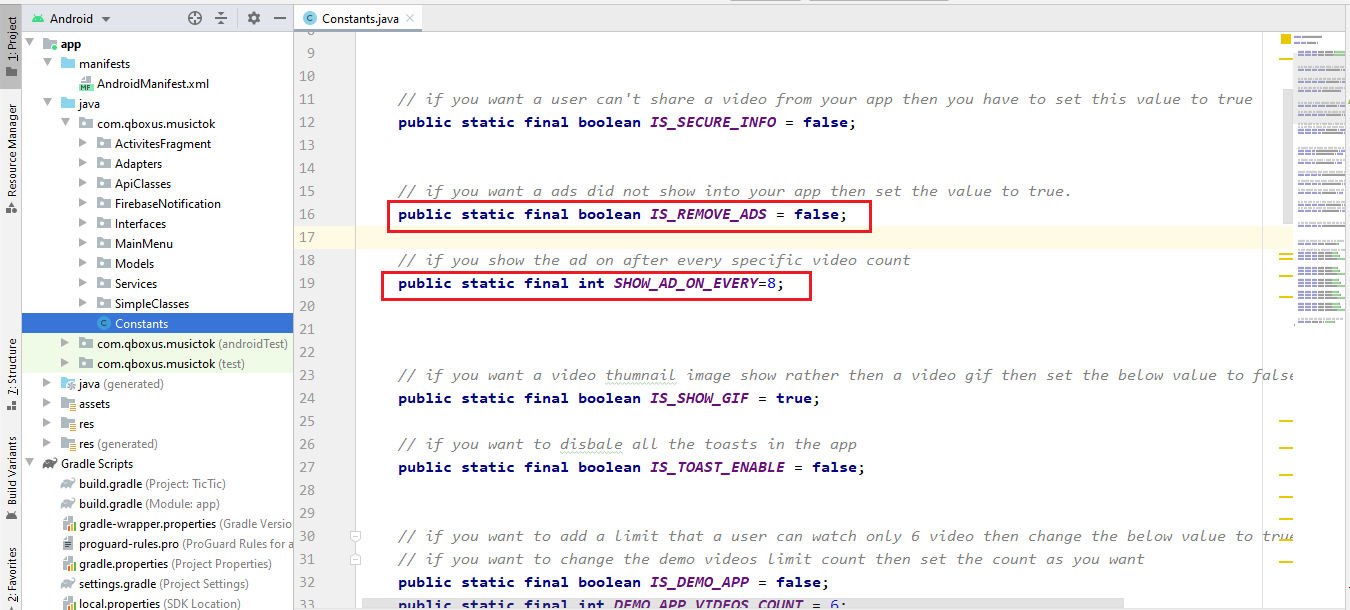
If you want to remove ads just set the value "true" in this code, follow this screenshot
public static final boolean IS_REMOVE_ADS=false => IS_REMOVE_ADS=true;
Remove/Change Streaming Limit
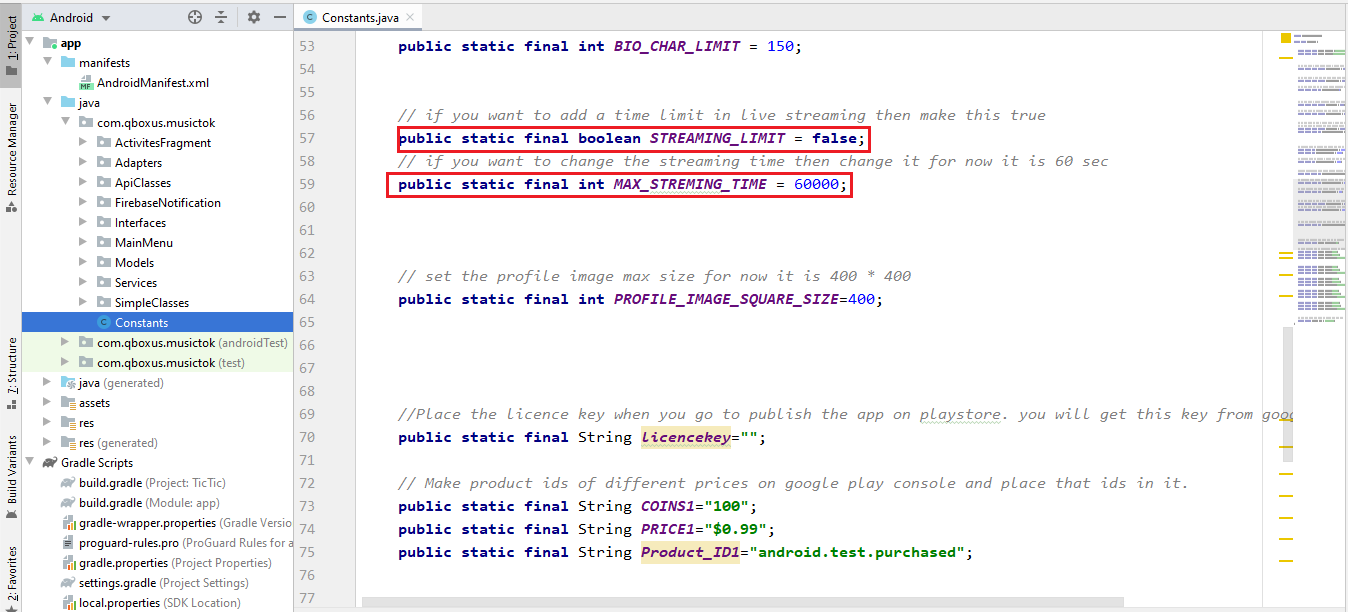
If you want to remove/change live streaming and video calling limit dialog then follow Screenshot.
Change Language
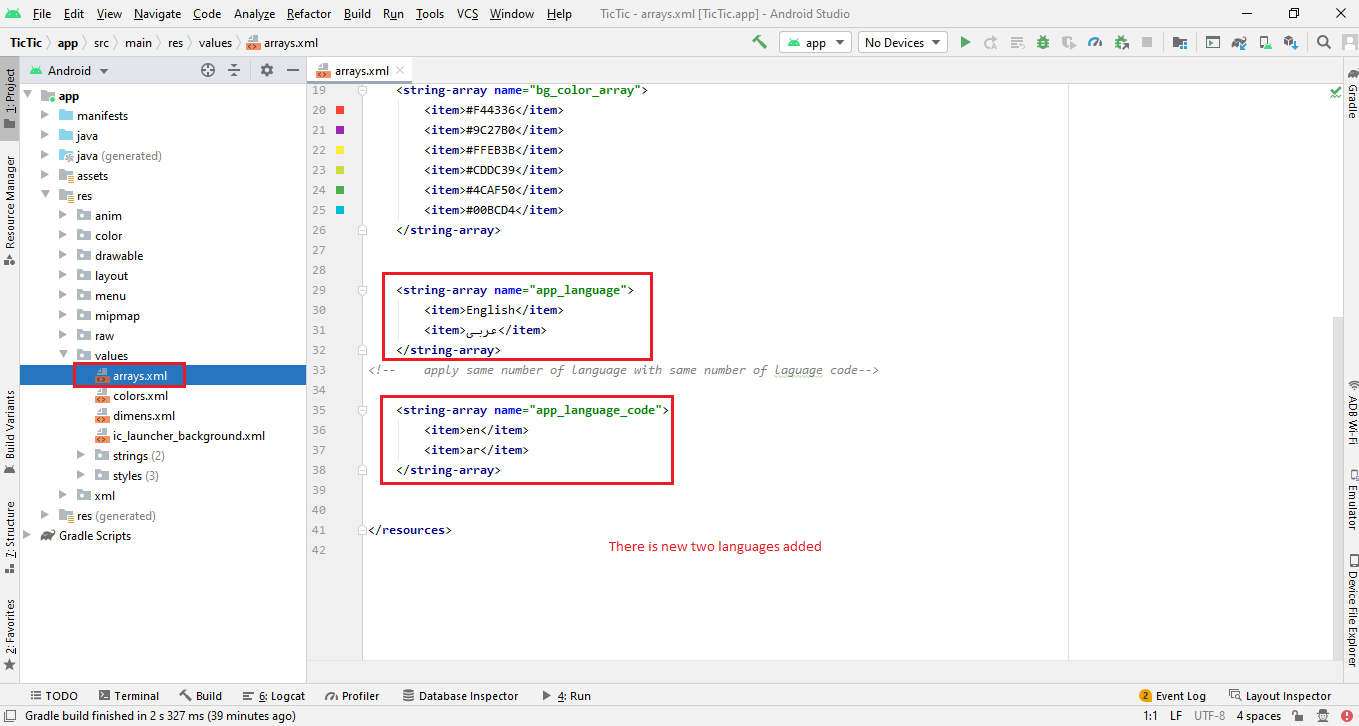
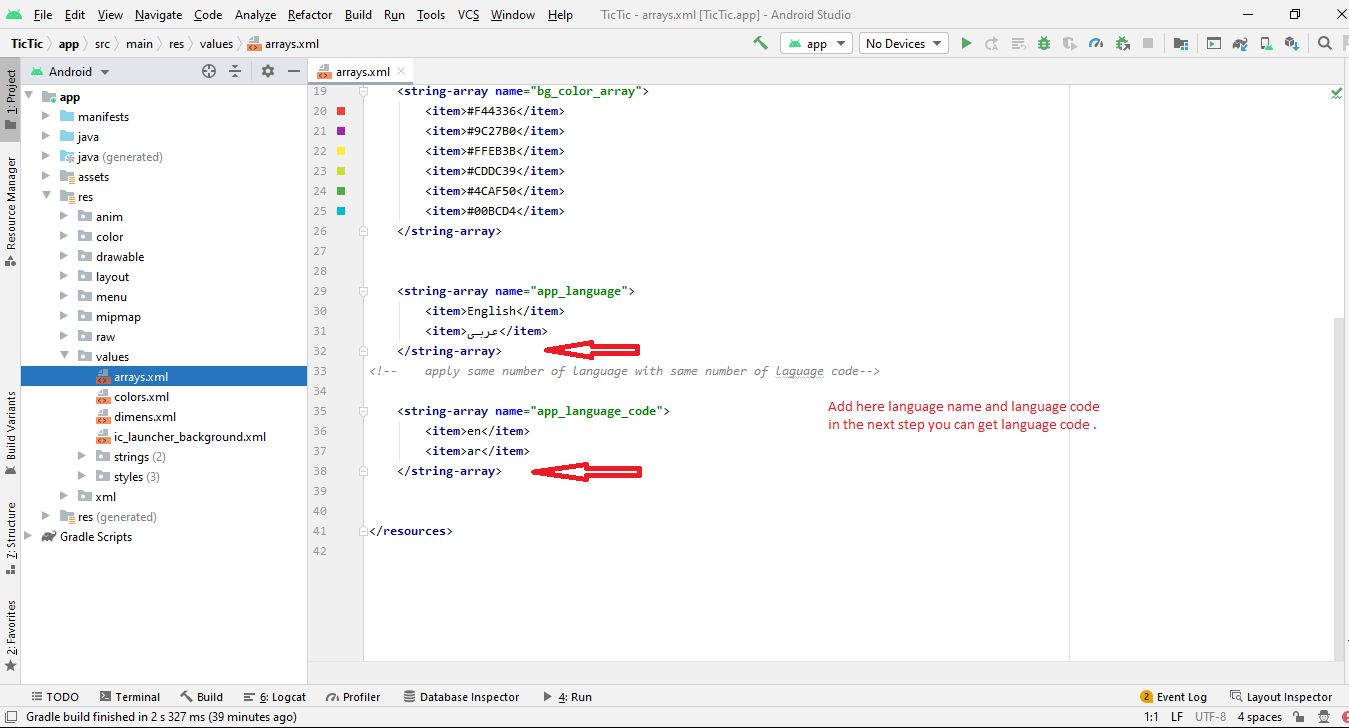
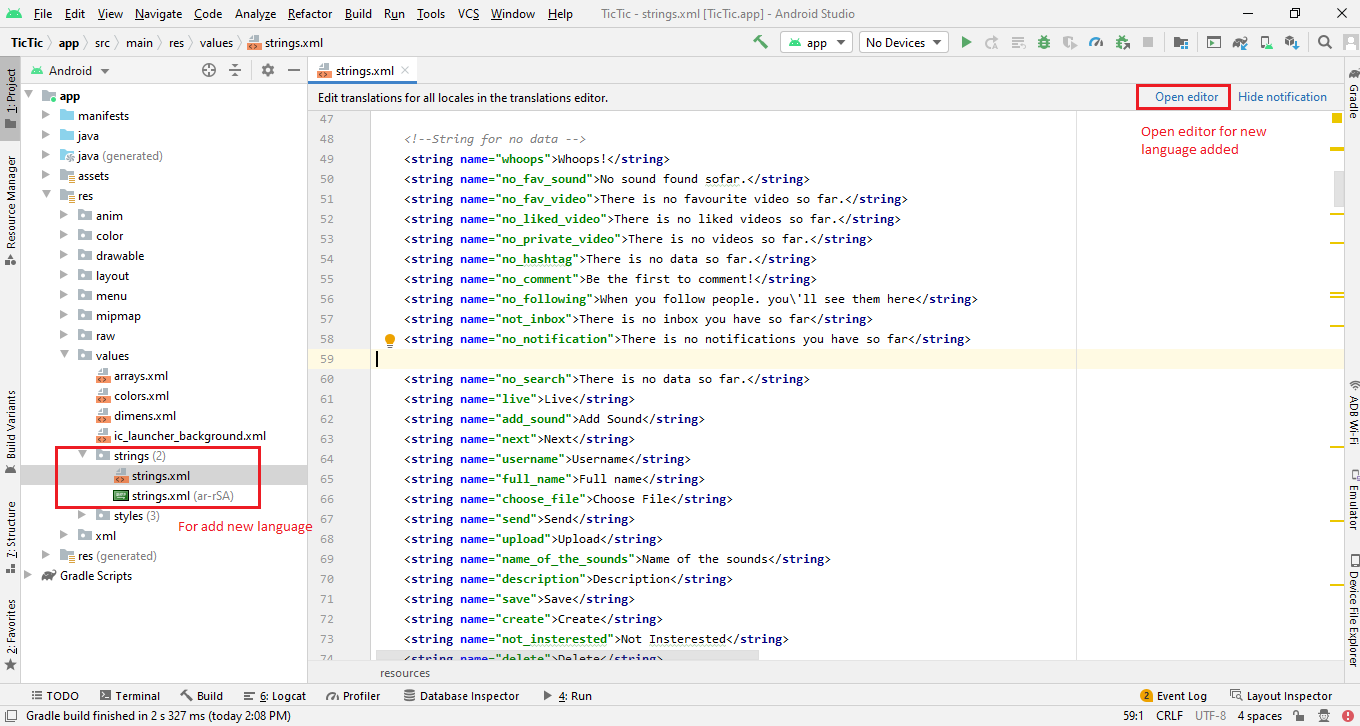
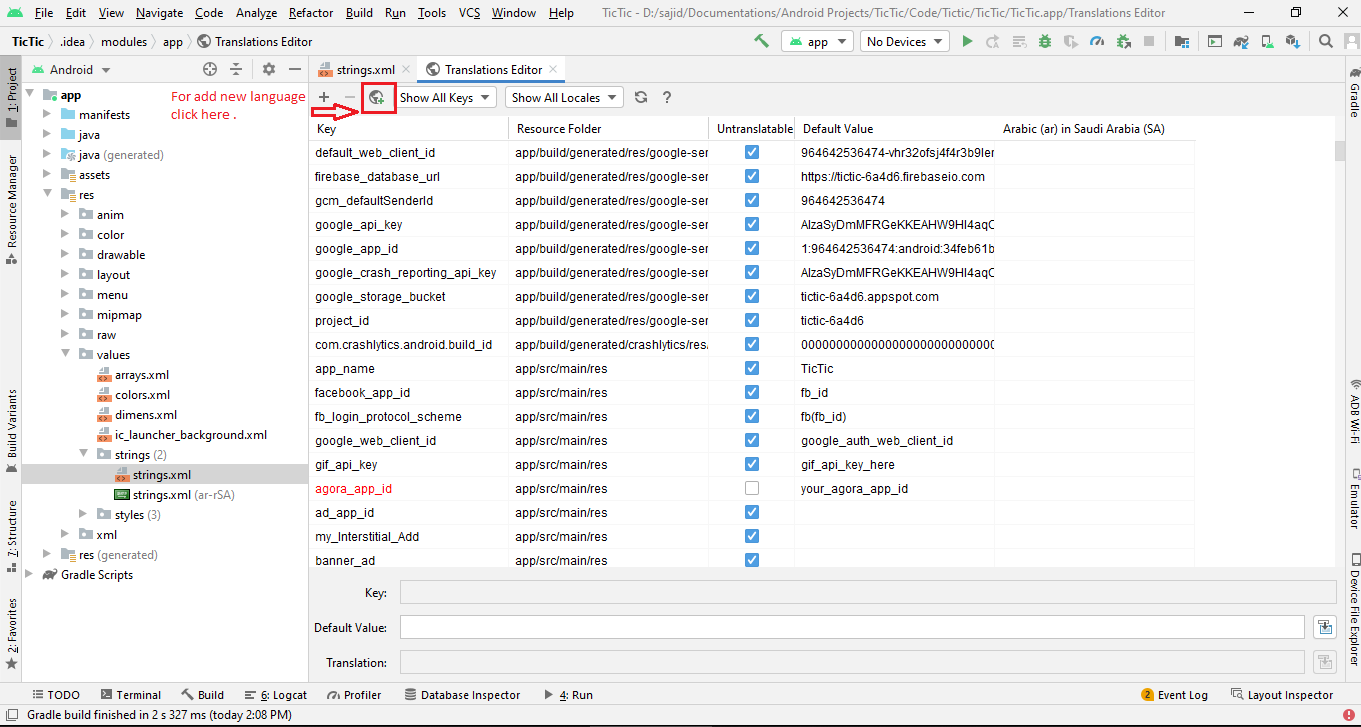
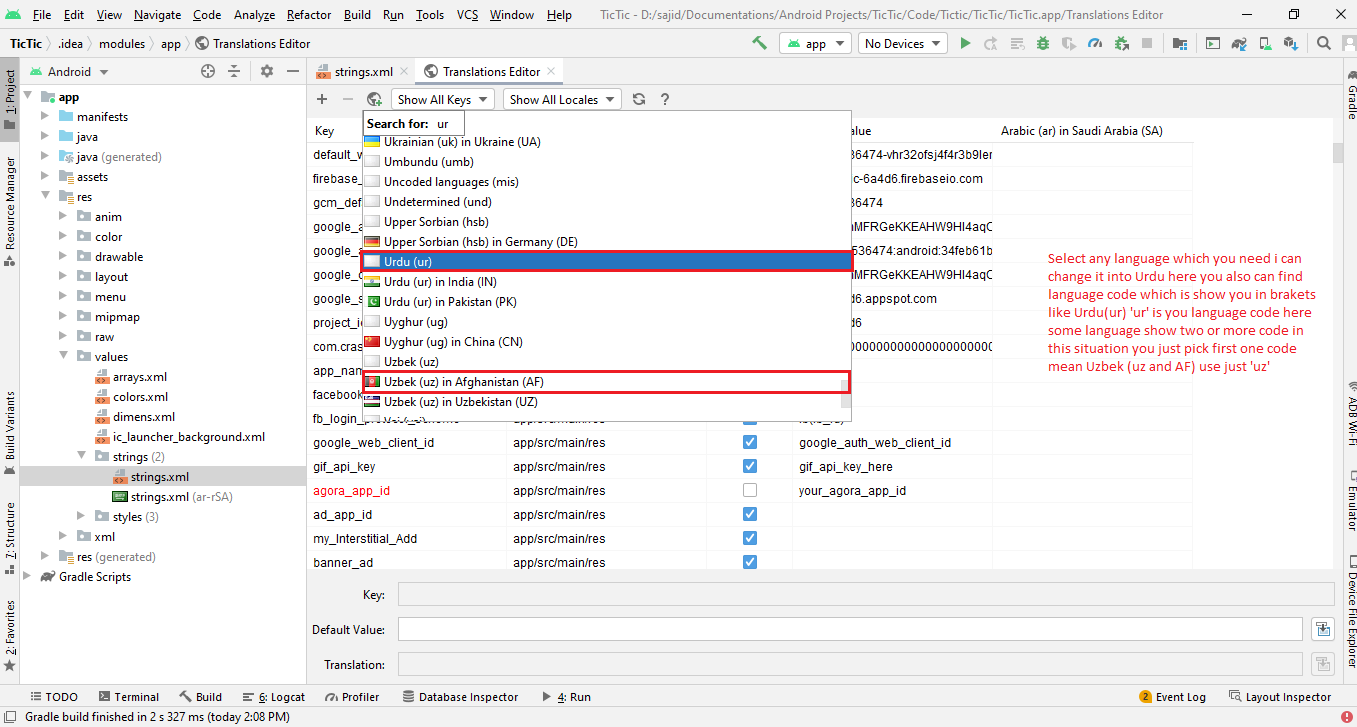
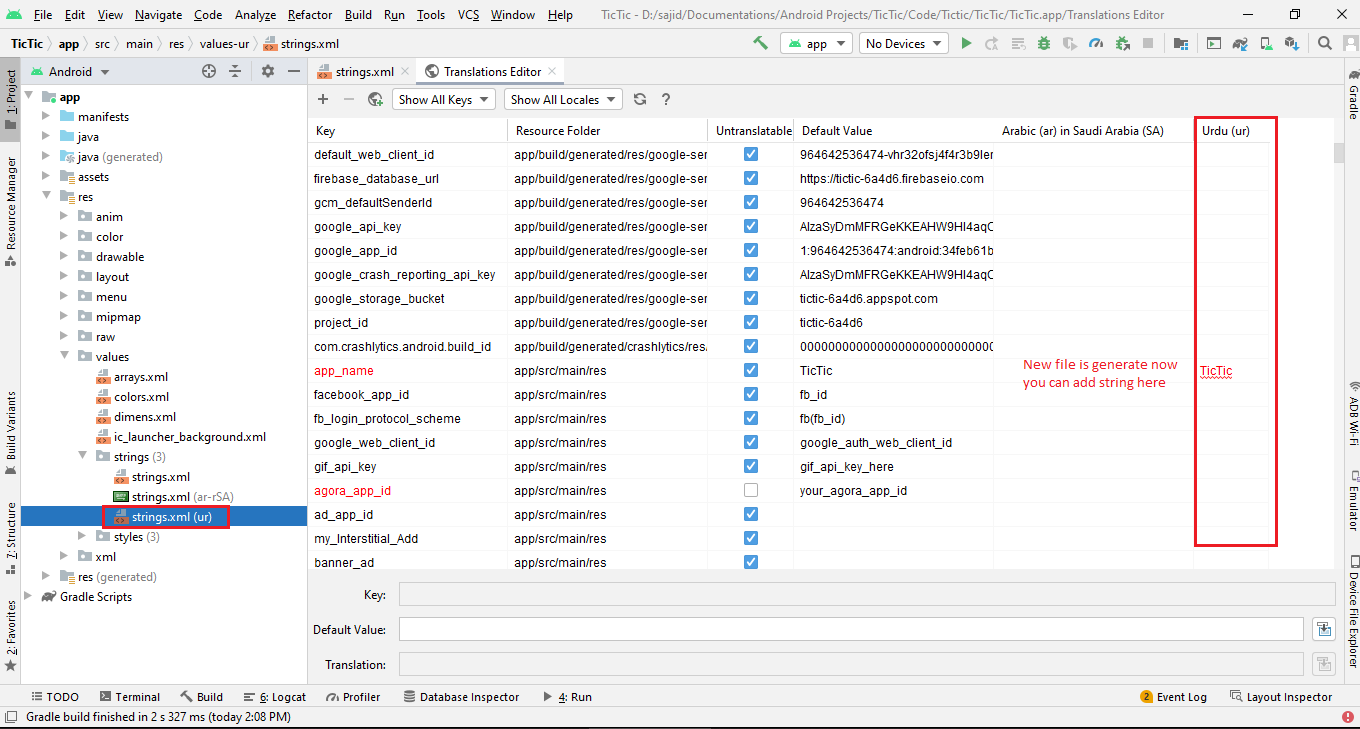
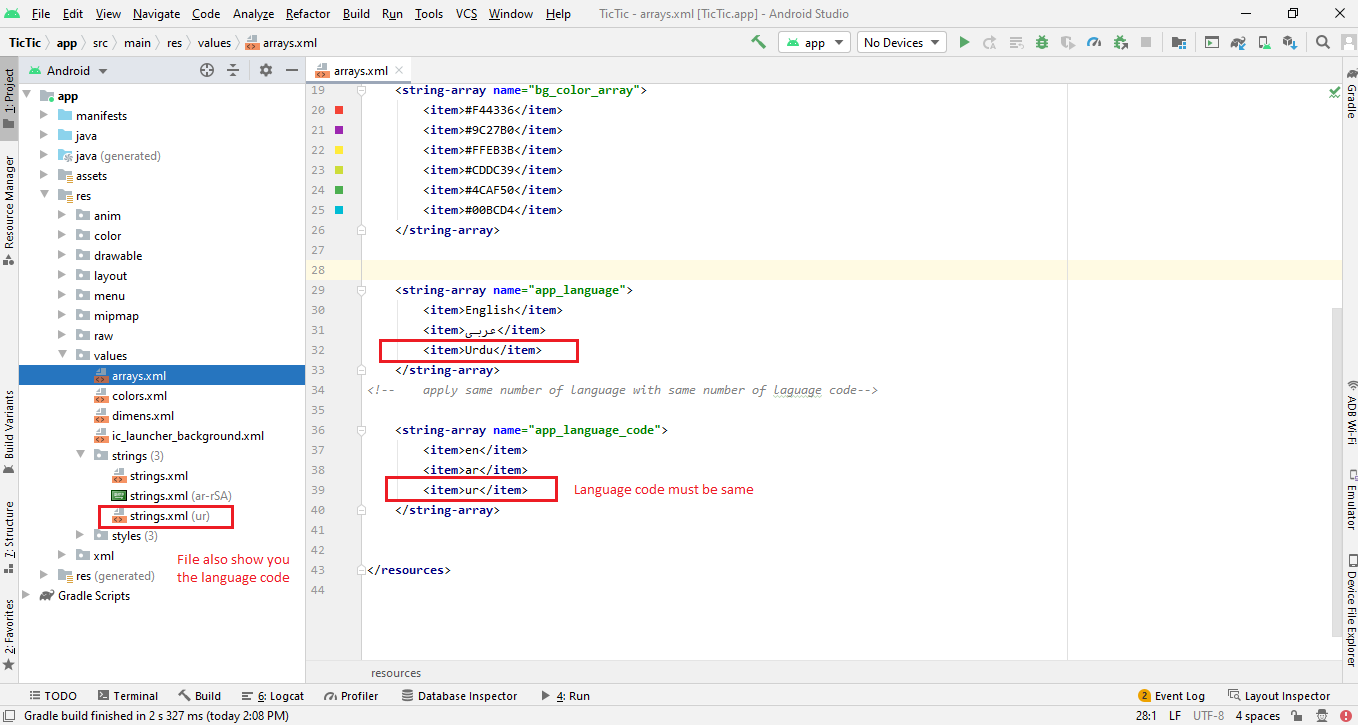
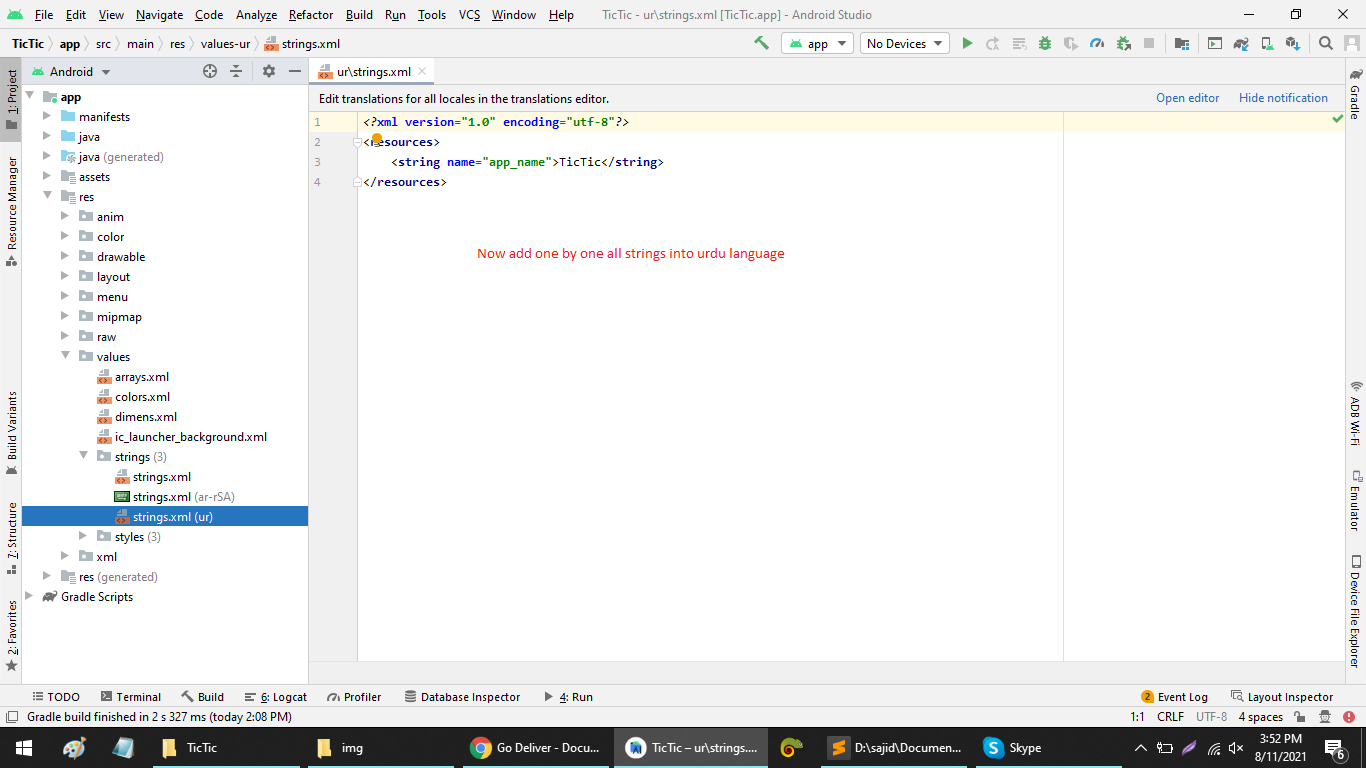
For Now application support only 2 languages ( English and Arabic). if you want to add more languages in app the follow the steps below.
Firebase Configuring
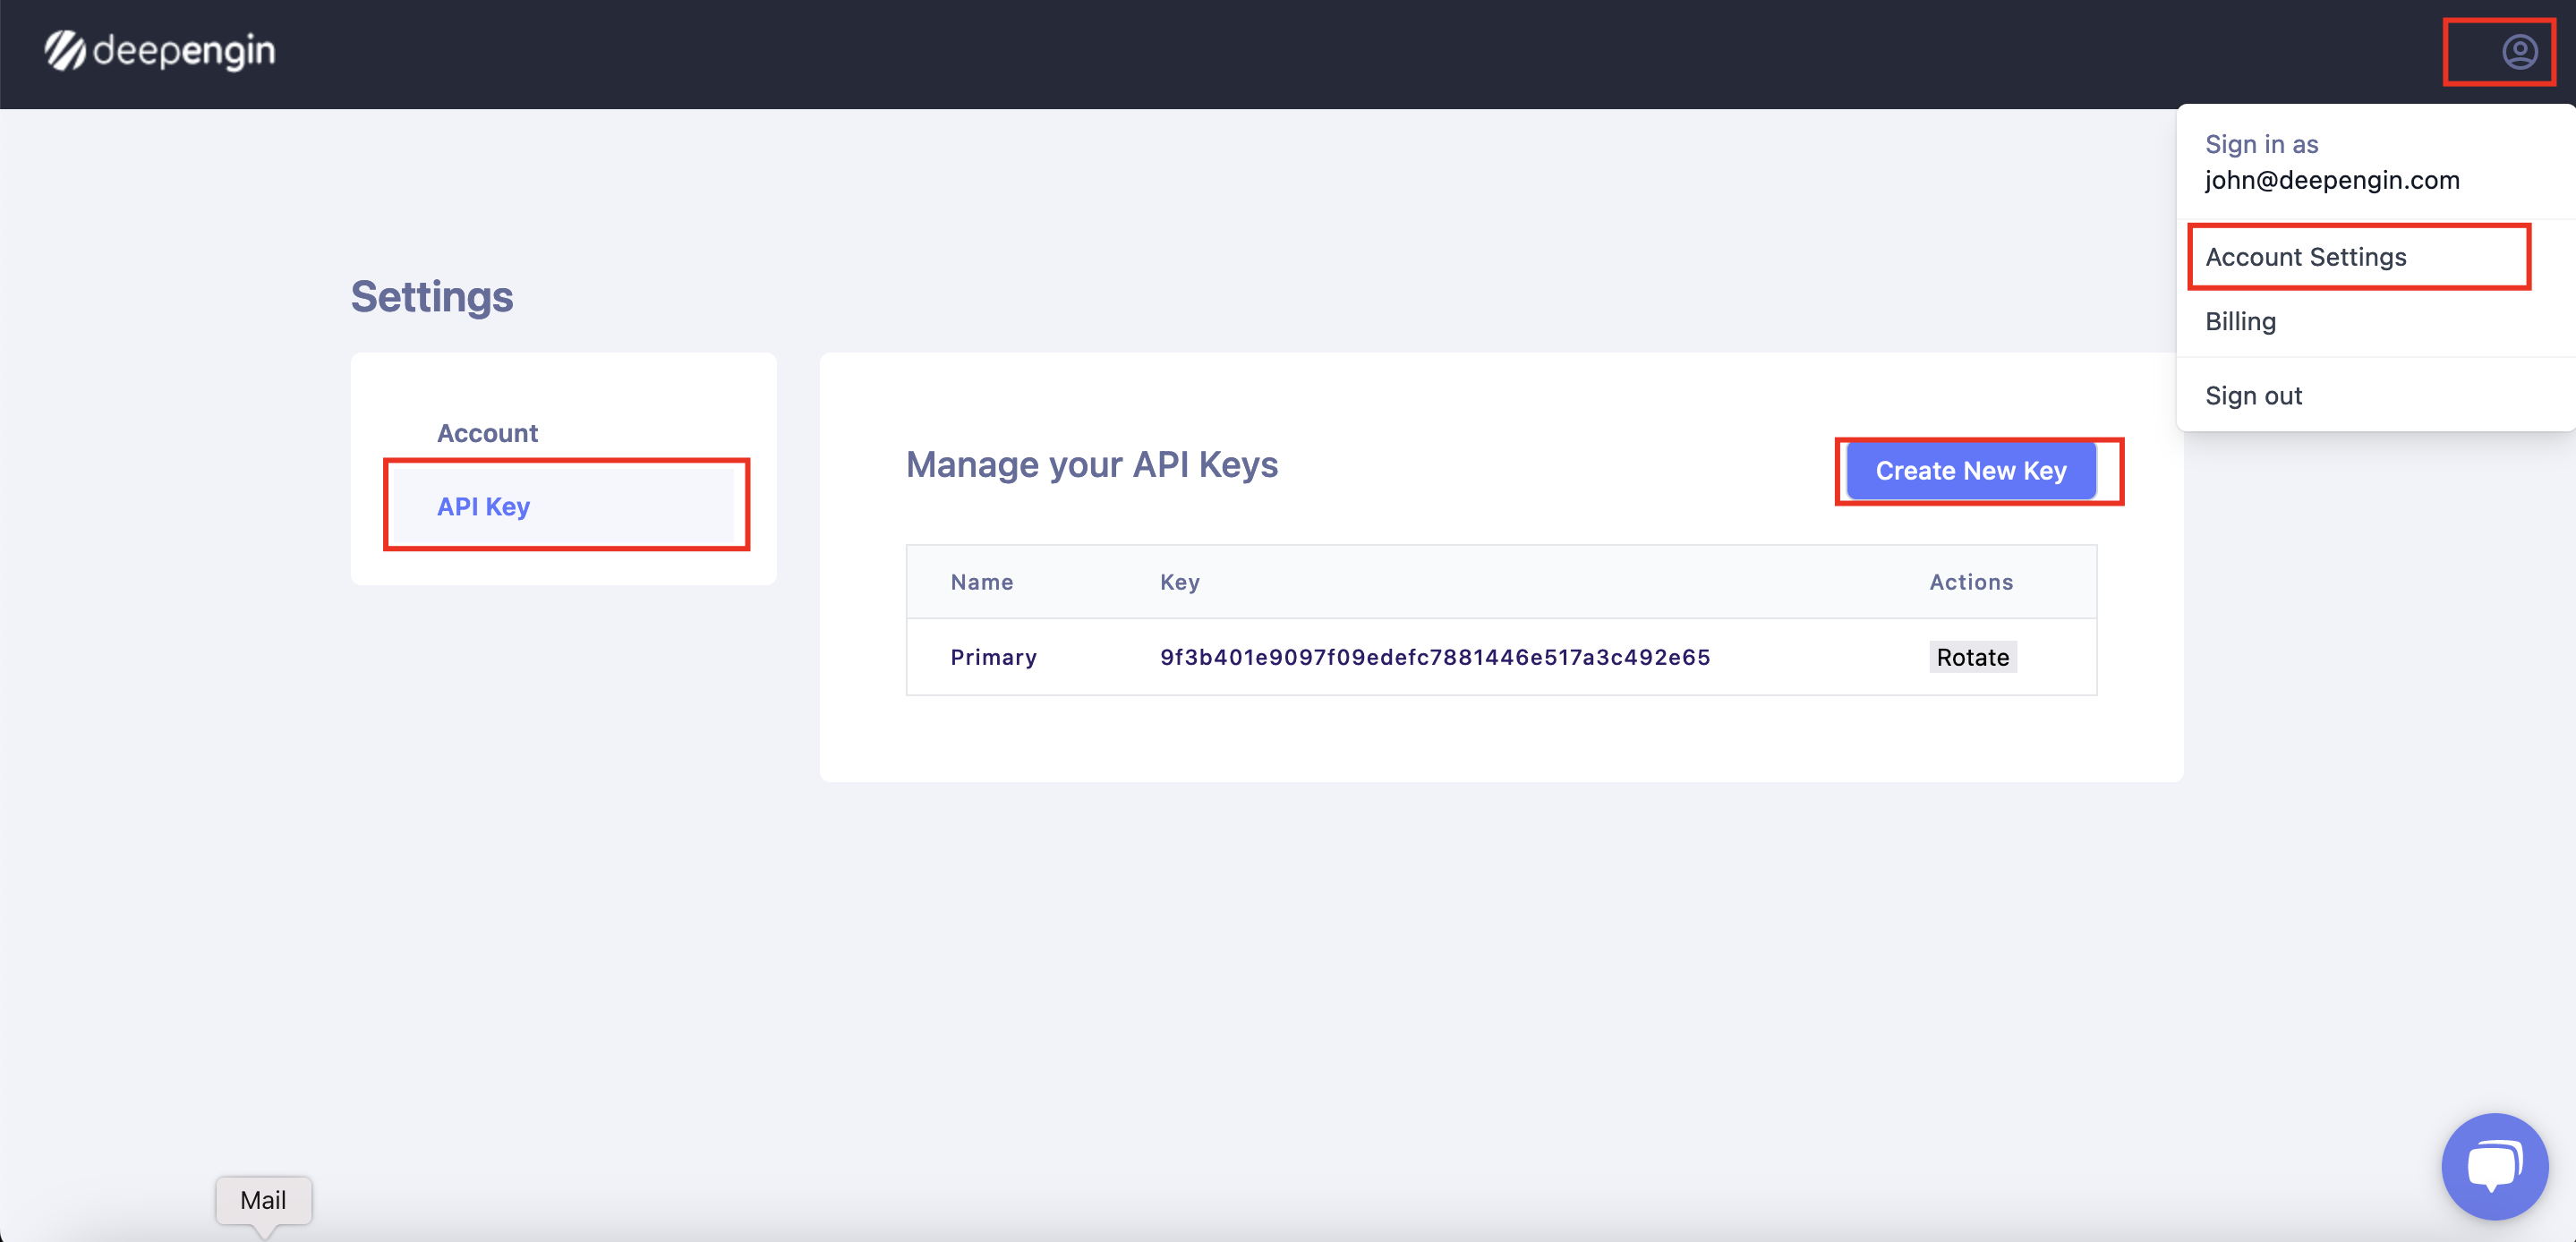
Nudity Detection (Deepengin.com)
Deepengin Configration
Add your Deepengin key in your mobileapp_api/app/Config/constant.php file
define('DEEPENGIN_KEY', 'key here');
define('DEEPENGIN_VIDEO_MODERATION_URL', 'https://videos.deepengin.com/v1/videoModeration');
Deepengin Configration Server Side
If you’re subscribed to Deepengin and want to enable video compression and detect nudity in videos, you’ll need to set up a cron job. The default configuration runs the cron job every minute, but you can adjust the schedule to suit your preferences.


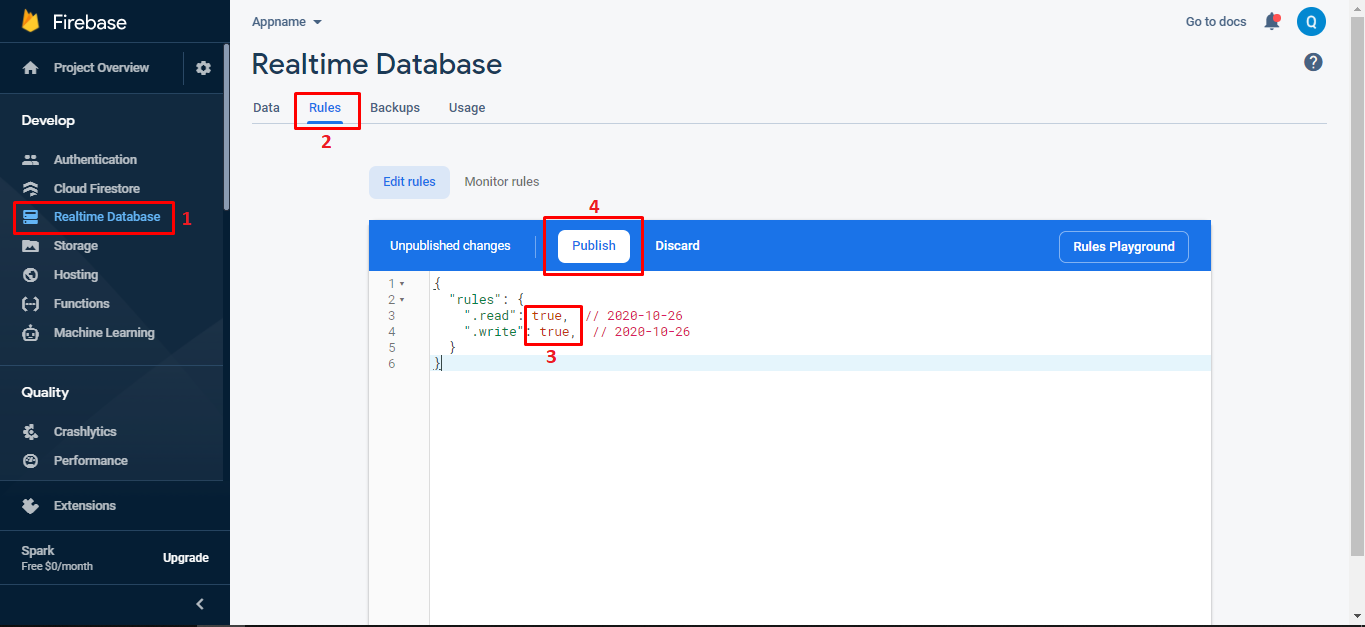
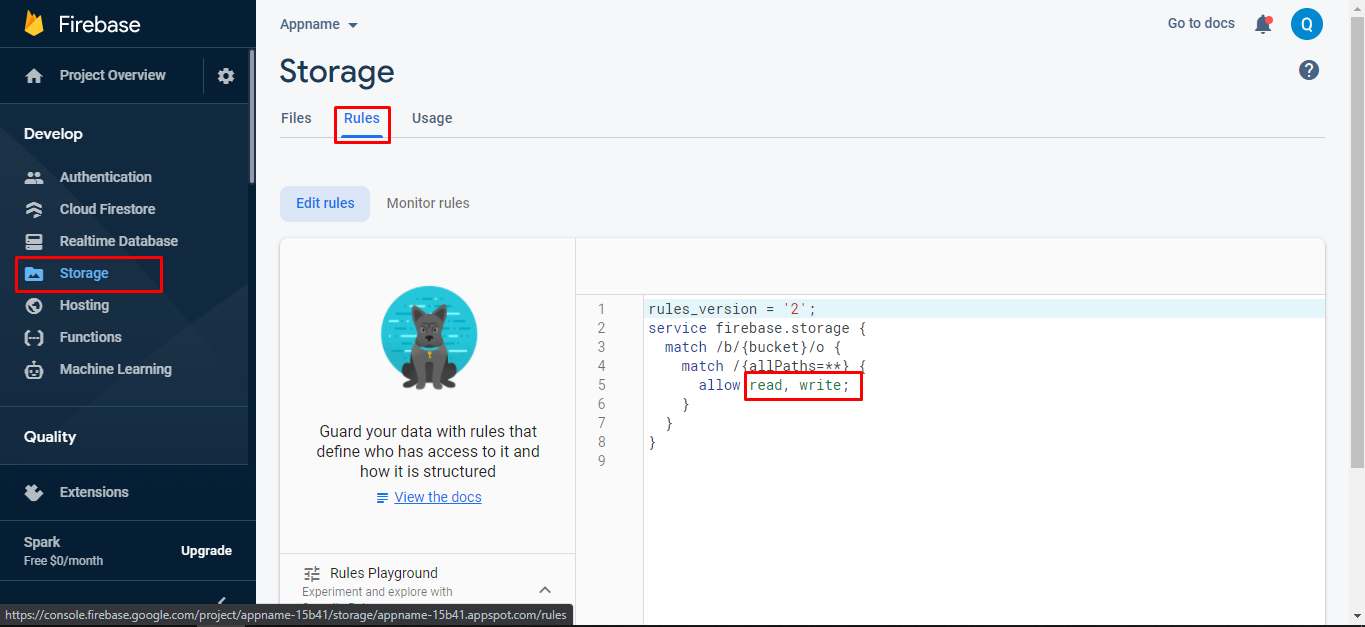
Change Firebase Database Rules
if you did not change the firebase rules some of the app functions will not work like chat or save/change pictures.
Get Firebase Server key
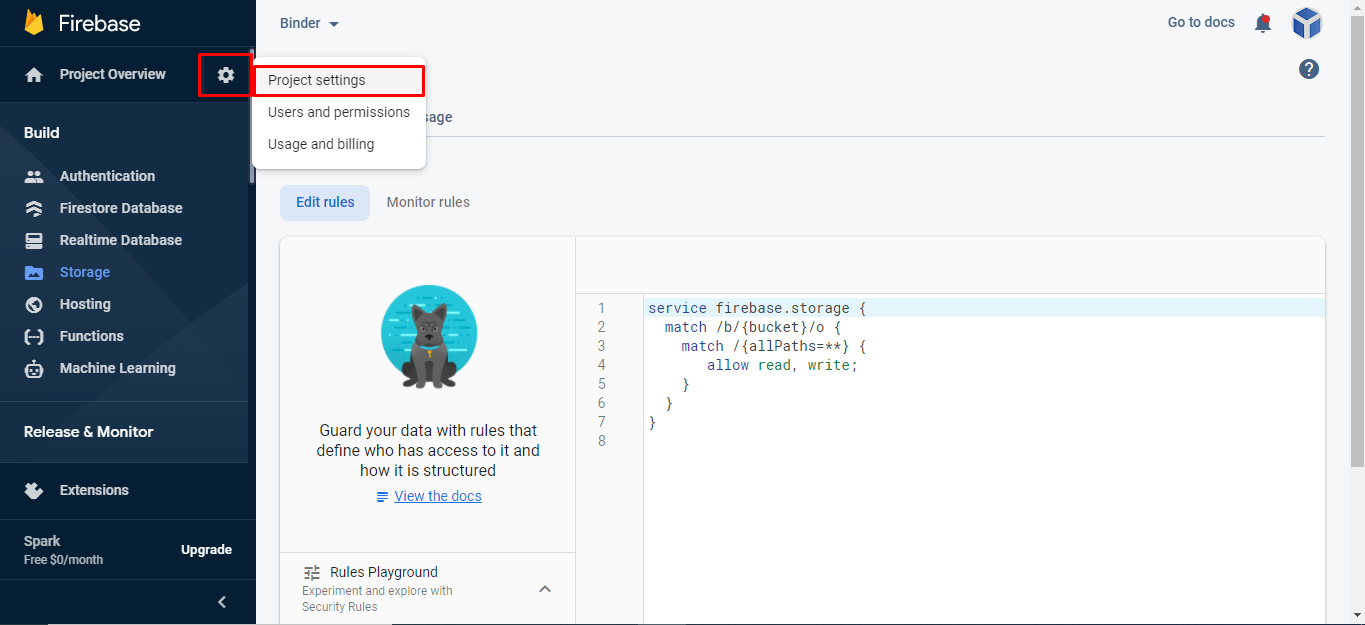
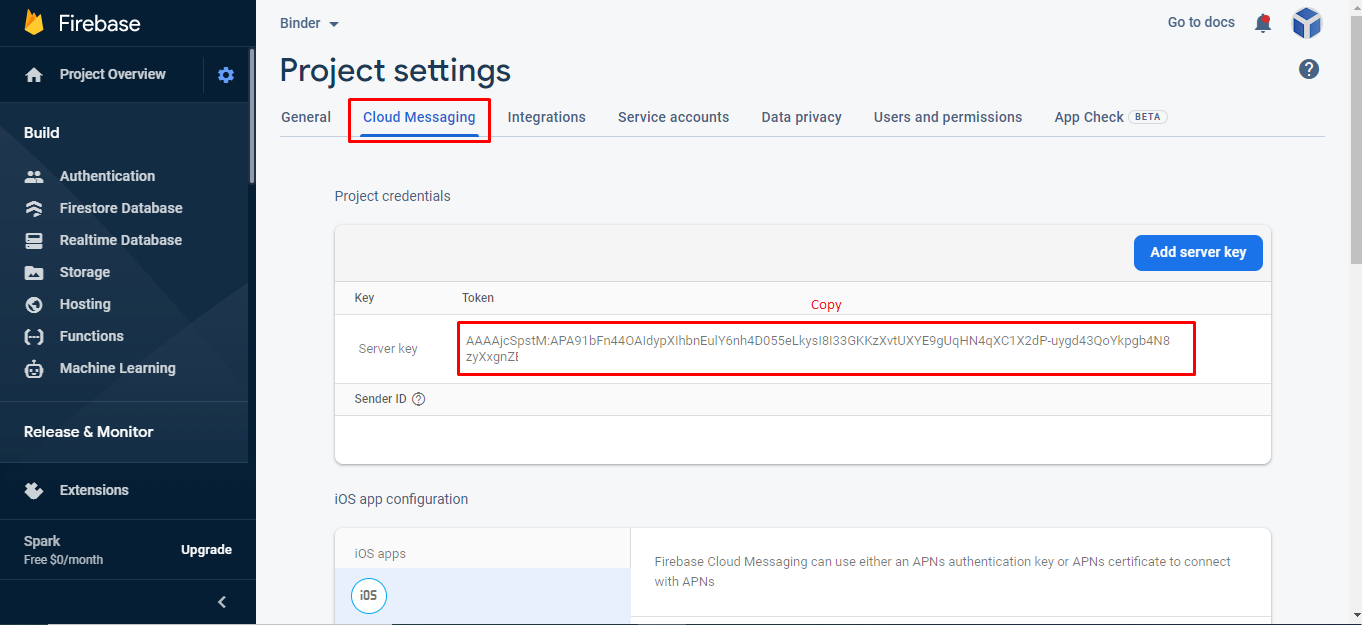
Add your Firebase server key in your mobileapp_api/app/Config/constant.php file

Add Release SHA1 key
After uploading your app on Google Play store get Release SHA1 key from Google Play store and paste into following Screen shot *Note: If you will not add Release SHA1 key then Phone & Google login will not work.
We have told you in Debug and Release key section how you can get SHA1 key from Google Play store
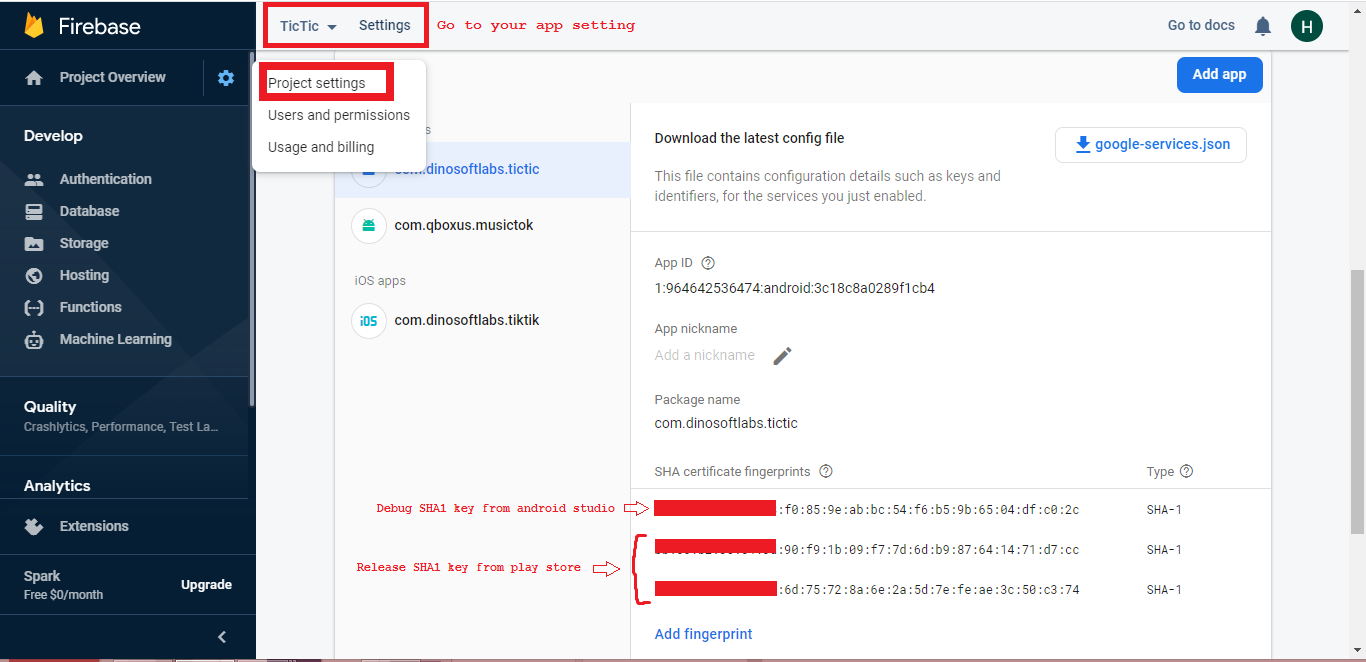
Debug and release Key
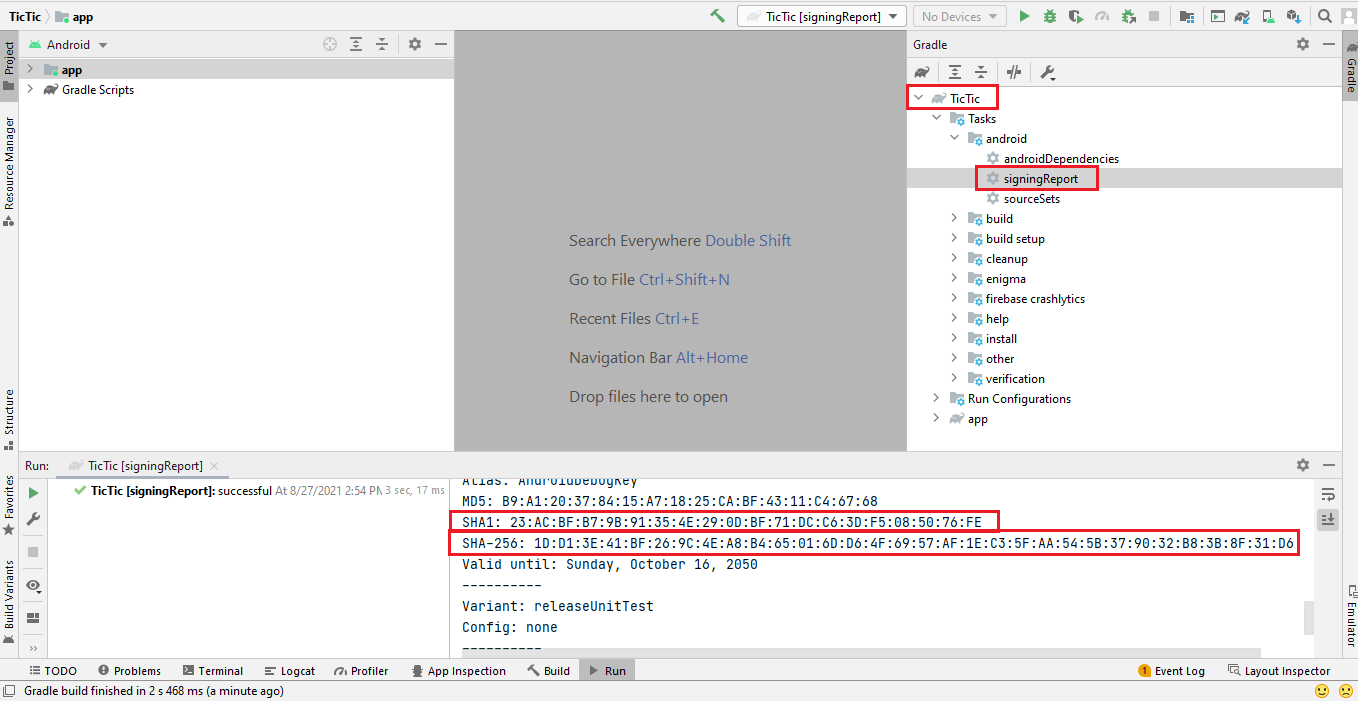
Before going to next you have to learn about the SHA1 key for both debug and release. if you are in the development mode then you will use the debug SHA1 key but when you going to publish the app on play store then you will have to use the SHA1 key of Release key.
First you will check your android studio version here i mentioned how you can check.
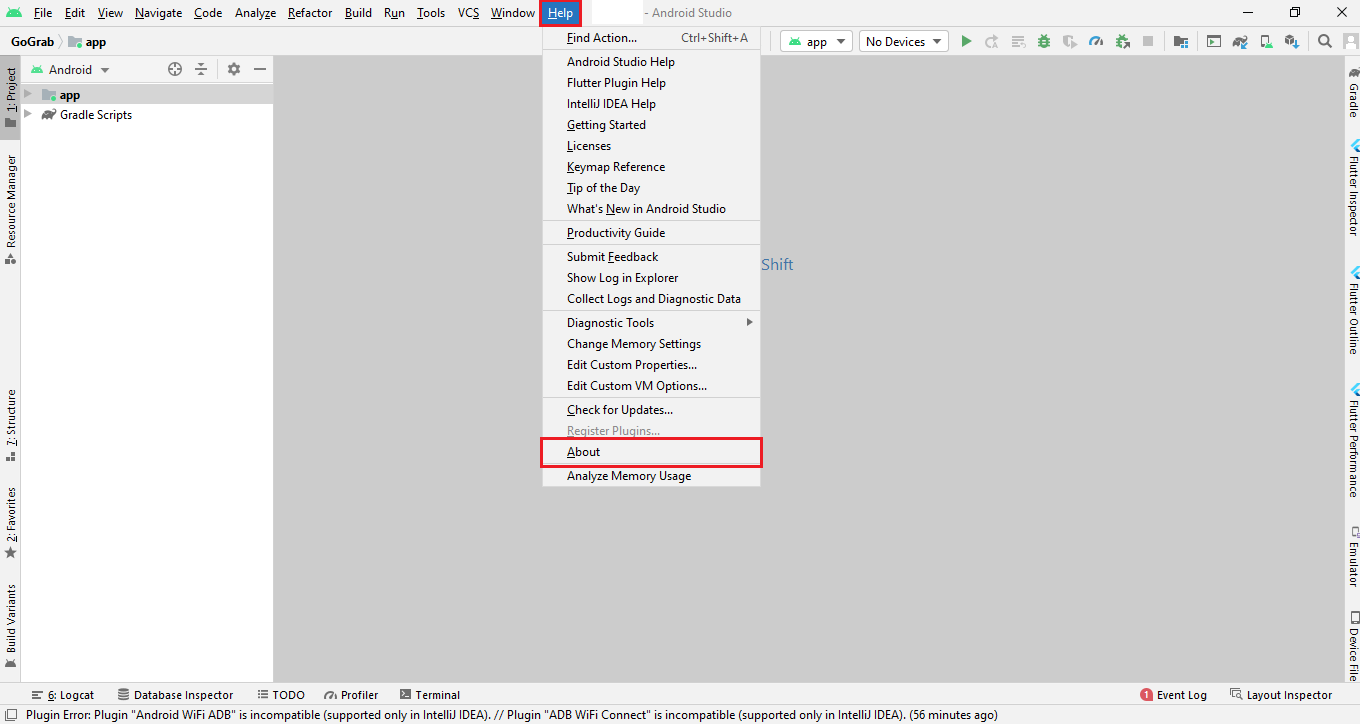
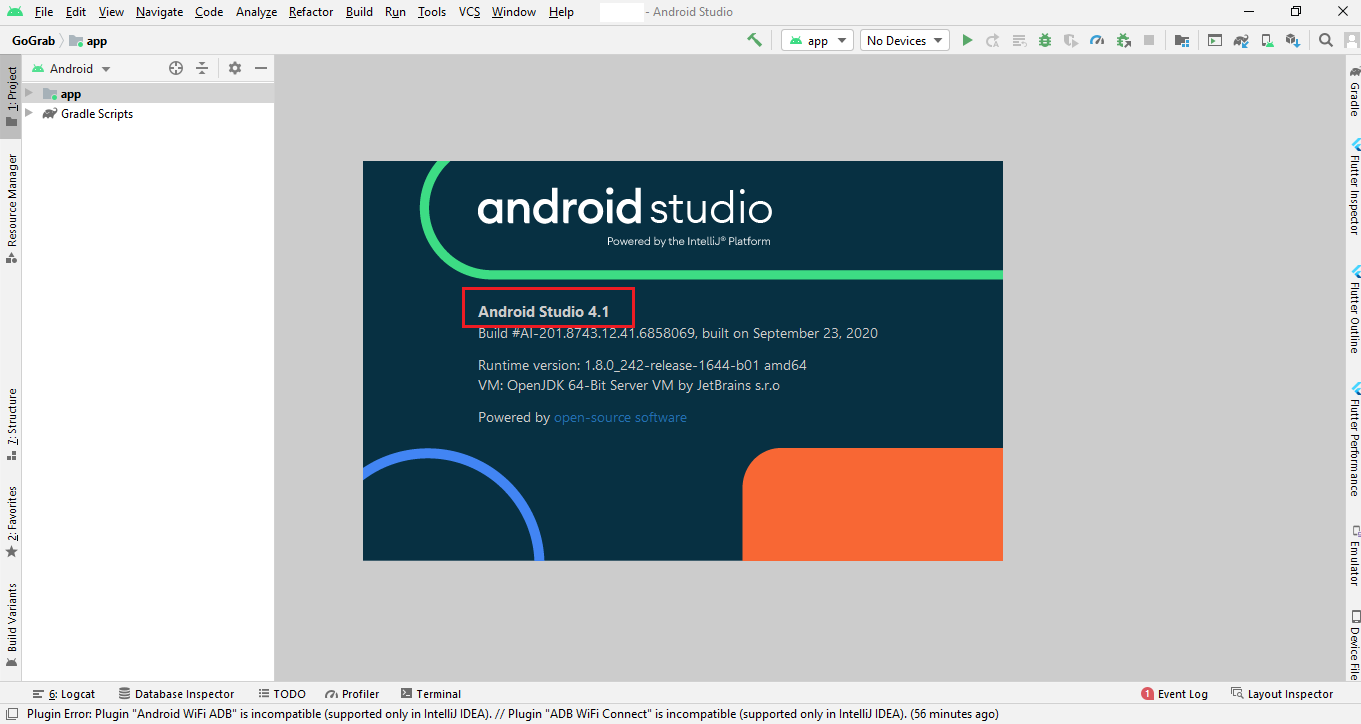
if your current android studio version is less than or equal to 4.1.1 then you will follow step 1 otherwise you will follow step 2 to get SHA1 key..
Step 1

Step 2
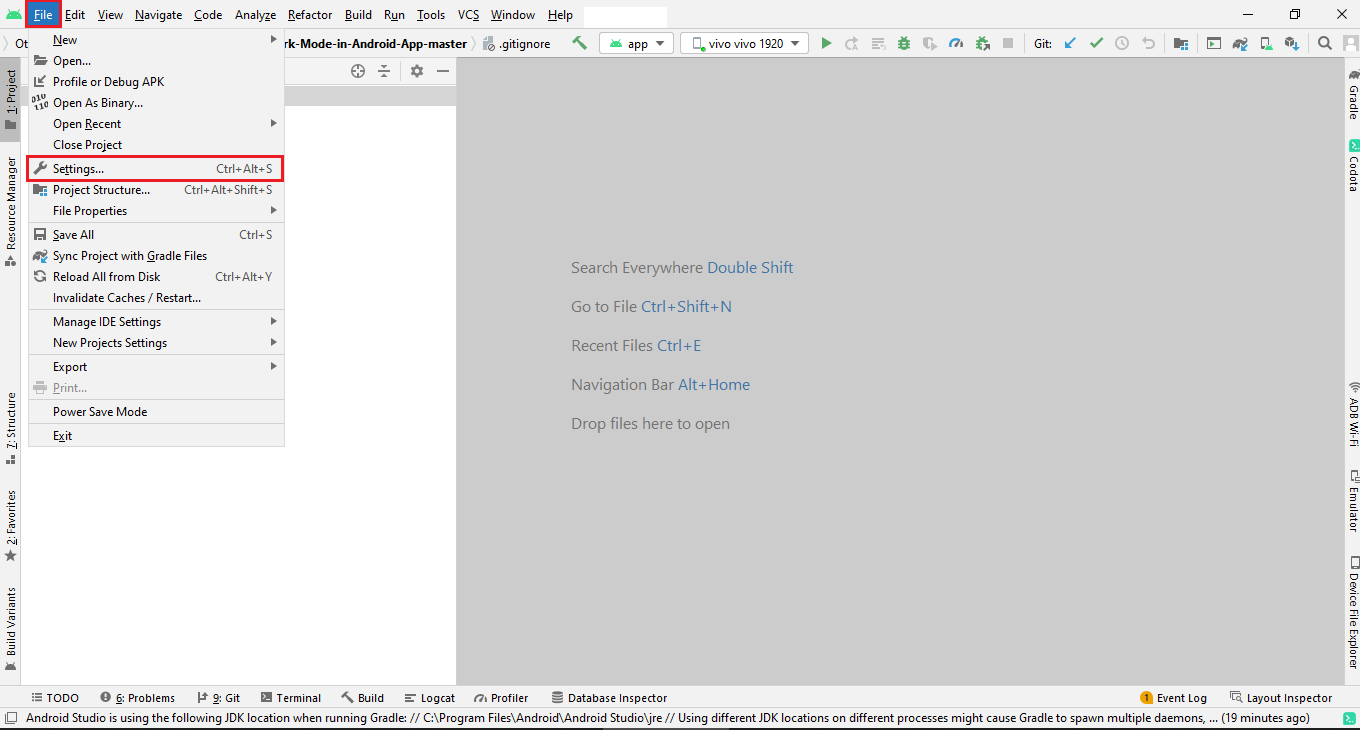
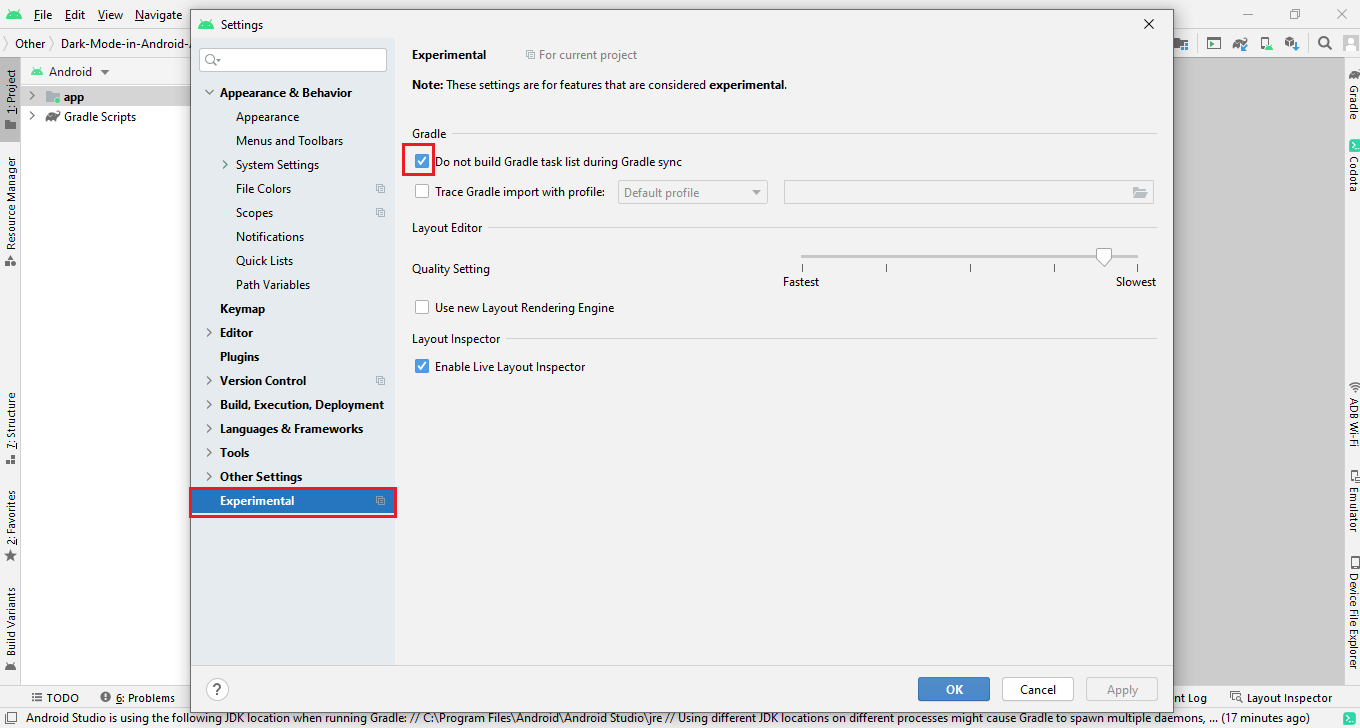
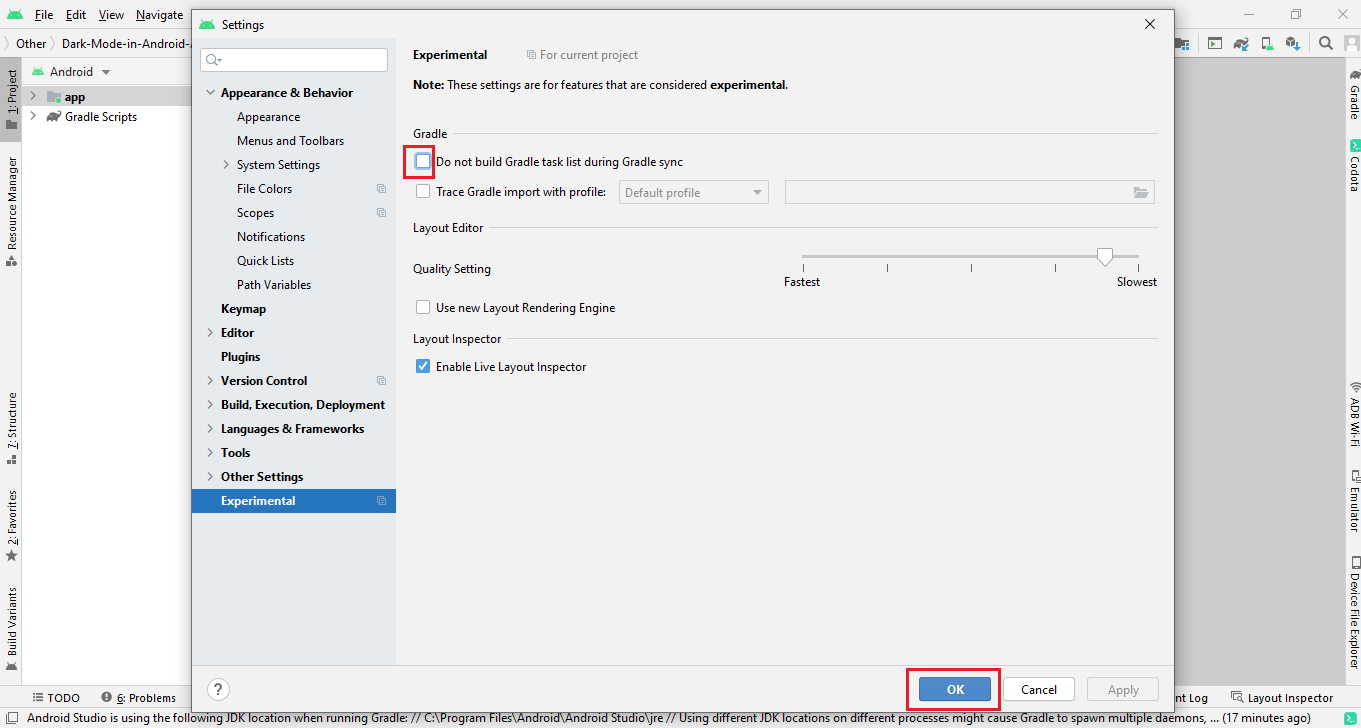

Method 1 How to get the SH1 key for the published app (Signed or release key)
Follow the steps
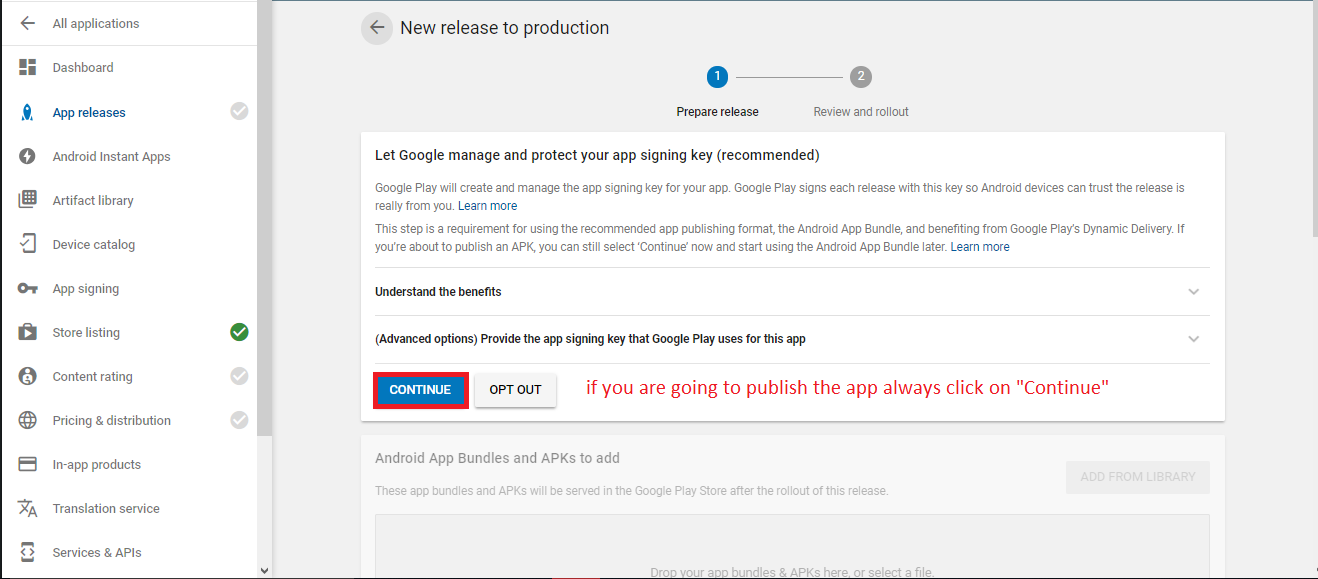
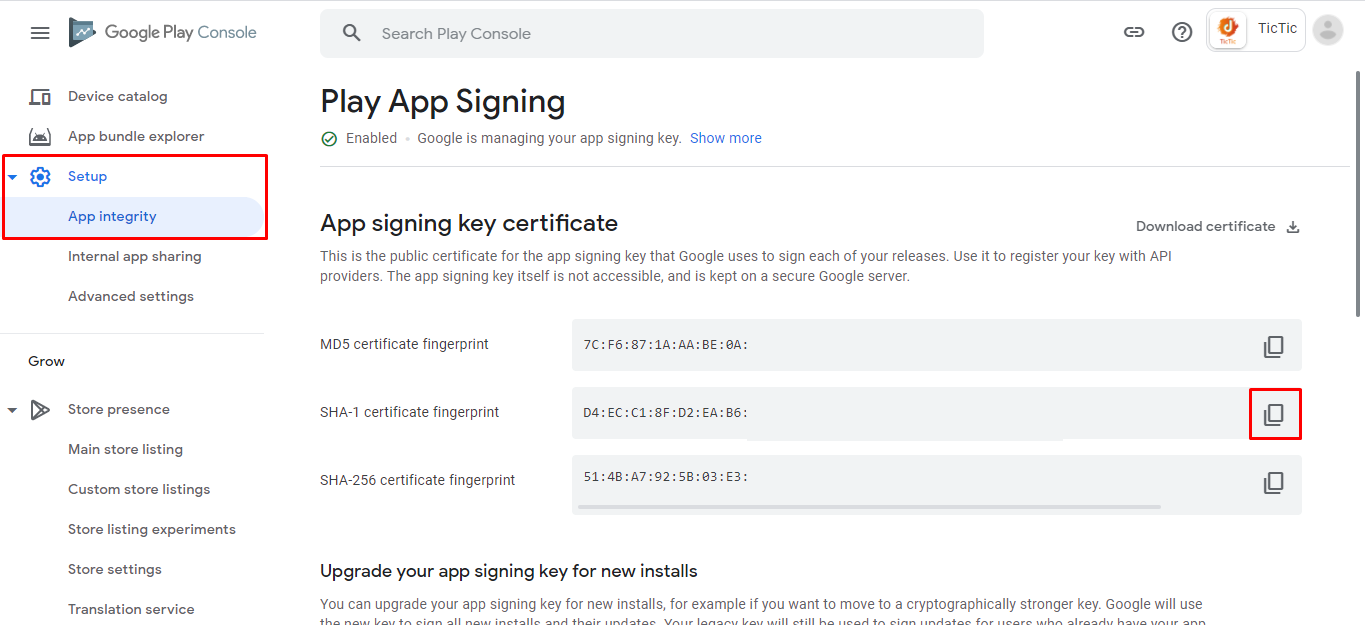
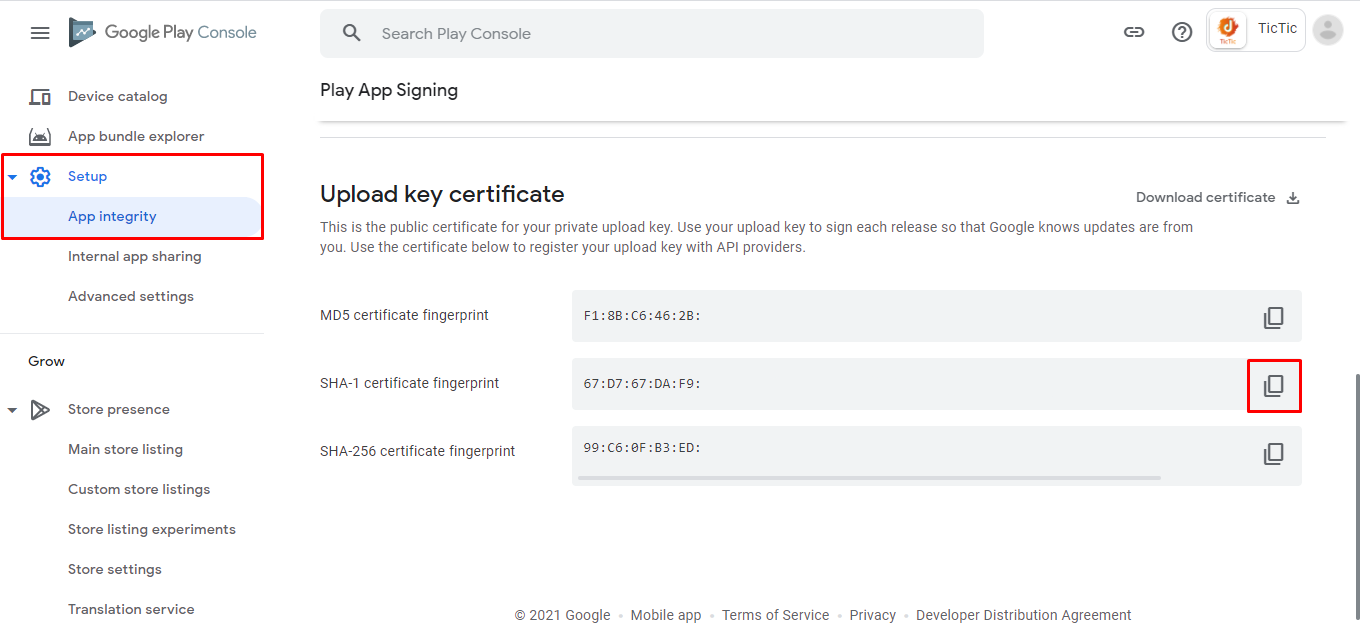
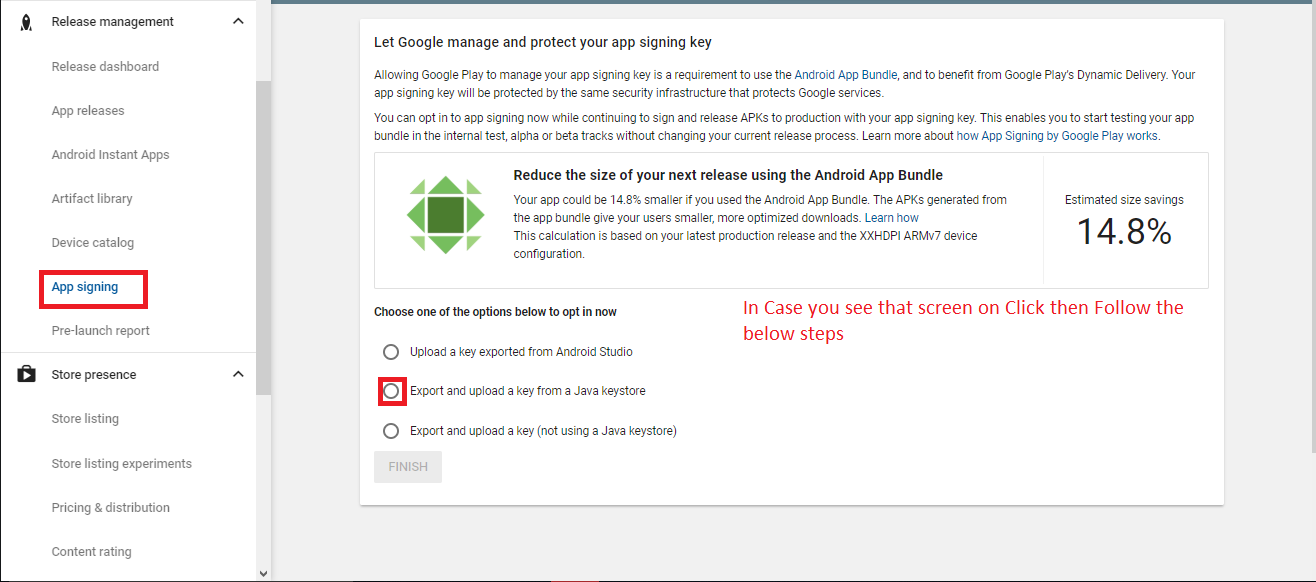
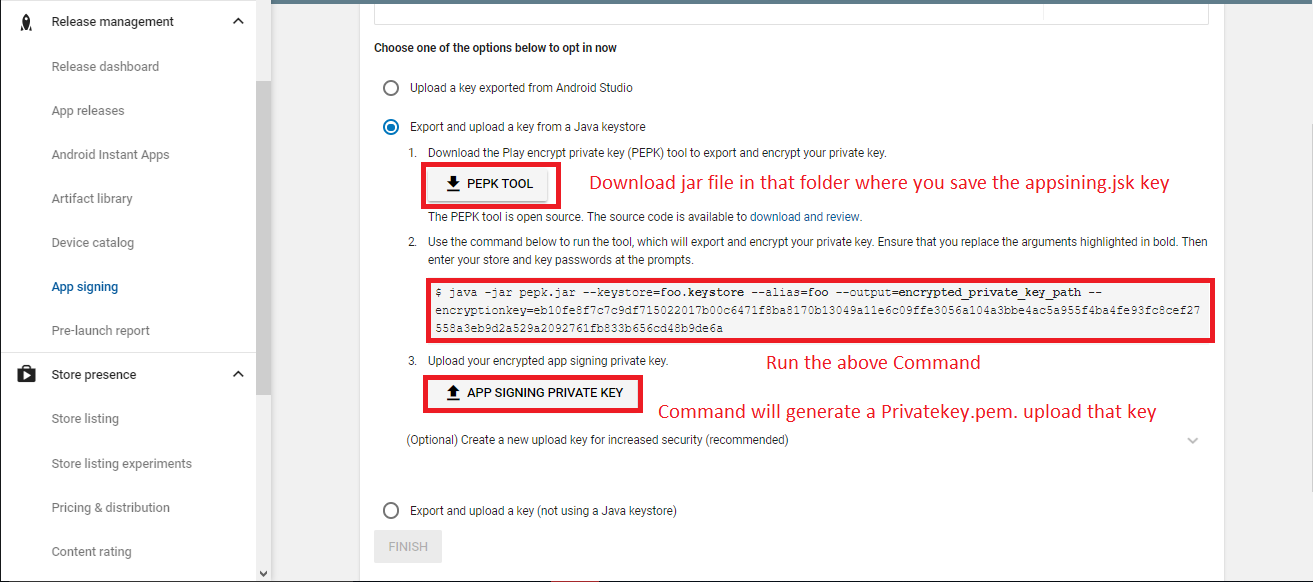
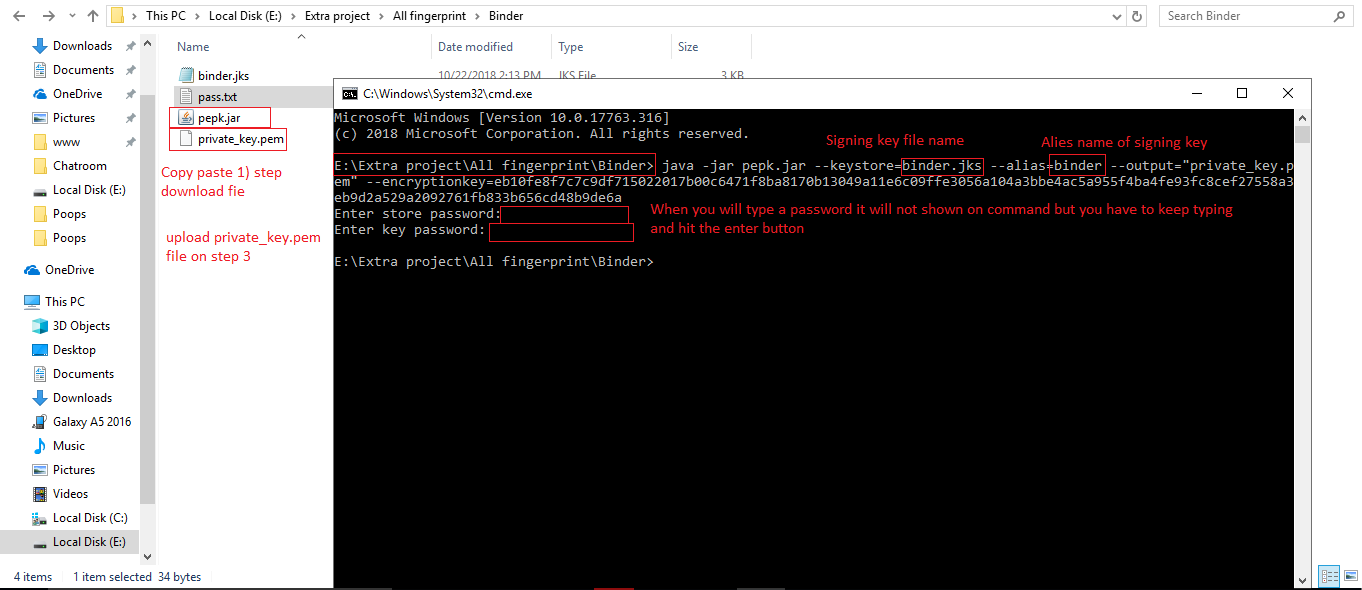
Method 2 How to get the SH1 key for the published app (Signed or release key)
To get realese sh1 contains two step.
Step1: you will generate your own app signing key Create signing key
Step2: Get the Sh1 key of app signing key
Get the Sh1 key. Run the below command on Command Promt
Facebook Login
You have to follow the steps
Here is the Helping video for setup facebook login
Step 1
Put you facebook id and App Secret here
Go to following web file
mobileapp_api/app/Config/constant.php

Facebook User Friends Permission
if you want to enable feature of invite friends from facebook in your app then follow below video and show into invite friends screen.
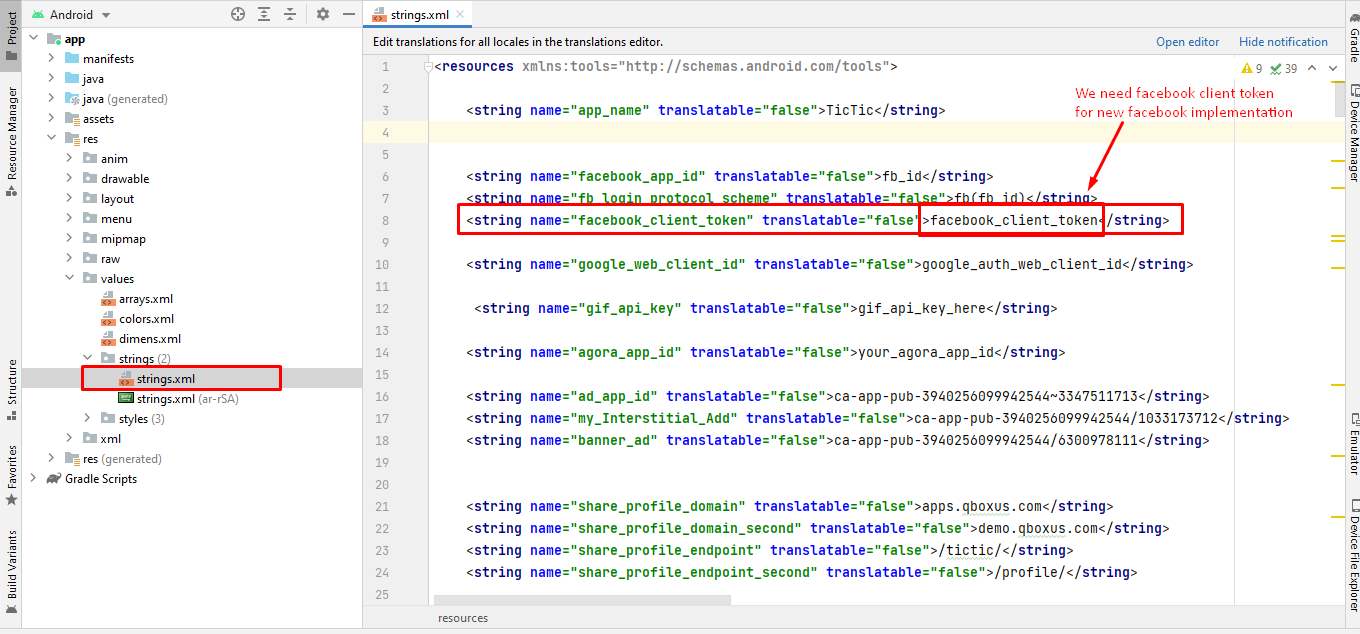
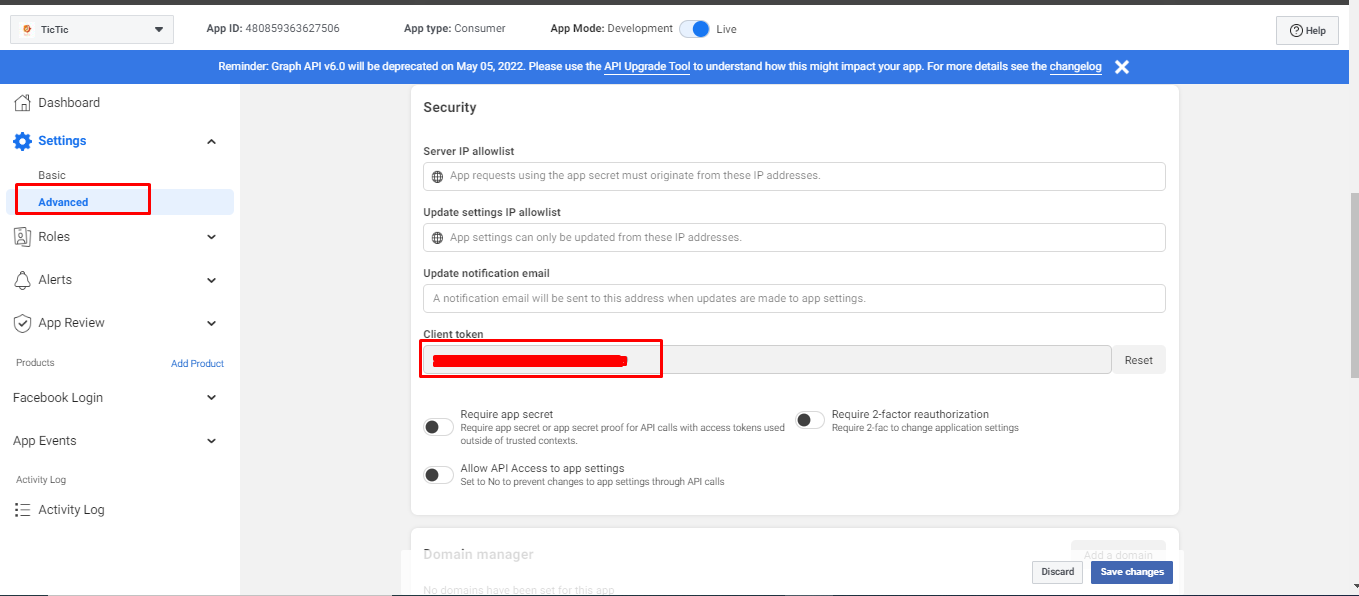
Facebook Login New Implementation
You have to follow these two images to update facebook client token
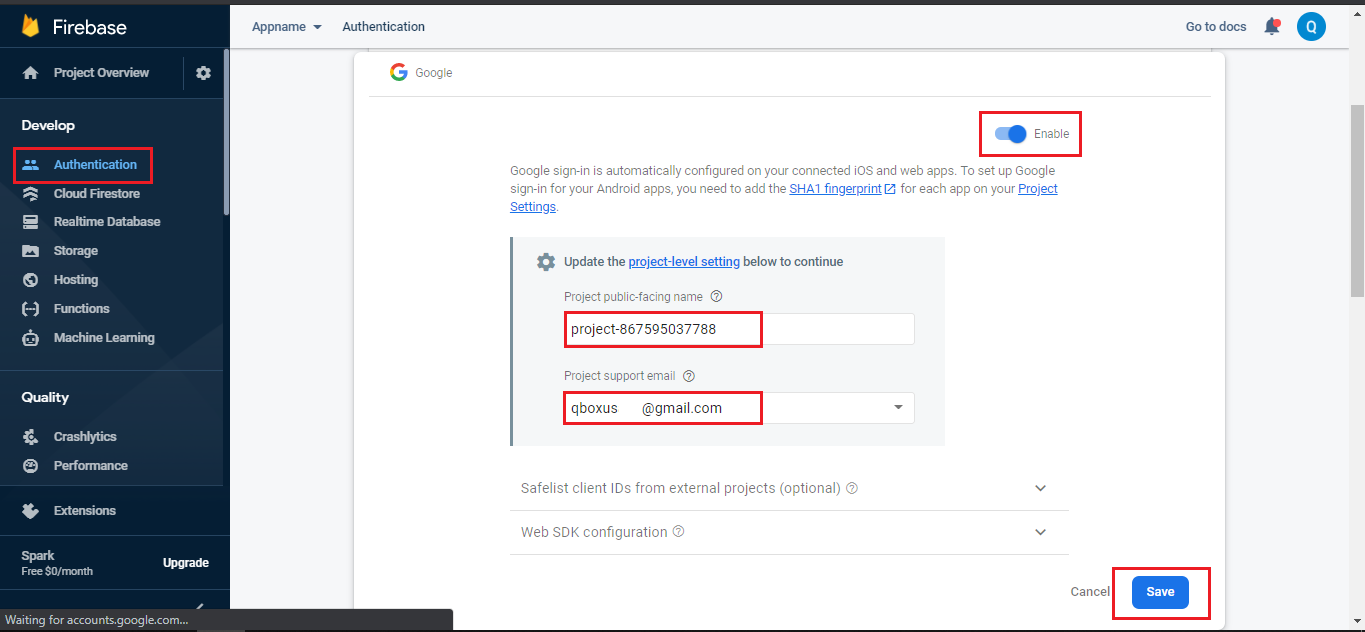
Google Login Configuration
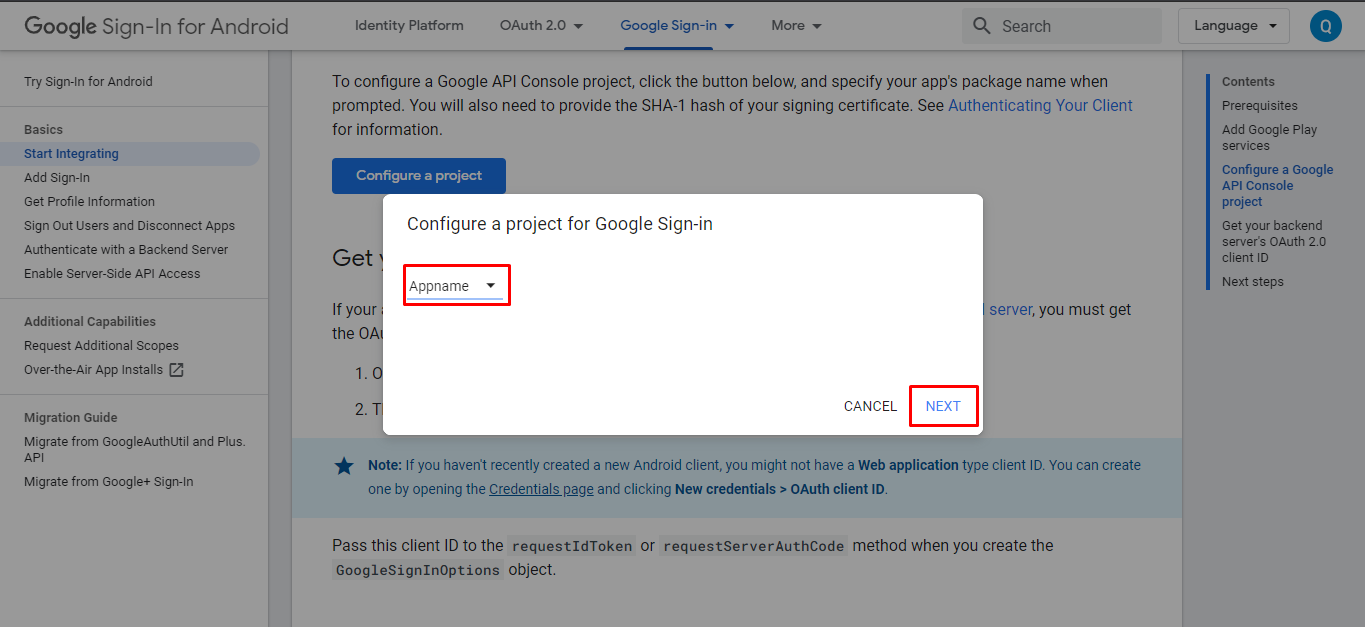
Here is the Helping video for setup google login
Step 1

Step 2
Step 3
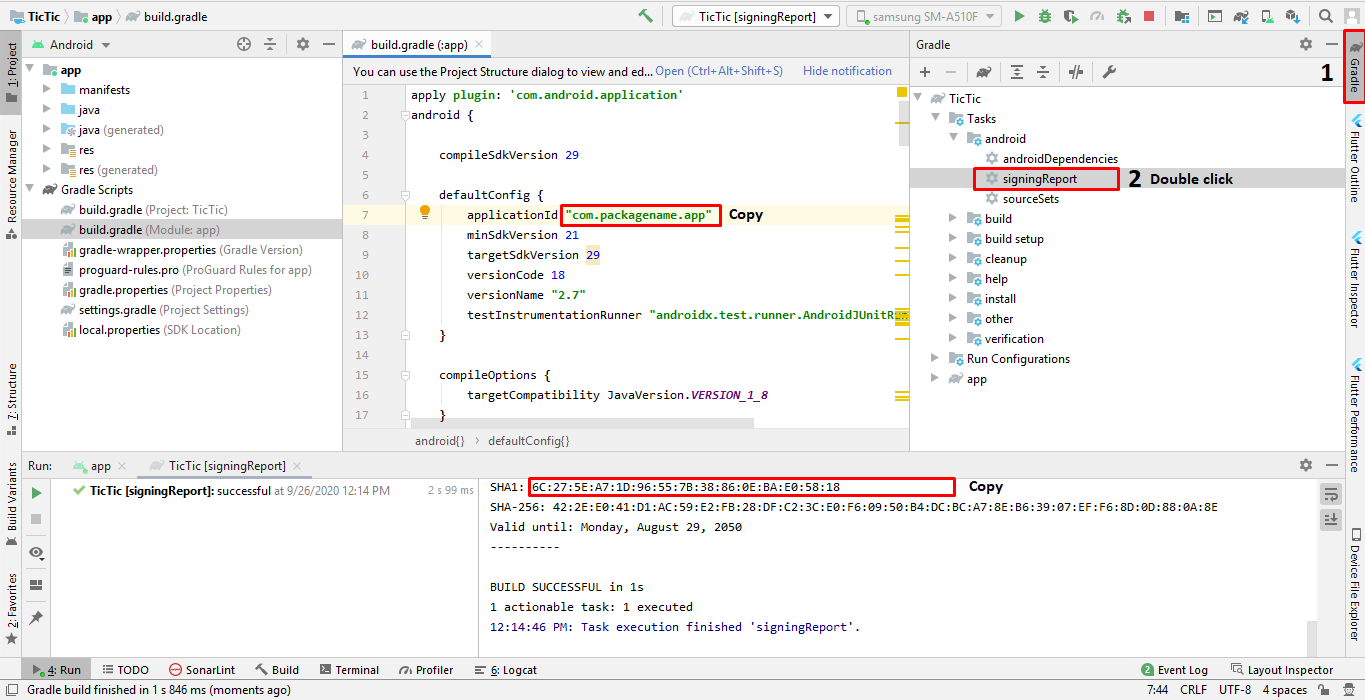
Step 4
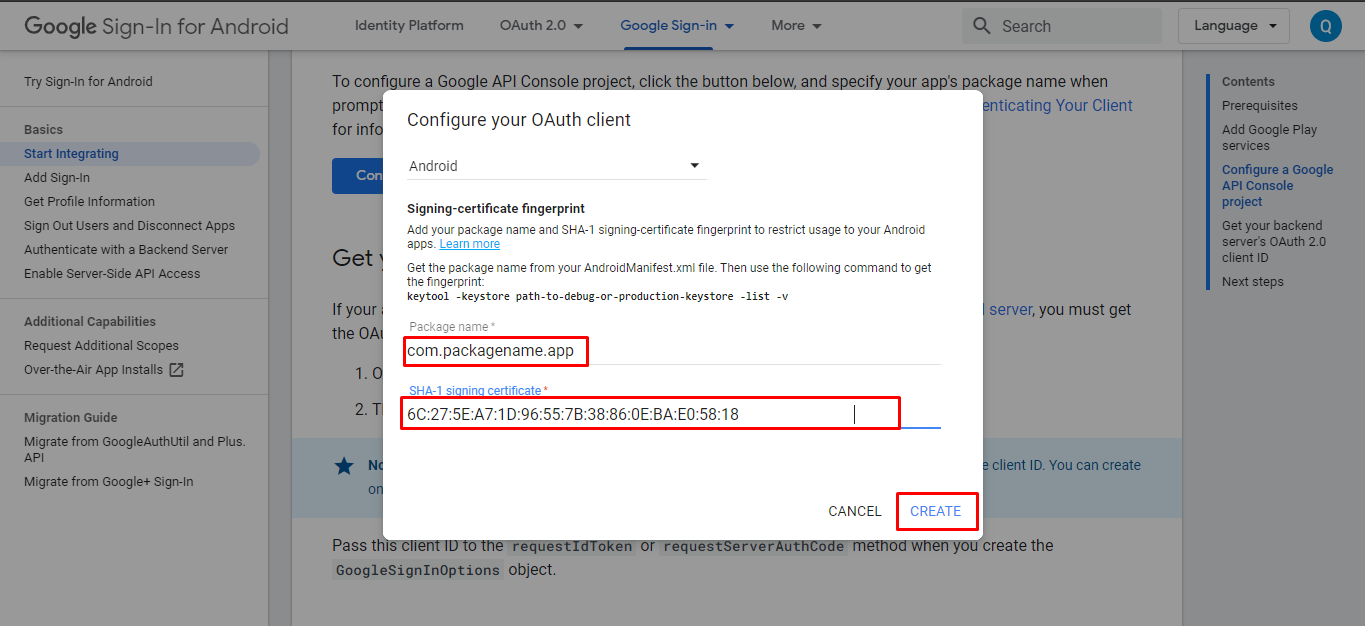
Step 5
Go to following web file
mobileapp_api/app/Config/constant.php

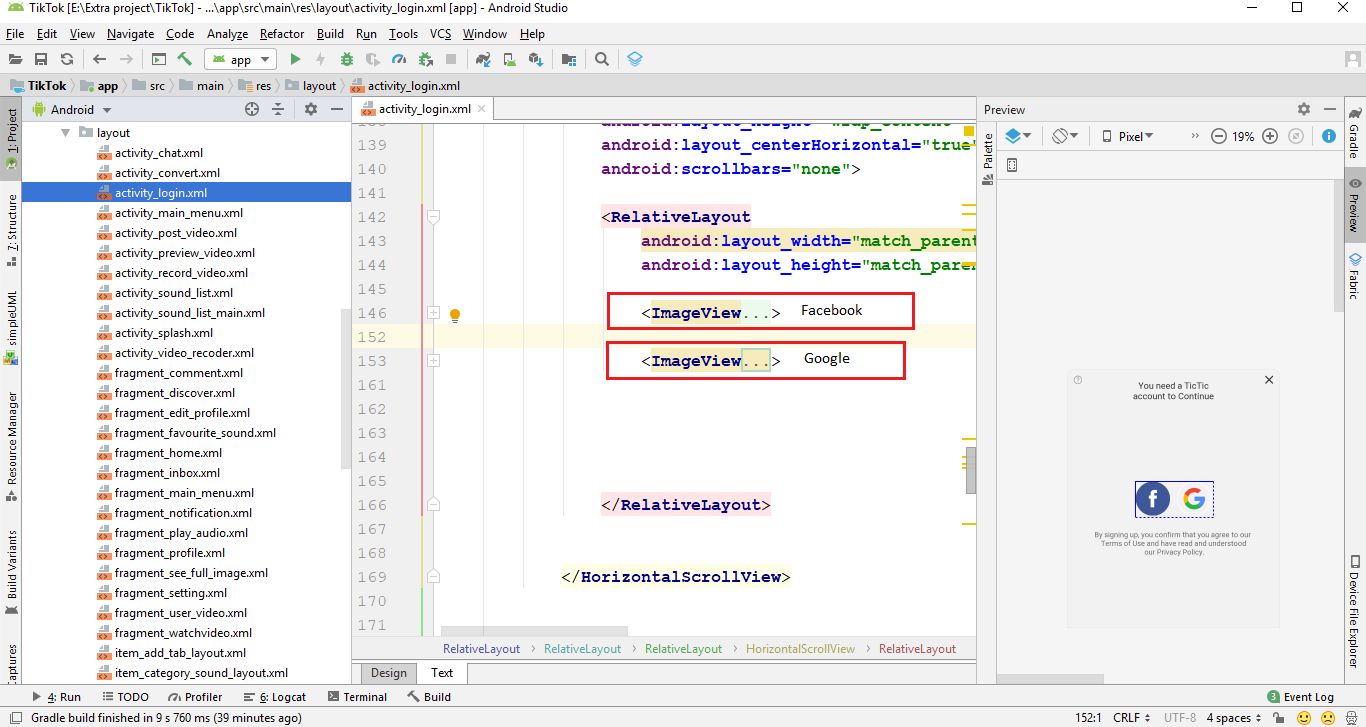
Hide Social Media Button
If you want to disable Social login
if you want to disable google login button you have to hide the mentioned View/Button just add android:visibility="gone"
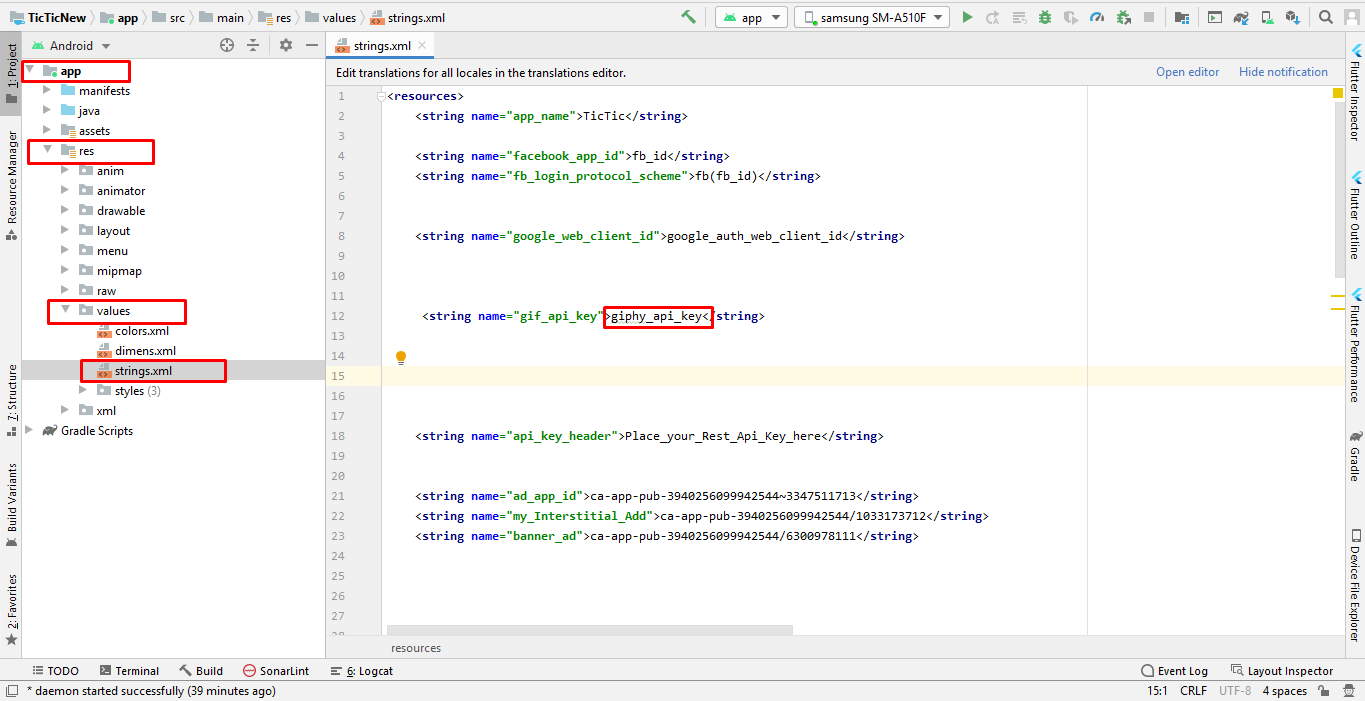
Giphy API & Integration
If you Here is the helping video for setup Giphy API
Click on developers.giphy.com . "Create an Account" and then "Create an App" then you get the API key "Copy the key" and paste at mentioned place in following screenshot.
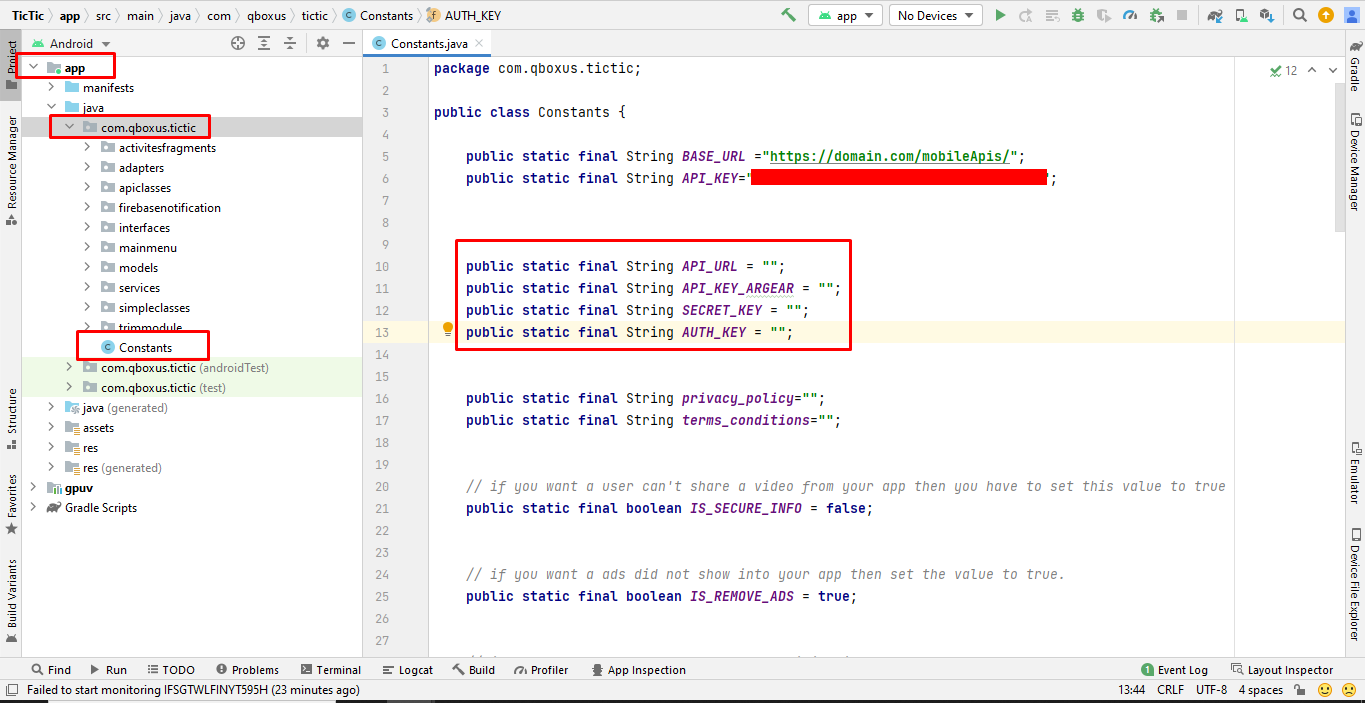
ARGear Configuration
For use AR Filter and 3D effects into your video editing we have use the ARGear SDK. So in below we will tell you which action you have to done for run video editing in to your project
Click on argear.io . "Create an Account" and then "Create an Project" then you get the keys "Copy the keys" and paste at mentioned place in following screenshot.
Google Places API Key and Encoded Key
Step 1
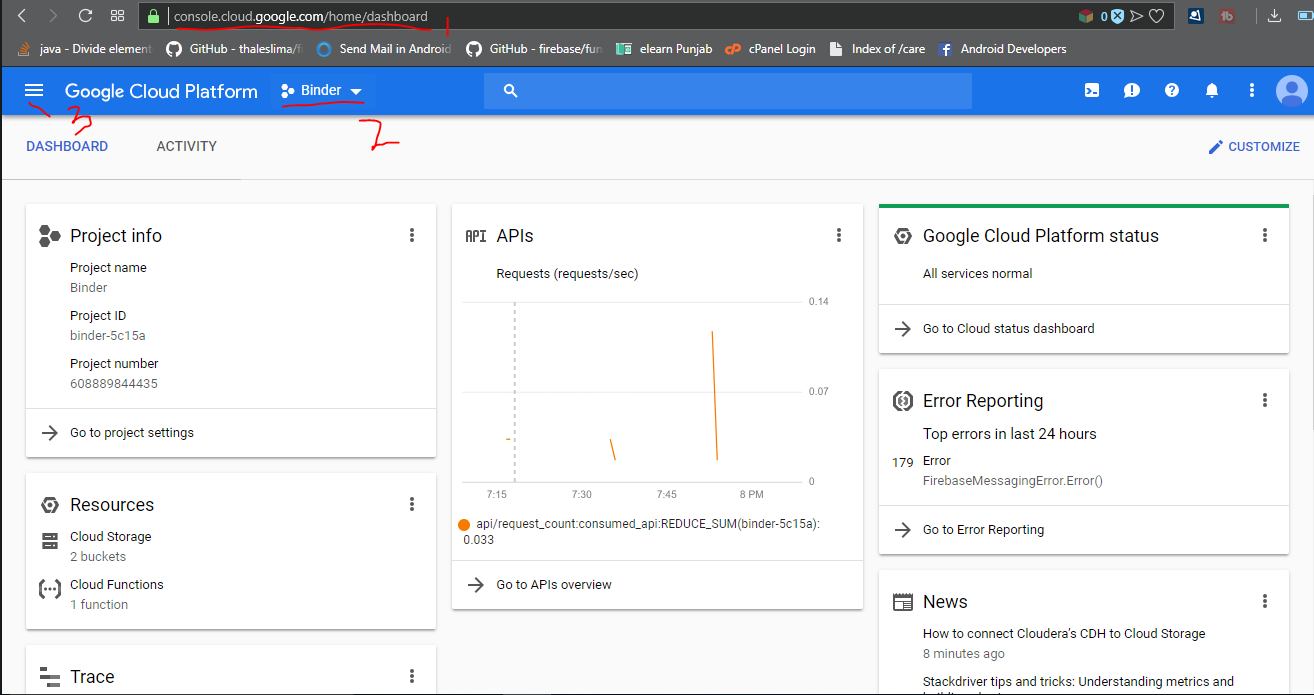
Go to Google Cloud console by clicking here.
1. Select your project
2. Click on API & Services

Step 2

Step 3
Enable both API's

Step 4
1. Select credentials
2. Create credential
3. API Key

Step 5
1. Click on SHOW KEY
2. Click on COPY BUTTON

Step 6
Convert your MAP API KEY into Encoded key by click here.
1. Paste your Map Api Key
2. Press ENCODED button
3. Copy encoded key

Step 7
Open your project in android studio
1. Open this file
2. Paste Map API Key
3. Paste your encoded key

Agora Configuration
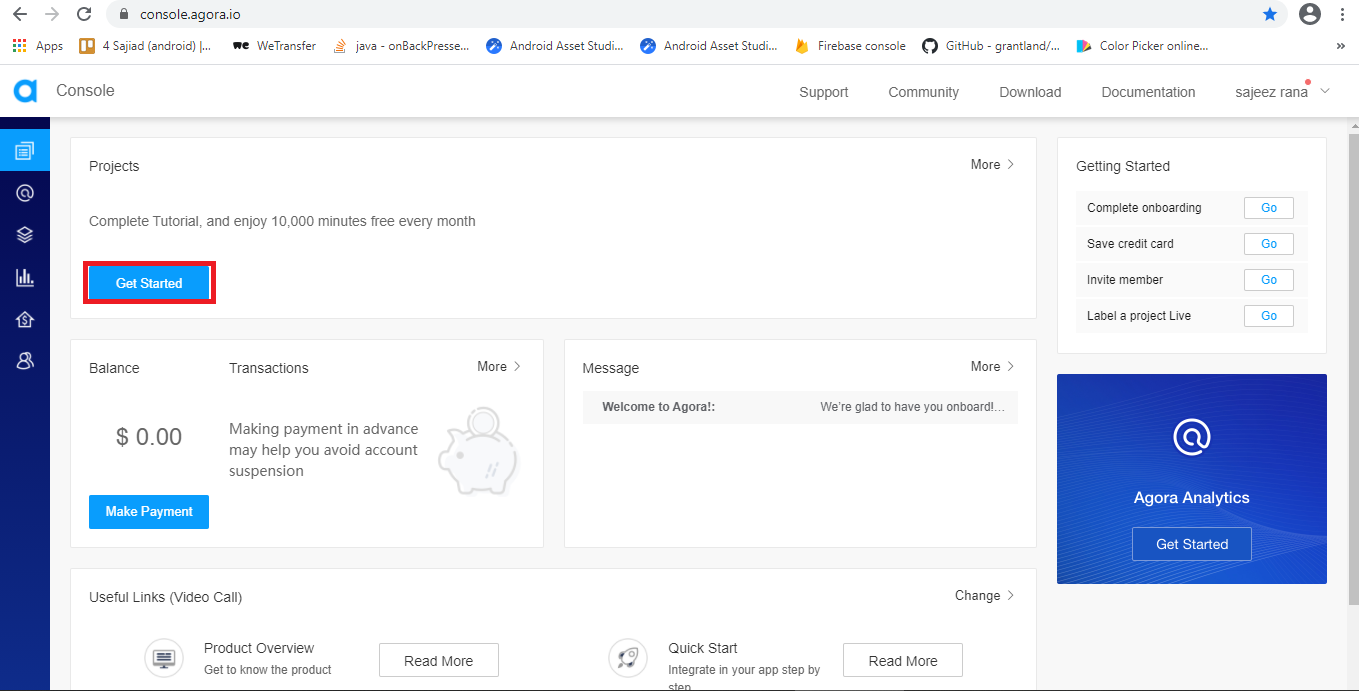
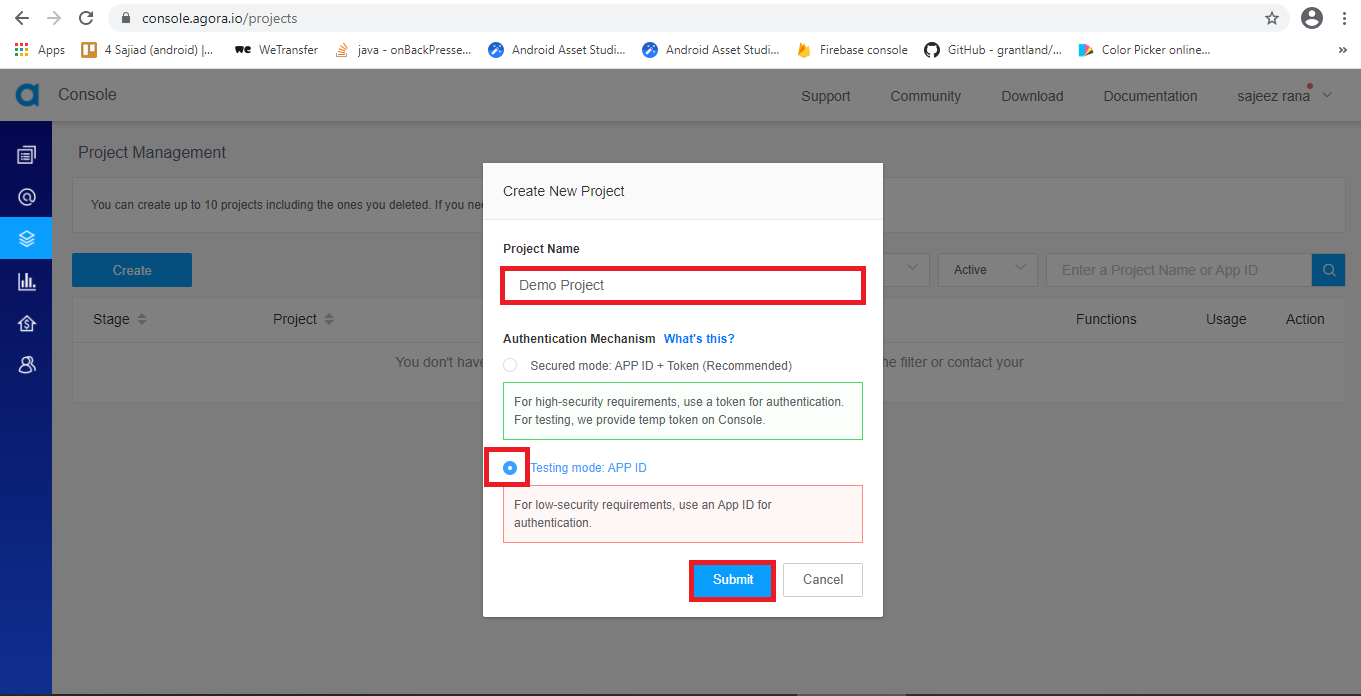
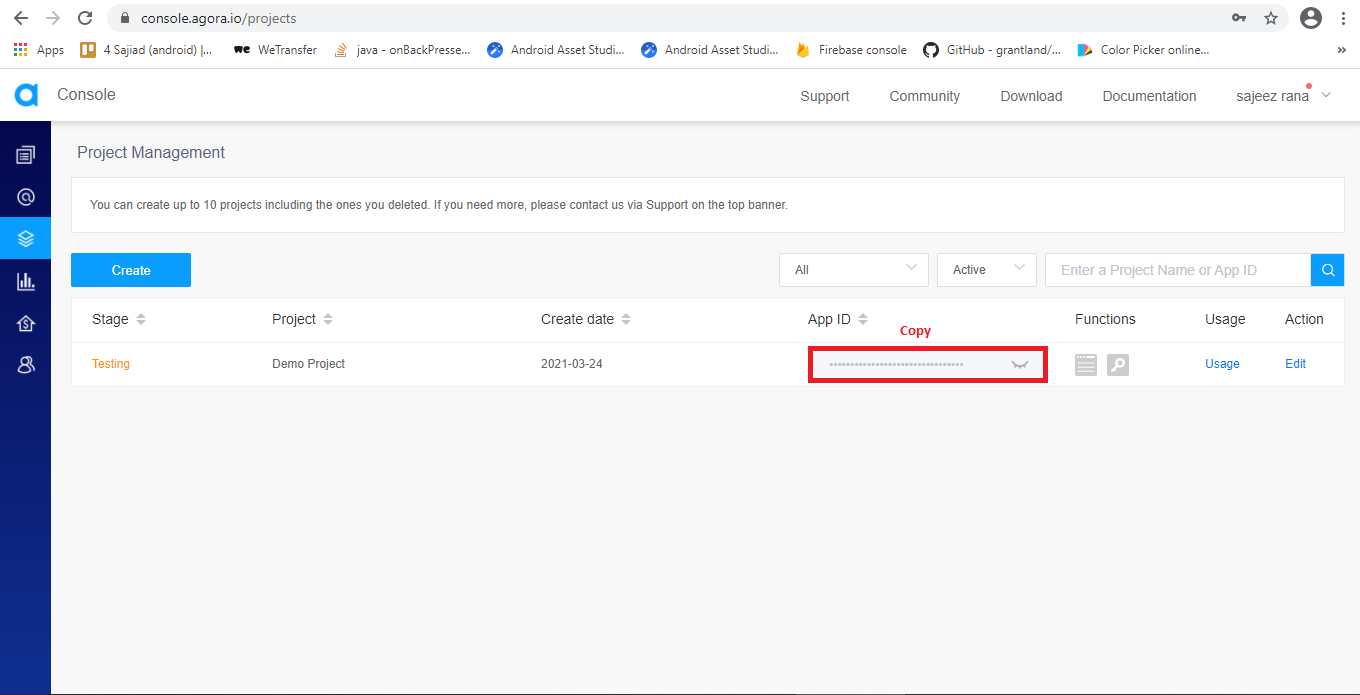
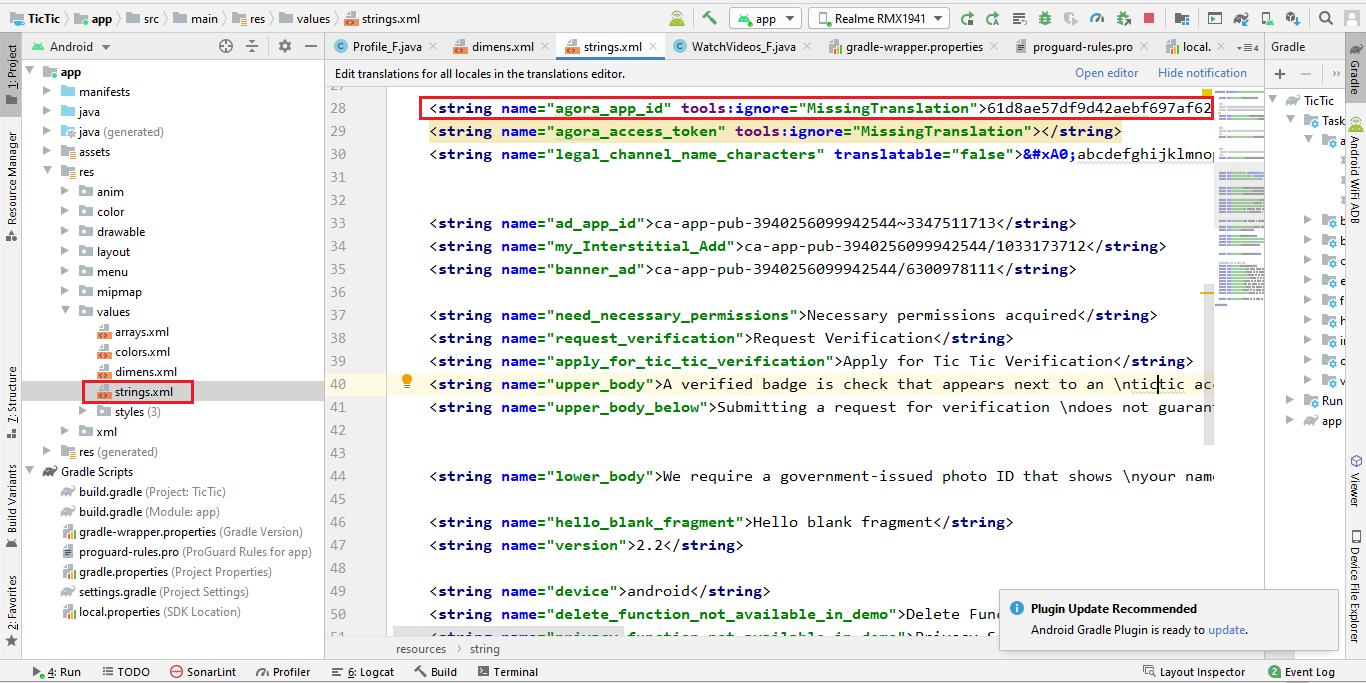
For live streaming video we have use the agora SDK. So in below we will tell you which action you have to done for run live streaming in to your project
Step 1
Go to https://sso.agora.io/v2/signup then sign up.
Step 2
After login you will go to agora dashboard their you can create your project
In-app Purchases
Follow below steps to make product Id for In App Purchase


Enable Deep linking
For enable deep linking openassetlinks.json file and right click on the file and save it

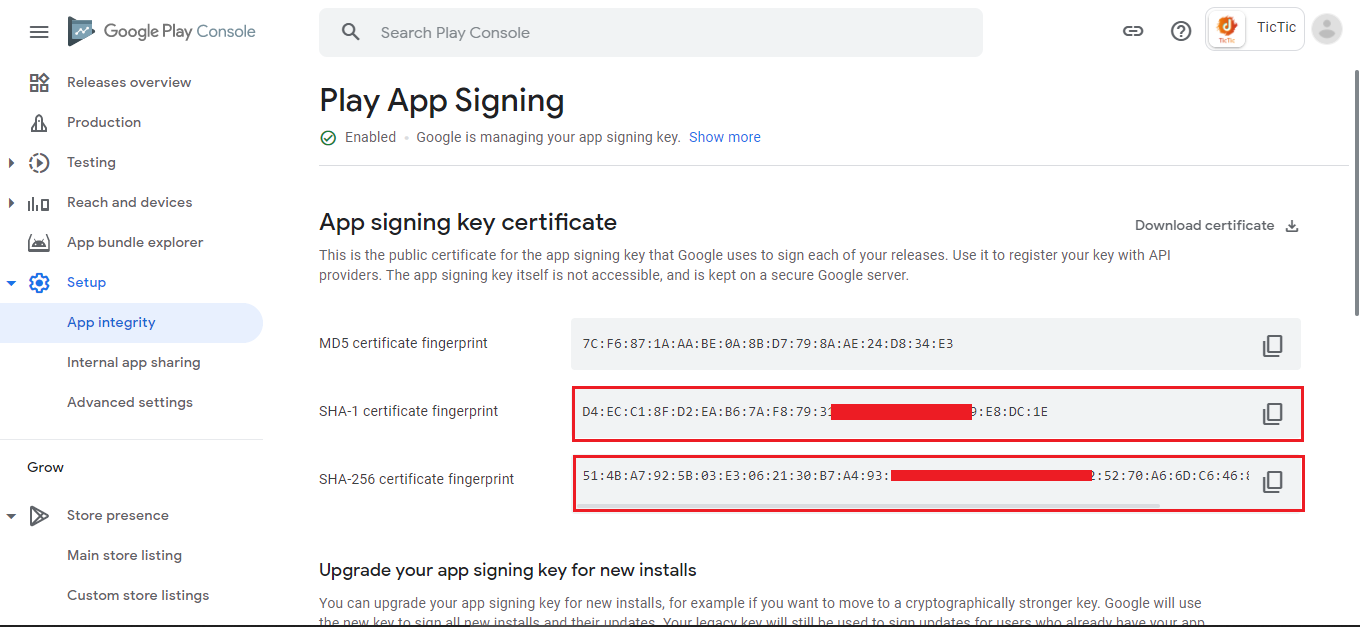
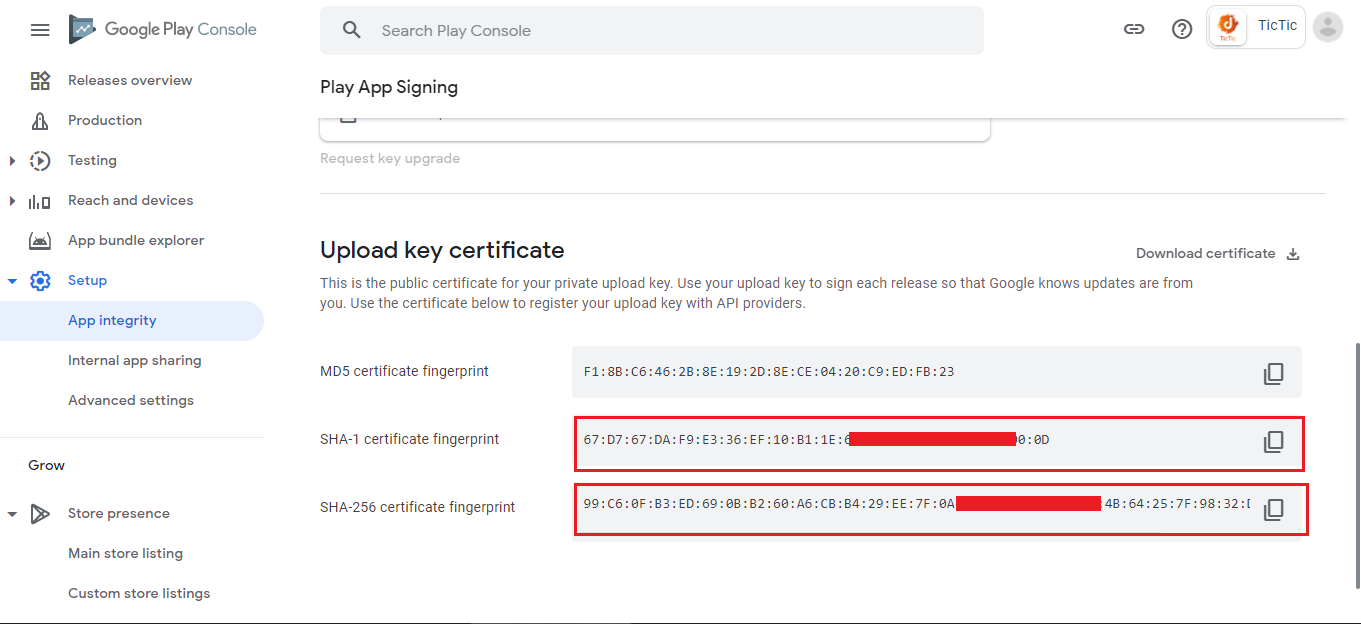
After done all the editing of the file assistlinks.json file paste the file on server in that address
https://your_domain/.well-known/assetlinks.json

Generate Debug Apk
Here is the Helping video for generating debug APK
Step 1

Web API Configuration
installing Tictic PHP API is an easy process and we will guide you through it .
Before getting started, please make sure your web server meets all the requirements:
- Latest PHP Version 8.0/8.1
- MySQL extension (enabled on all hosts by default)
Step 1 - Upload the mobileapp_api files which we have provided in your downloaded package from codecanyon
Step 2 - Login in your hosting cpanel Navigate to File Manager , upload the mobileapp_api.zip , then extract it
Step 3 - For Database & 3rd party API configurations edit constant.php file which is located at "mobileapp_api/app/Config/constant.php"
if you dont have htaccess file?
Make sure .htaccess file exist in the directory mobileapp_api/. If not then create the file .htaccess and copy the below code in it
										<IfModule mod_rewrite.c>


										    RewriteEngine On

                                            RewriteCond %{REQUEST_FILENAME} !-d

                                            RewriteCond %{REQUEST_FILENAME} !-f

                                            RewriteRule ^(.*)$ index.php [QSA,L]


										</IfModule>
SQL Database Setup
Step 1 -Import the SQL file which we have provided in your downloaded package from codecanyon
Step 2 - edit constant.php file which is located at "mobileapp_api/app/Config/constant.php"
Fill the database details in "mobileapp_api/app/Config/constant.php"
define('DATABASE_HOST', 'localhost');
define('DATABASE_USER', '');
define('DATABASE_PASSWORD', '');
define('DATABASE_NAME', '');
Step 3
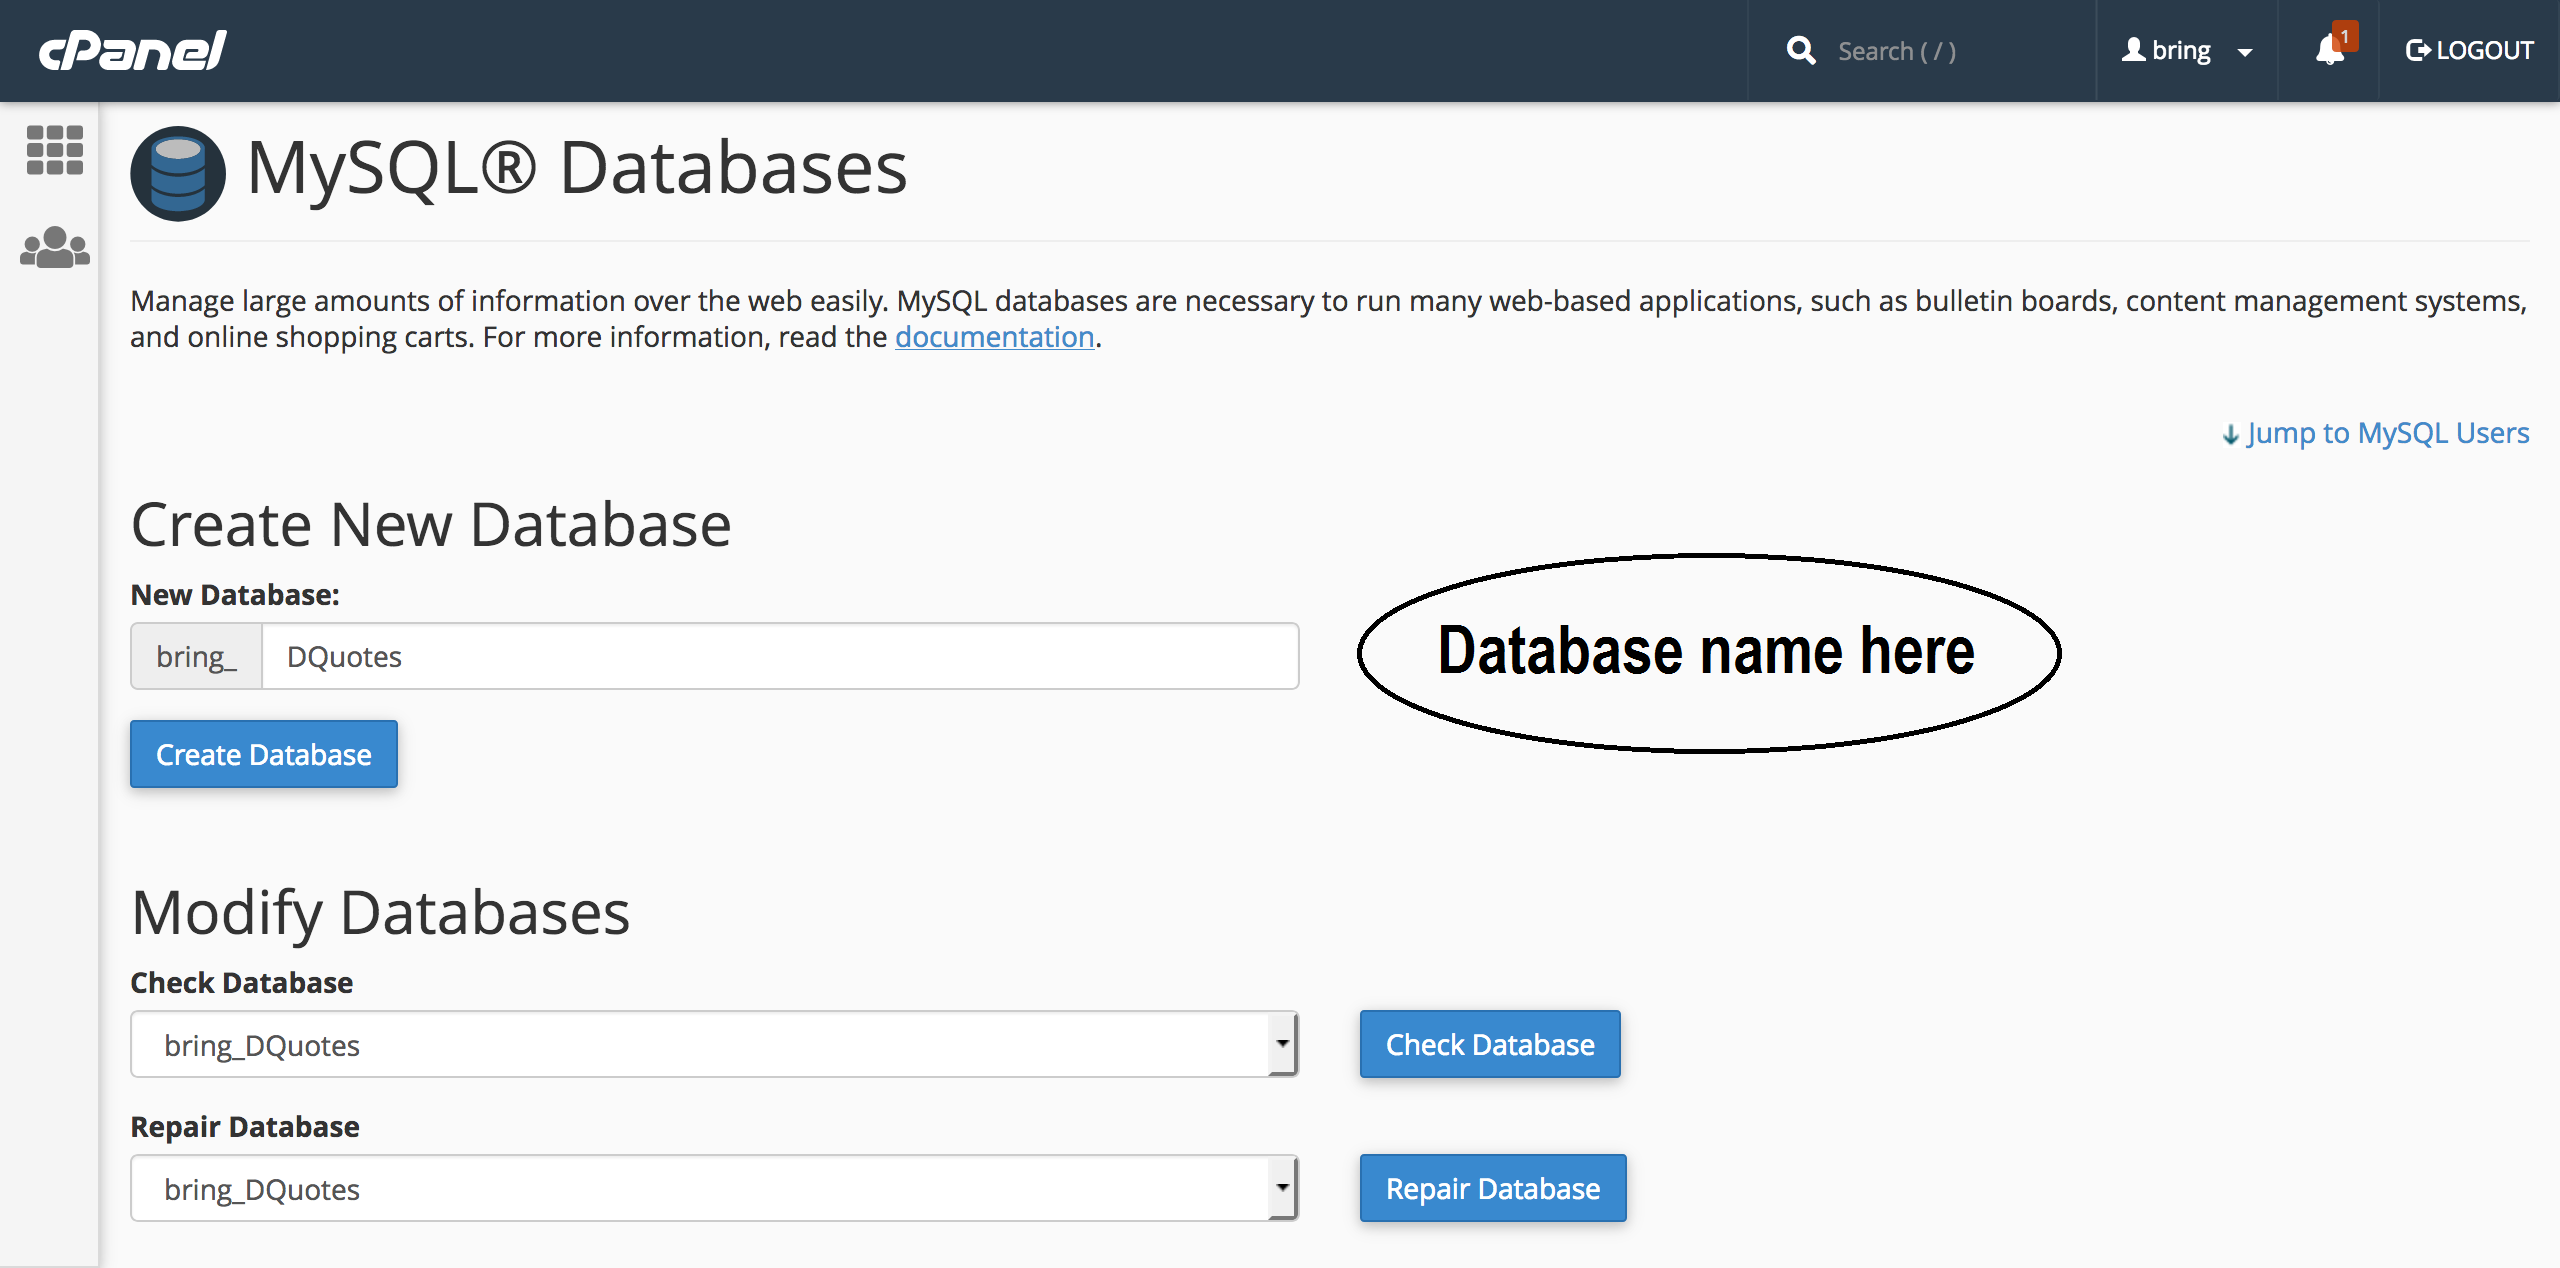
- Create Database in mysql databases ( in cPanel ) with the name of "Tictic" you can write what ever you want
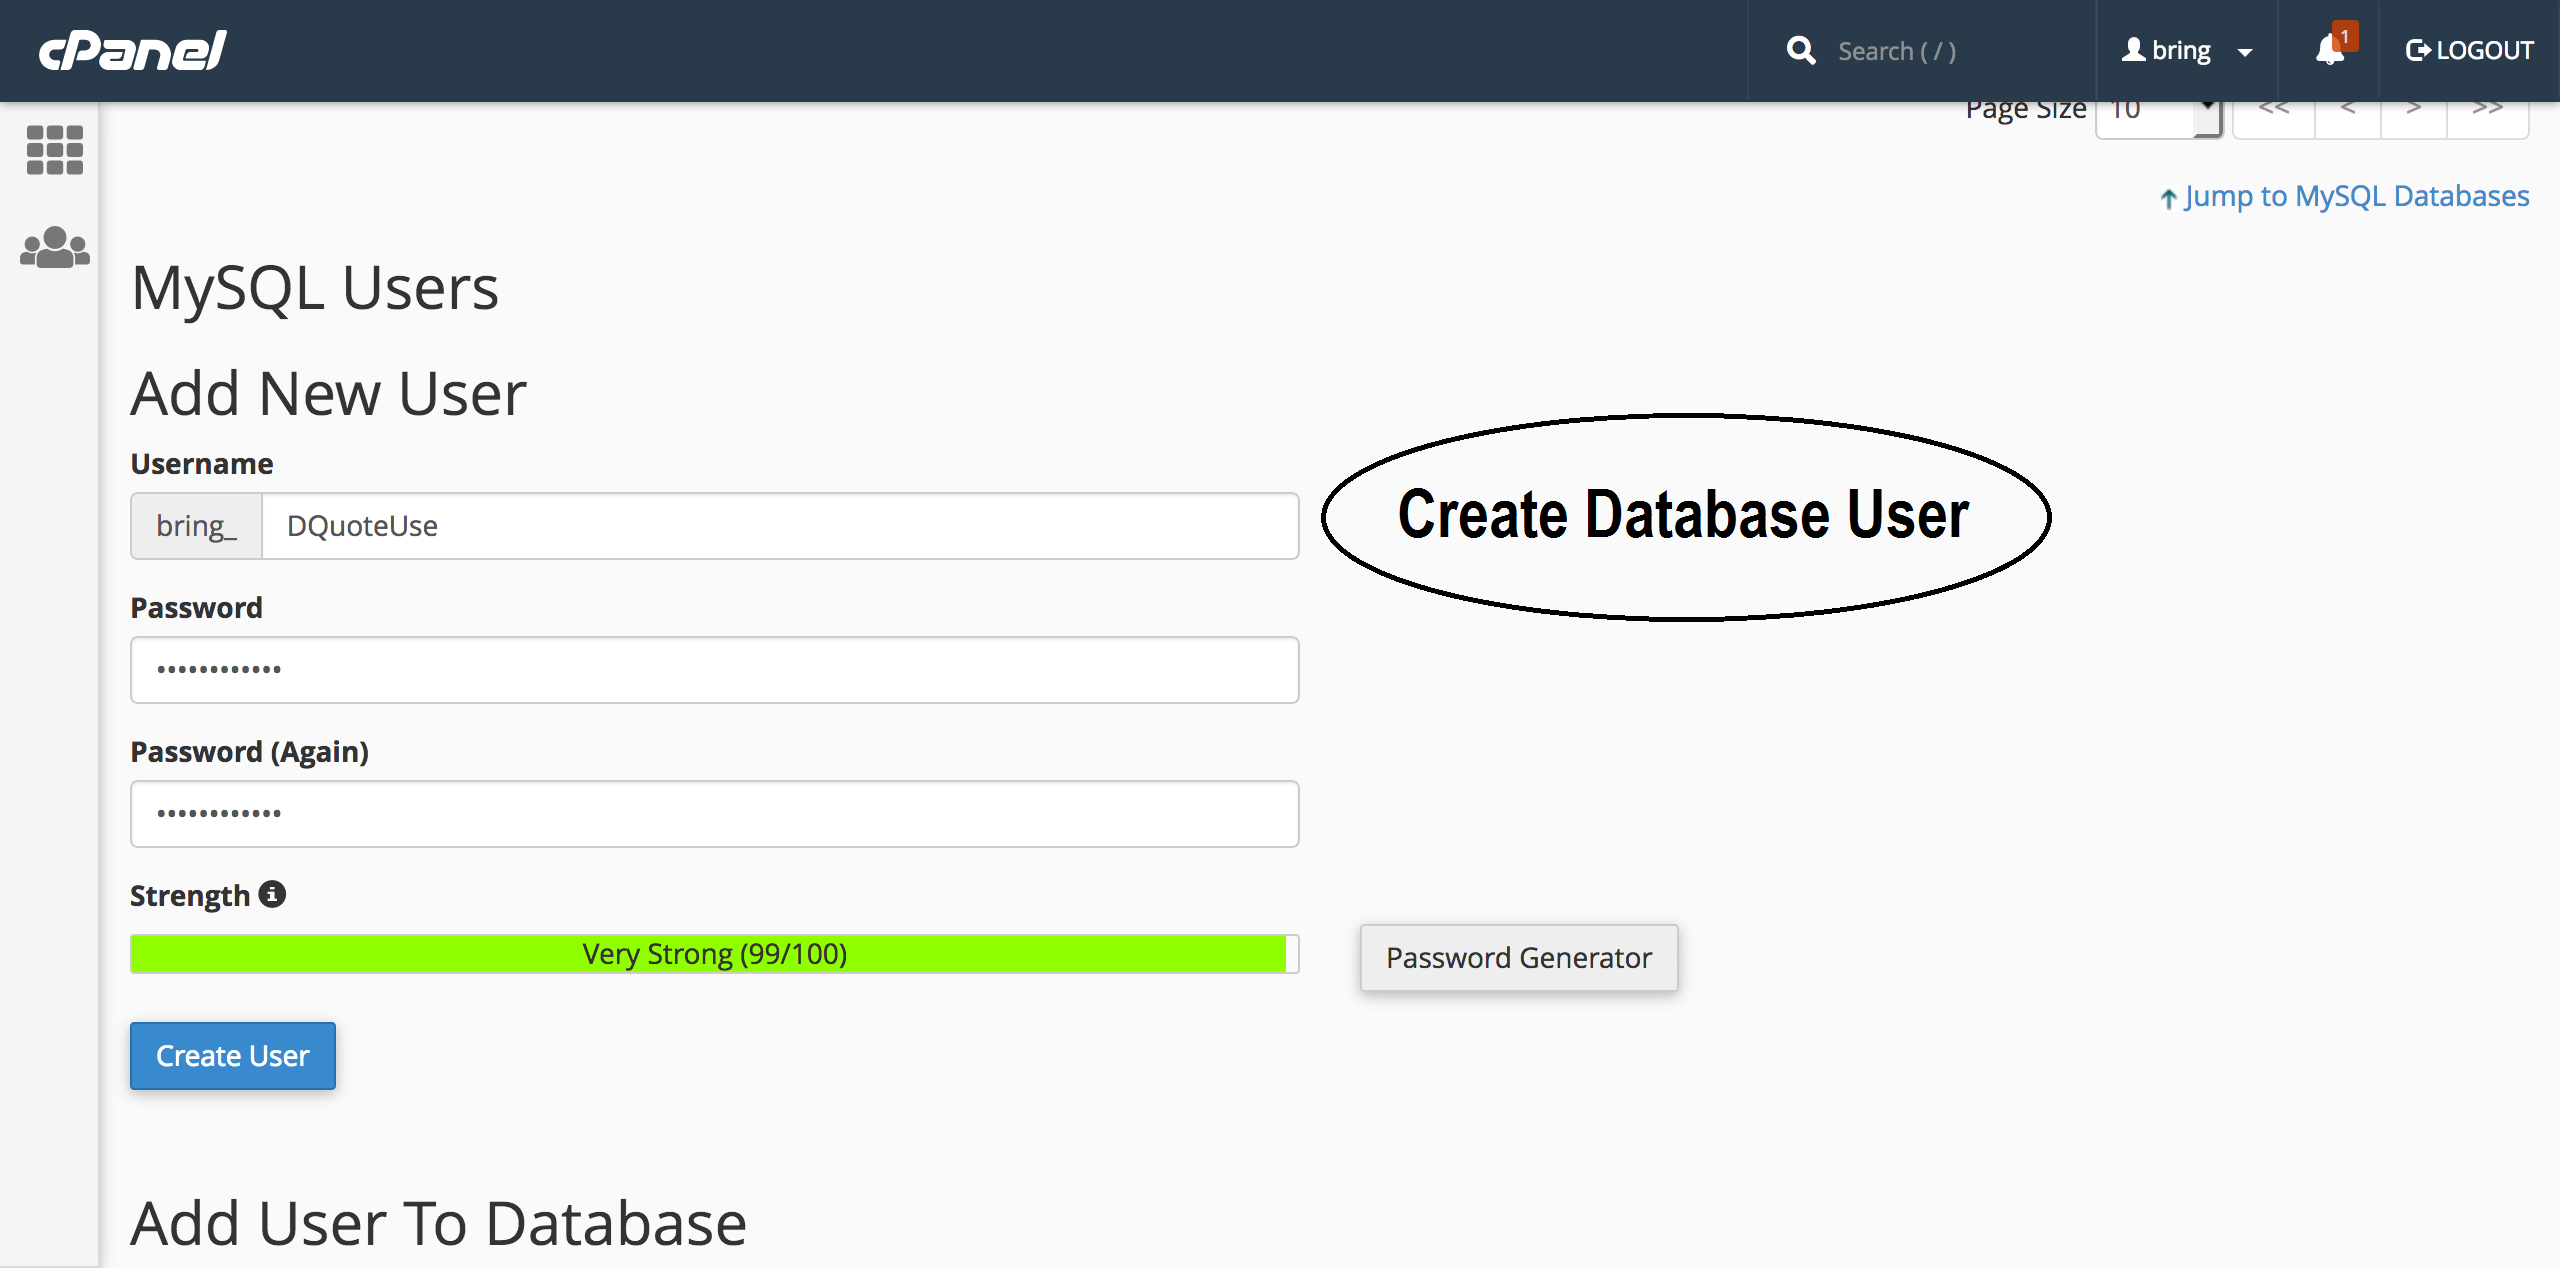
- Create a new user
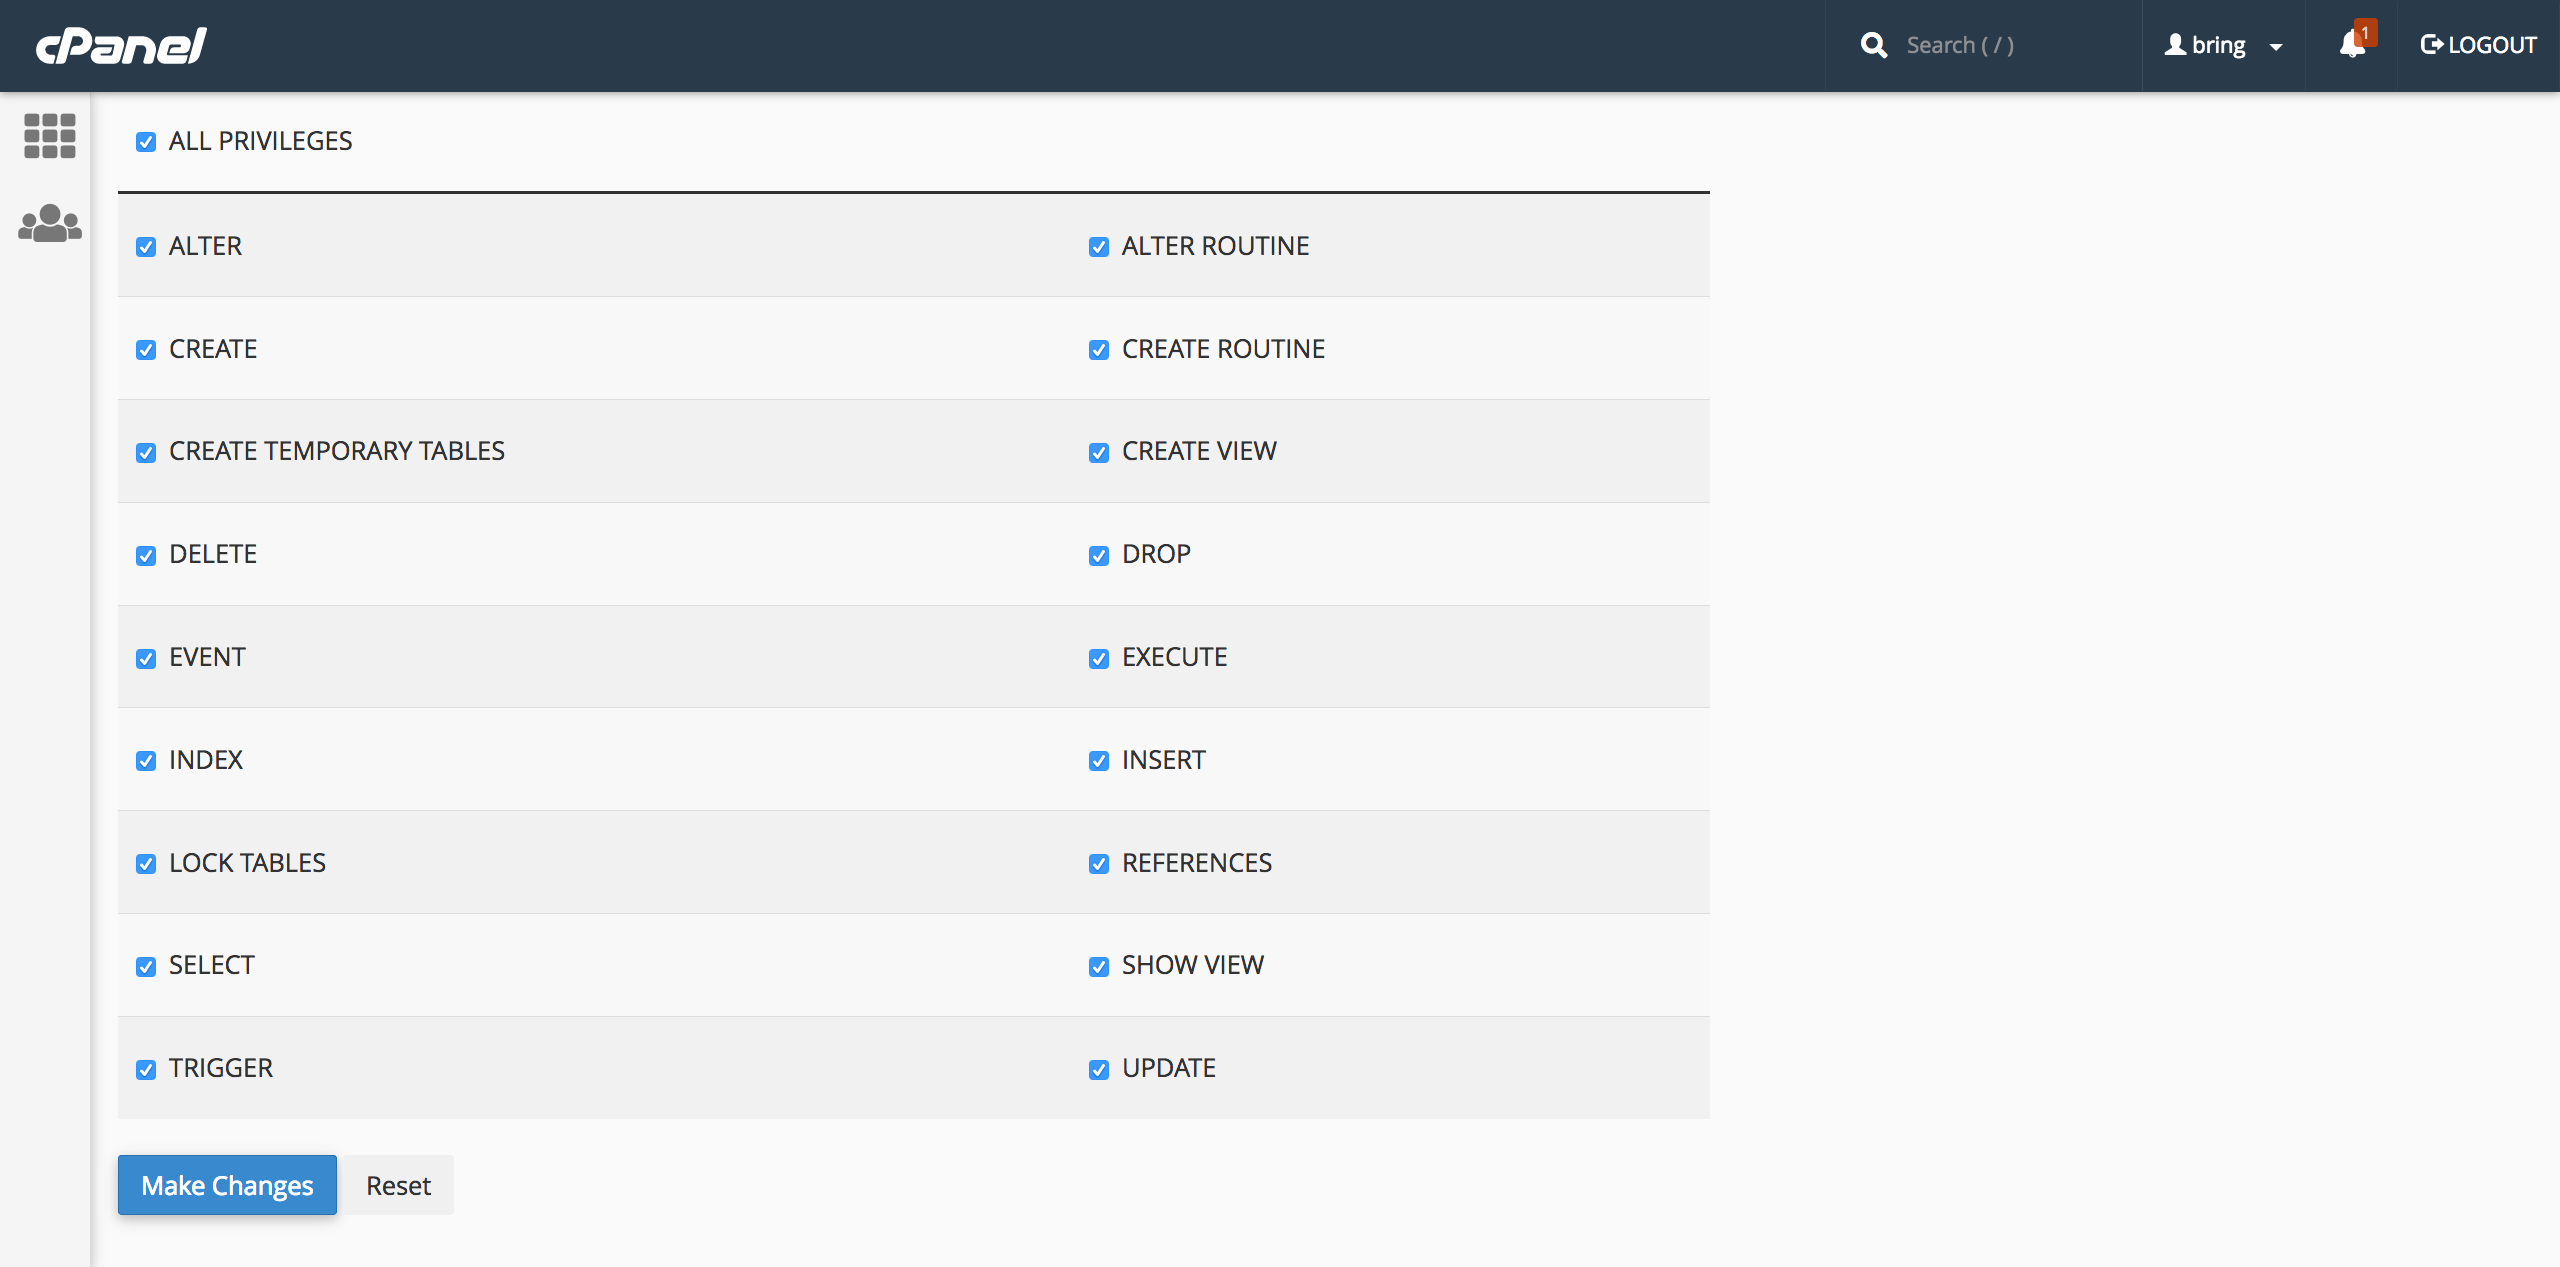
- Assign that user to database
Step 4
- Edit the file "constant.php" and update the Database information that you setup above
Importing Service Account JSON file
Step 1 - Go to Google Cloud Console: Google Console
Step 2 - Select or create a project, navigate to IAM & Admin > Service Accounts, and create a new service account.
Step 3 - Grant the necessary permissions to the service account (e.g., Viewer, Editor, or Owner).
Step 4 - Generate a key by going to Manage Keys, selecting Create New Key, and choosing JSON. A JSON file will be downloaded.
Step 5 - Once downloaded, Import it into mobileapp_api/app/Vendor/serviceAccountKey.json Directory
Promotion Setup
Step 1
Add your paypal settings in your mobileapp_api/app/Config/constant.php file

Admin Panel Configuration
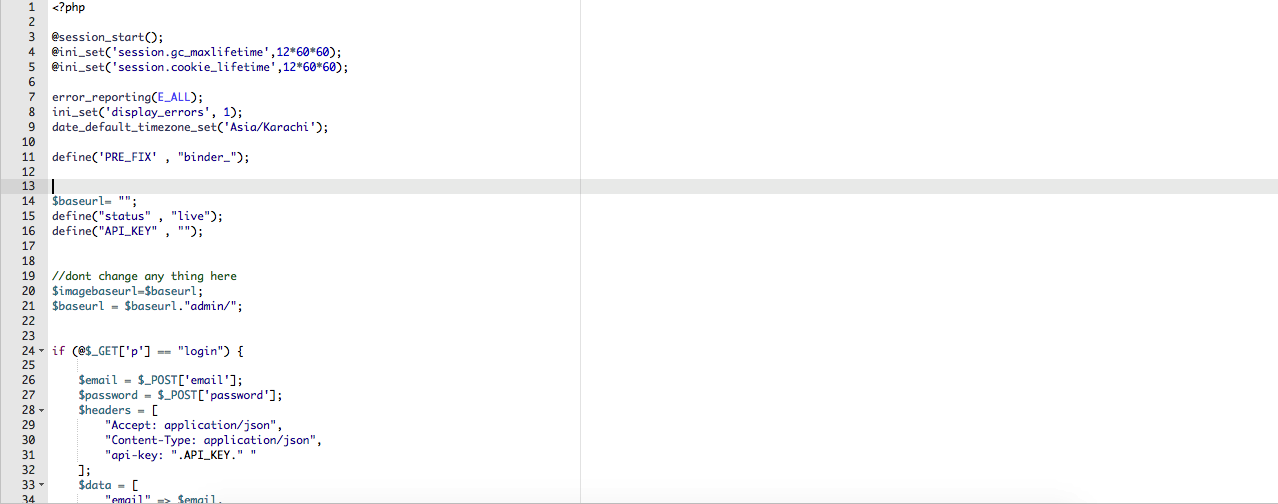
- You have to open your API URl and copy the code from here Click Here and paste it in your portal/config.php
Setup AWS s3
Go to this url https://console.aws.amazon.com/
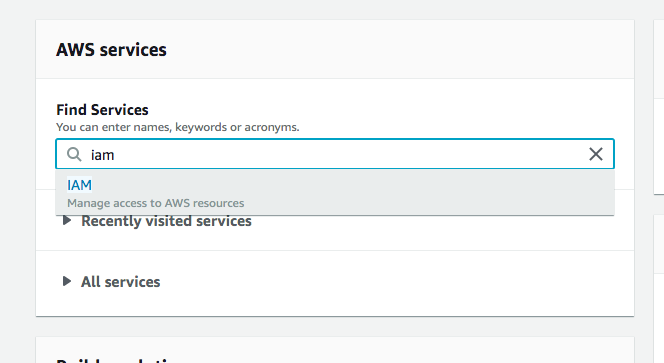
Search services "IAM"
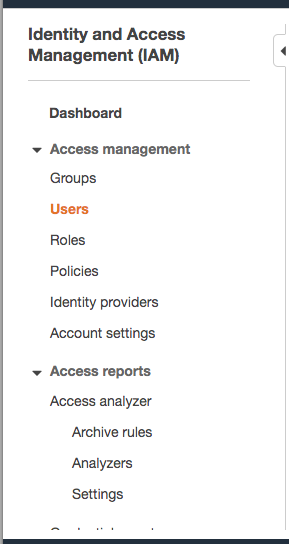
Click On Users
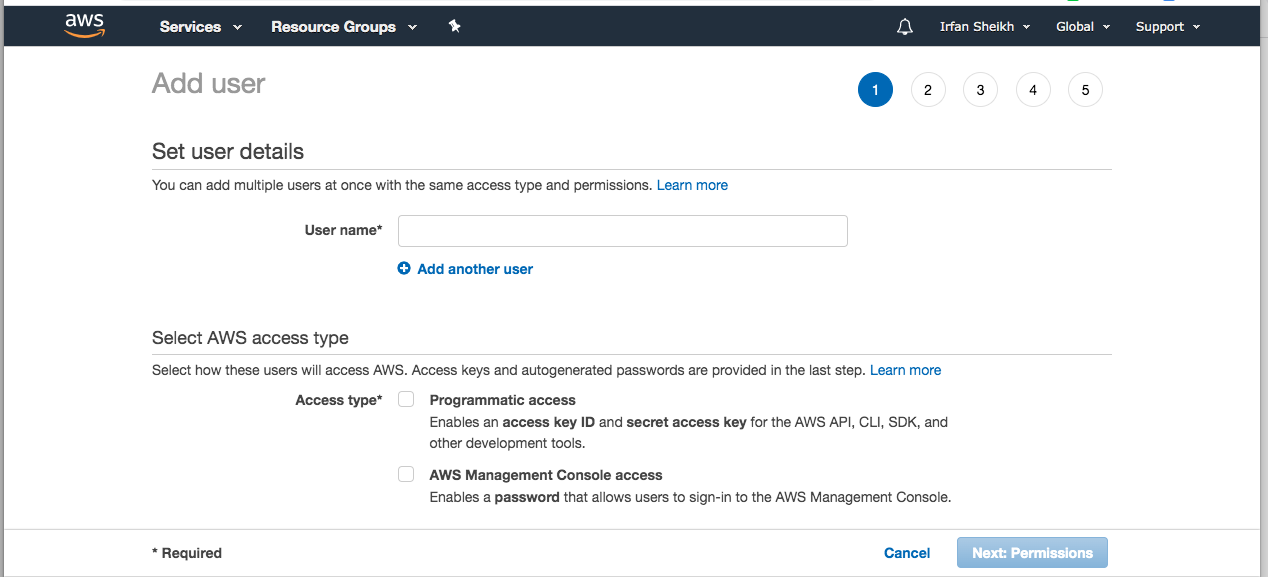
Add Users

add username and check field "Programmatic access"
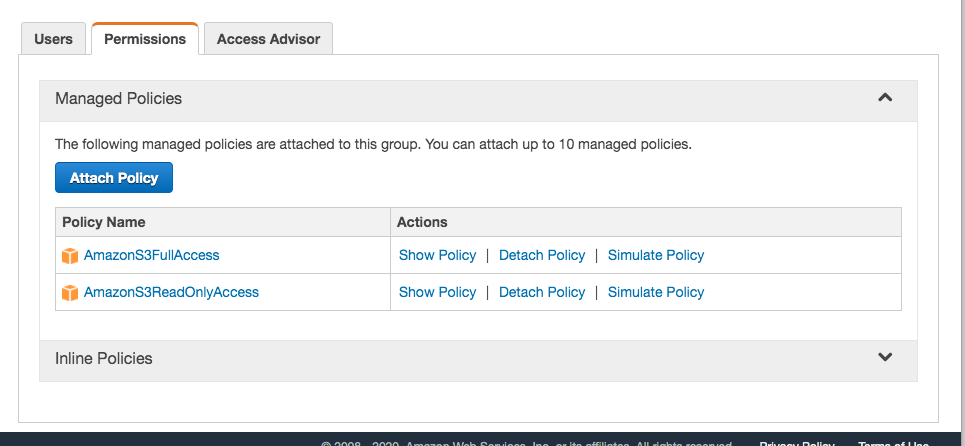
Create a group and add these two policies in that group (Amazons3fullaccess, Amazons3readonlyaccess)
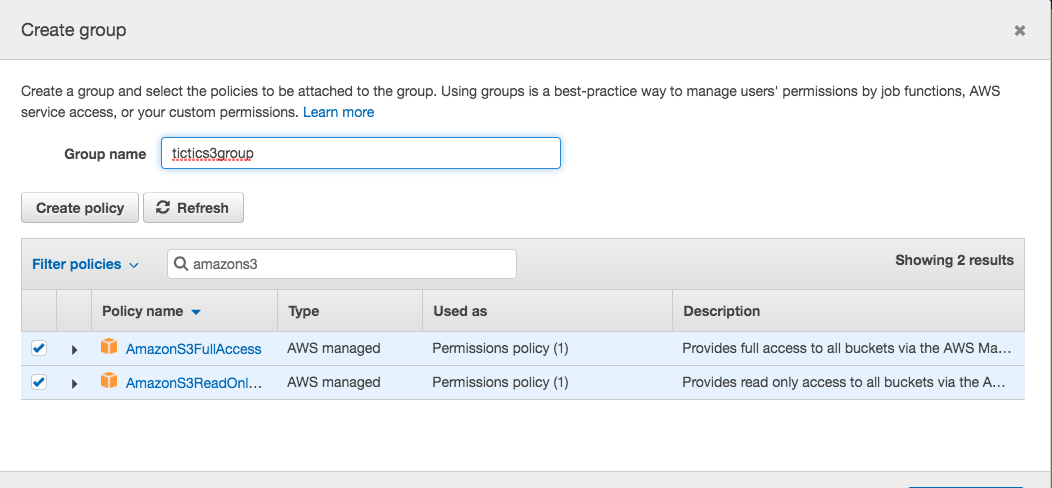
tags are optional - you can skip that and hit Create user button
Not down access key id and secret key and download the file and save it.

Then go to https://console.aws.amazon.com/ and search “S3” or go directly here https://console.aws.amazon.com/s3/
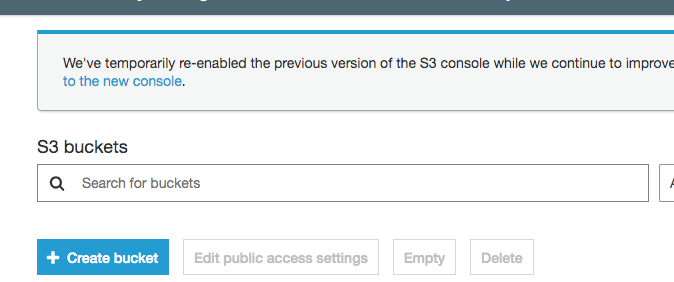
And create a Bucket. Set a name and choose options according to your choice and you are done. Use this bucket name in the code.
Note. These are the steps which you need to do to setup aws. You can also find on google a lot of tutorials for this. Amazon also updates the interface time to time. So please don’t ask us questions here regarding what region to choose or what name to choose etc etc. These are the basic steps we have mentioned here. So you should need to read aws documentation as well. We would try our best to help you as we can
Now you have to fill the information in app/Config/constant.php , if you donot have the files then you have to contact us for the AWS files this feature is only for extended license customers
 How you find bucket region on amazon S3?
You can get the bucket region by clicking on your bucket name. Your region will show up in the url for example our bucket name is qboxus_bucket and once we clicked on it this shows in the url

Setup a CloudFront?
Click on get started Under Web Section

Select s3 folder in the domian section and click create distribution
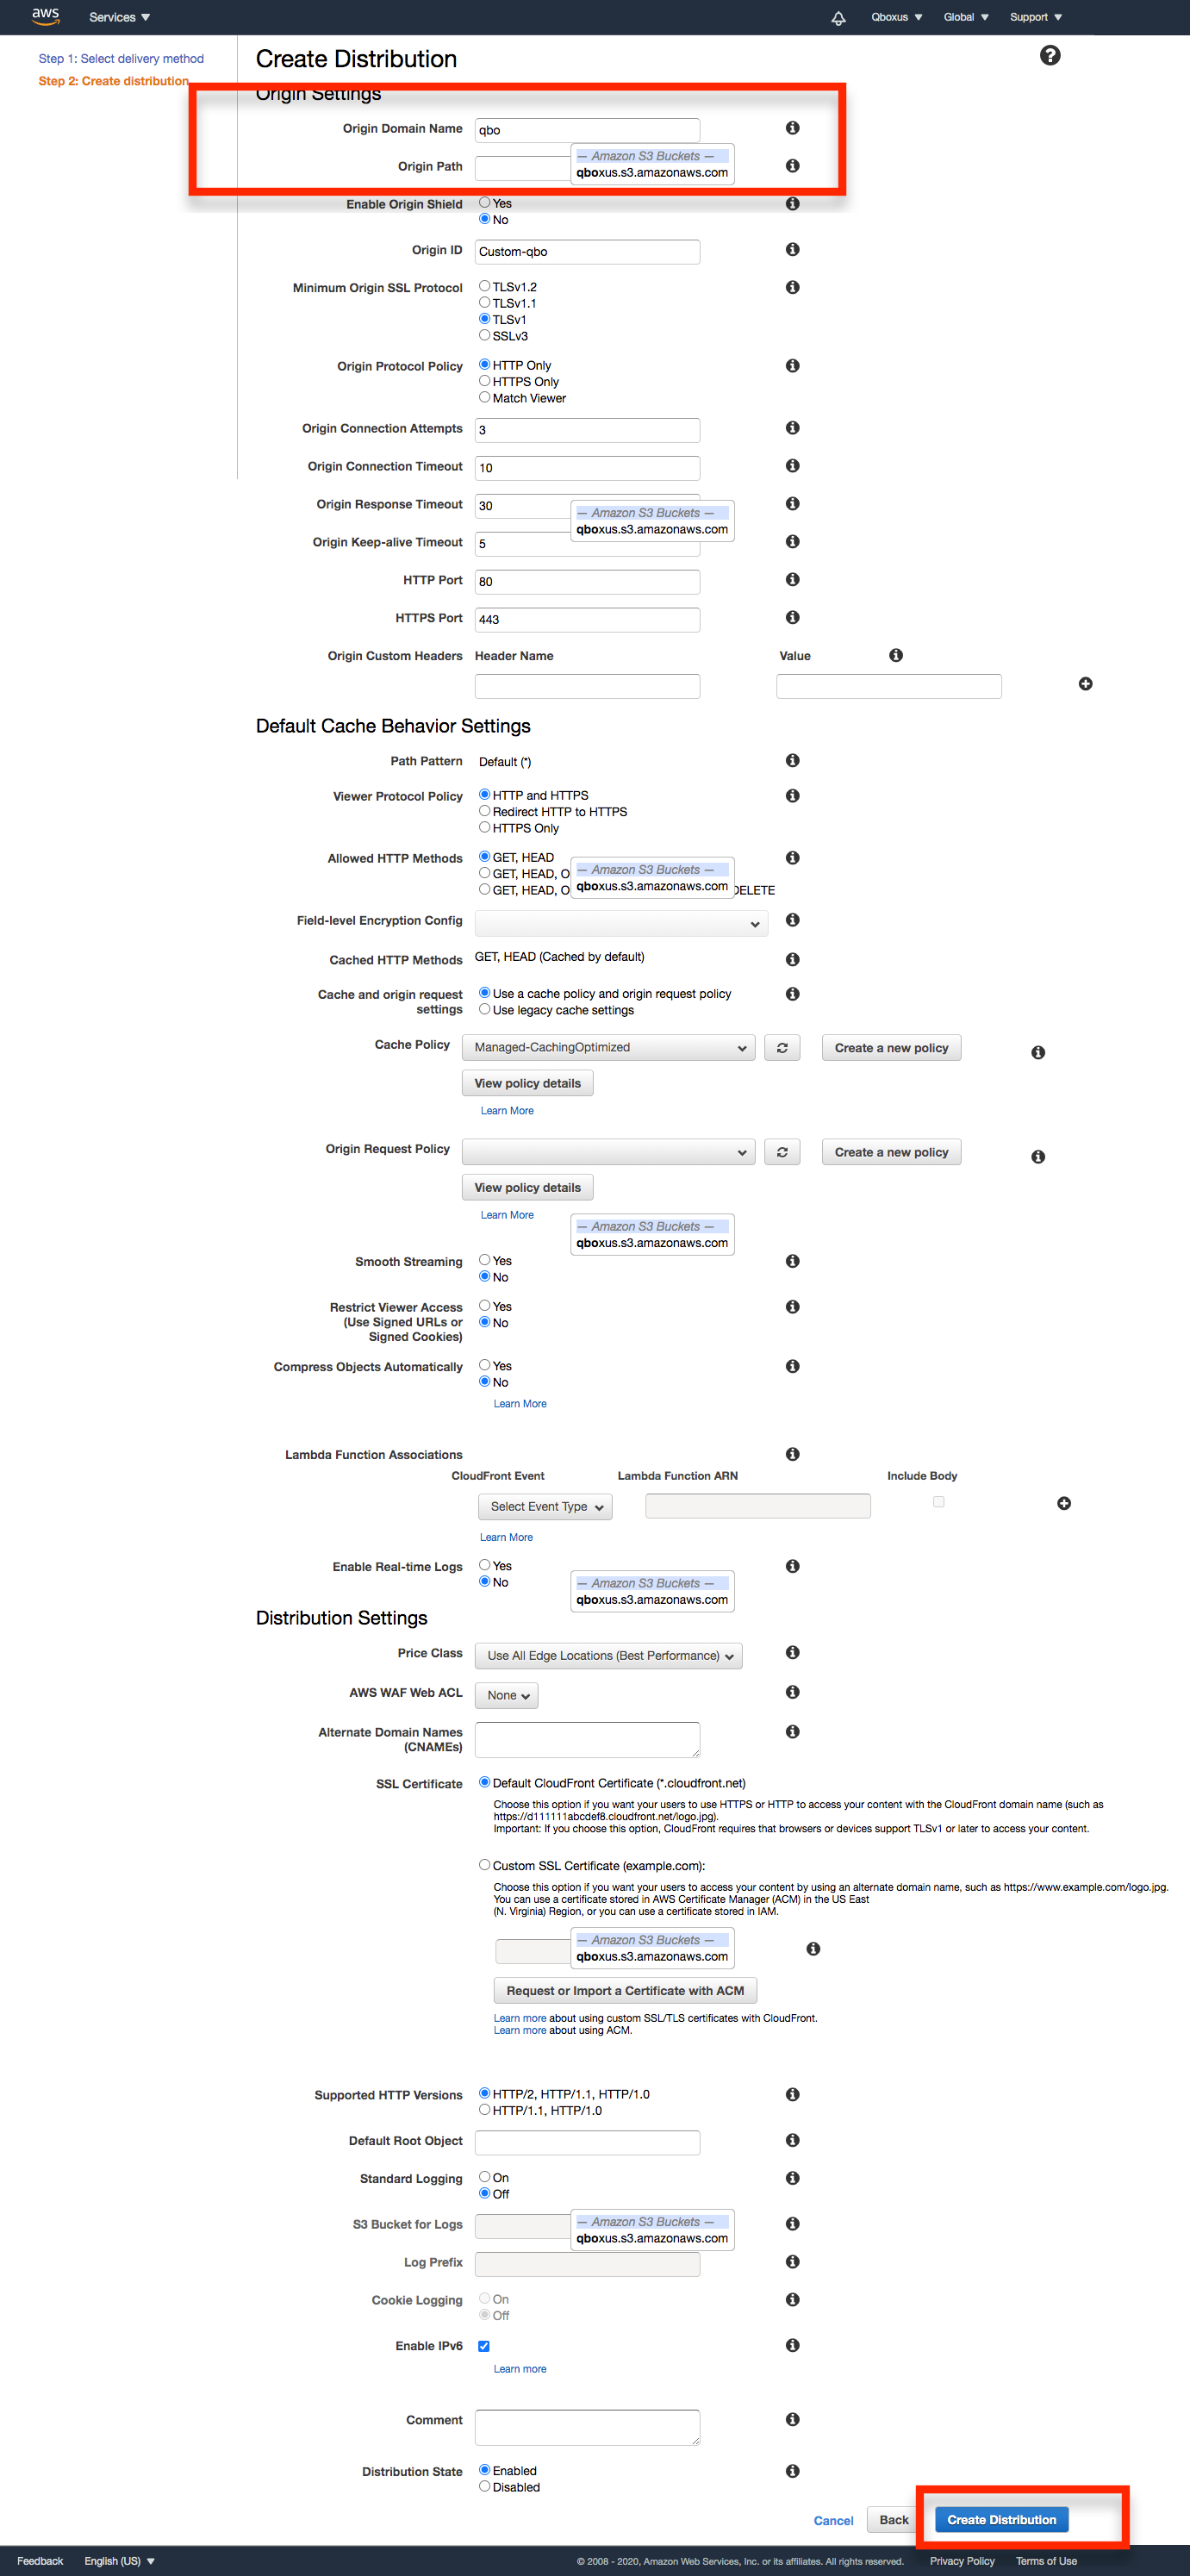
Copy domain link and enter in app/Config/constant.php
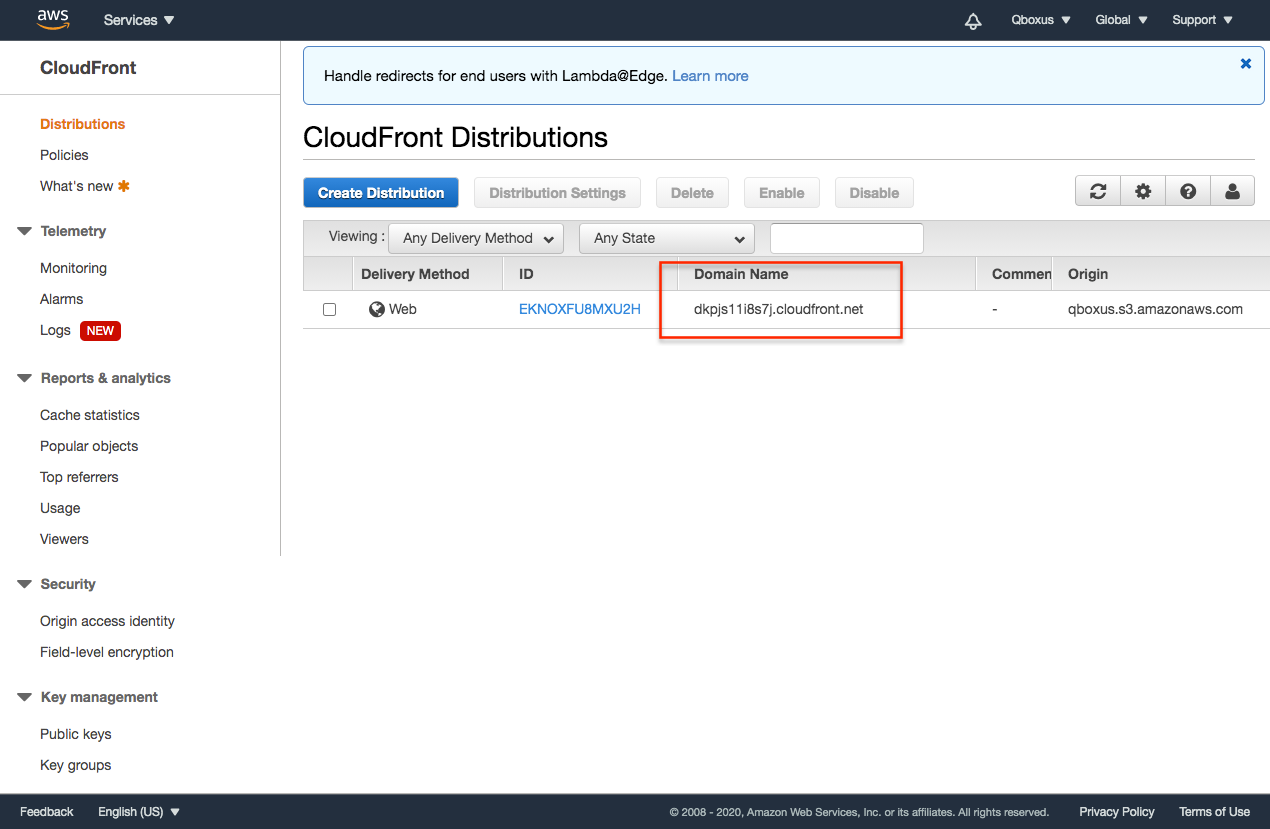
You can get the bucket region by clicking on your bucket name. Your region will show up in the url for example our bucket name is qboxus_bucket and once we clicked on it this shows in the url

Thank you & Support
I'd like to thank you again for your purchase and I hope you where able to successfully install the app and using it in your future business . If you need support or have some questions. You can visit our support resources here at hello@qboxus.com
What support does include- Answers to (technical) questions about the item's features
- Assistance with reported bugs and issues
- Answers to questions about importing and setting up the item as is described in the docs.
- Customization & adding new features
- Installation Services
- Support for 3rd party software and/or plugins
- Content related rejections and violations from Google
FAQ
App Develope in native or not?
Yes app is in native coding
Which PHP version?
it will work on PHP 7.0 or more then 7.0
Which Database You are using?
We are using mysql database
Does it have Admin panel
Yes It has admin panel as well which is in HTML/CSS and connected with datbase via PHP API
Does it have Documentation
Yes it has Documentaion about android , web api setup , admin panel setup , firebase push notification setup

