
Get Started
Thank you for purchasing our app
Please read the documentation carefully , and if you have any question check us . Most pages are accompanied by a video tutorial , it's recommended to check both , the video and the written Documentation .
Must Read this:
After purchase if you run the project and test the build in phone it will not work becuase you have to setup the Web API first then app will be works fine.Web API is in PHP 7.0 and it will work on any kind of hosting packages

Premium Features

- Watermark - watermark with downloaded video
- Duet Feature - Do Duet with other user's videos
- Promotion - Promote / Advertise Video
- CDN service - Video loads faster without delay
For Premium features, contact us on skype hello@qboxus.com or post a ticket here
Recommended Hosting (Free Life Time Support)
Customers who host their files with hostrever.com will receive free support for life
Why free support?
Having a hosting platform that our support team is familiar with makes it easier for them to assist you
Server Requirements
We have added some advance functions into our product. We try to keep our product simple but unfortunately due to greater no of request we are forced to upgrade our product and we had to use a FFMPEG Library.
- Php 7.0
- VPS/Cloud: The code will not work on Shared hosting.
- Ffmpeg v3.4.7 should be installed
- Curl should be enabled
- memory_limit should be 500M View Attachment
- 4 Core processor + 8/16GB Ram

If you face any issue in video upload or it takes time in uploading video to server that might be because of your server. Sometimes server gives this error if you check your error log file
Allowed memory size of 33554432 bytes exhausted (tried to allocate 15756752 bytes)
If you see this error then you would need to upgrade your server or increase Php memory limit by going into php.ini file. you need to google about where this file is. This file resides in different locations in different servers
Step 1
First thing which is very important is that you need to either use VPS or cloud Hosting. This FFMPEG won't work on shared hosting and you need a terminal access to install ffmpeg
Step 2
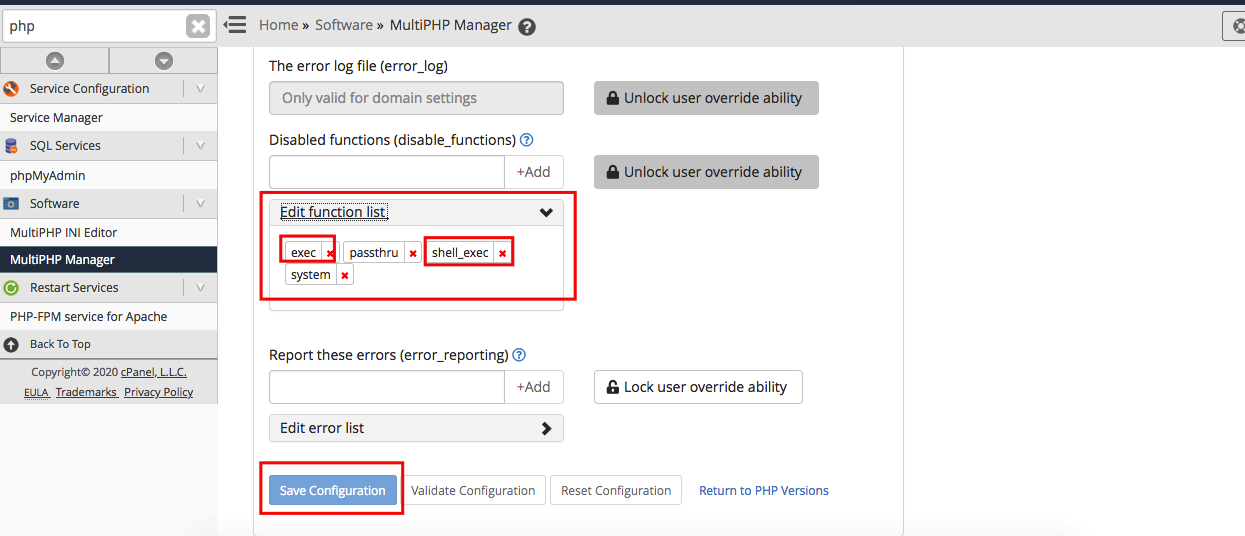
Make sure that your server does not block shell exec , or exec. You have to remove it from WHM and save the settings
Step 3
Increase your upload limit

One last thing you need to do is increase your post_max_size and upload_max_filesize.
Note: We have tested this on Hostgator VPS. Terminal we accessed from whm. Operating system was CENT OS 7.8
Quick Setup
Follow Video
Just Follow Few Setups according to video to Run App
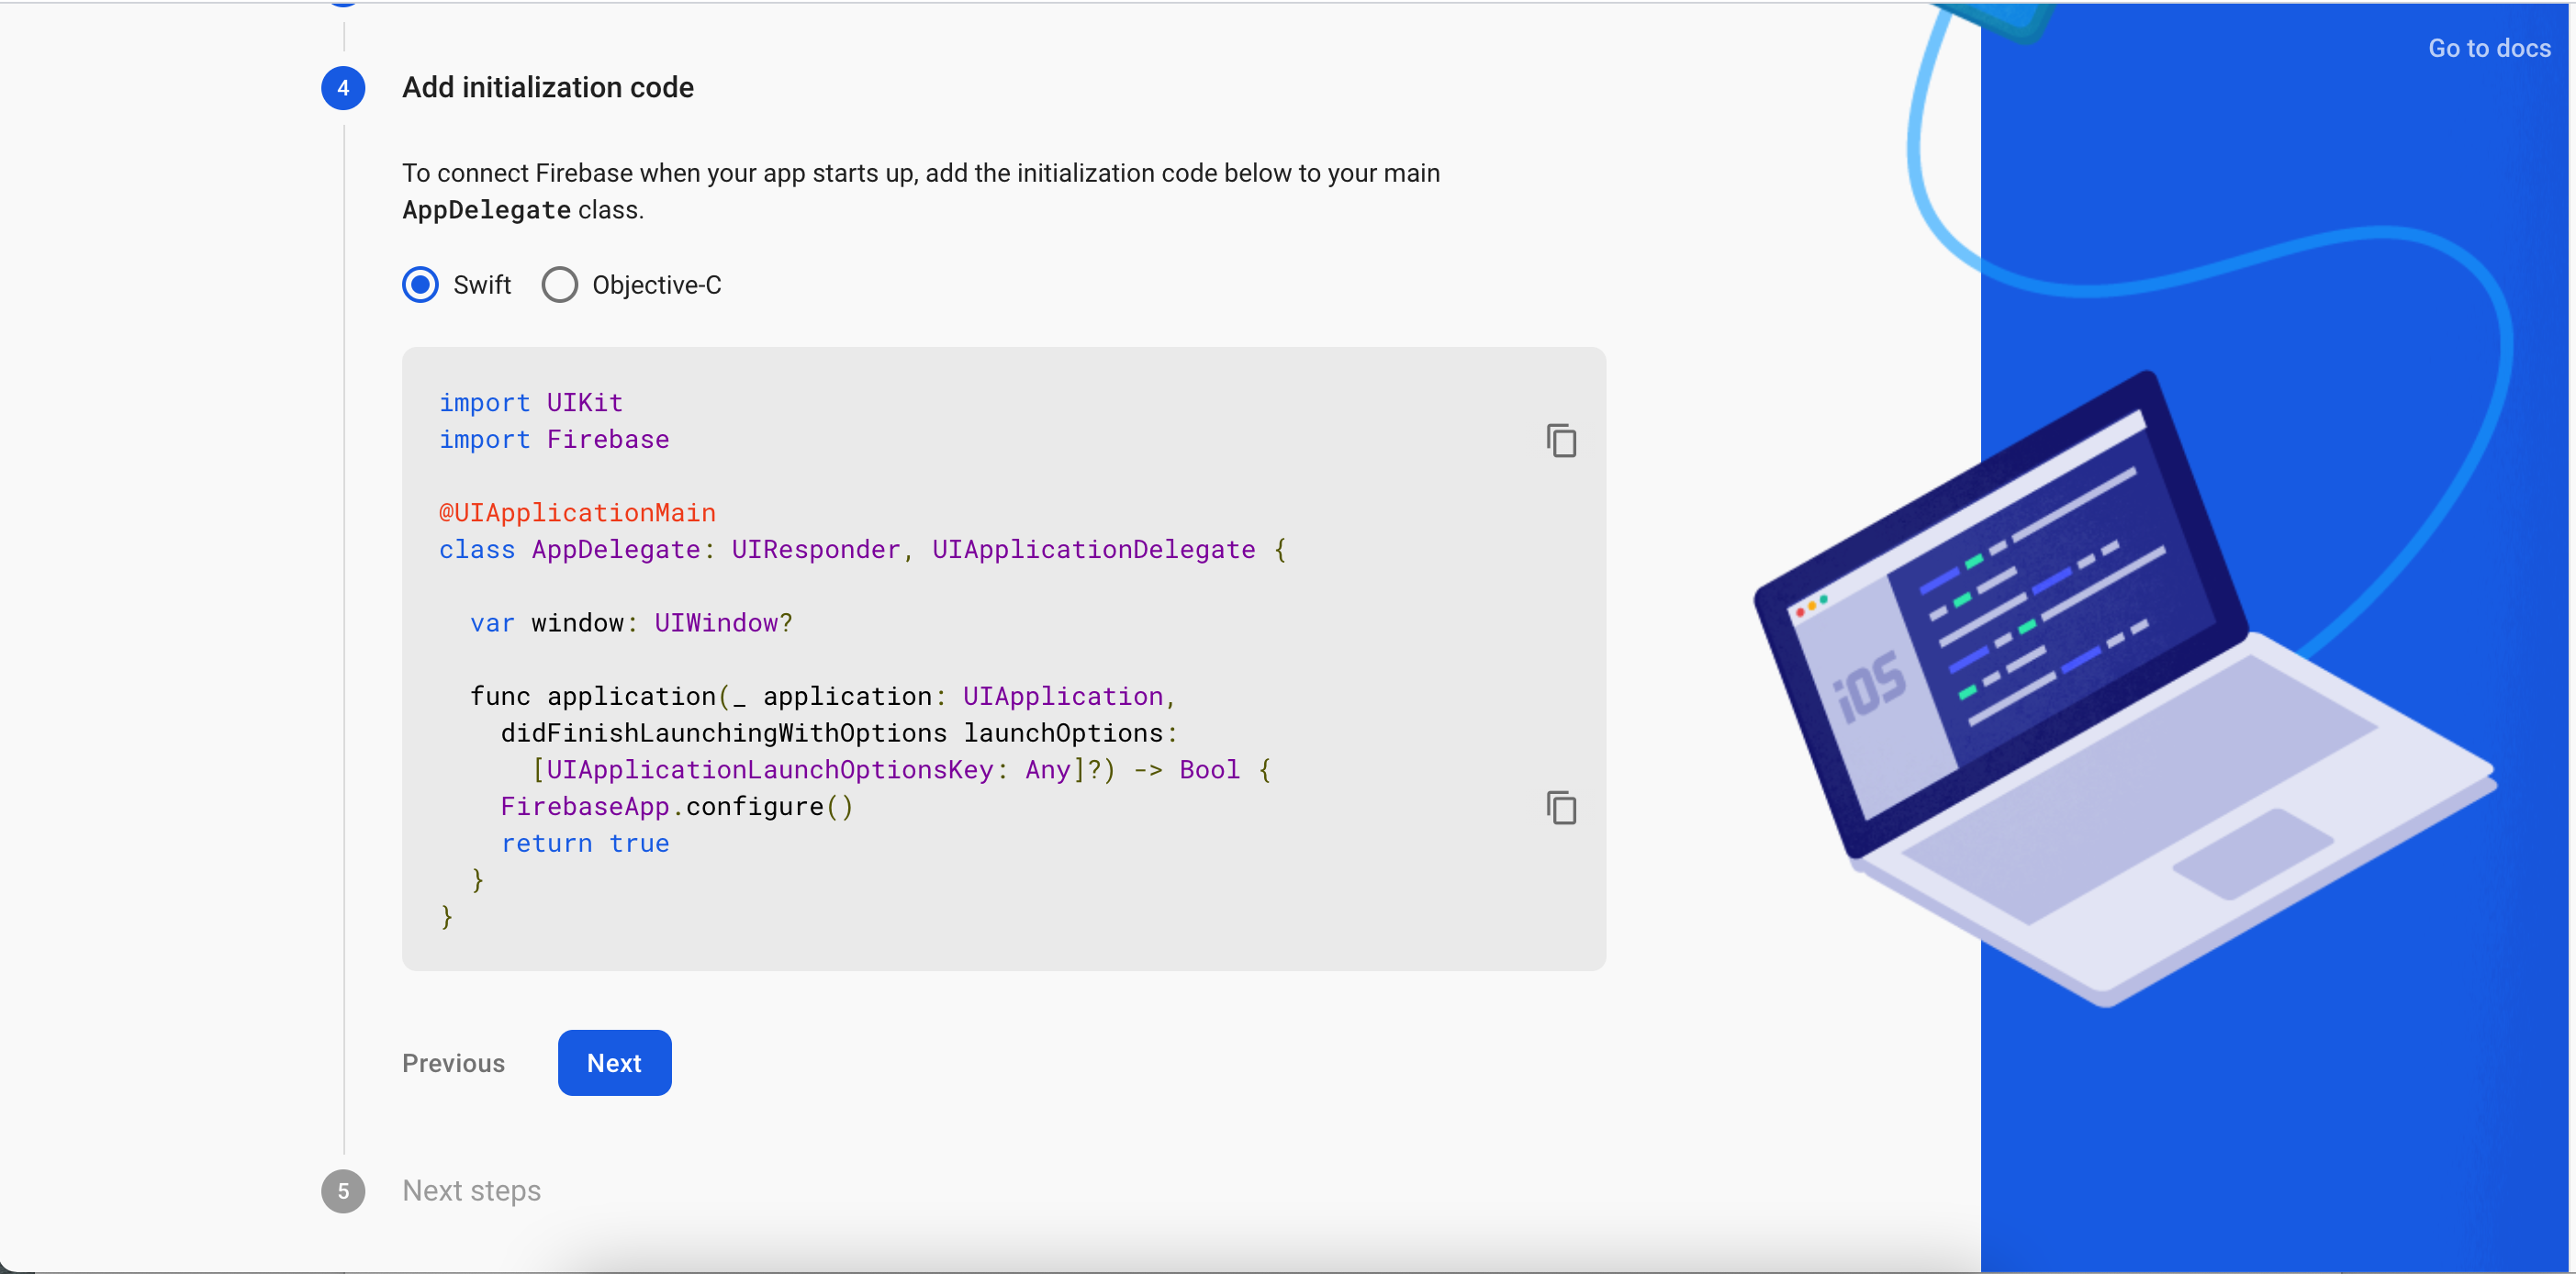
Firebase Configration
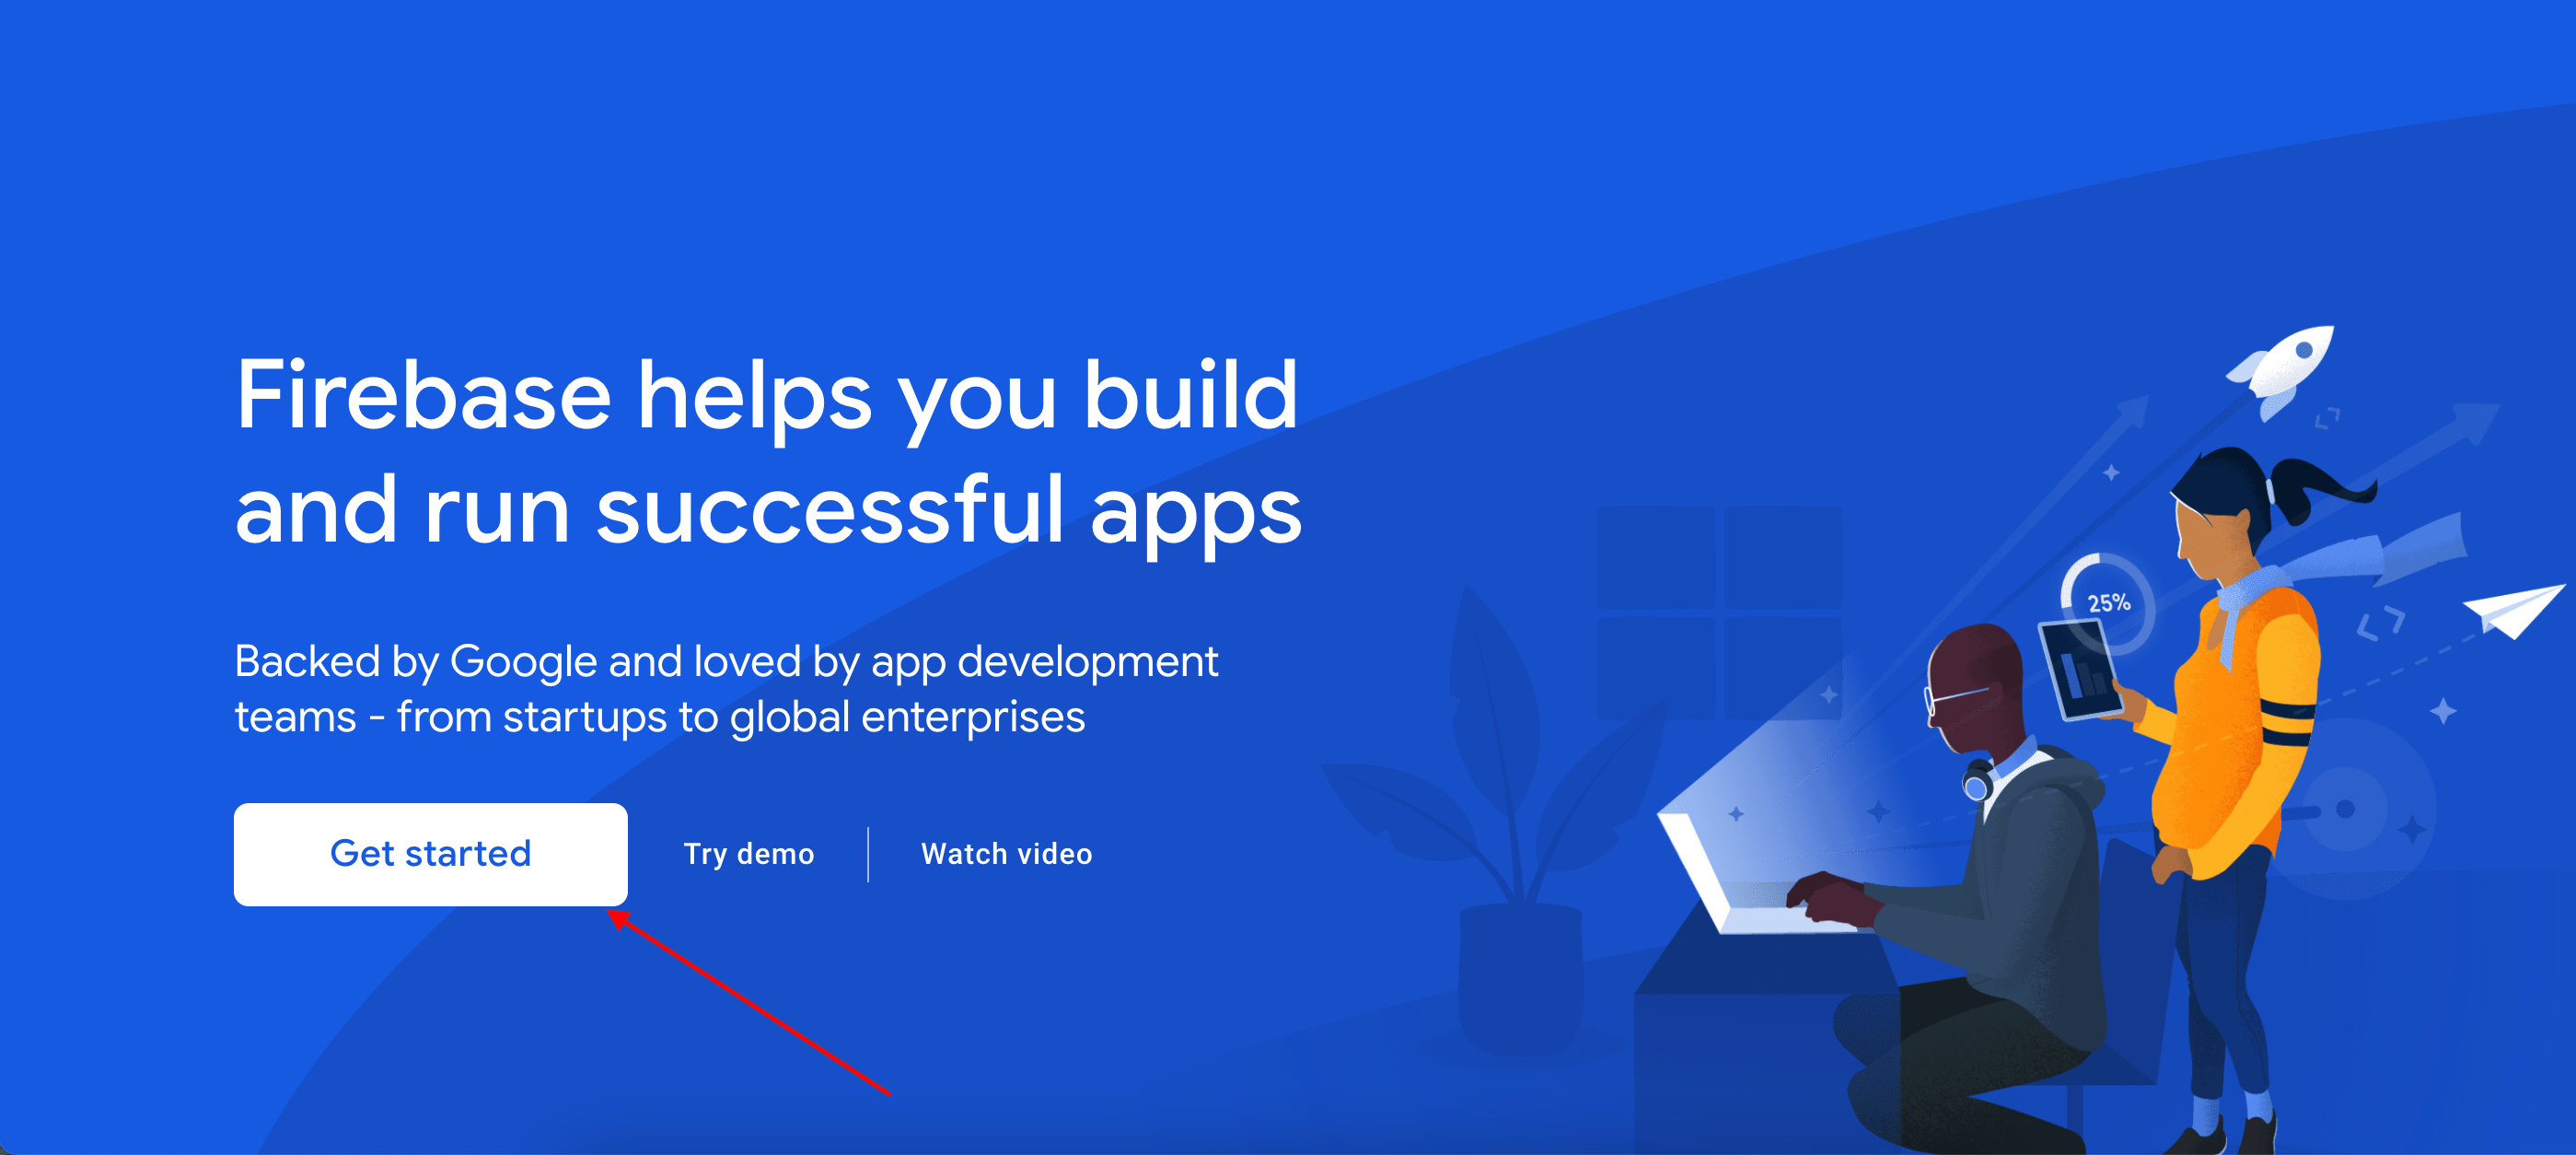
Step 1
Open link on Web Brower: https://firebase.google.com/ and then Click on “Get Started”
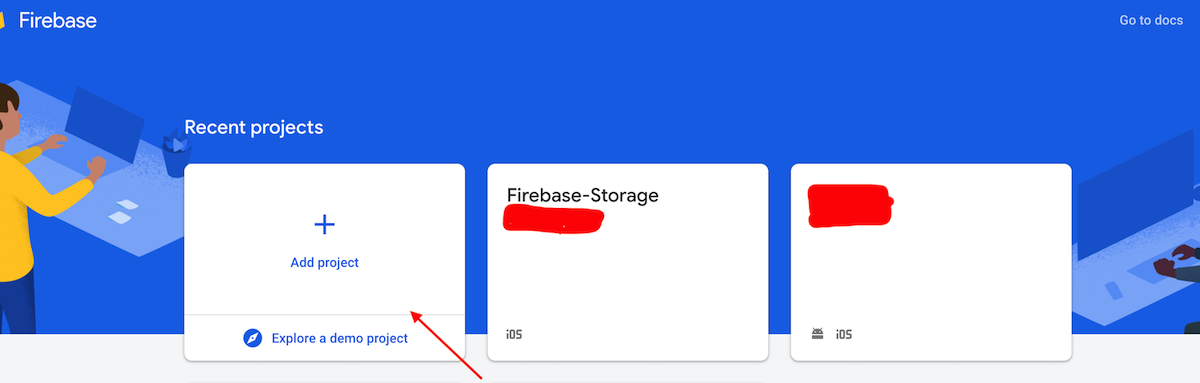
Step 2
Click on Add Project
Step 3
Write down name of the project here and then click on Continue
Step 4
Click on the Continue
Step 5
Check the box that are unchecked and click on Create project
Step 6
Now project Created on Firebase

Step 7
Now select your platform "iOS"
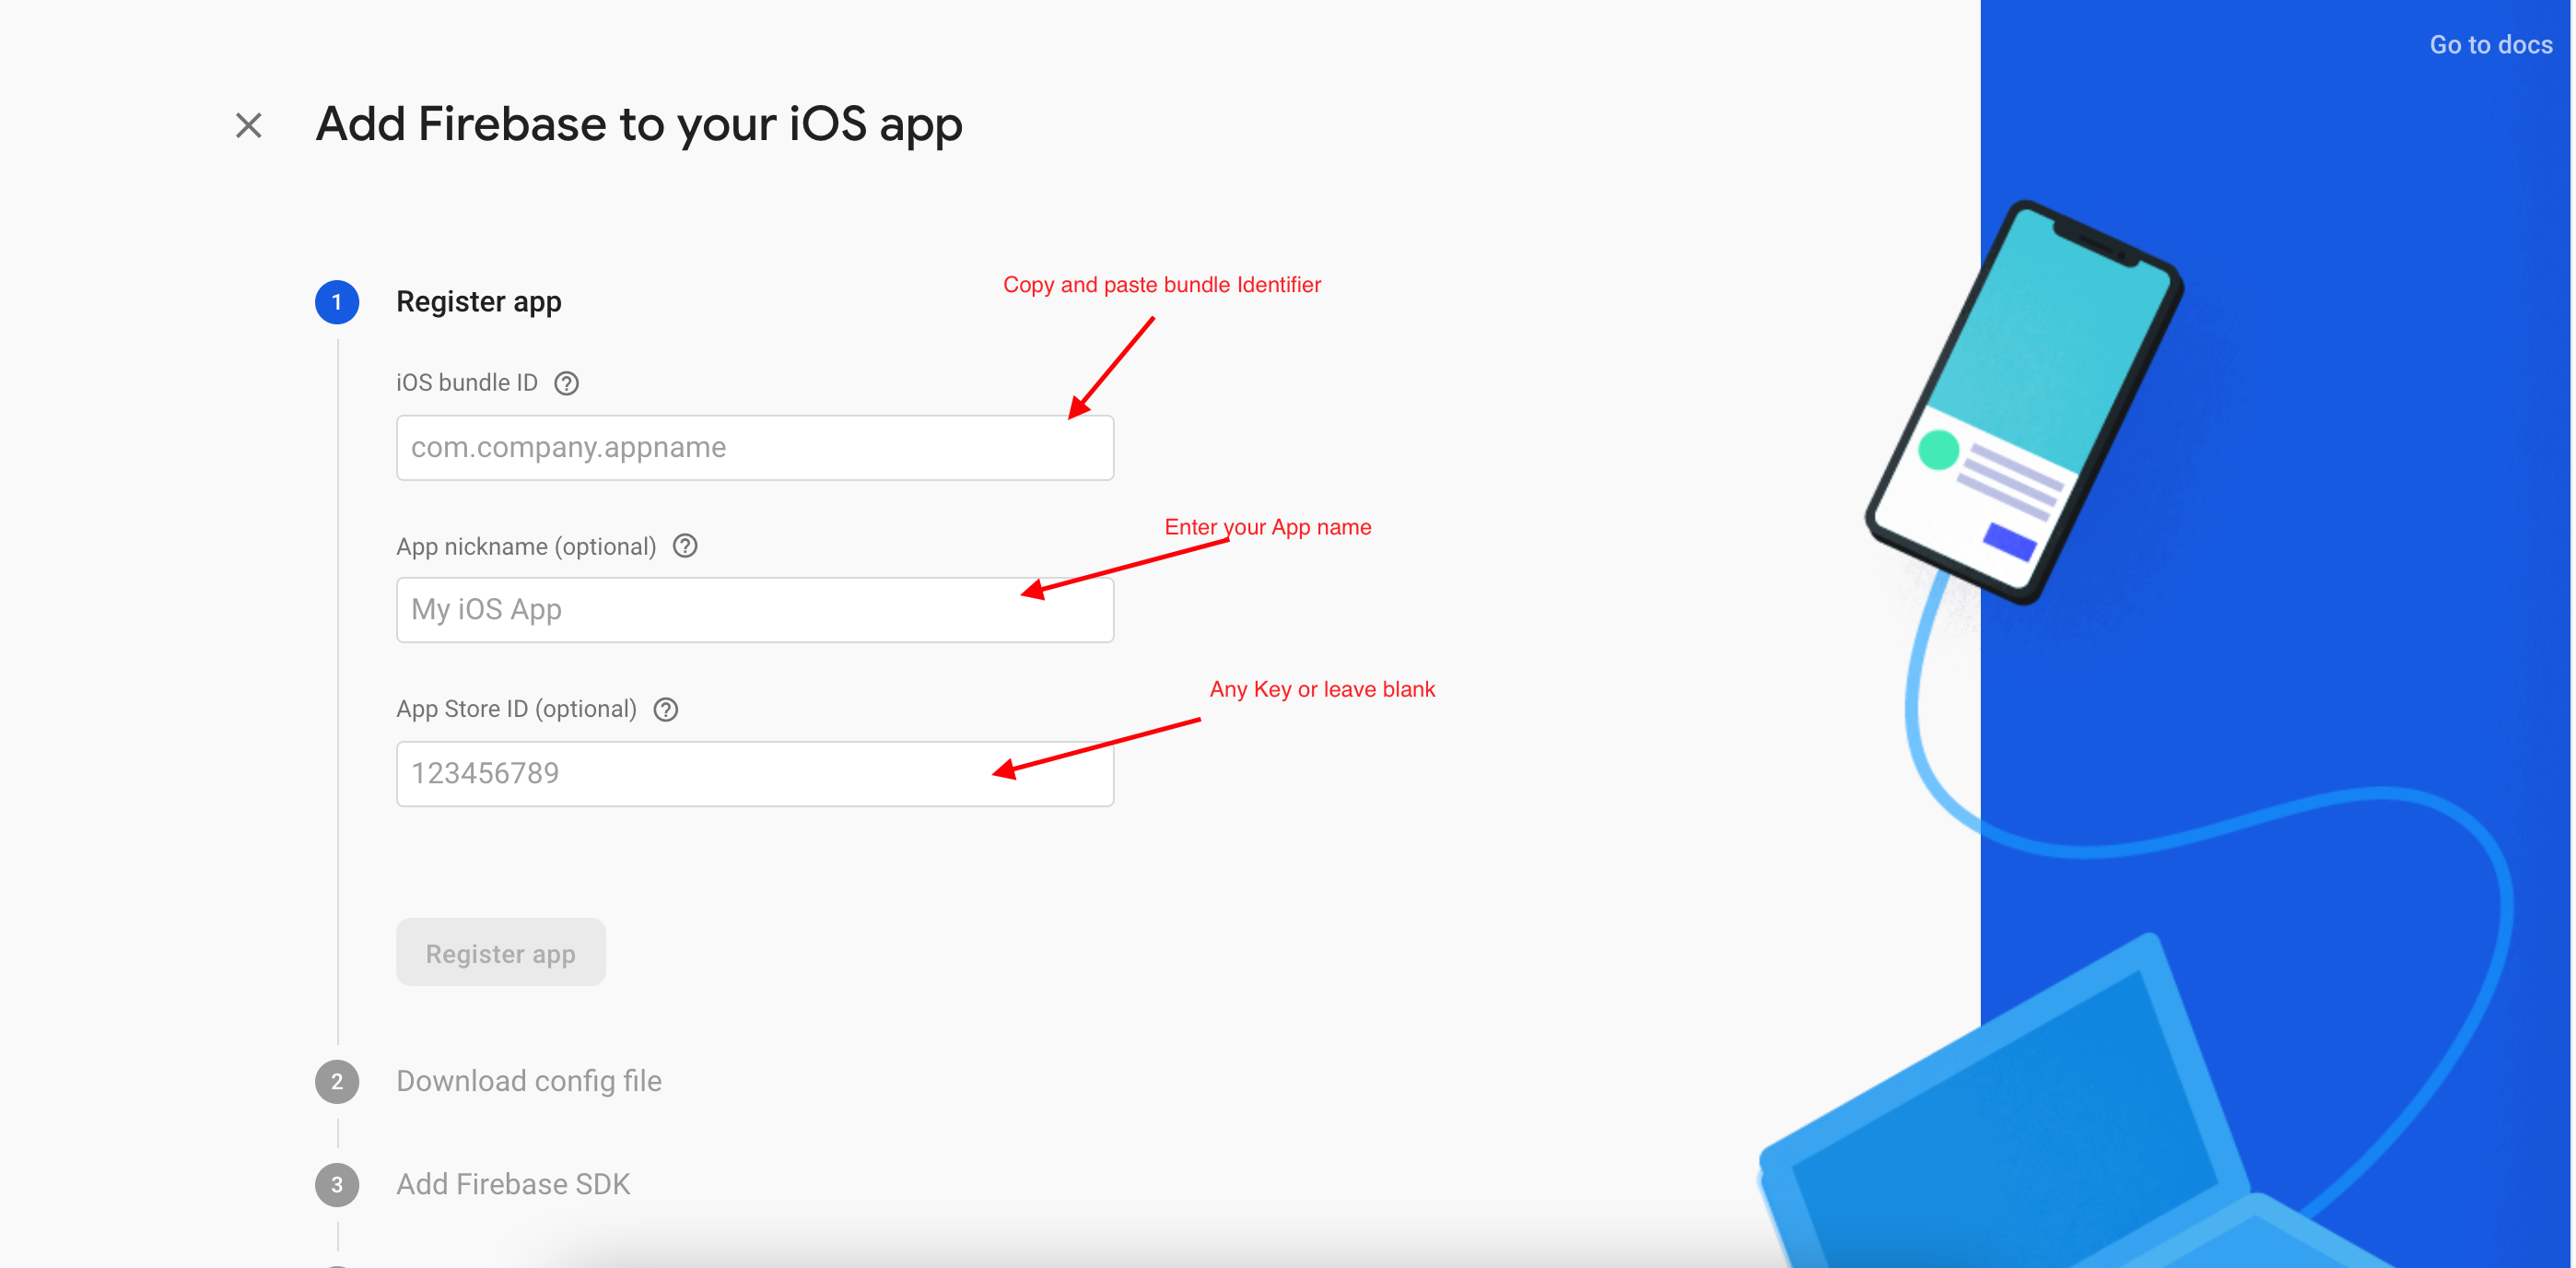
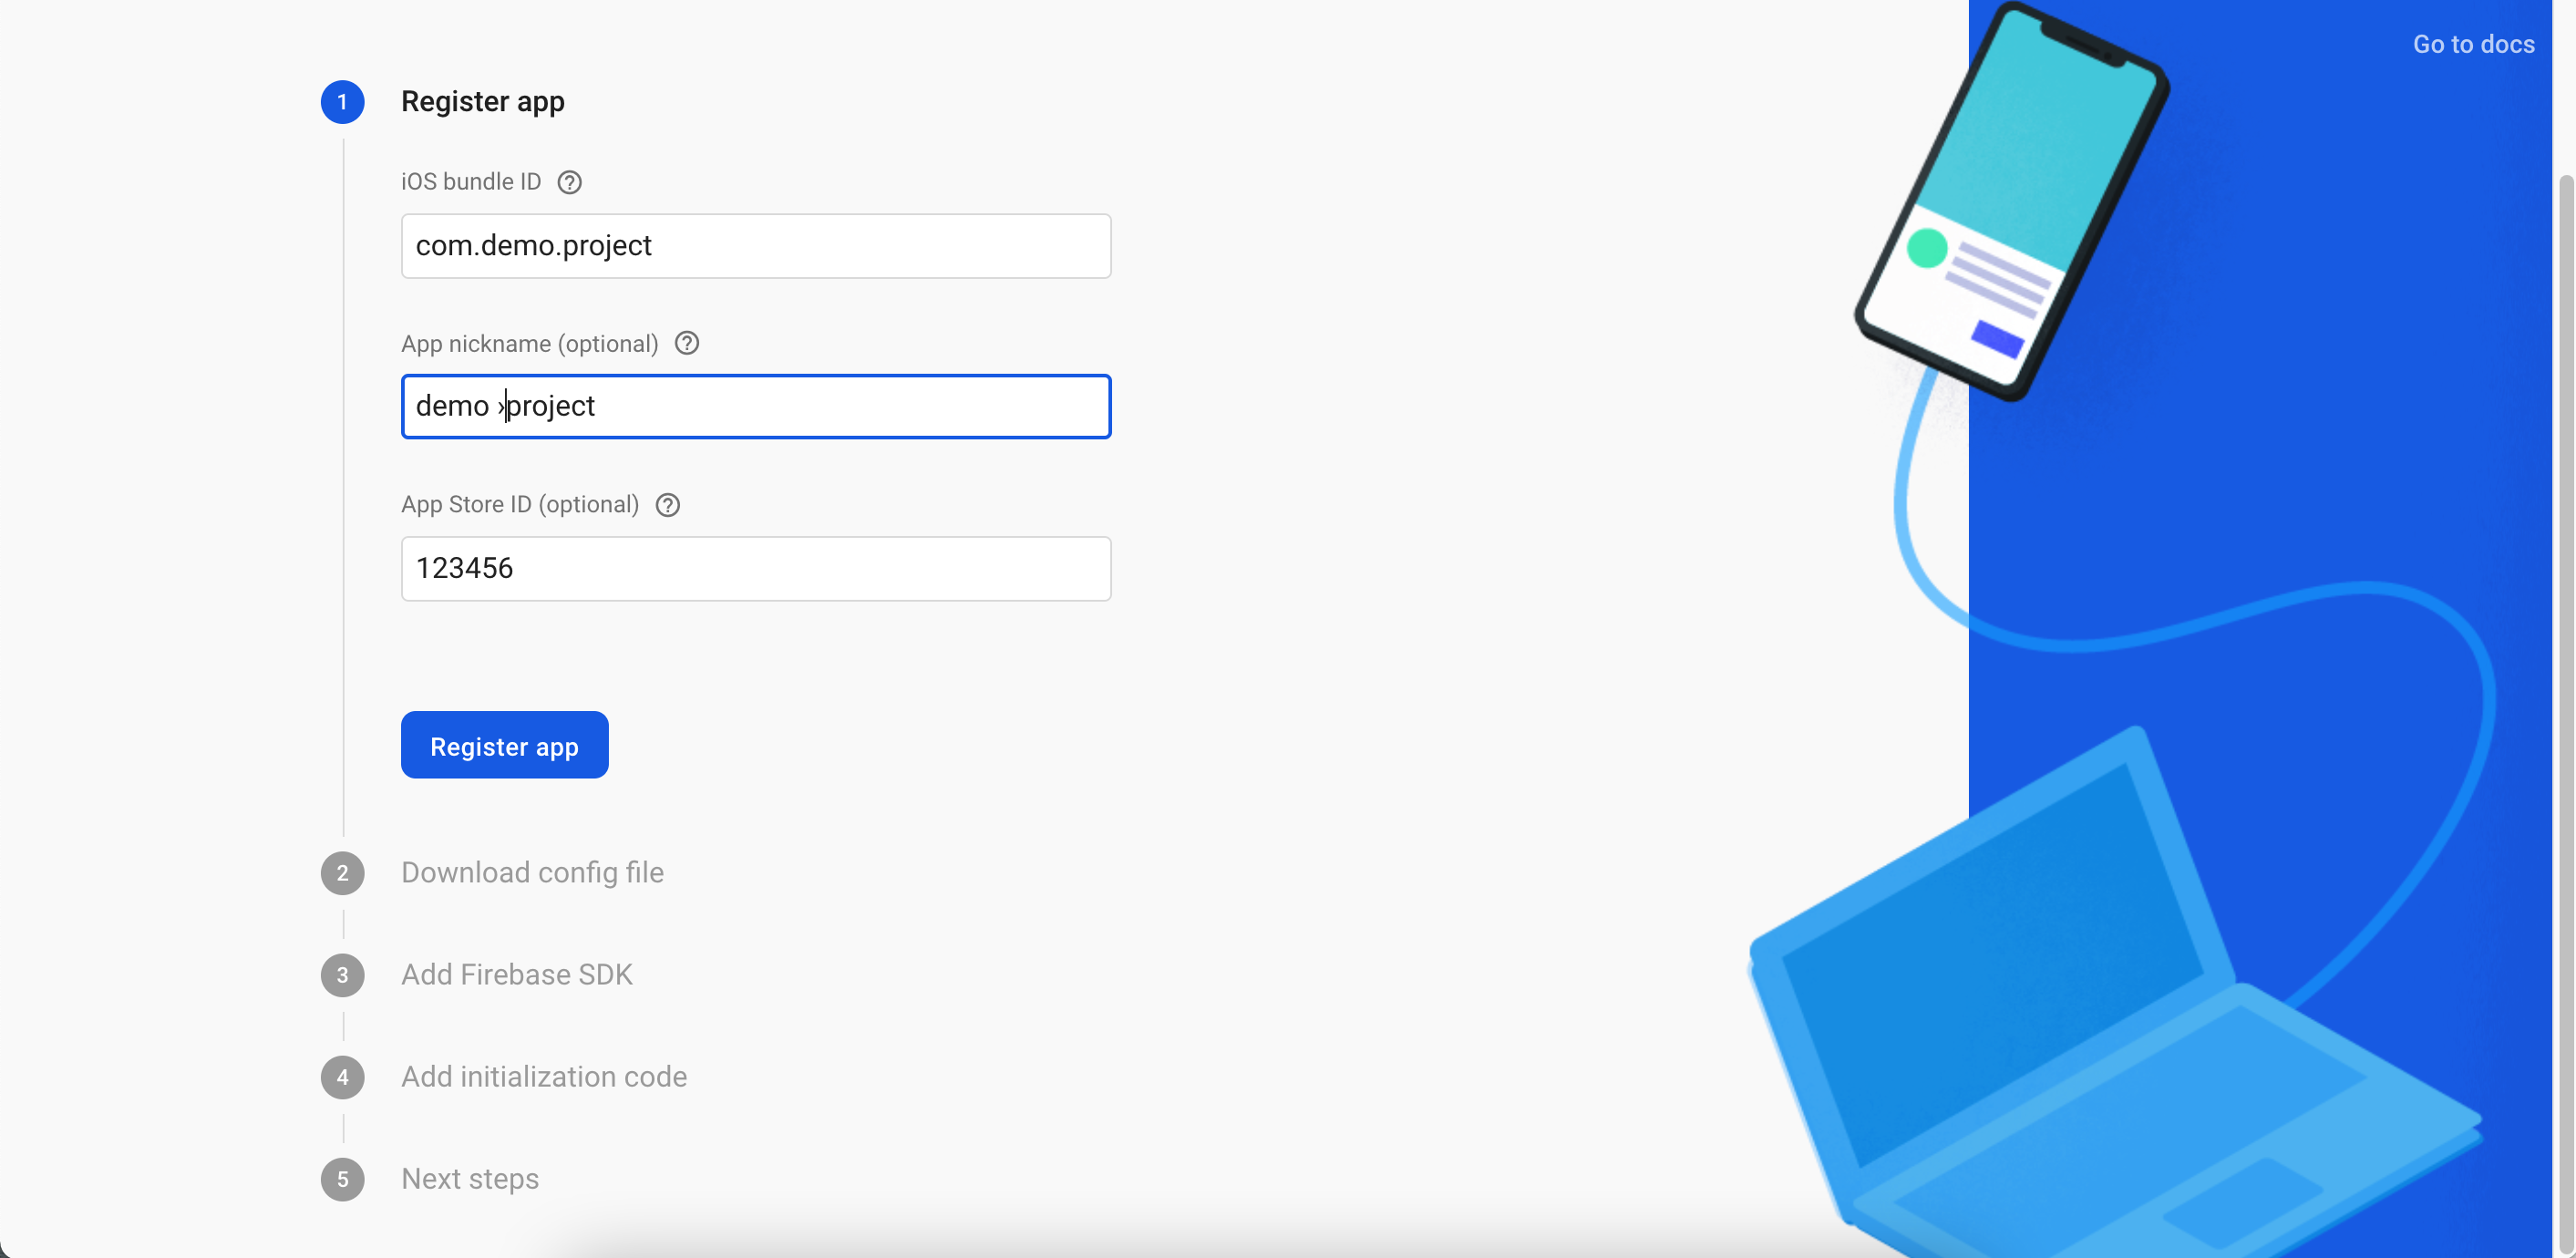
Step 8
Enter your iOS app bundle identifier, enter your App nickname and click on register How to get Bundle Identifier
Step 9
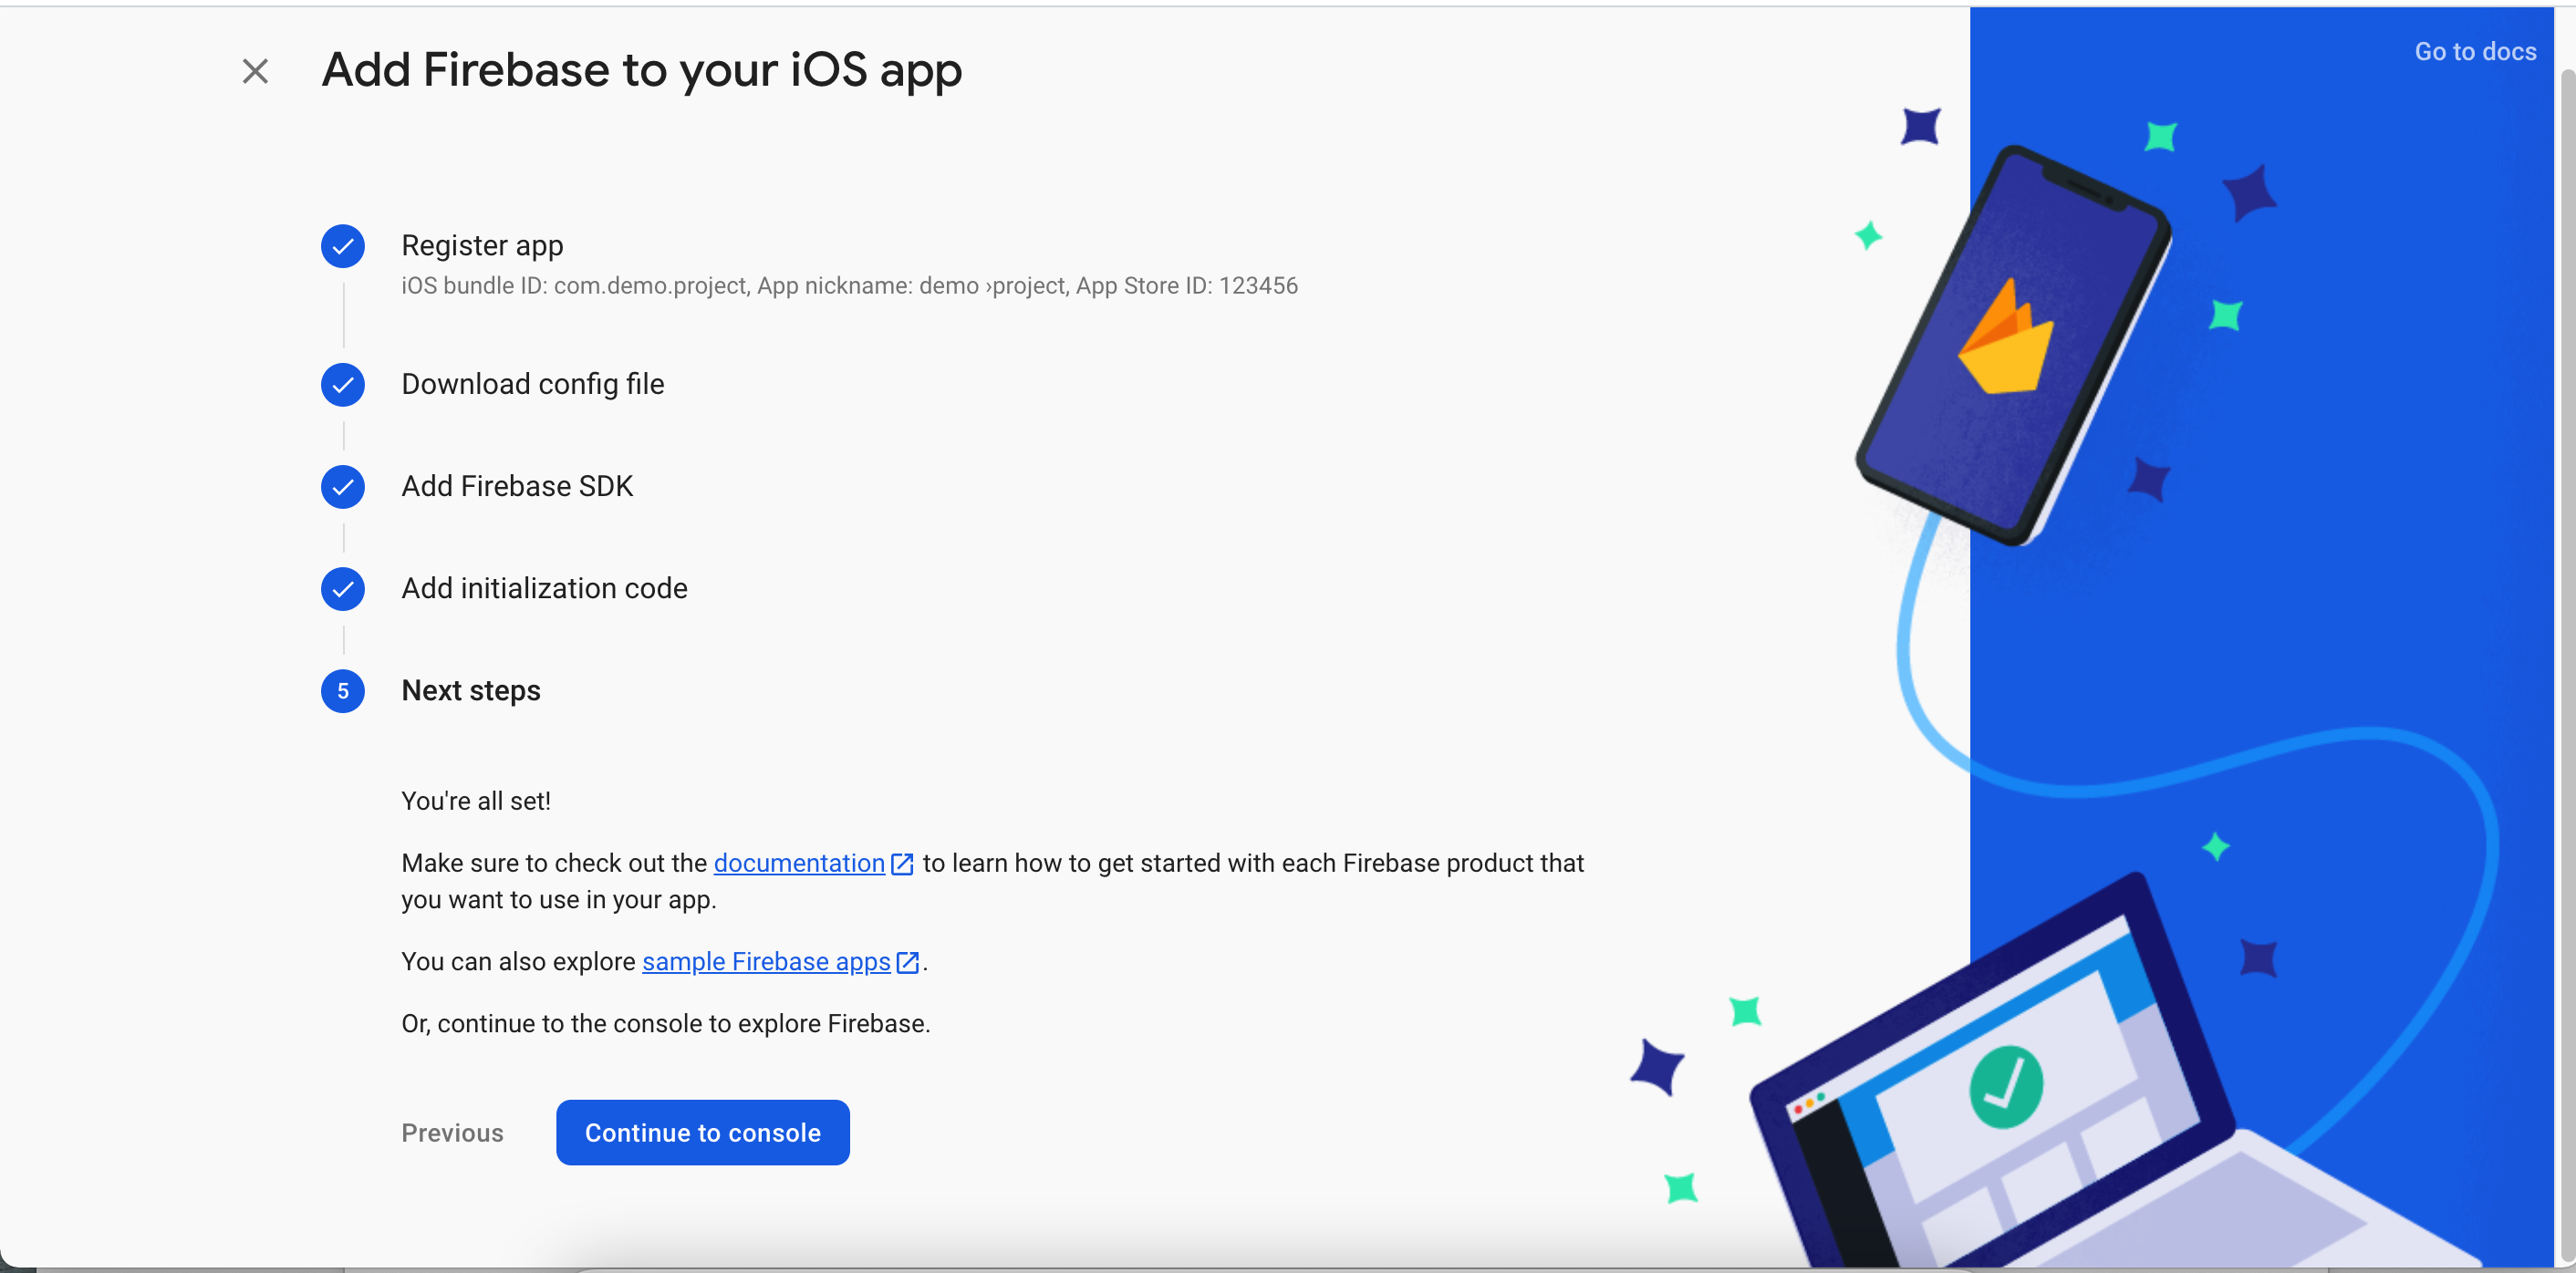
Now download your "GoogleServices-info.Plist"
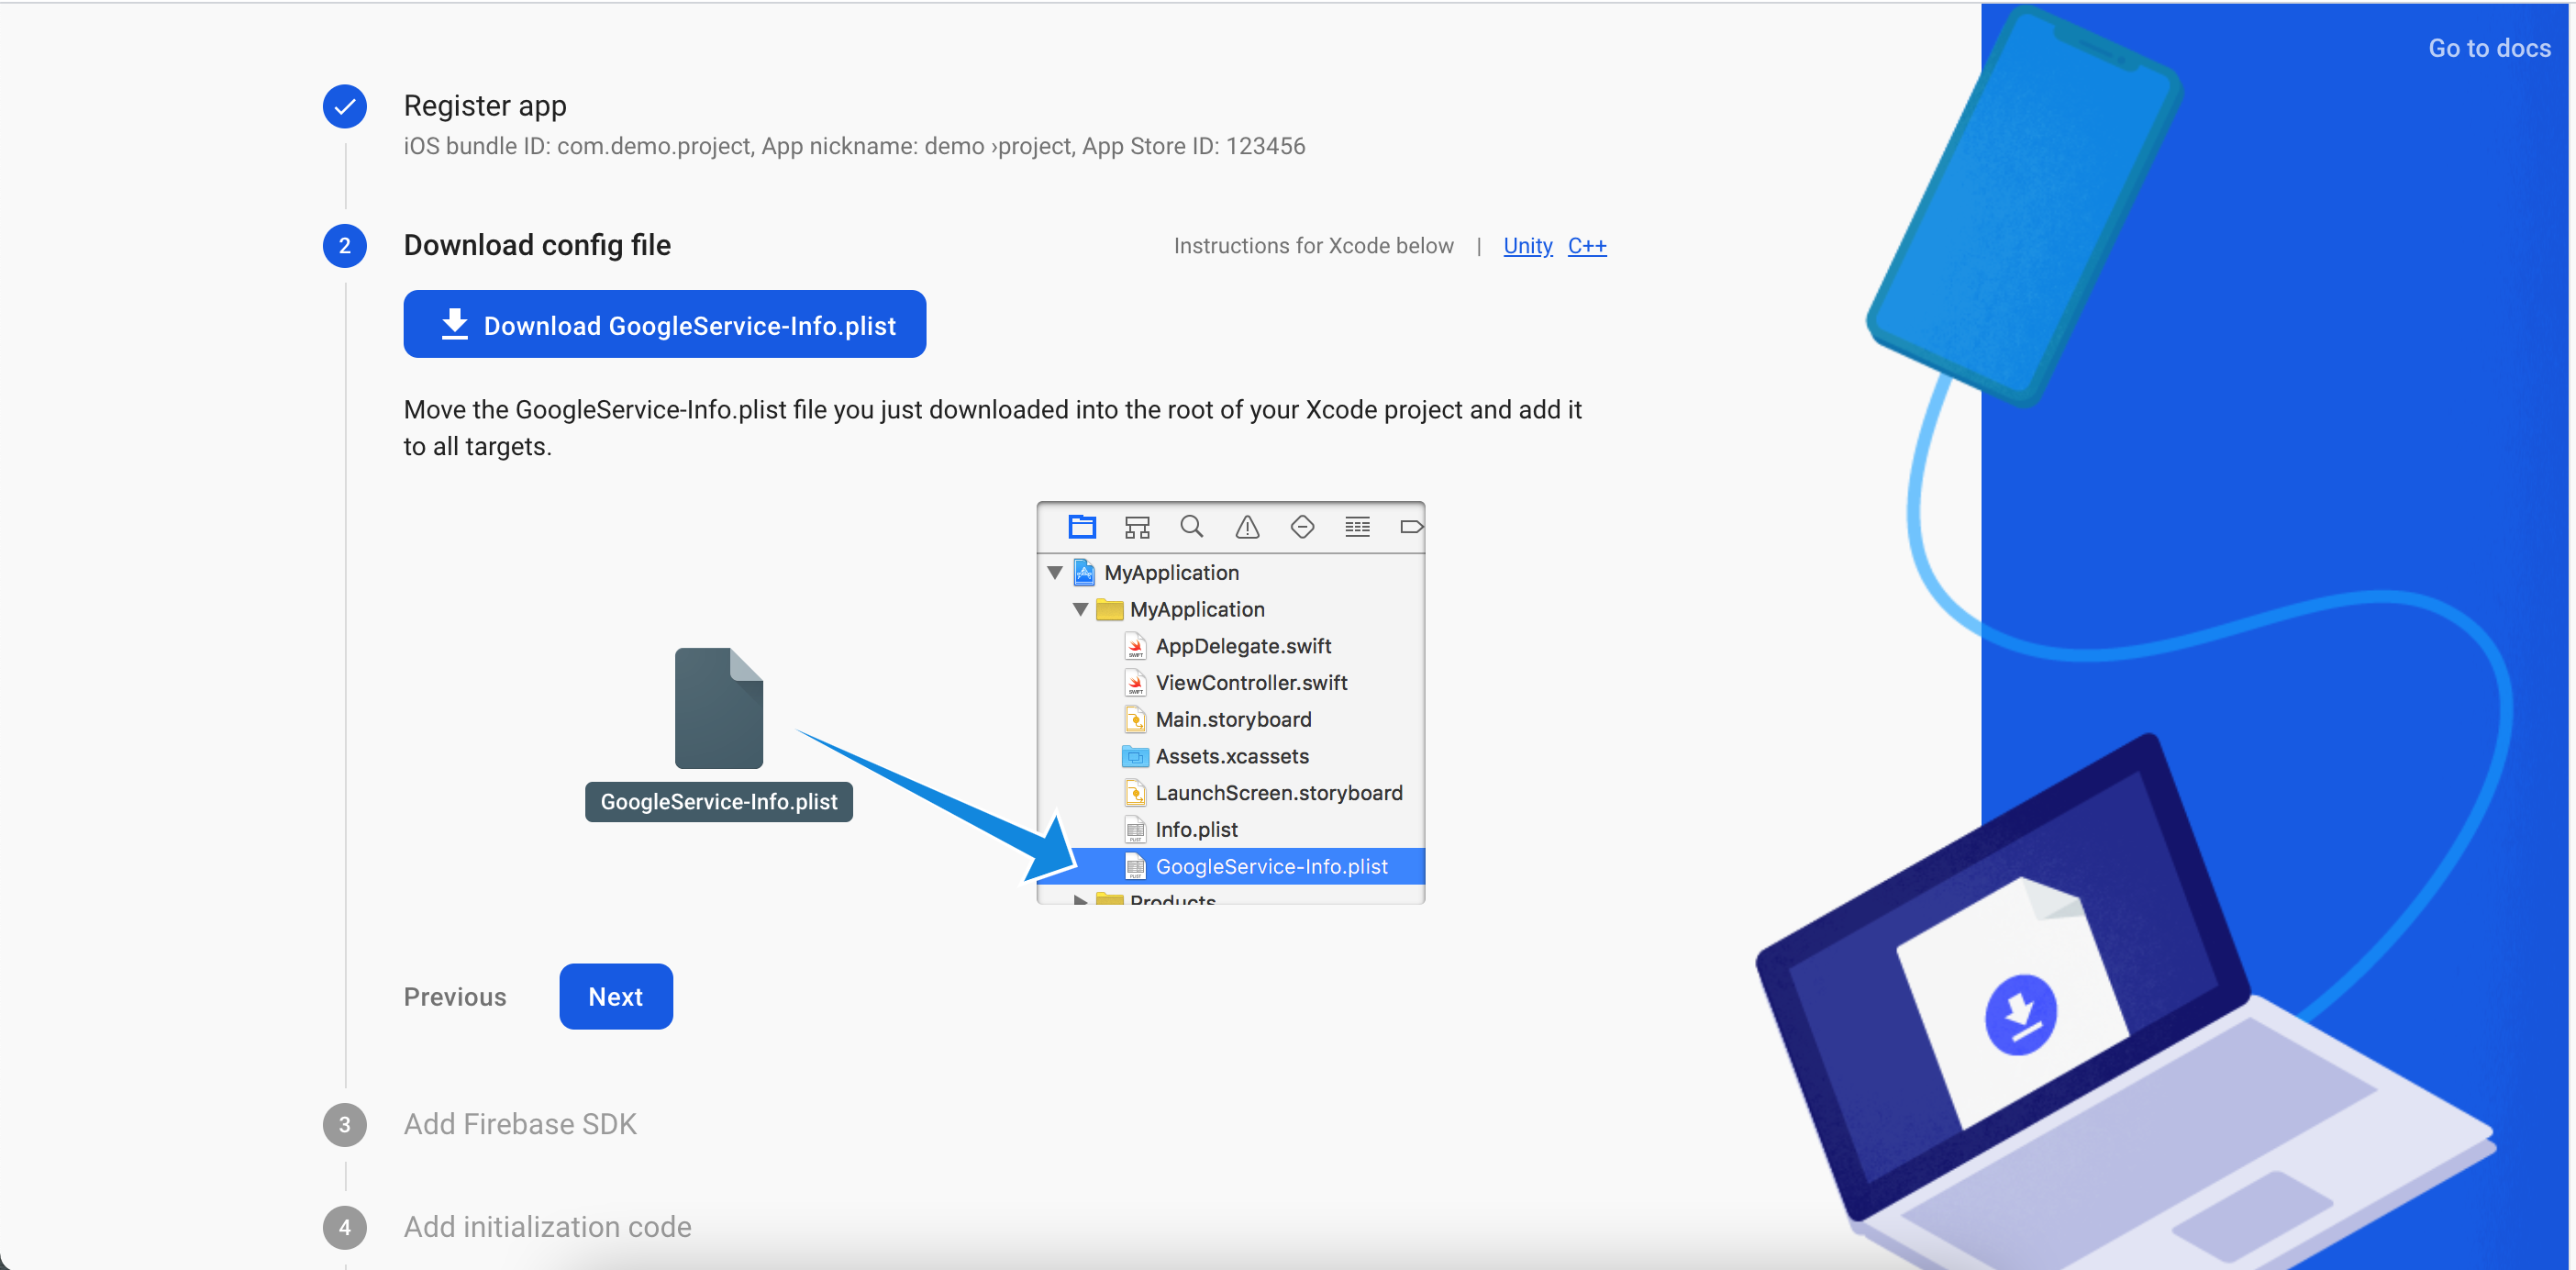
NOTE:
Save this Info.plist after successfully created project, then drag & drop this Info.plist in your Xcode project
Step 10
Click on Next
Step 11
Click on Continue Console.
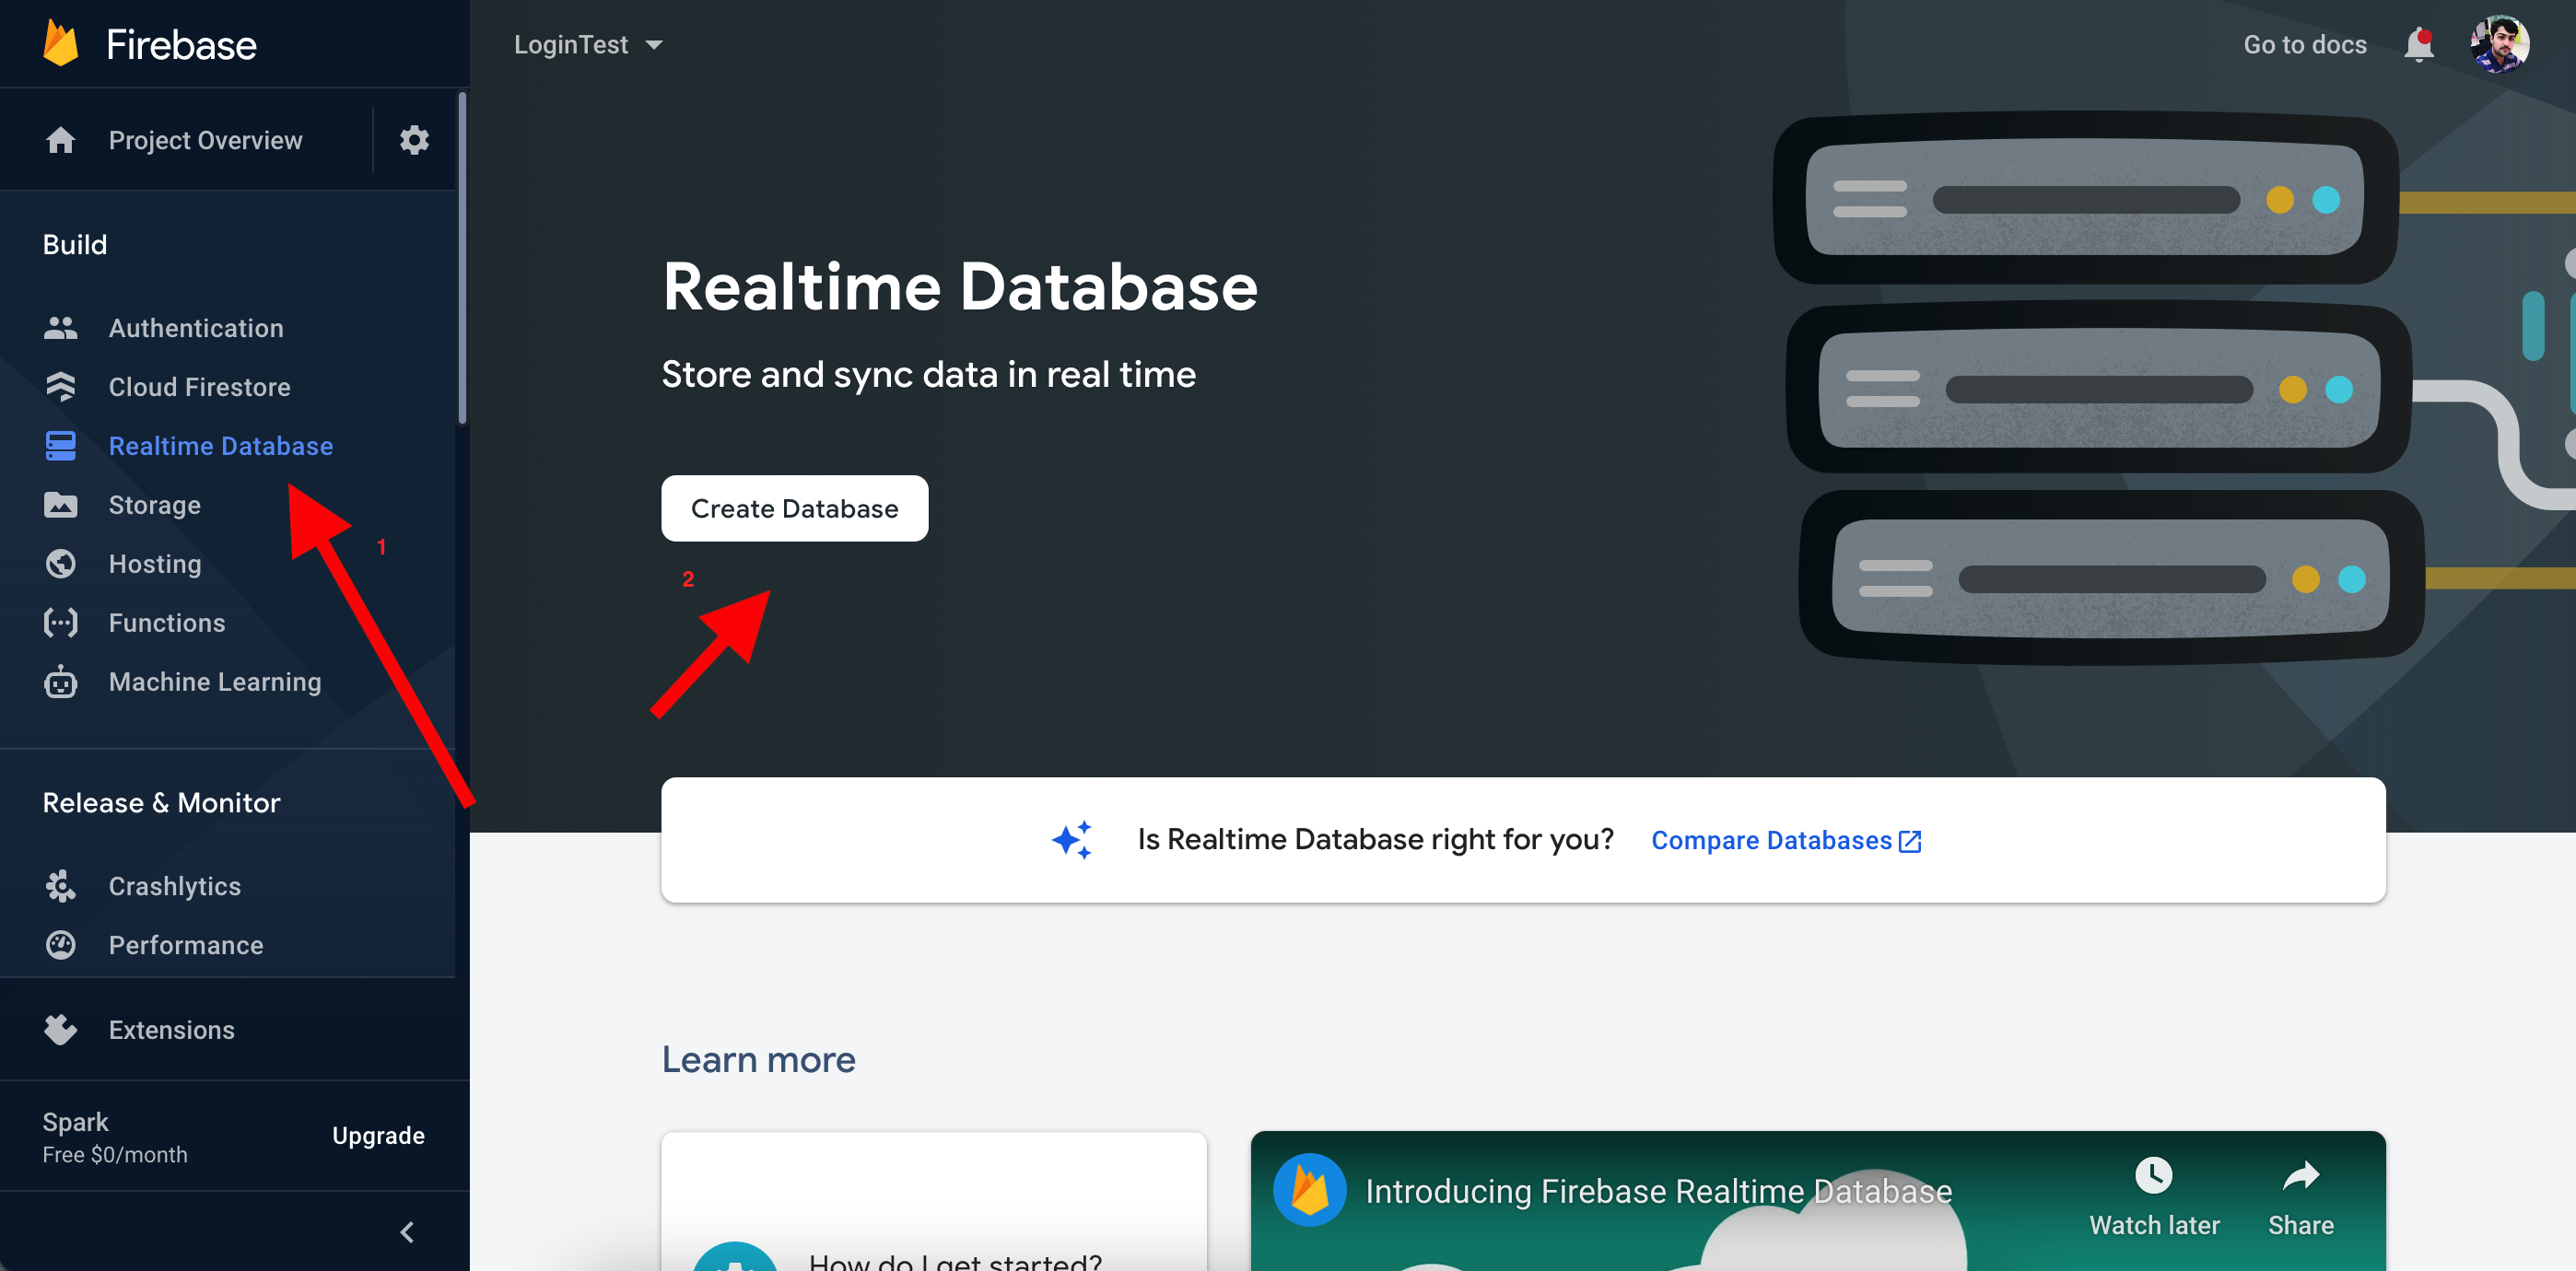
Step 12
Select Realtime Database and click on Create Database
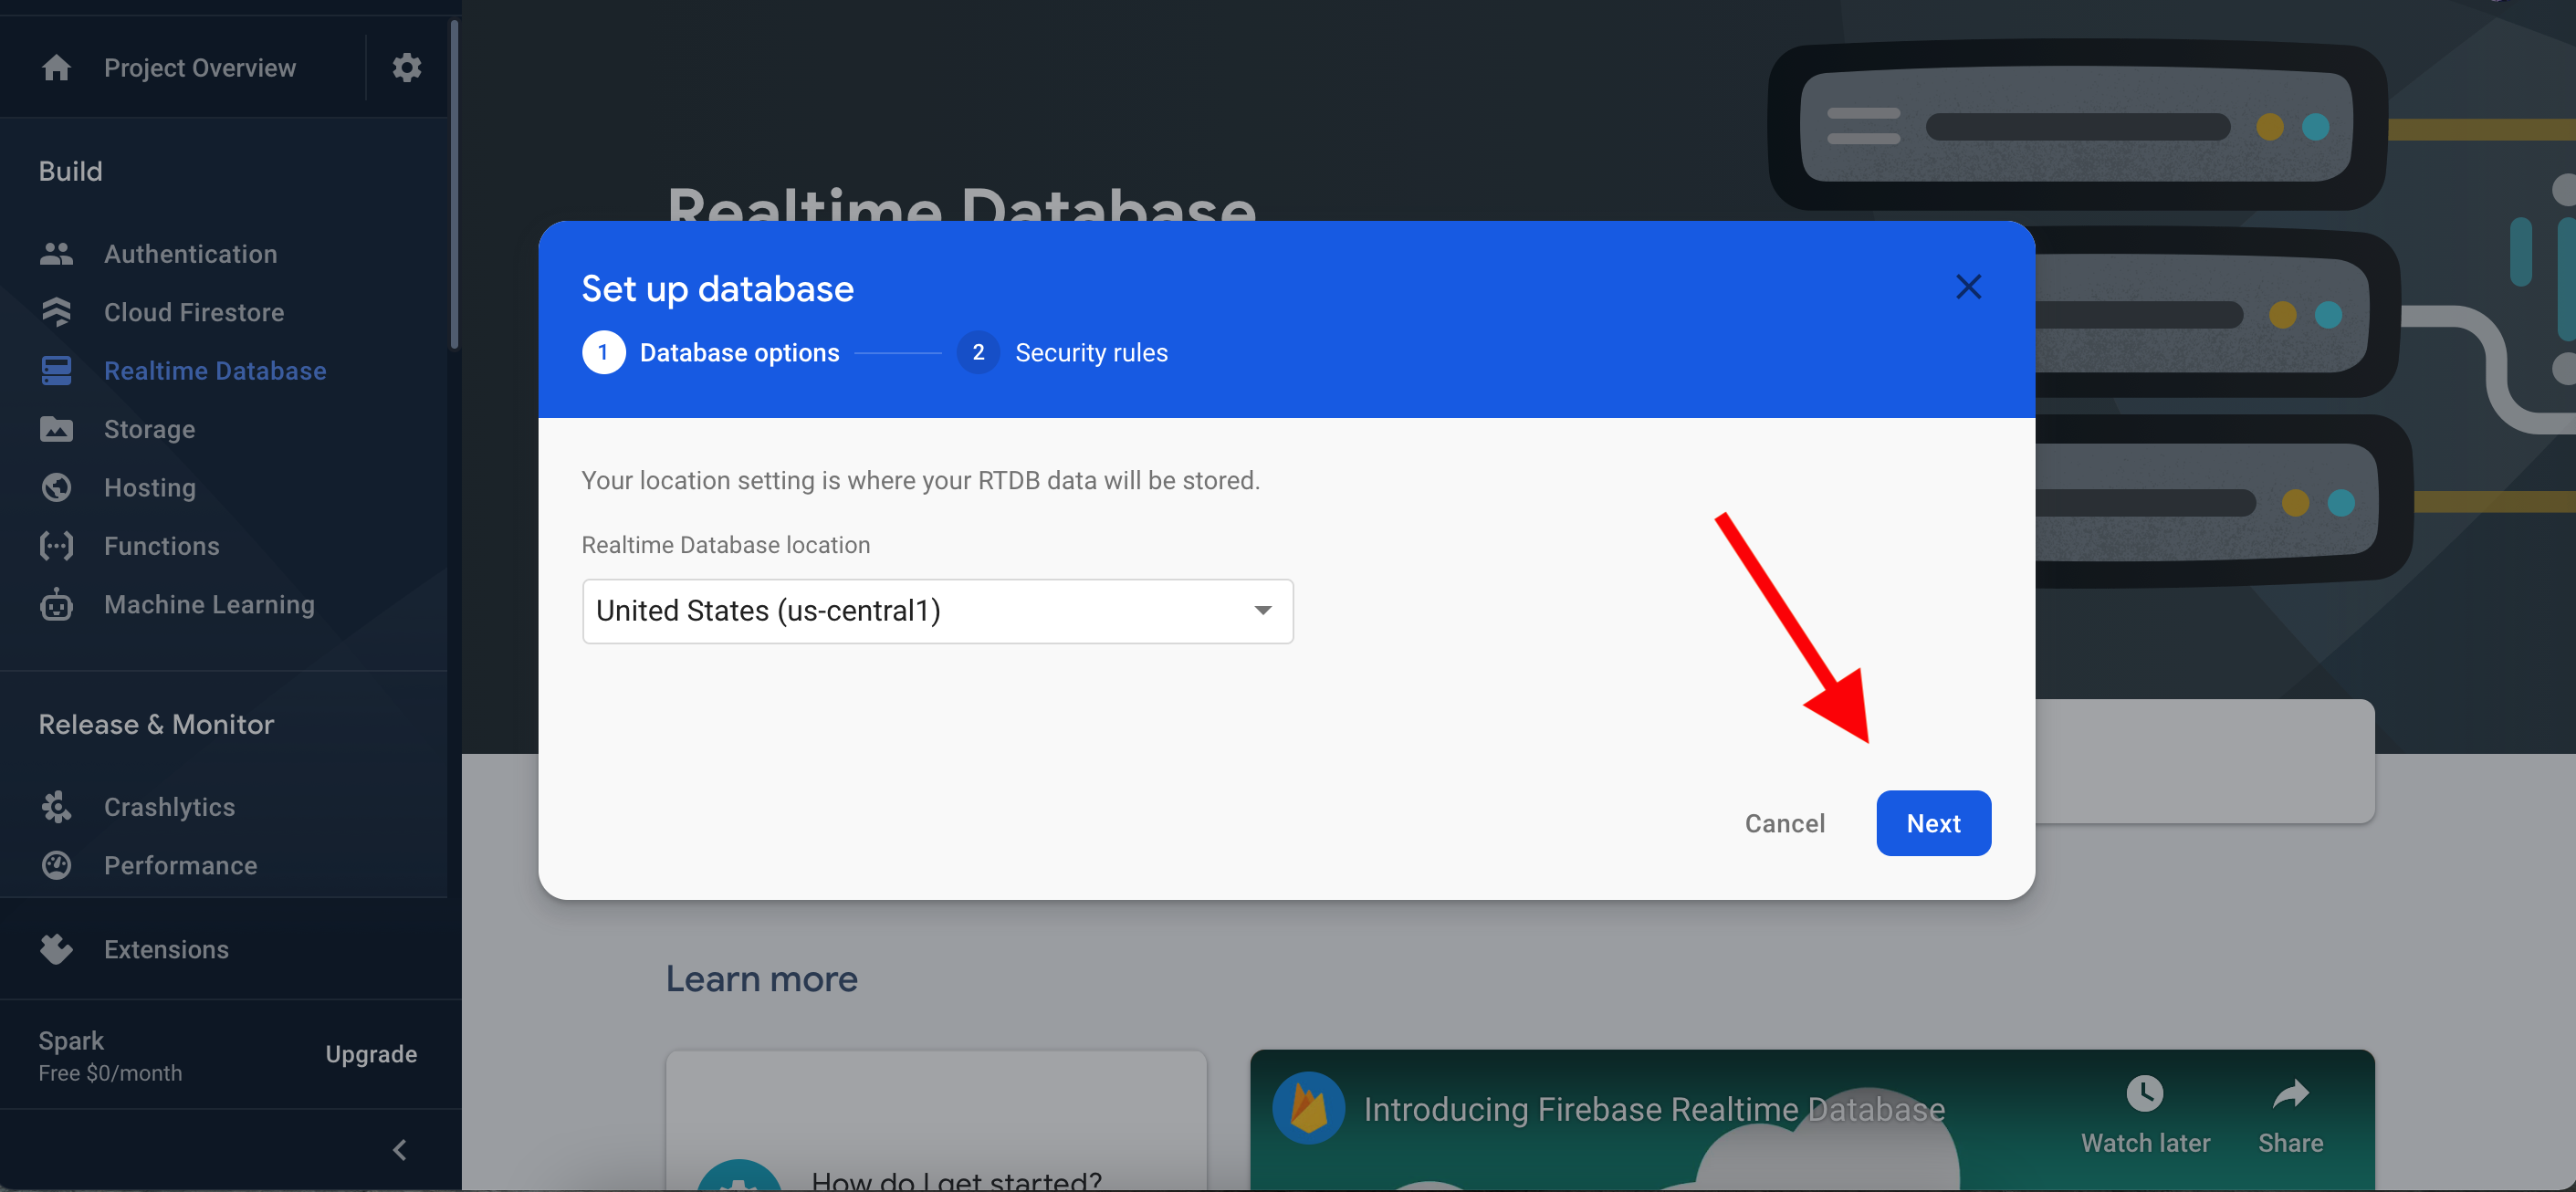
Step 13
Click on Next
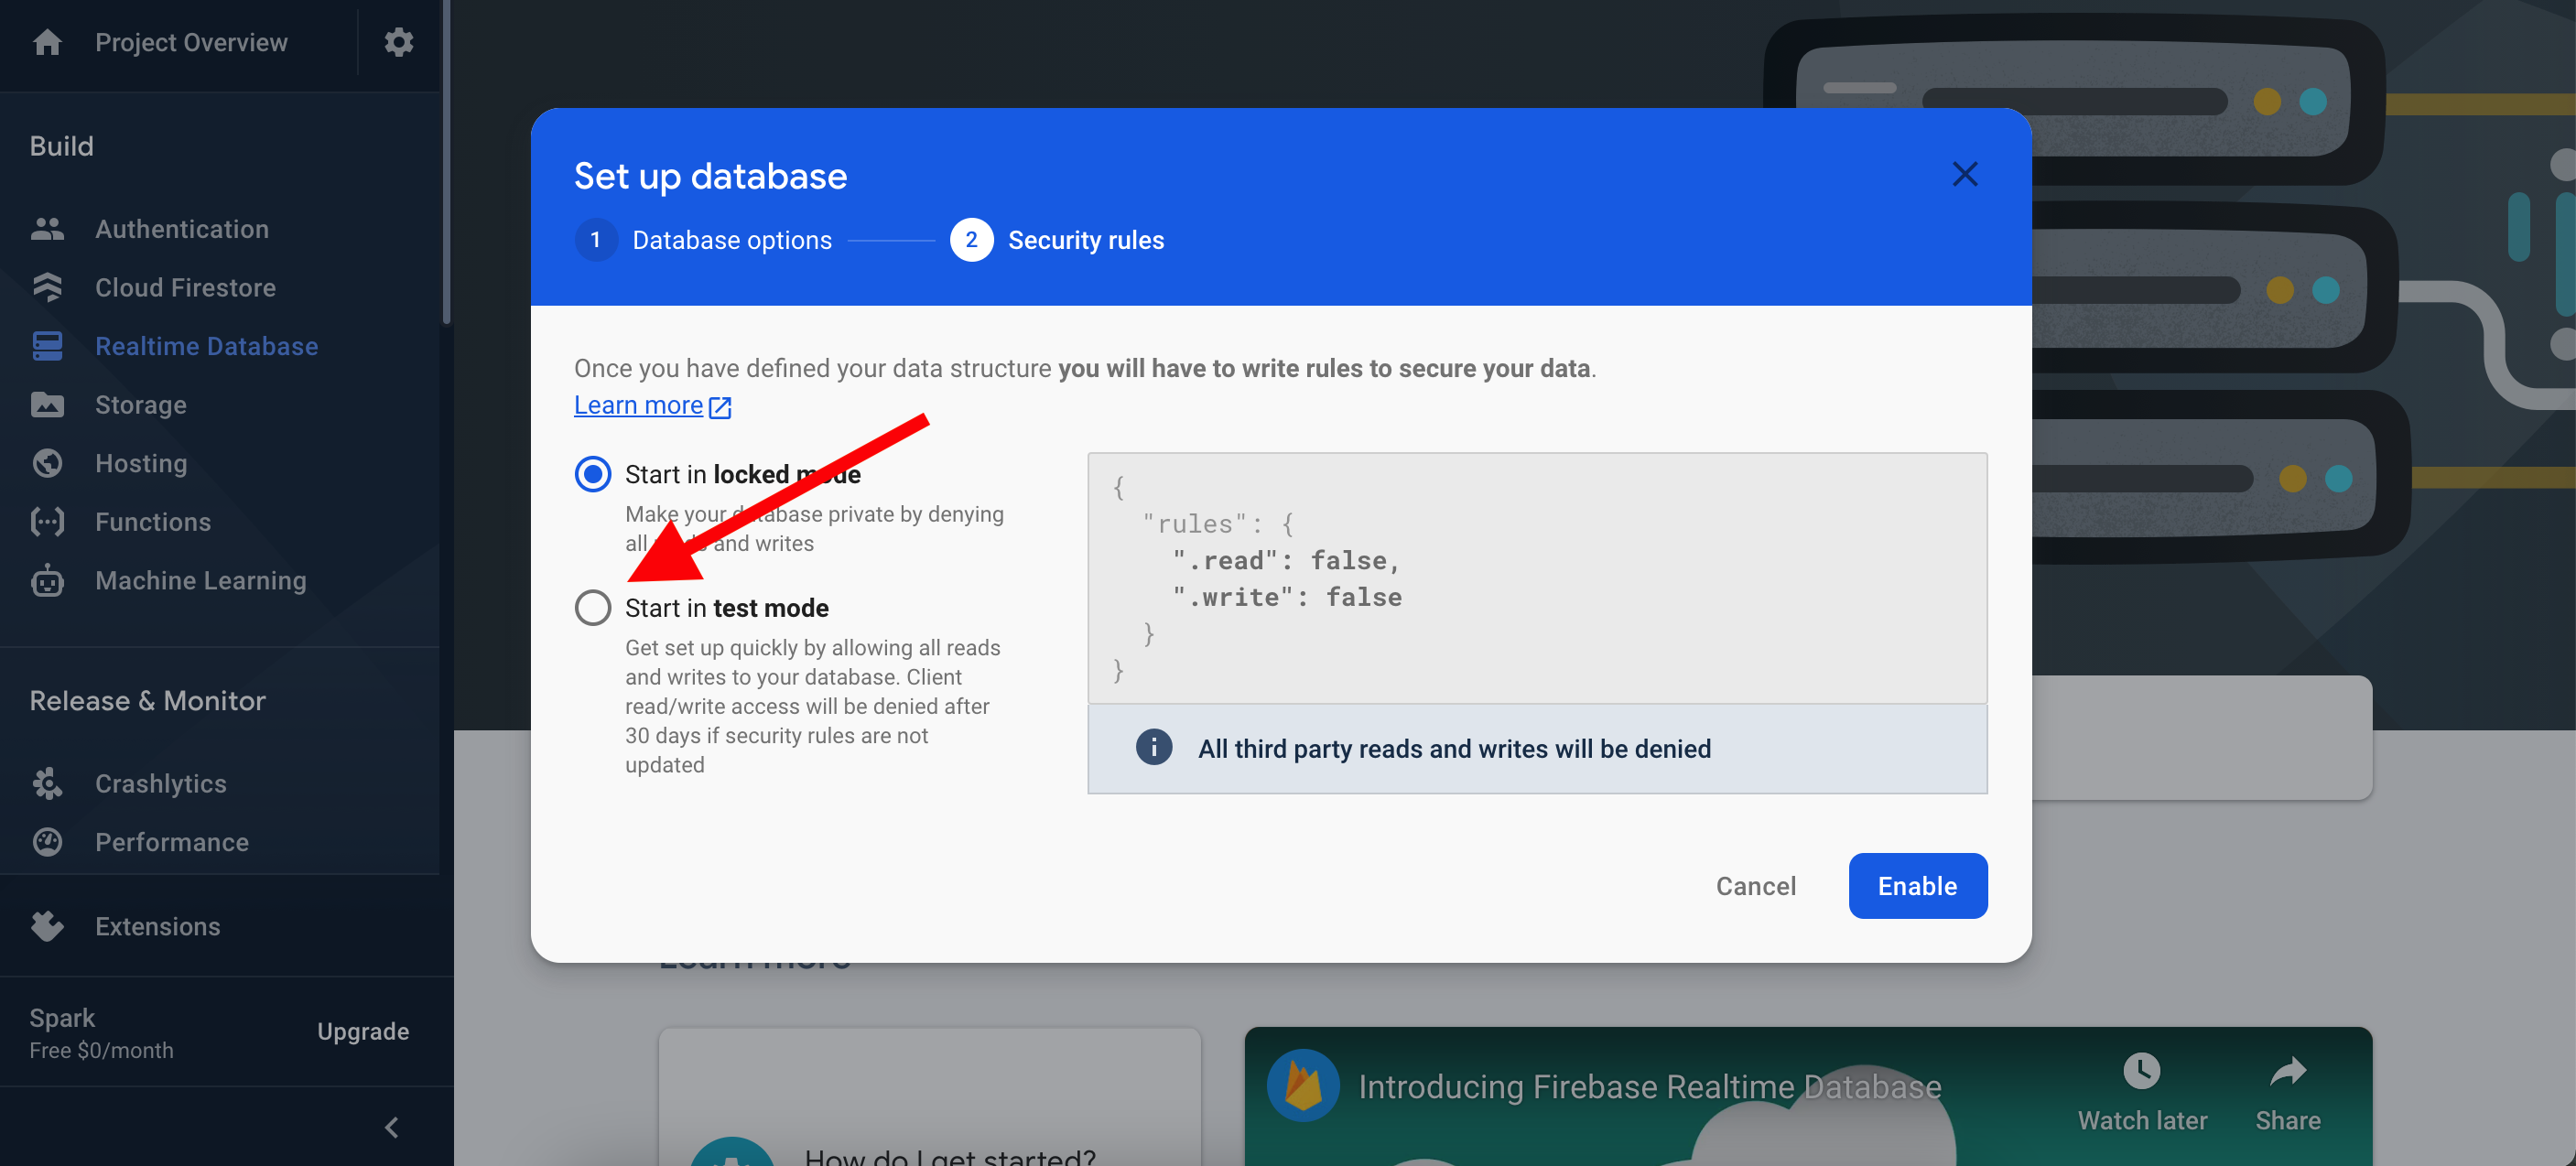
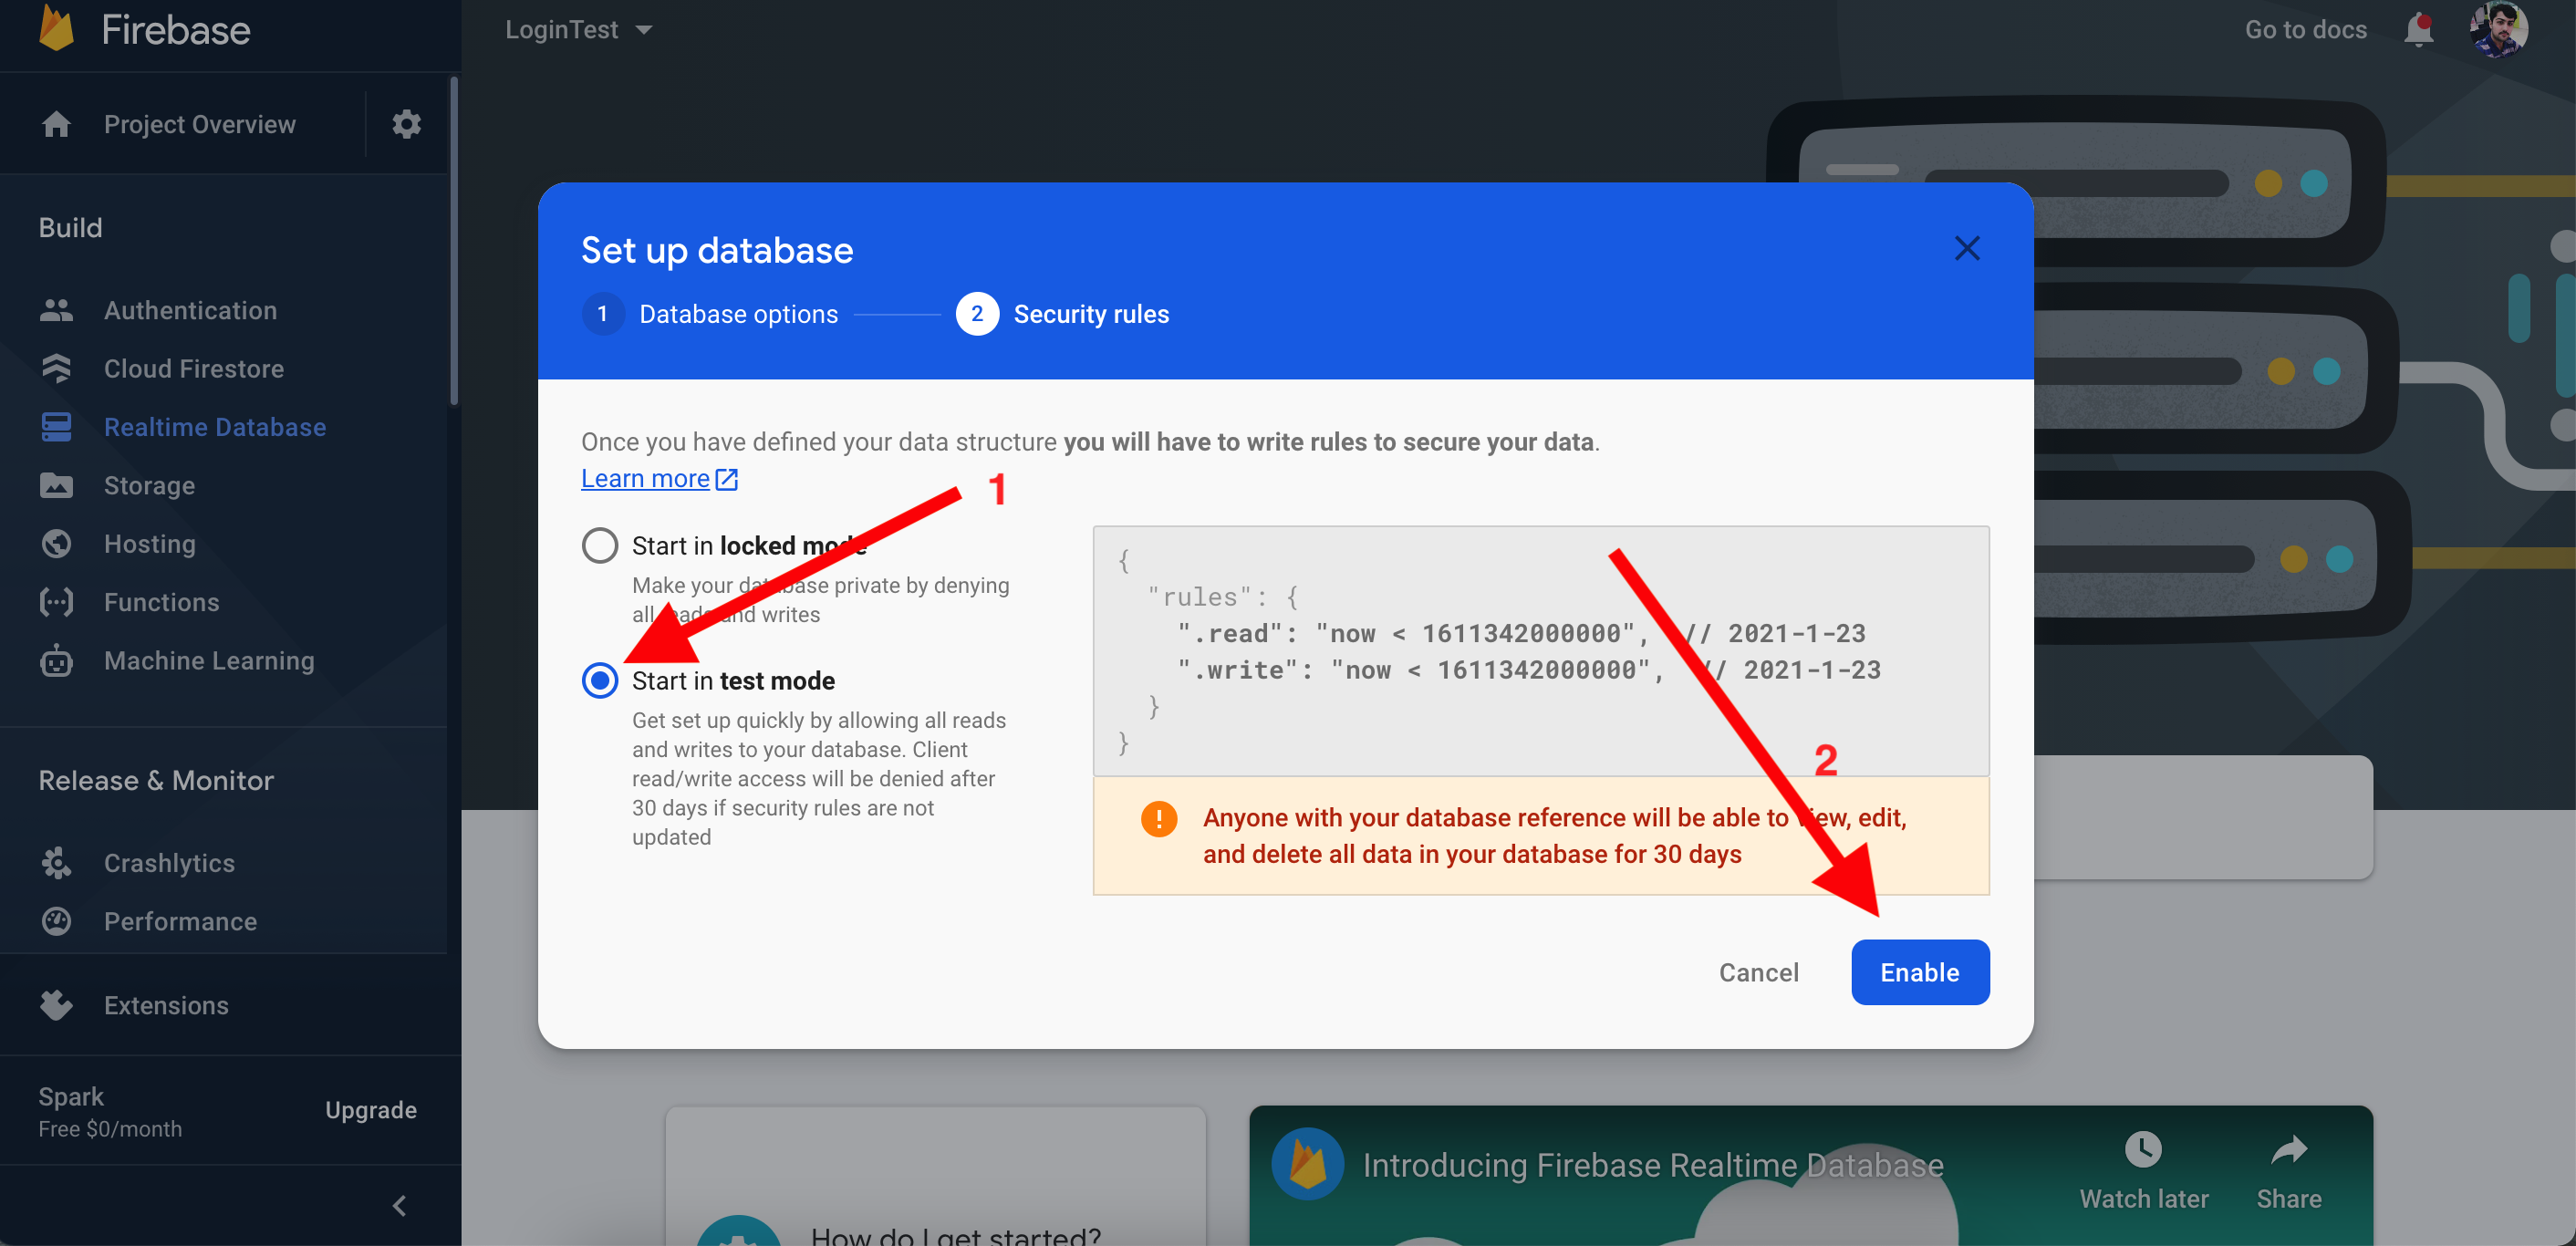
Step 14
Select 'Start in test mode' and then click on Enable
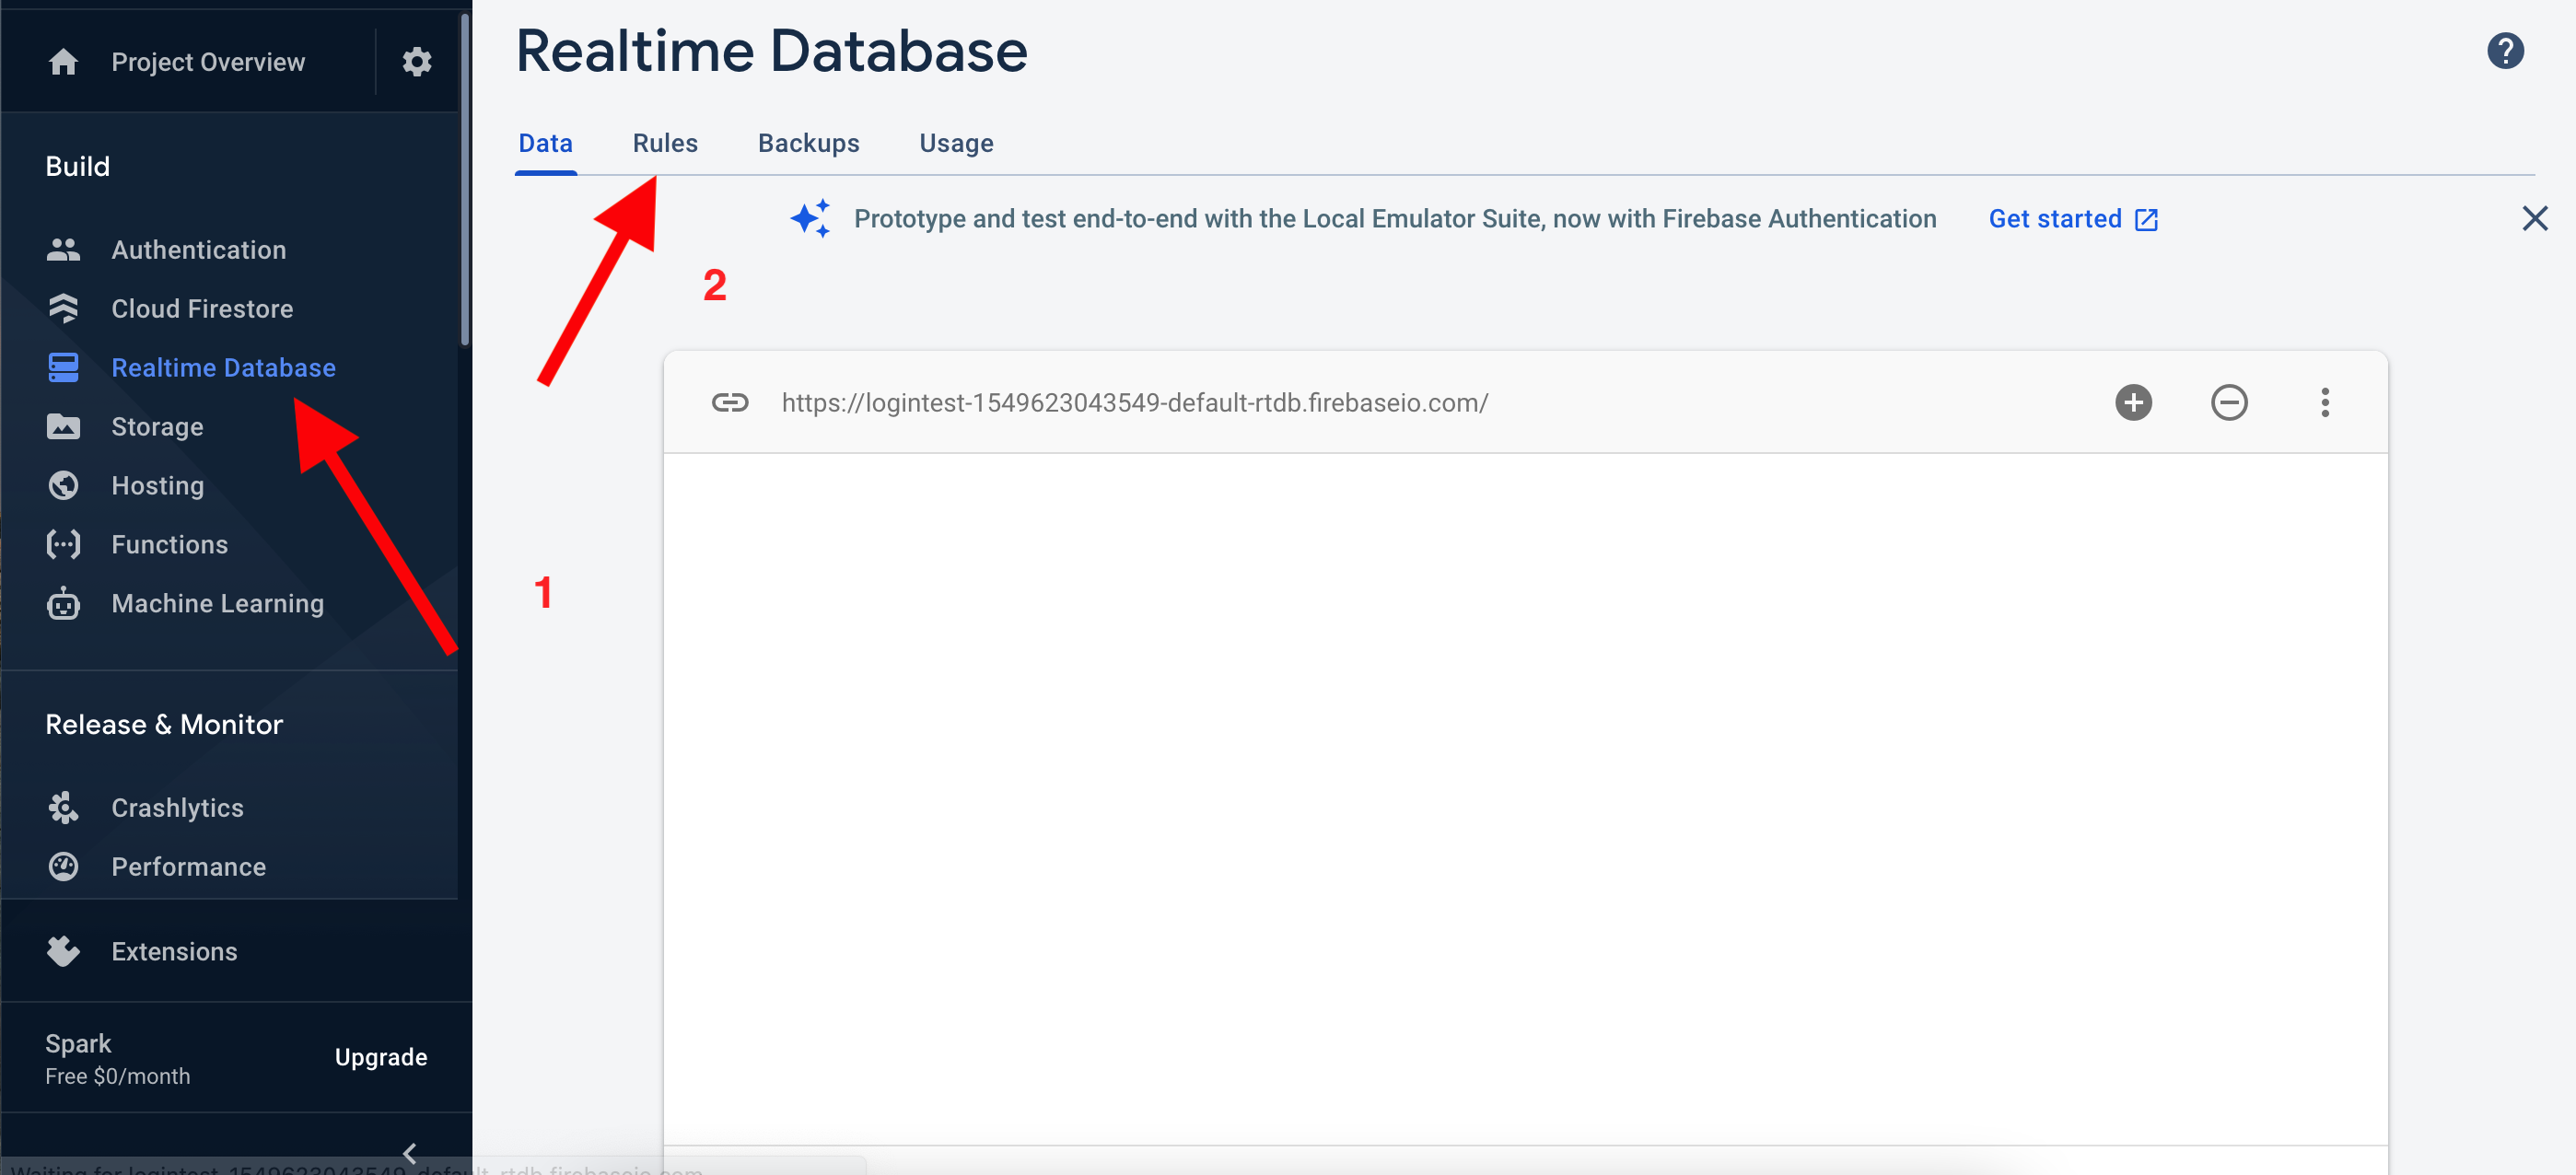
Step 15
Now select Realtime Database > Rules
Step 16
Replace the whole code with this
{
"rules": {
".read": "true",
".write": "true"
}
}
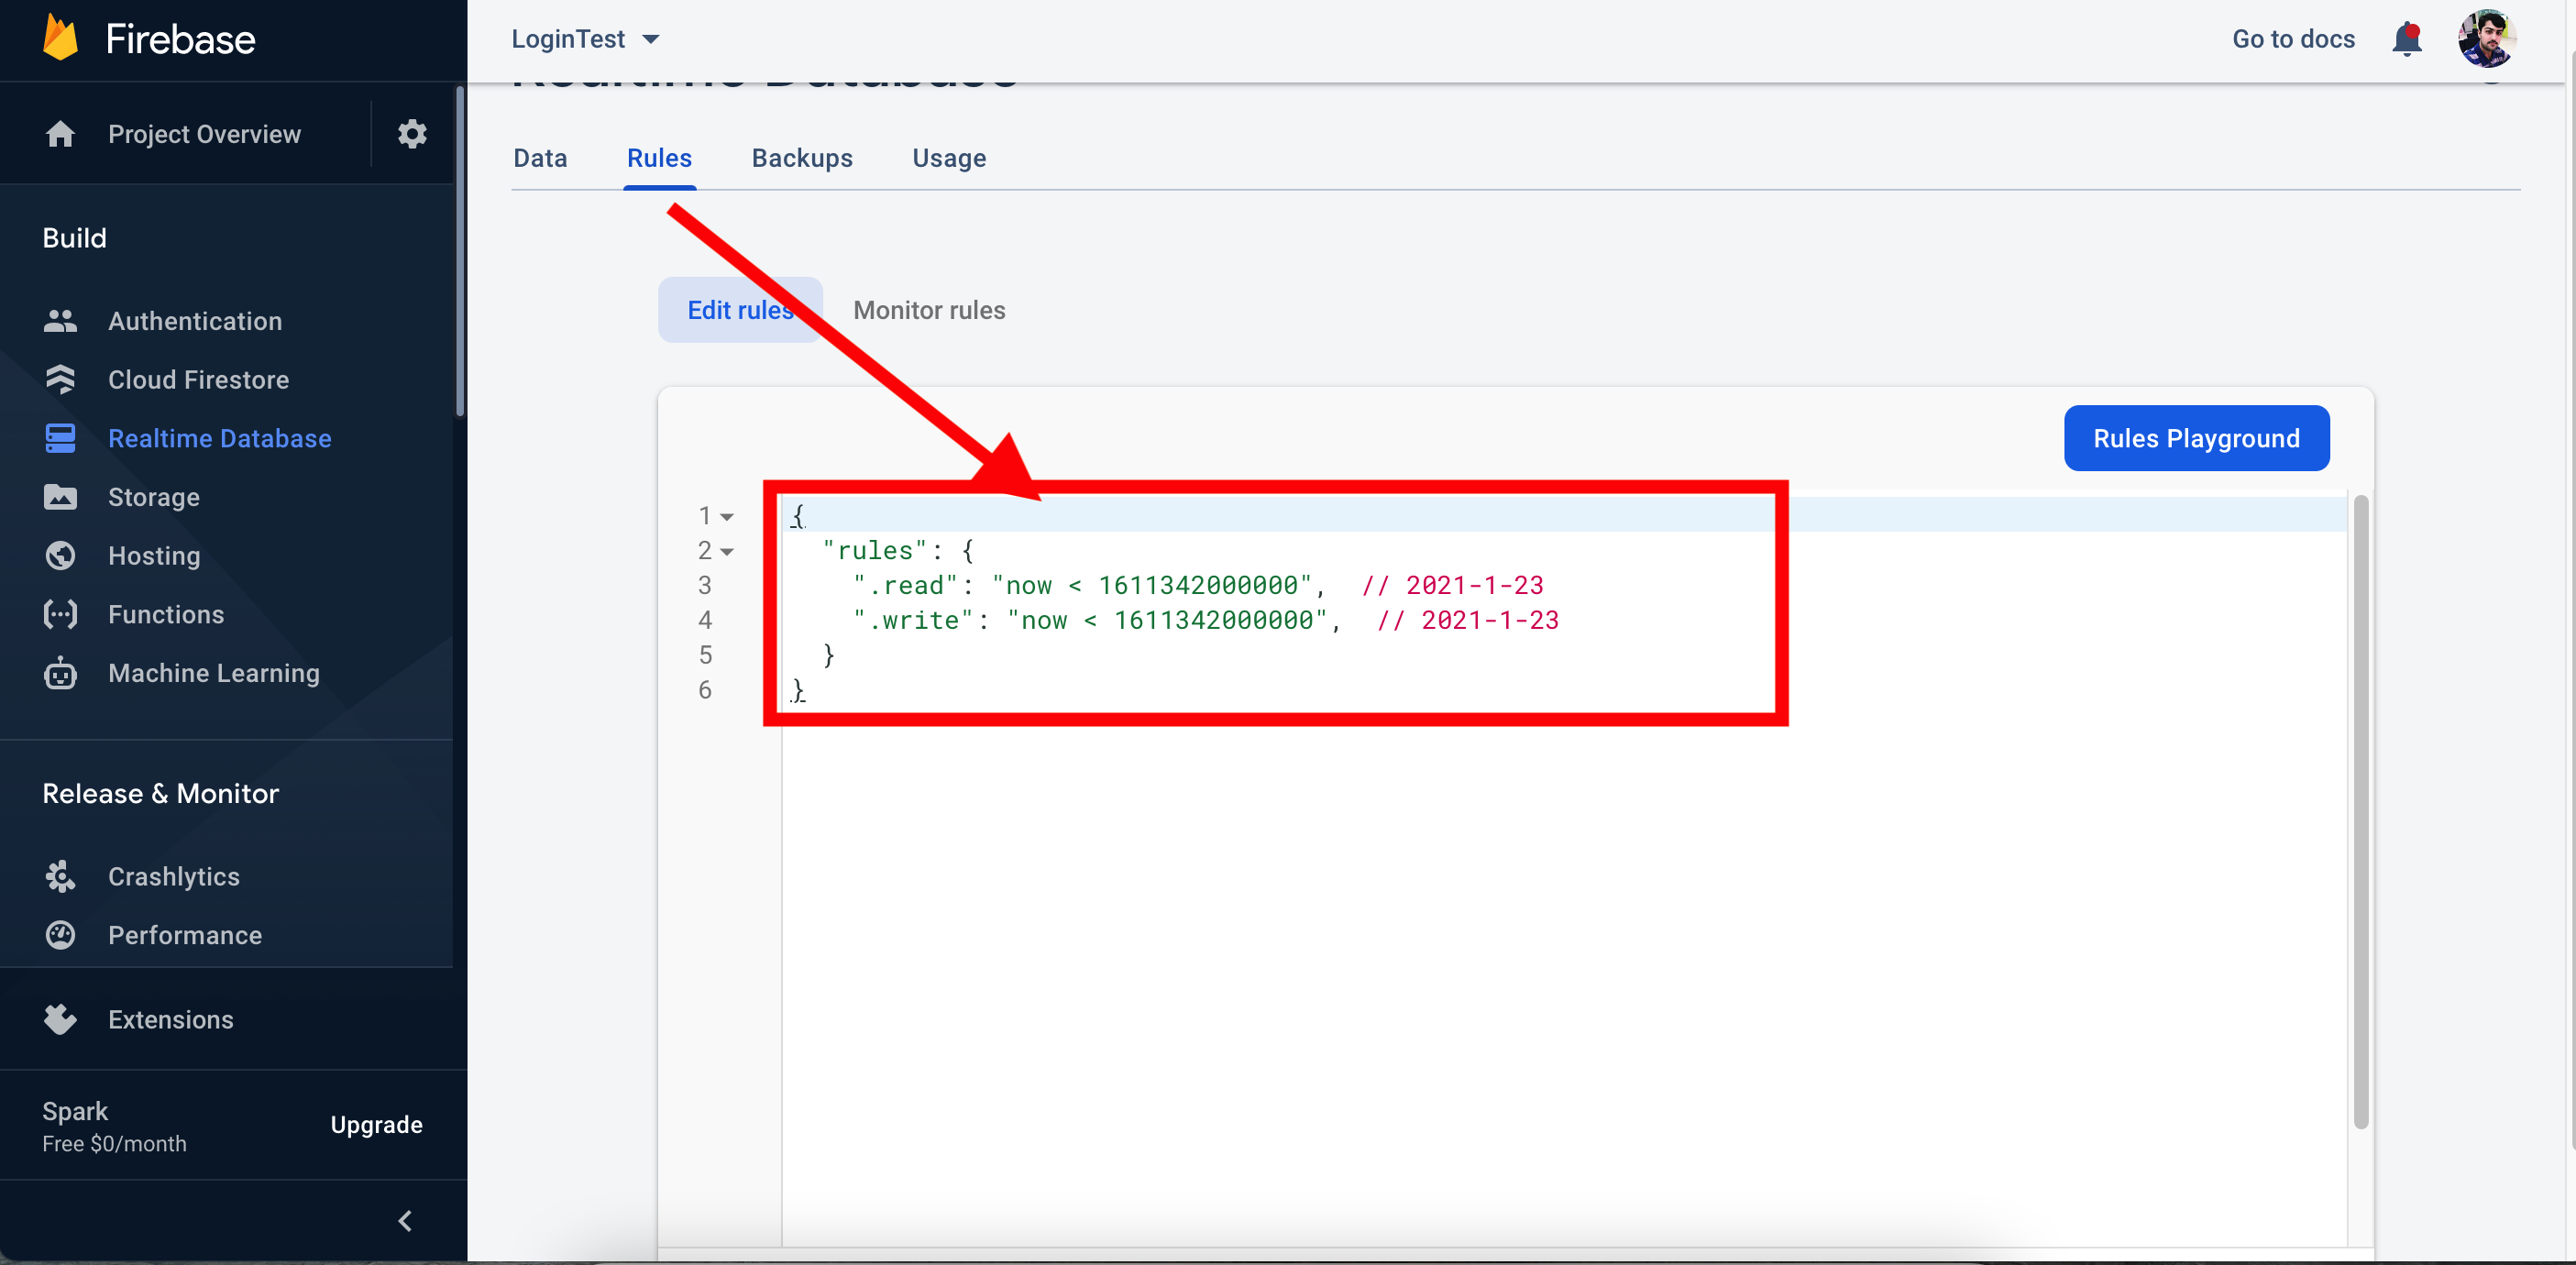
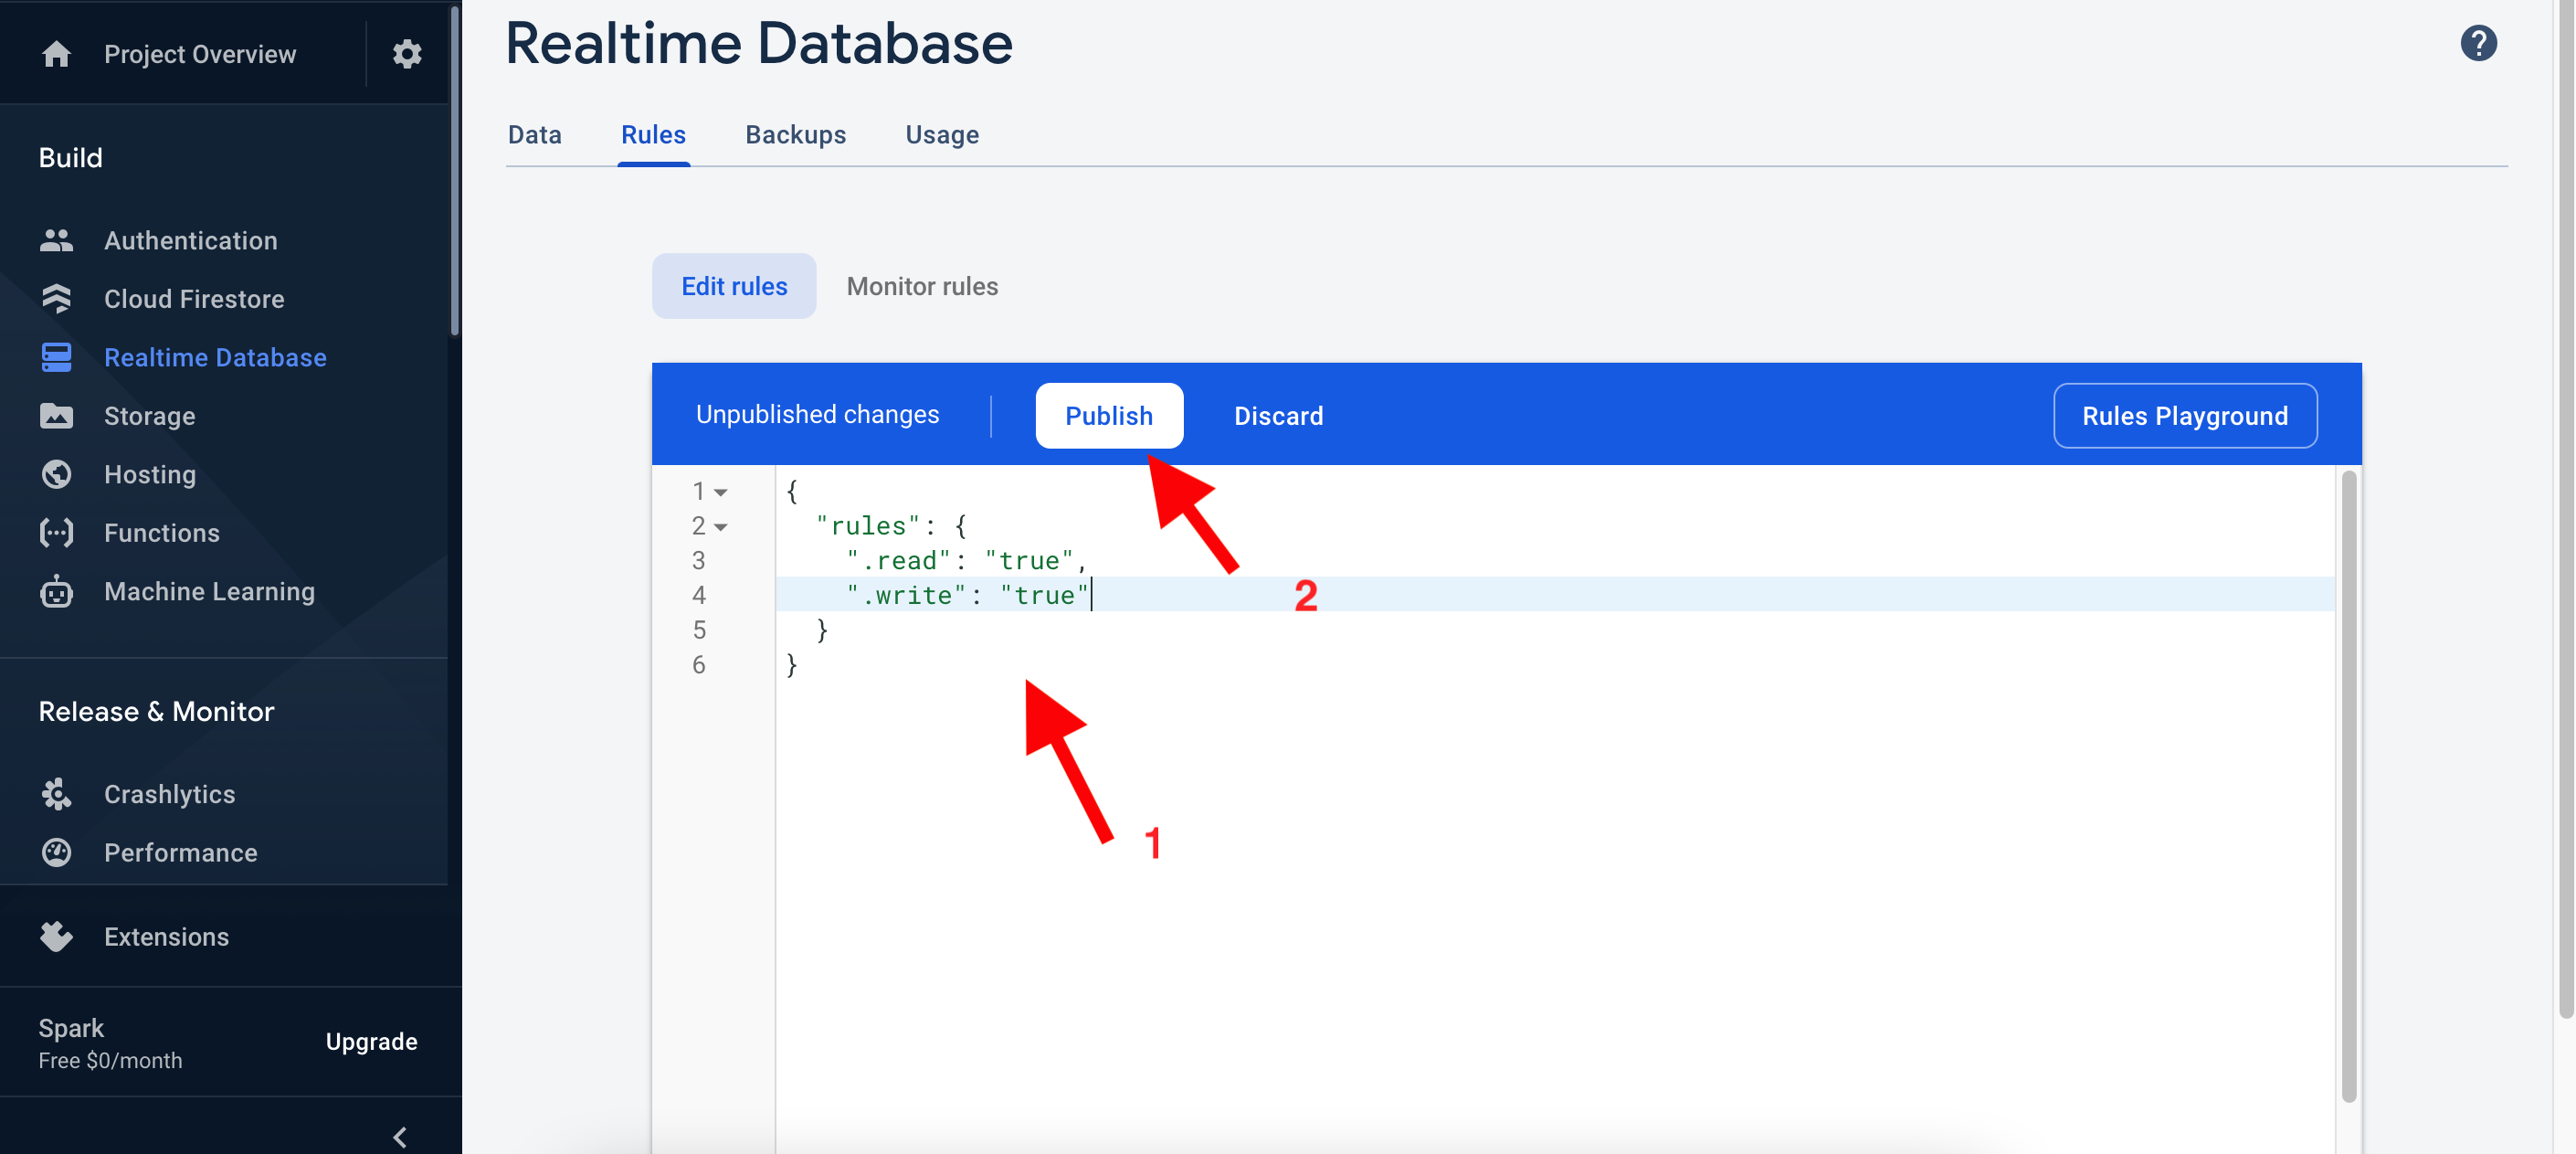
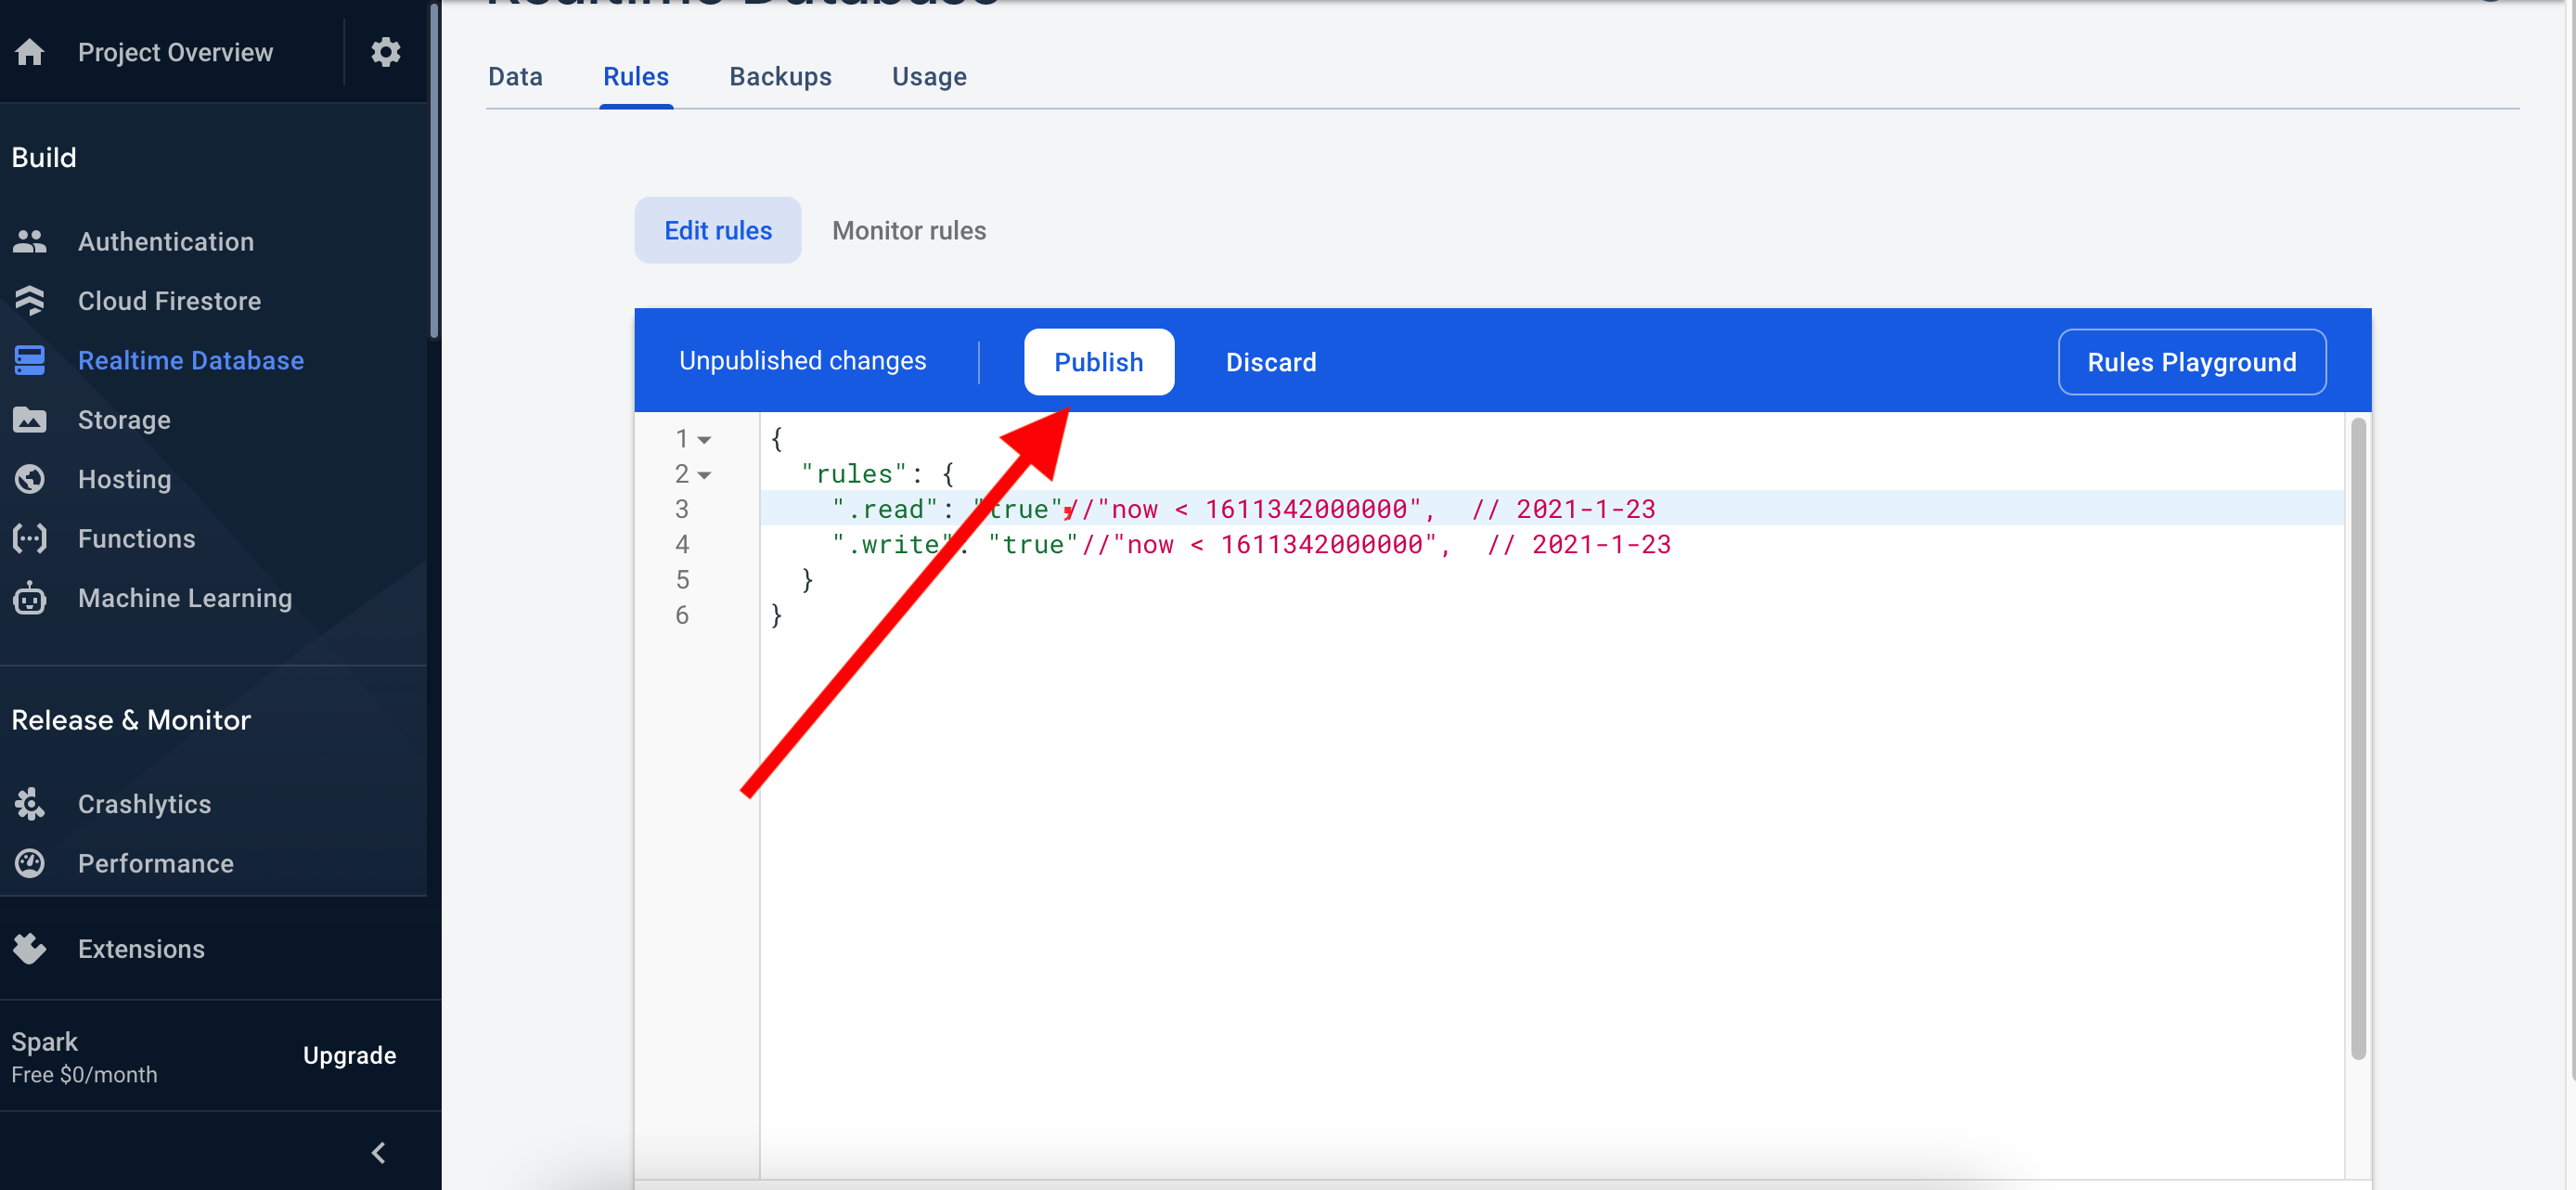
Step 17
Click on Publish
NOTE:
Now your configuration done with firebase
Facebook Login
You have to follow the steps
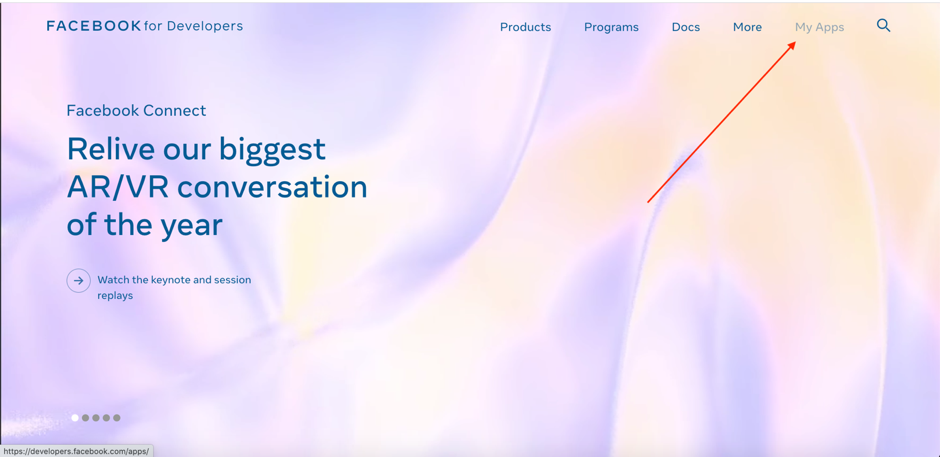
Step 1
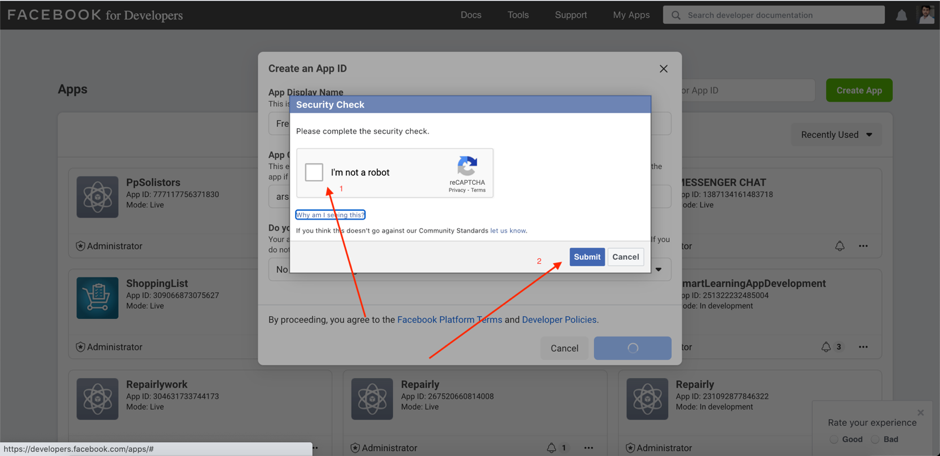
Open click on Web Browser https://developers.facebook.com/, then LogIn and Click on “MY App” then show your different app that if you have created
Step 2
Click in “Create App“ to create your new app

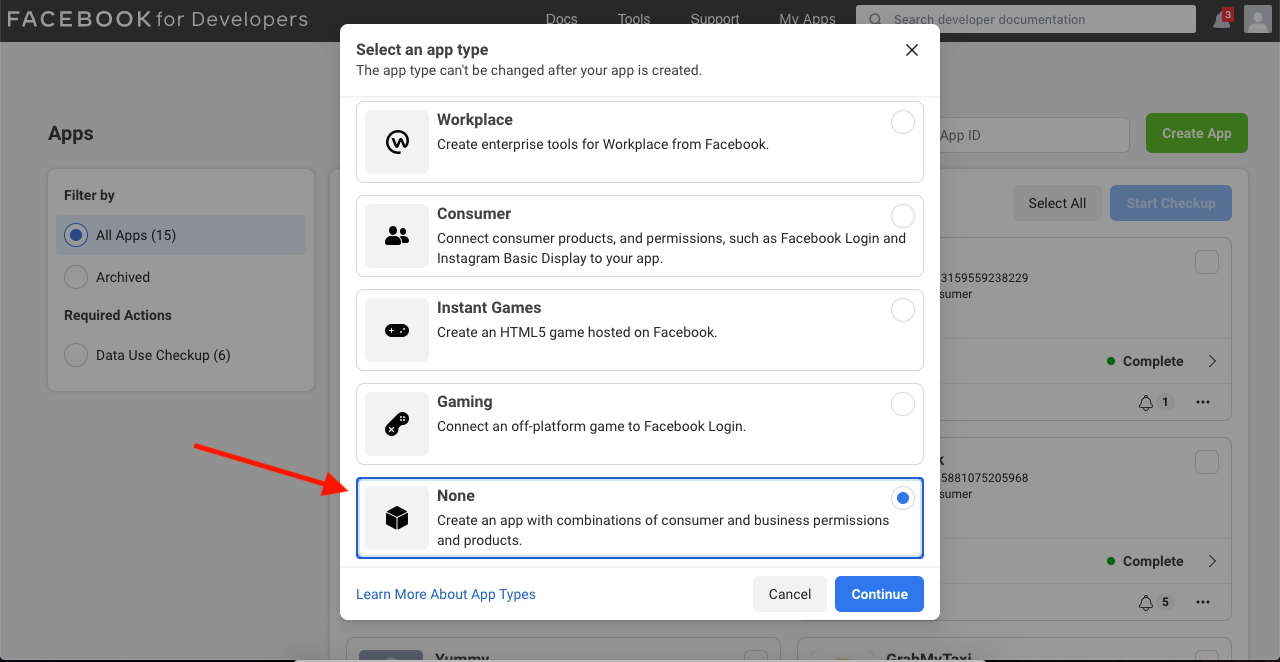
Step 3
then a dialogue box appear and select None and Continue
Step 4
Write the name of app that you want to display and also write email in below field

Step 5
Check on “I'm not a robot” and click on submit button
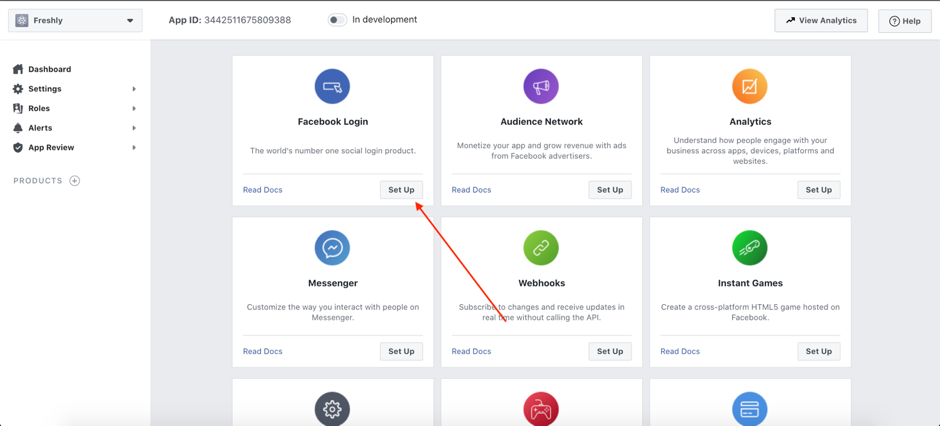
Step 6
Click Facebook Login Setup
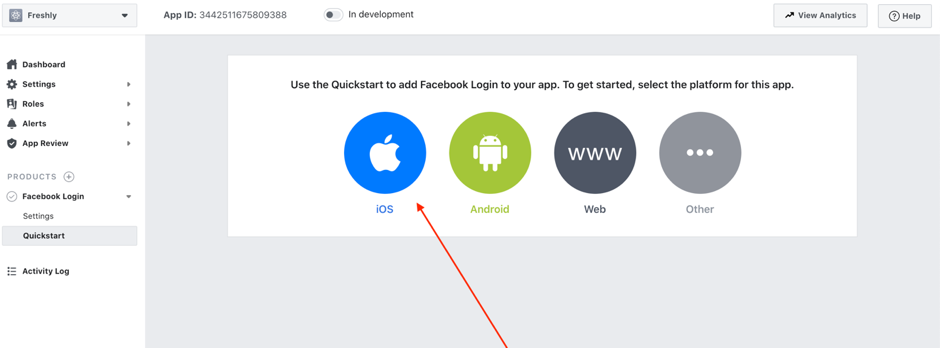
Step 7
Click on iOS
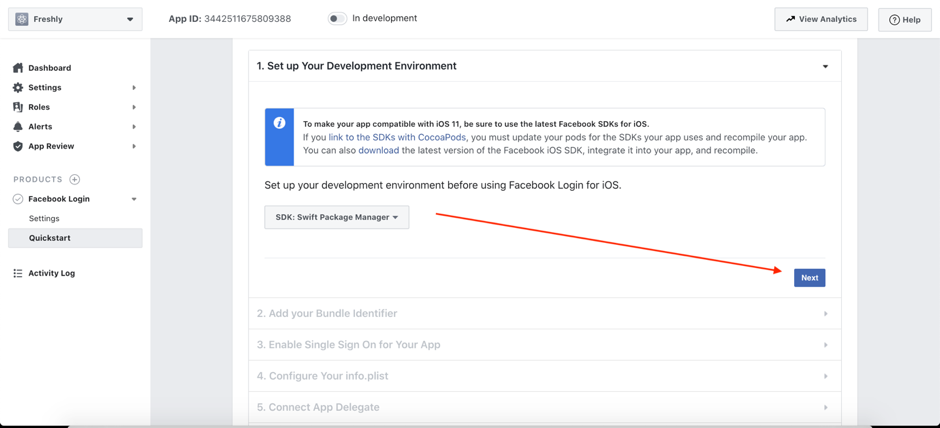
Step 8
Click on “Next” button
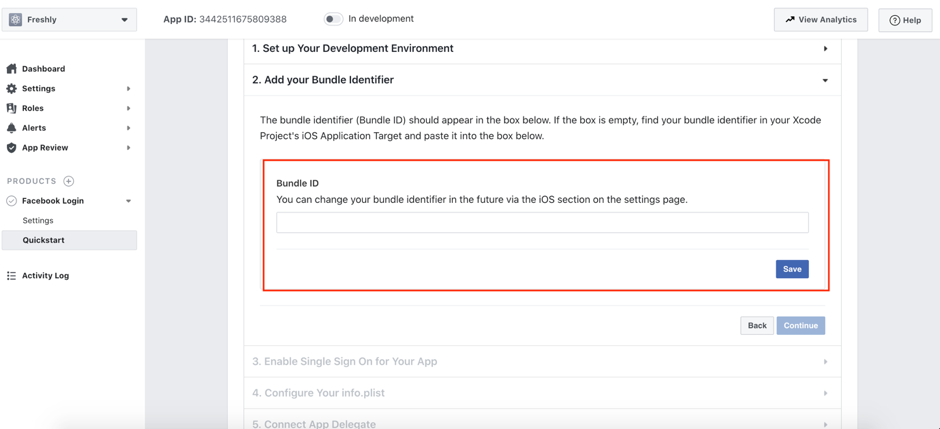
Step 9
Add your bundle identifier of your app and click on Save then press Continue How to get Bundle Identifier
Step 10
Copy the Facebookid it should be like "e.g: fb121444887" and past into info.plist
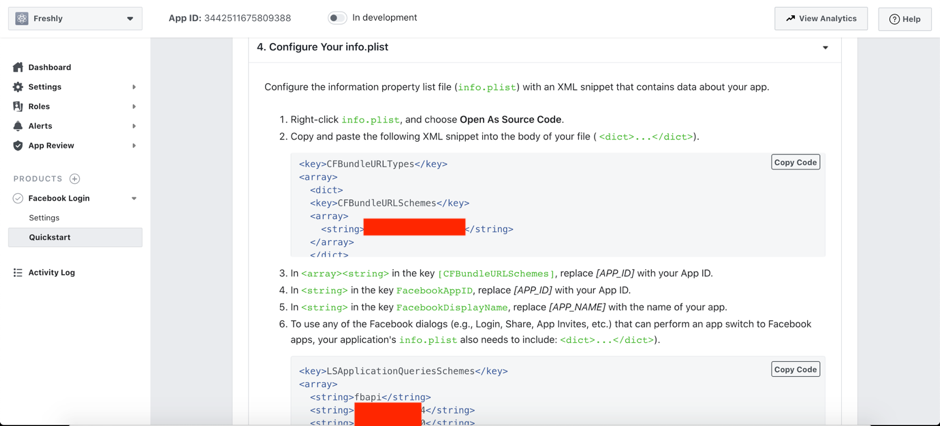
Step 11
and copy fbId replaced with fbid that used in info.plist
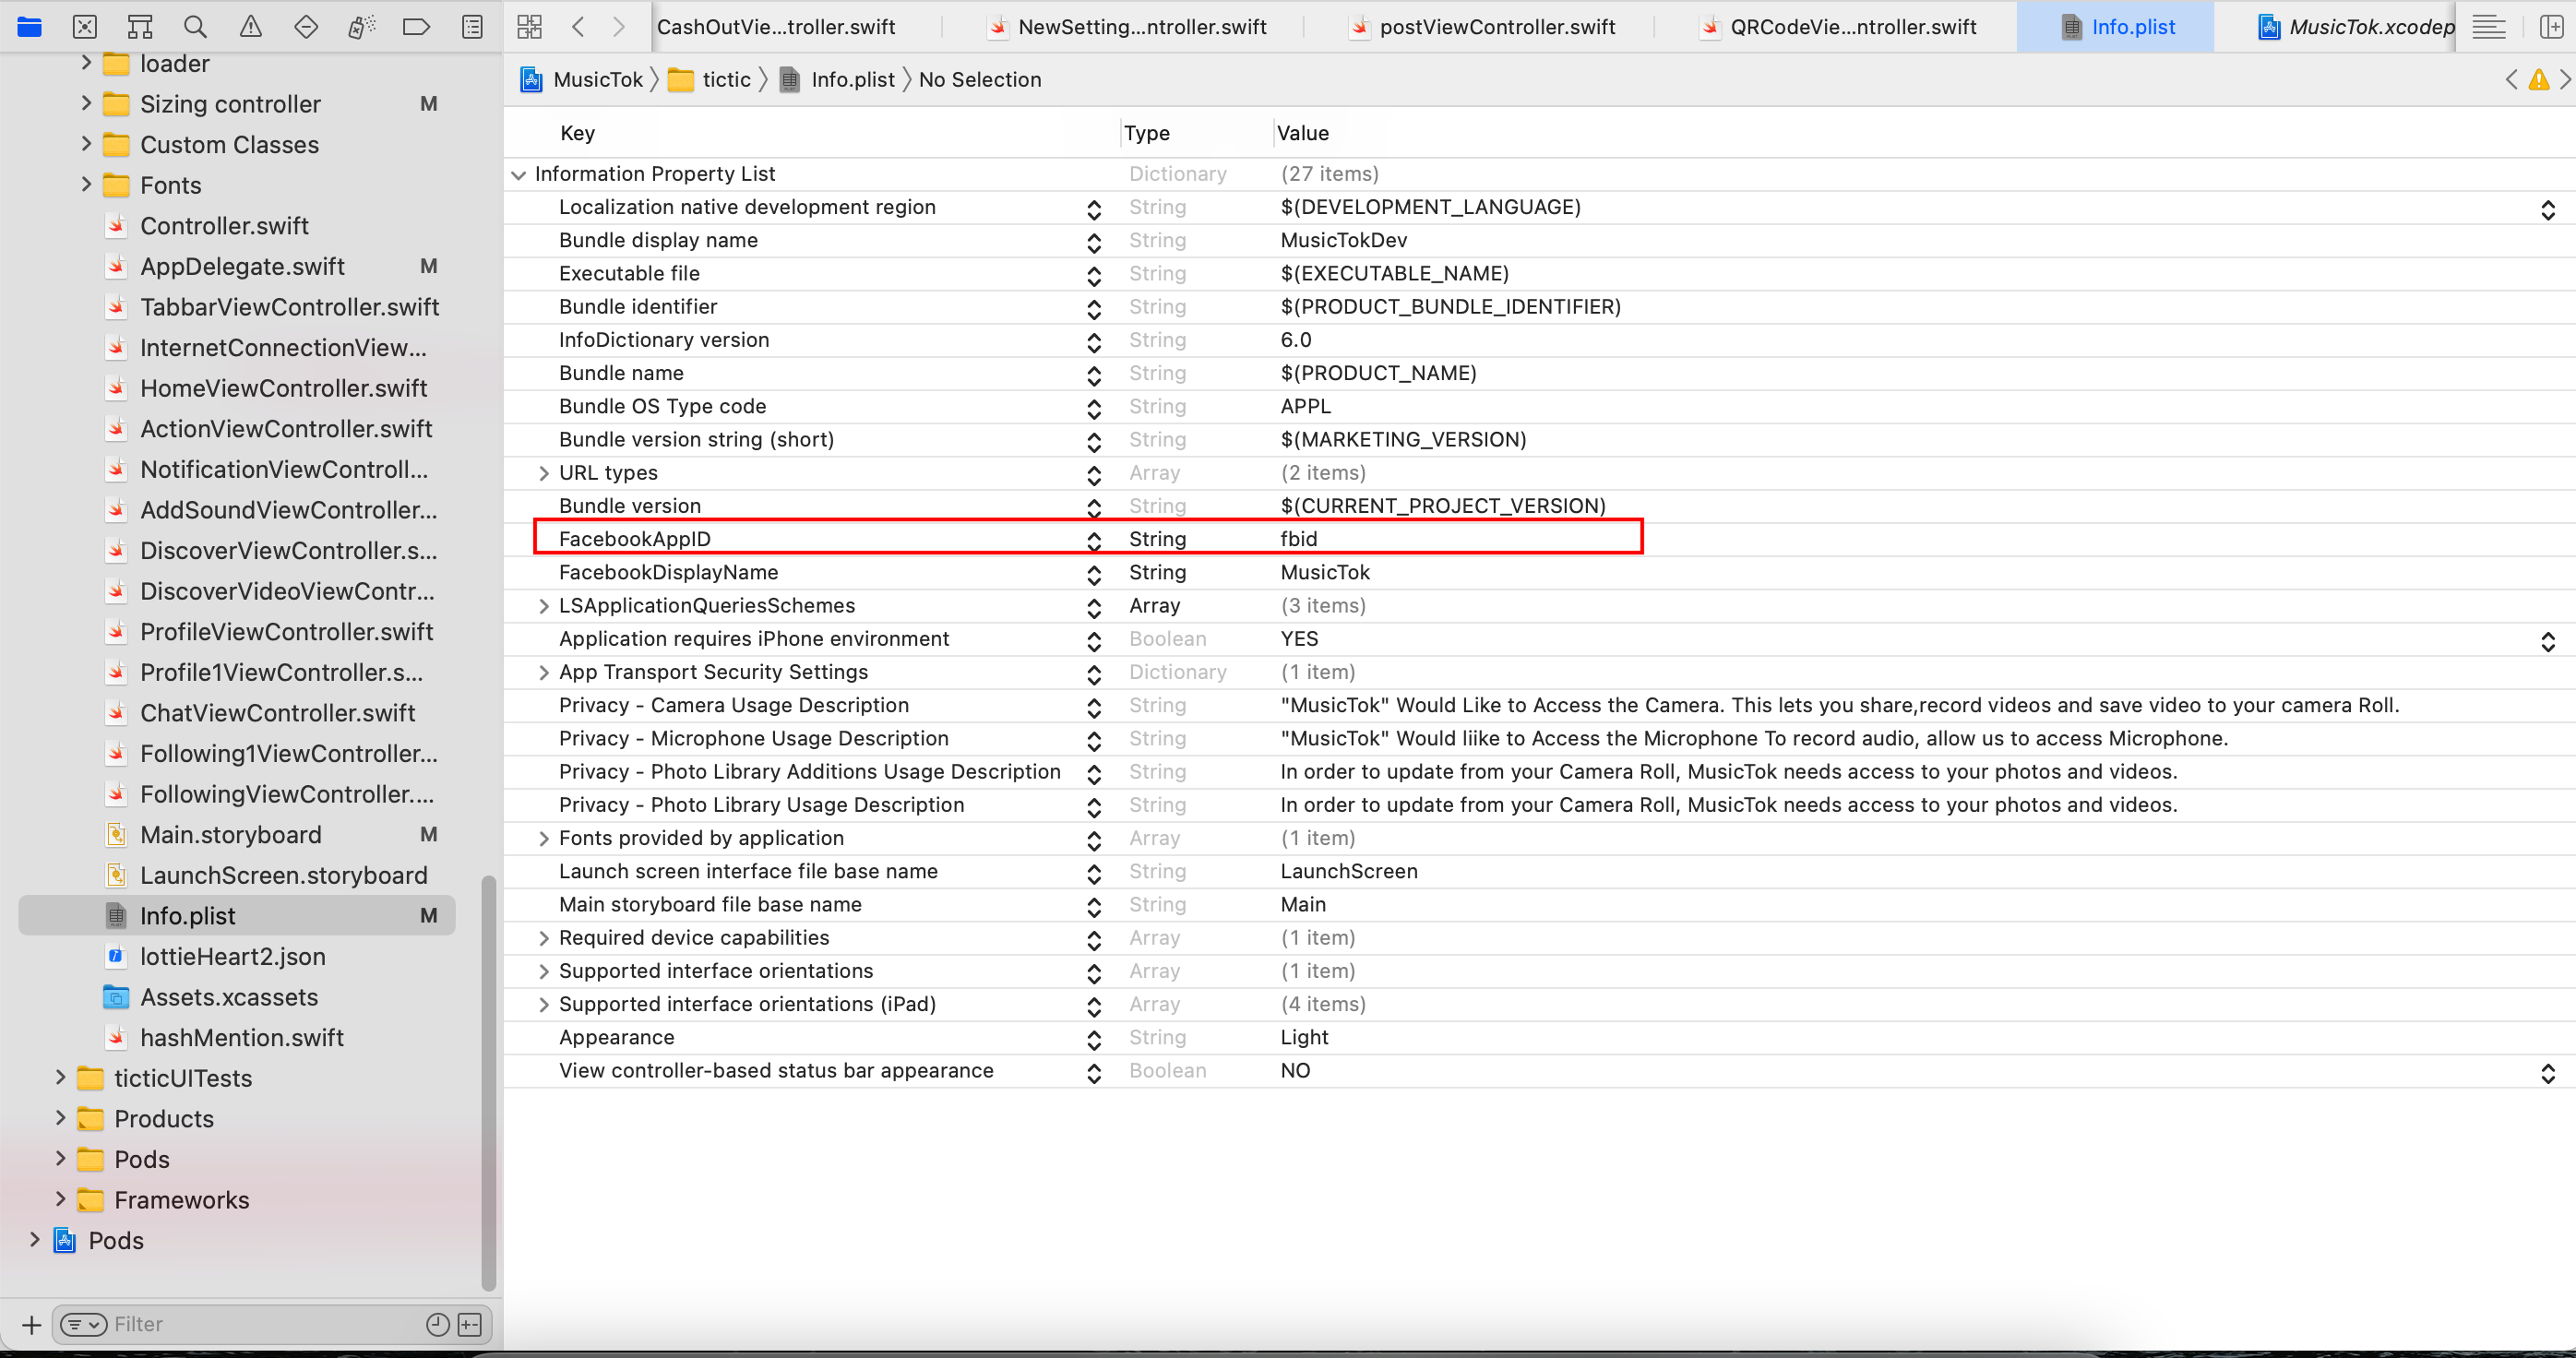
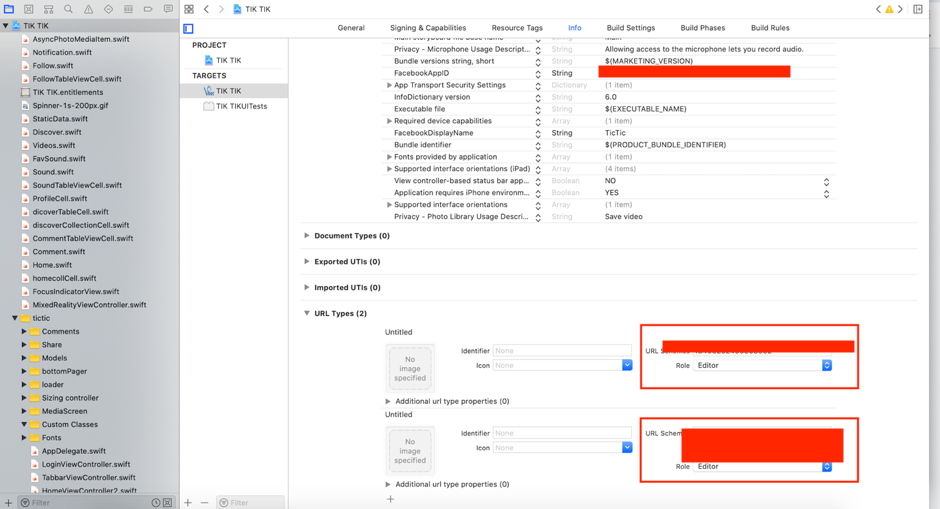
Step 12
Also copied “fbid” add in URL Type e.g fb0123456789
xCode Configration
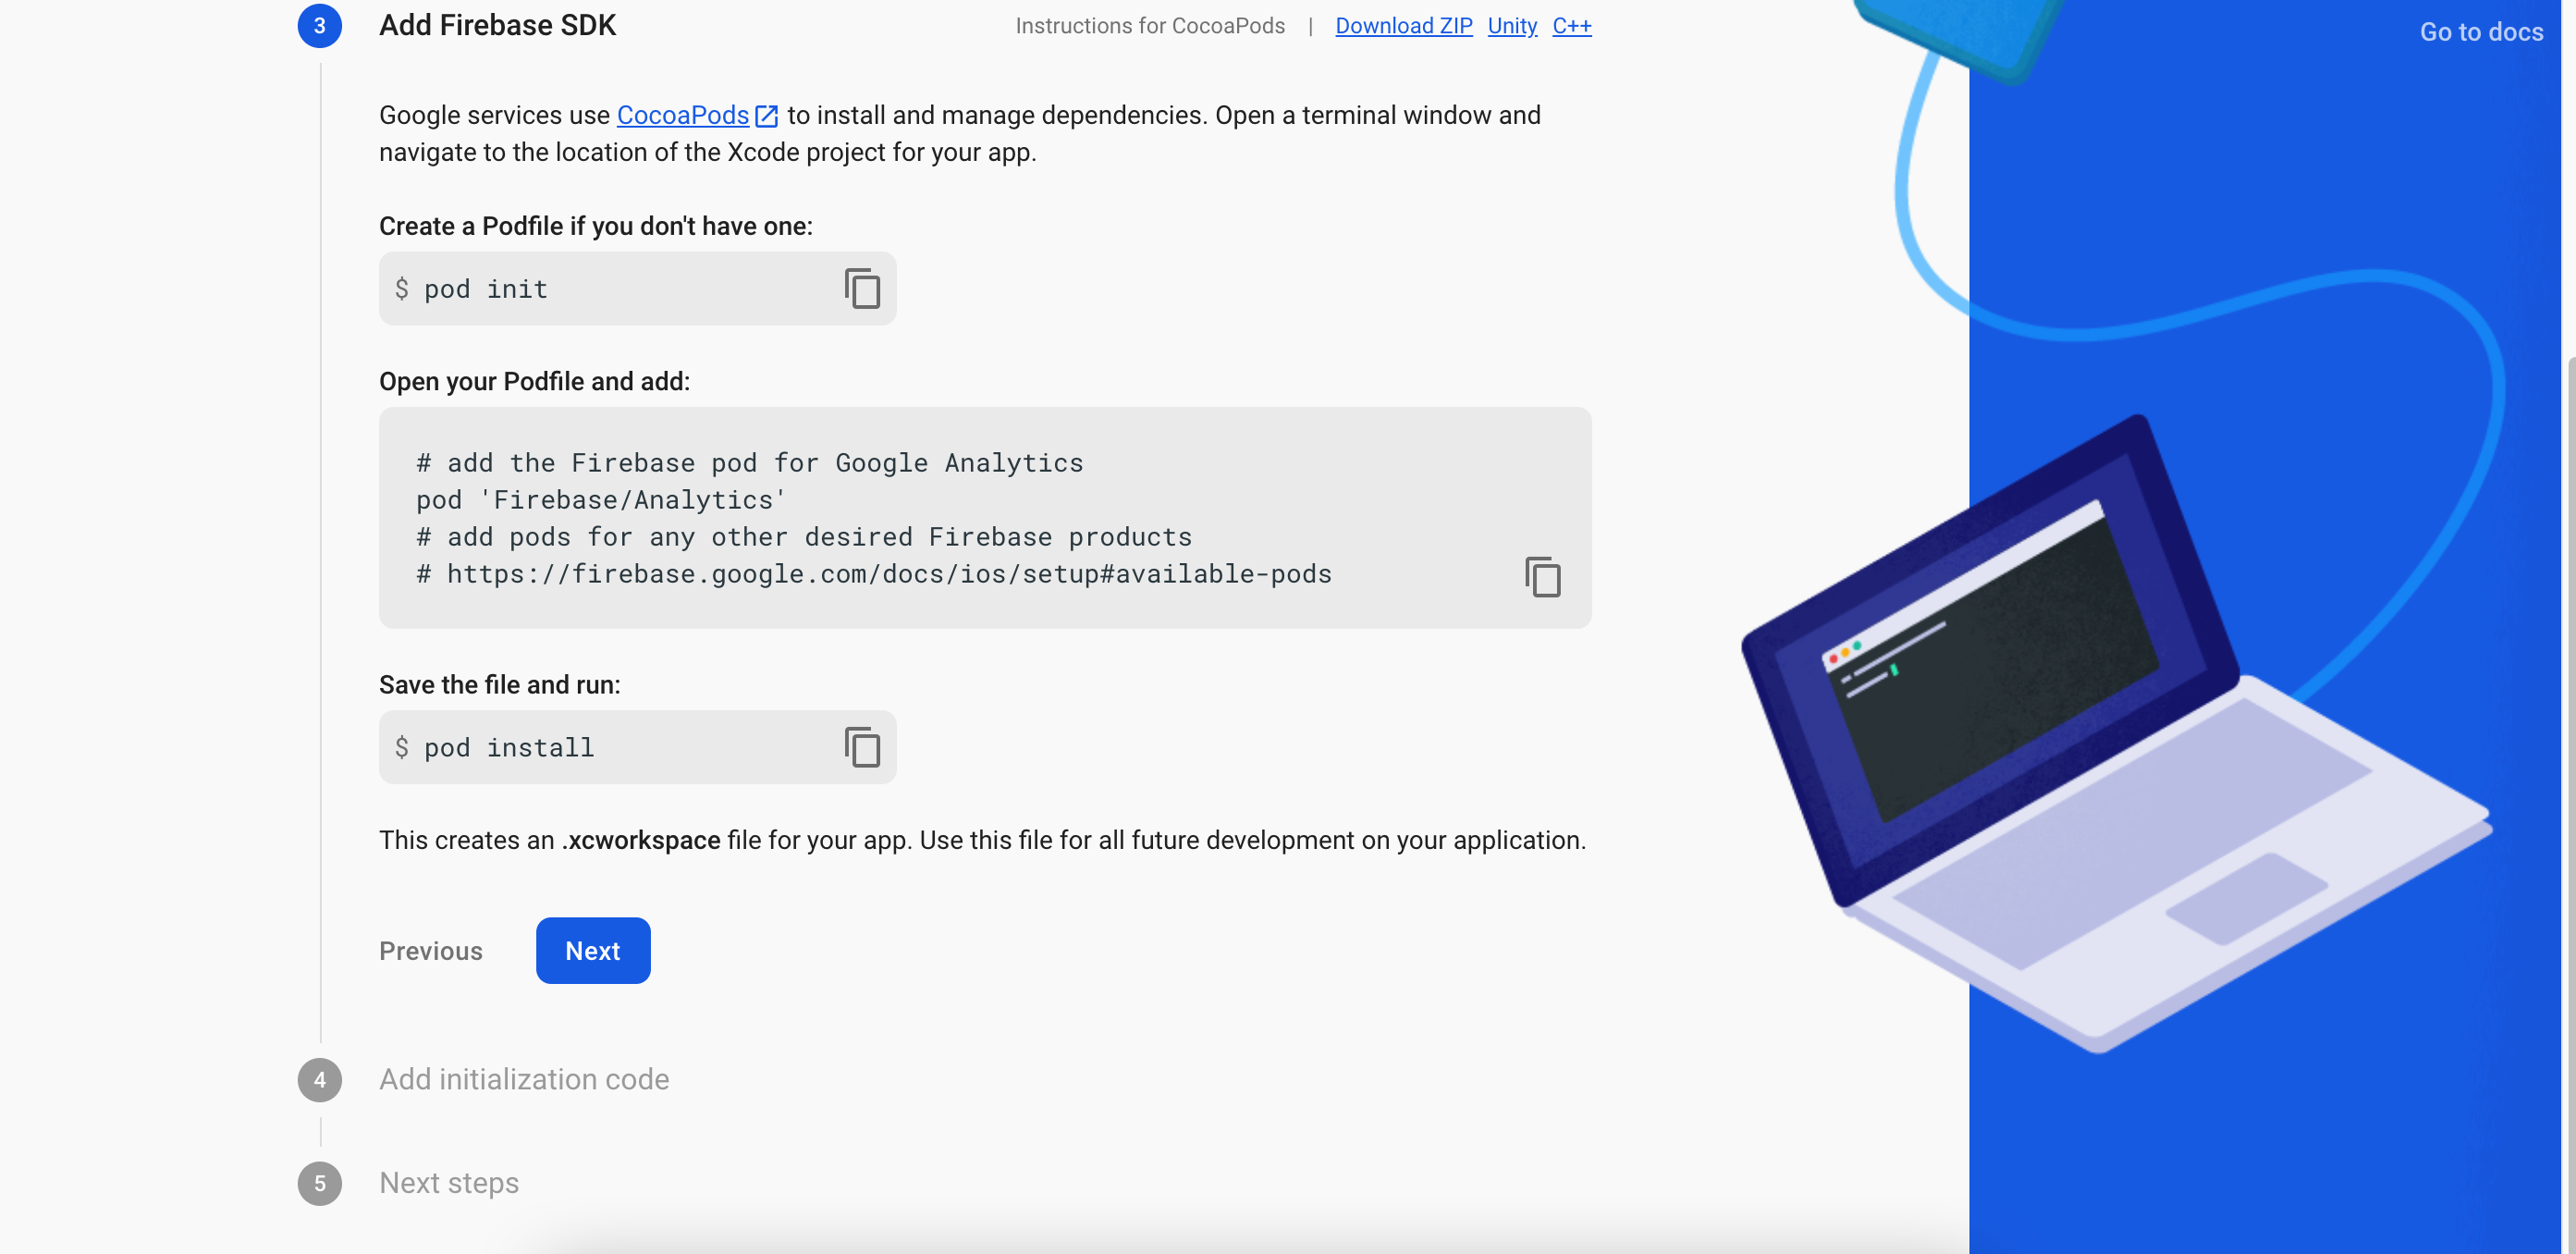
Follow the instructions for Xcode iOS
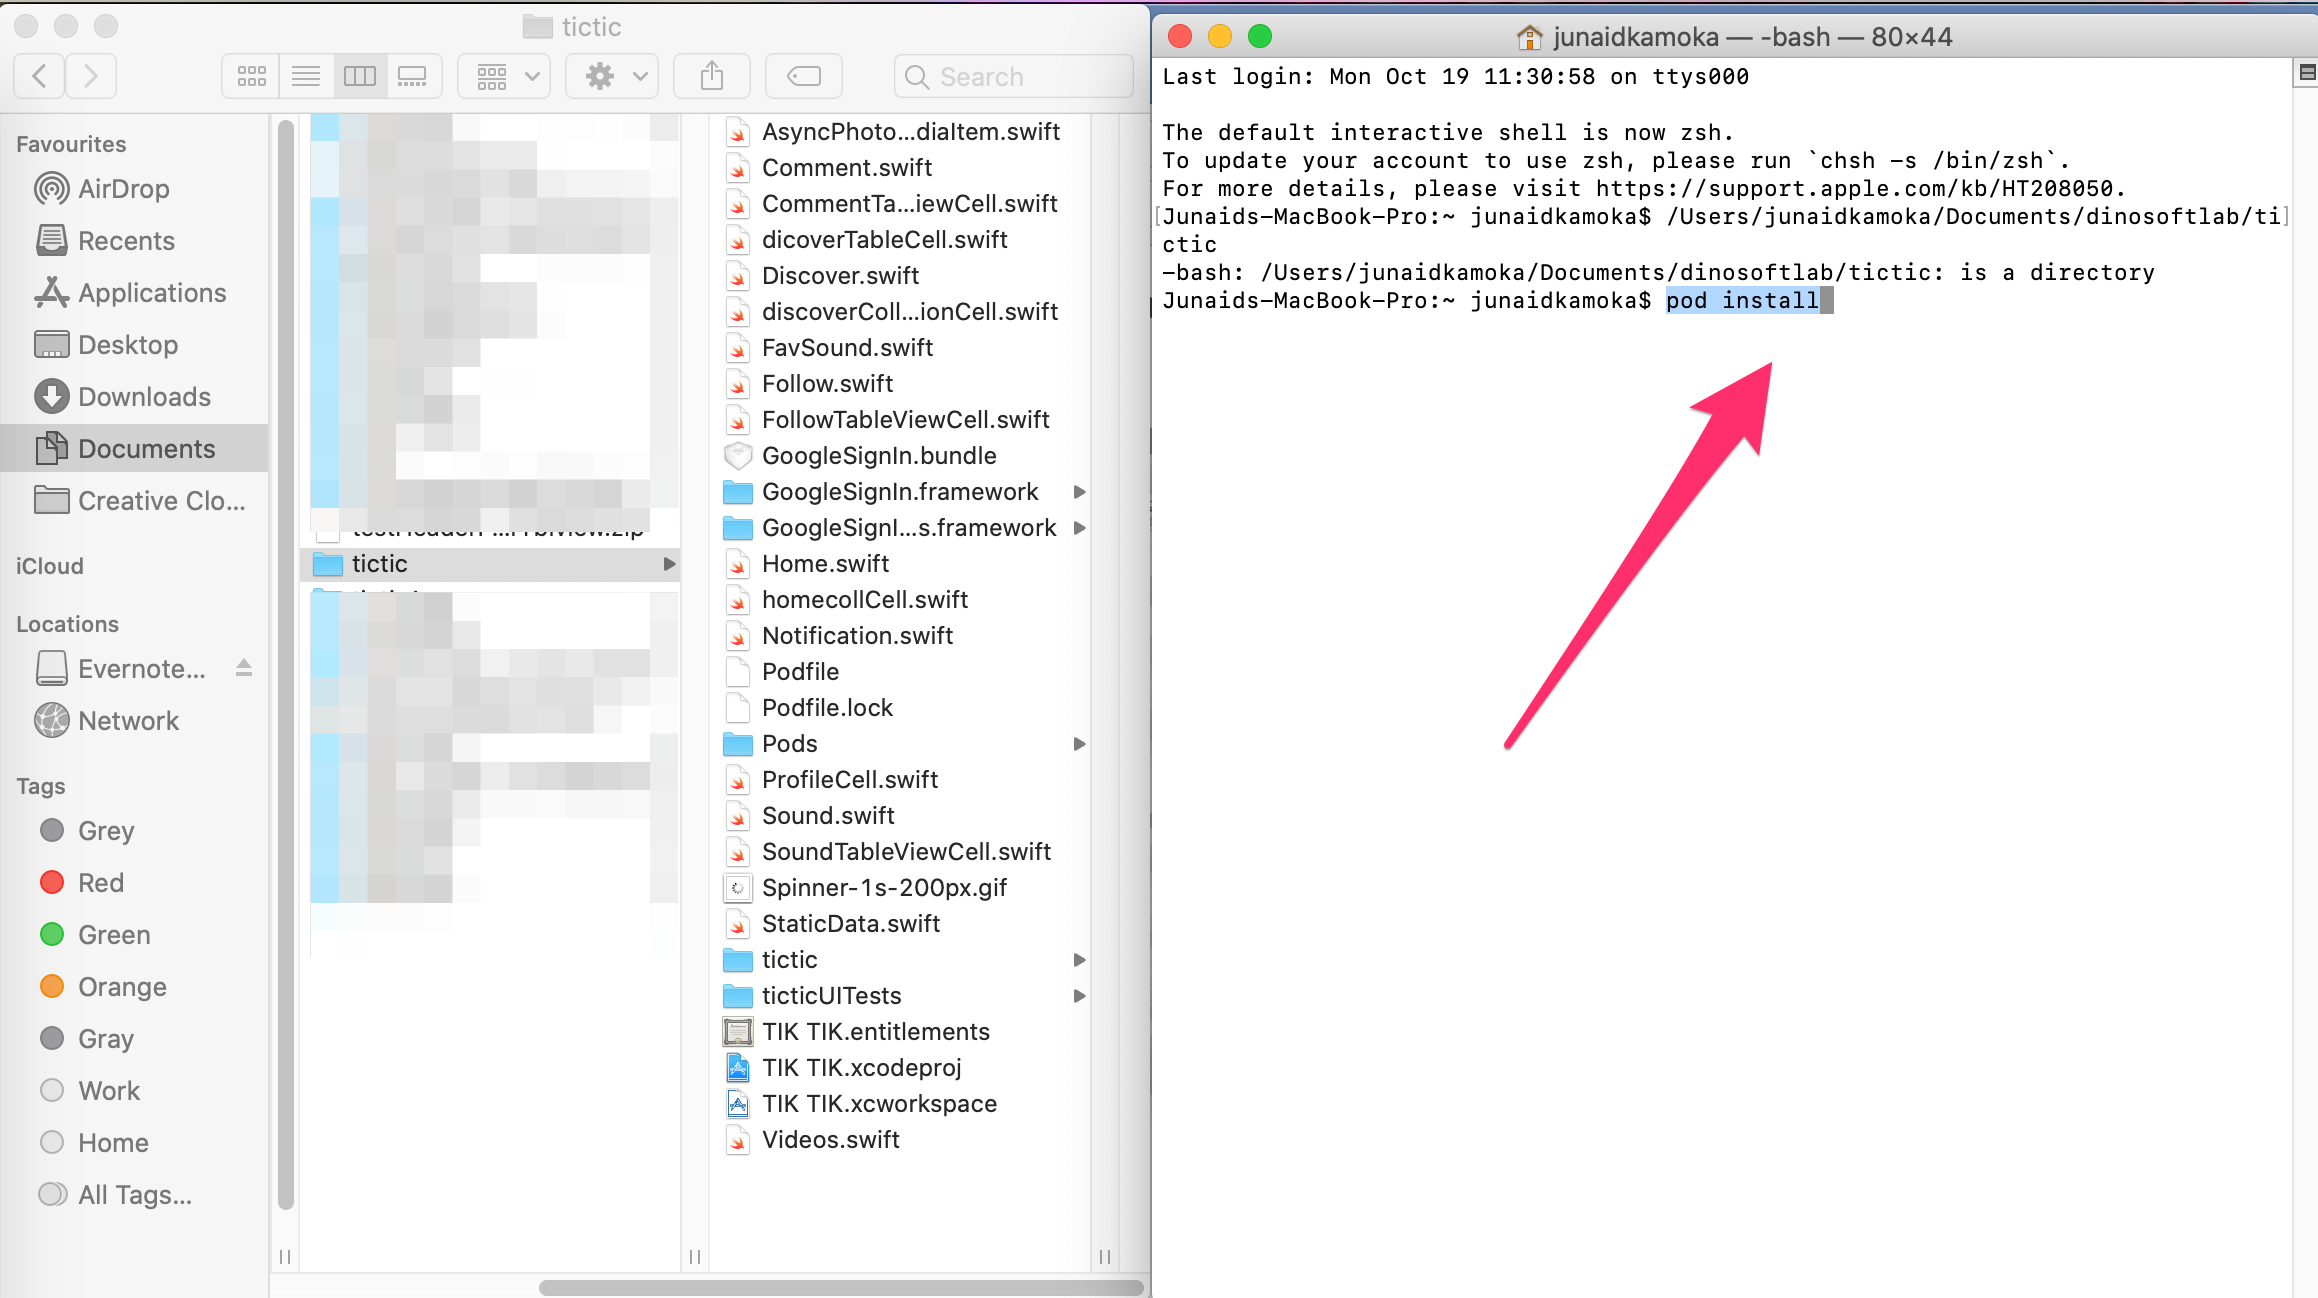
Open the terminal window in the project directory and type: pod install (cocoapods must be installed on your mac: https://cocoapods.org/)
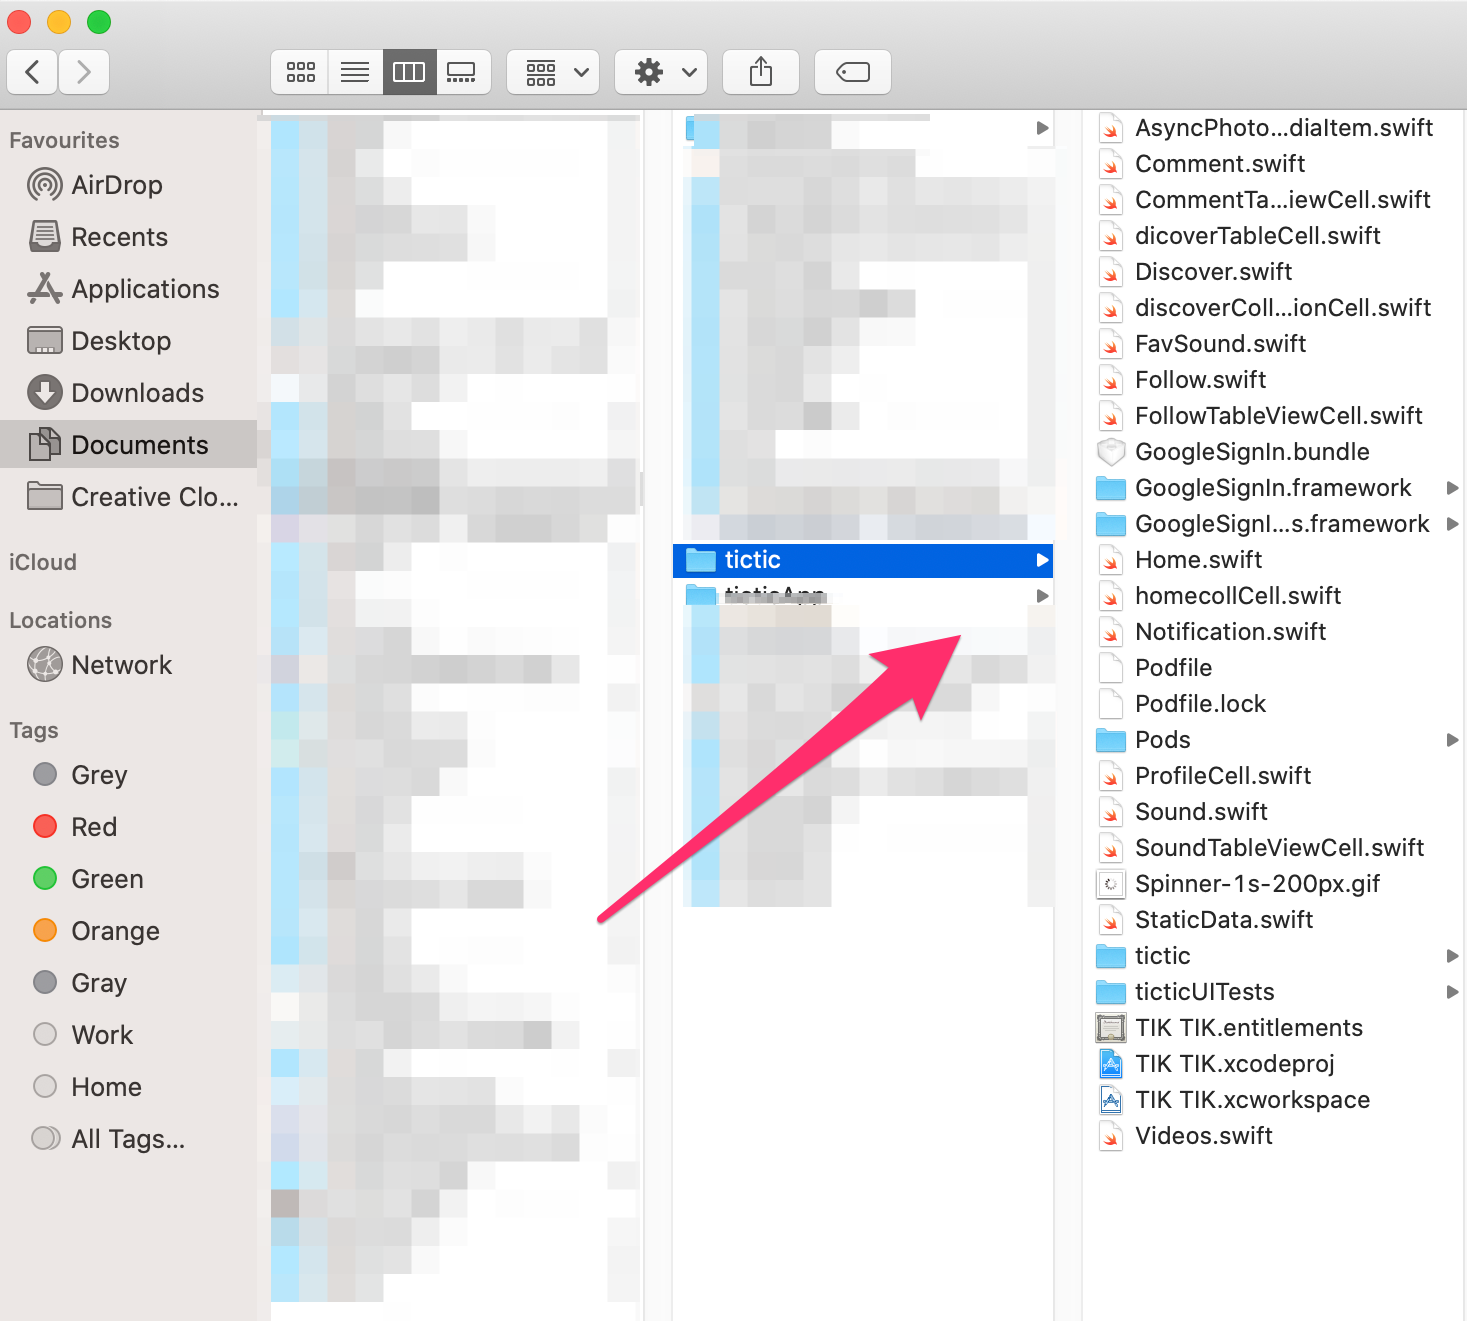
Find the Folder of Your Project
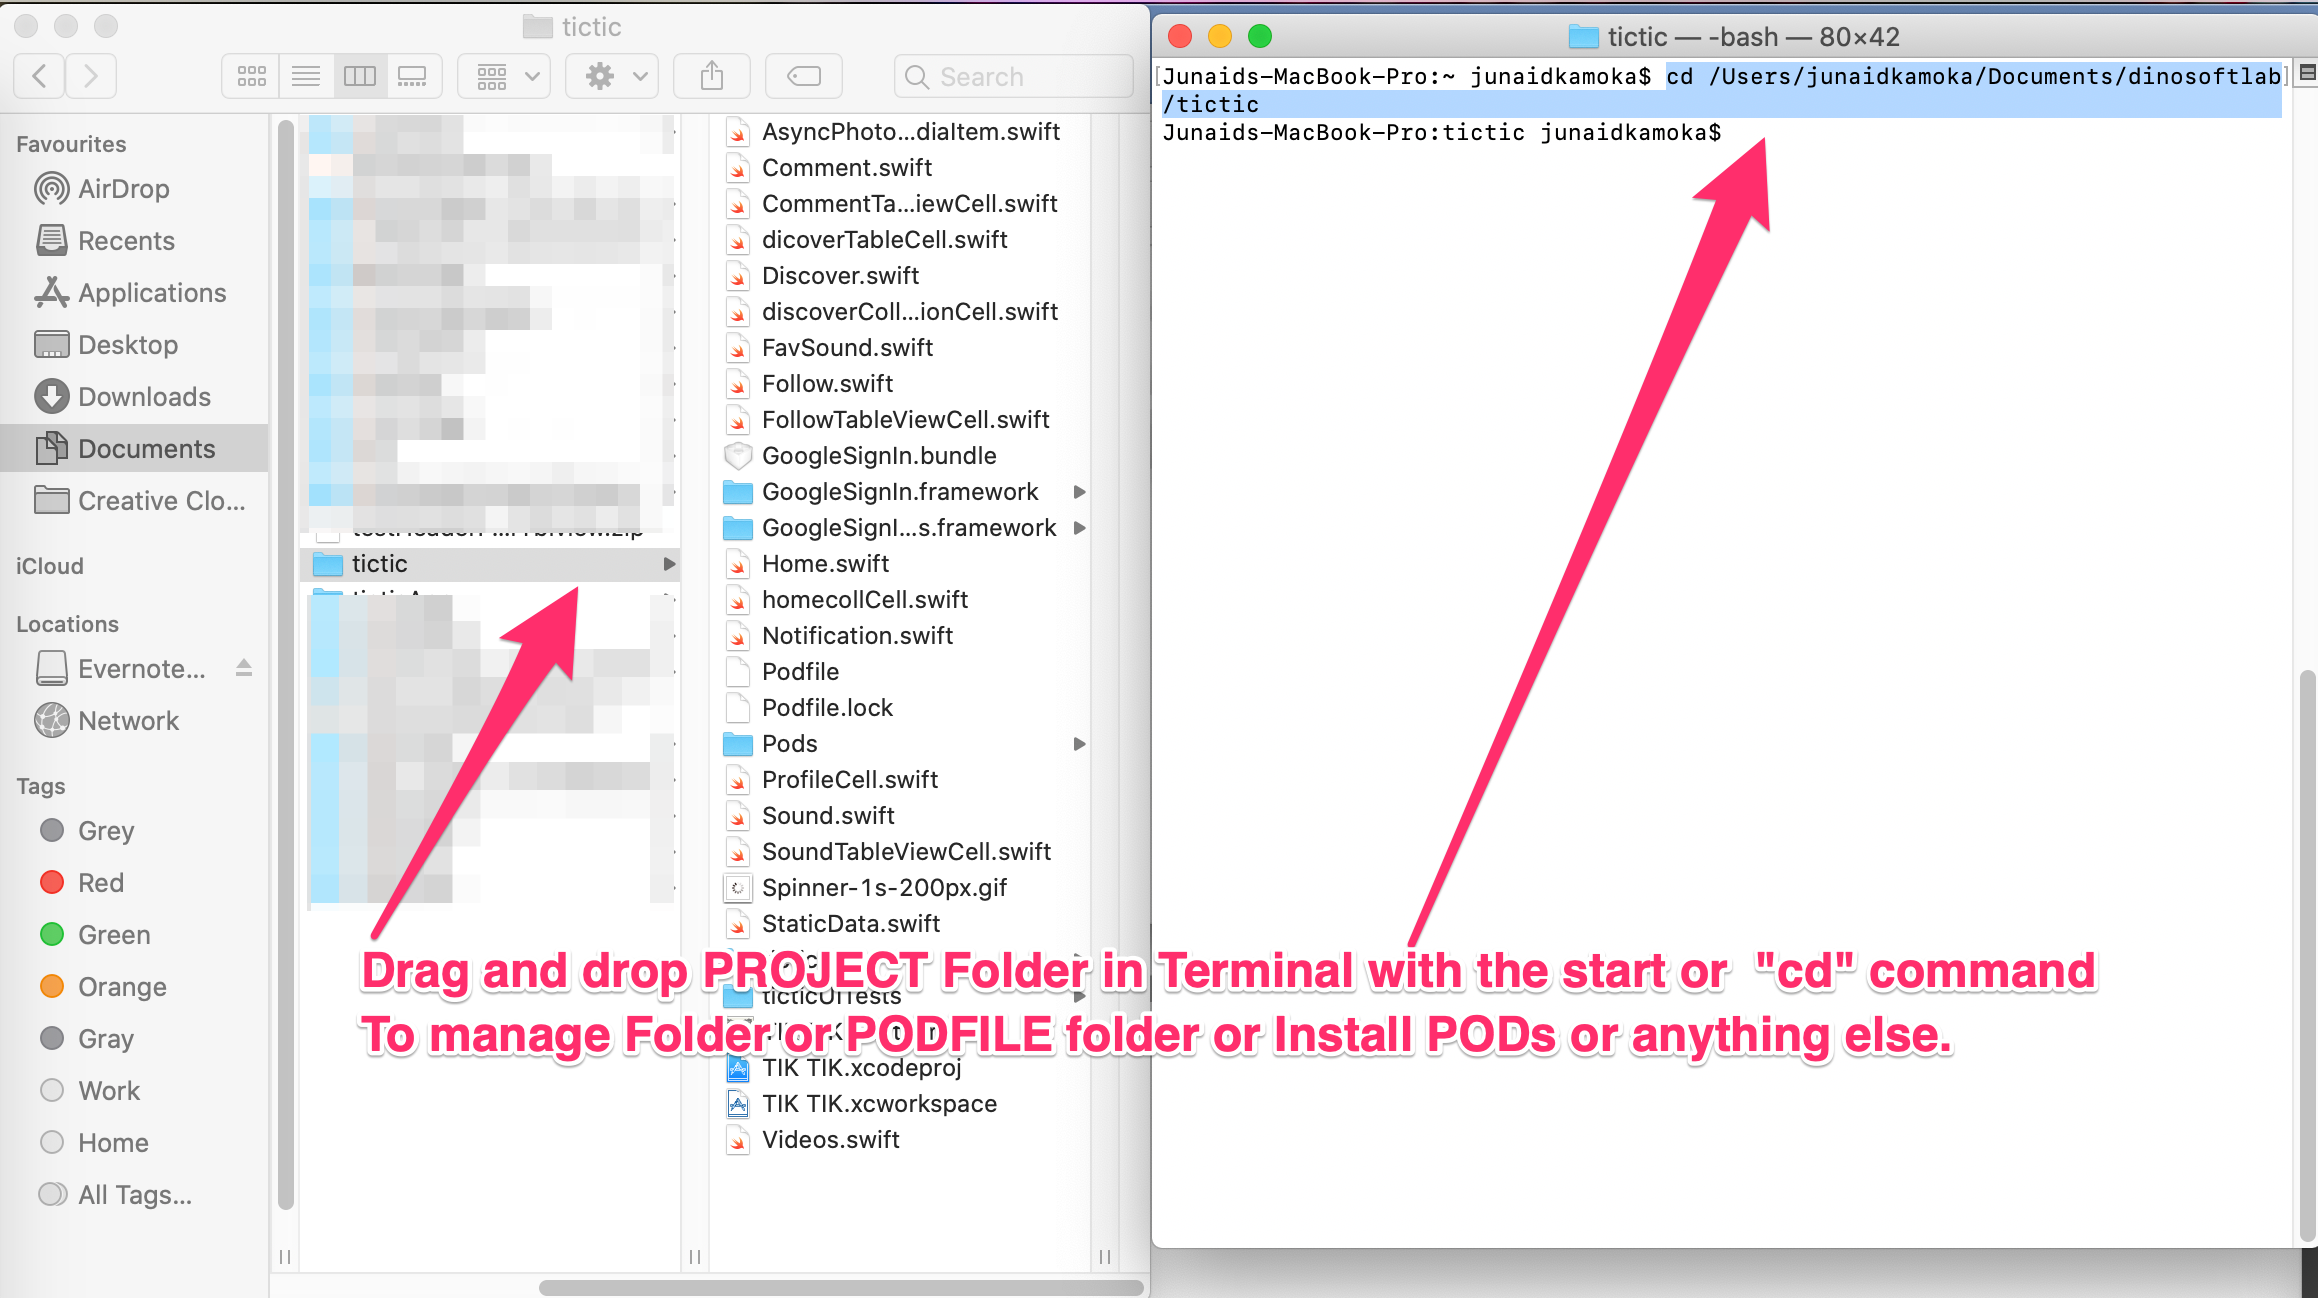
Find the Folder of Your Project,Just type pod install to install all pods And Open project in XCode using TIK TIK.xcworkspace file
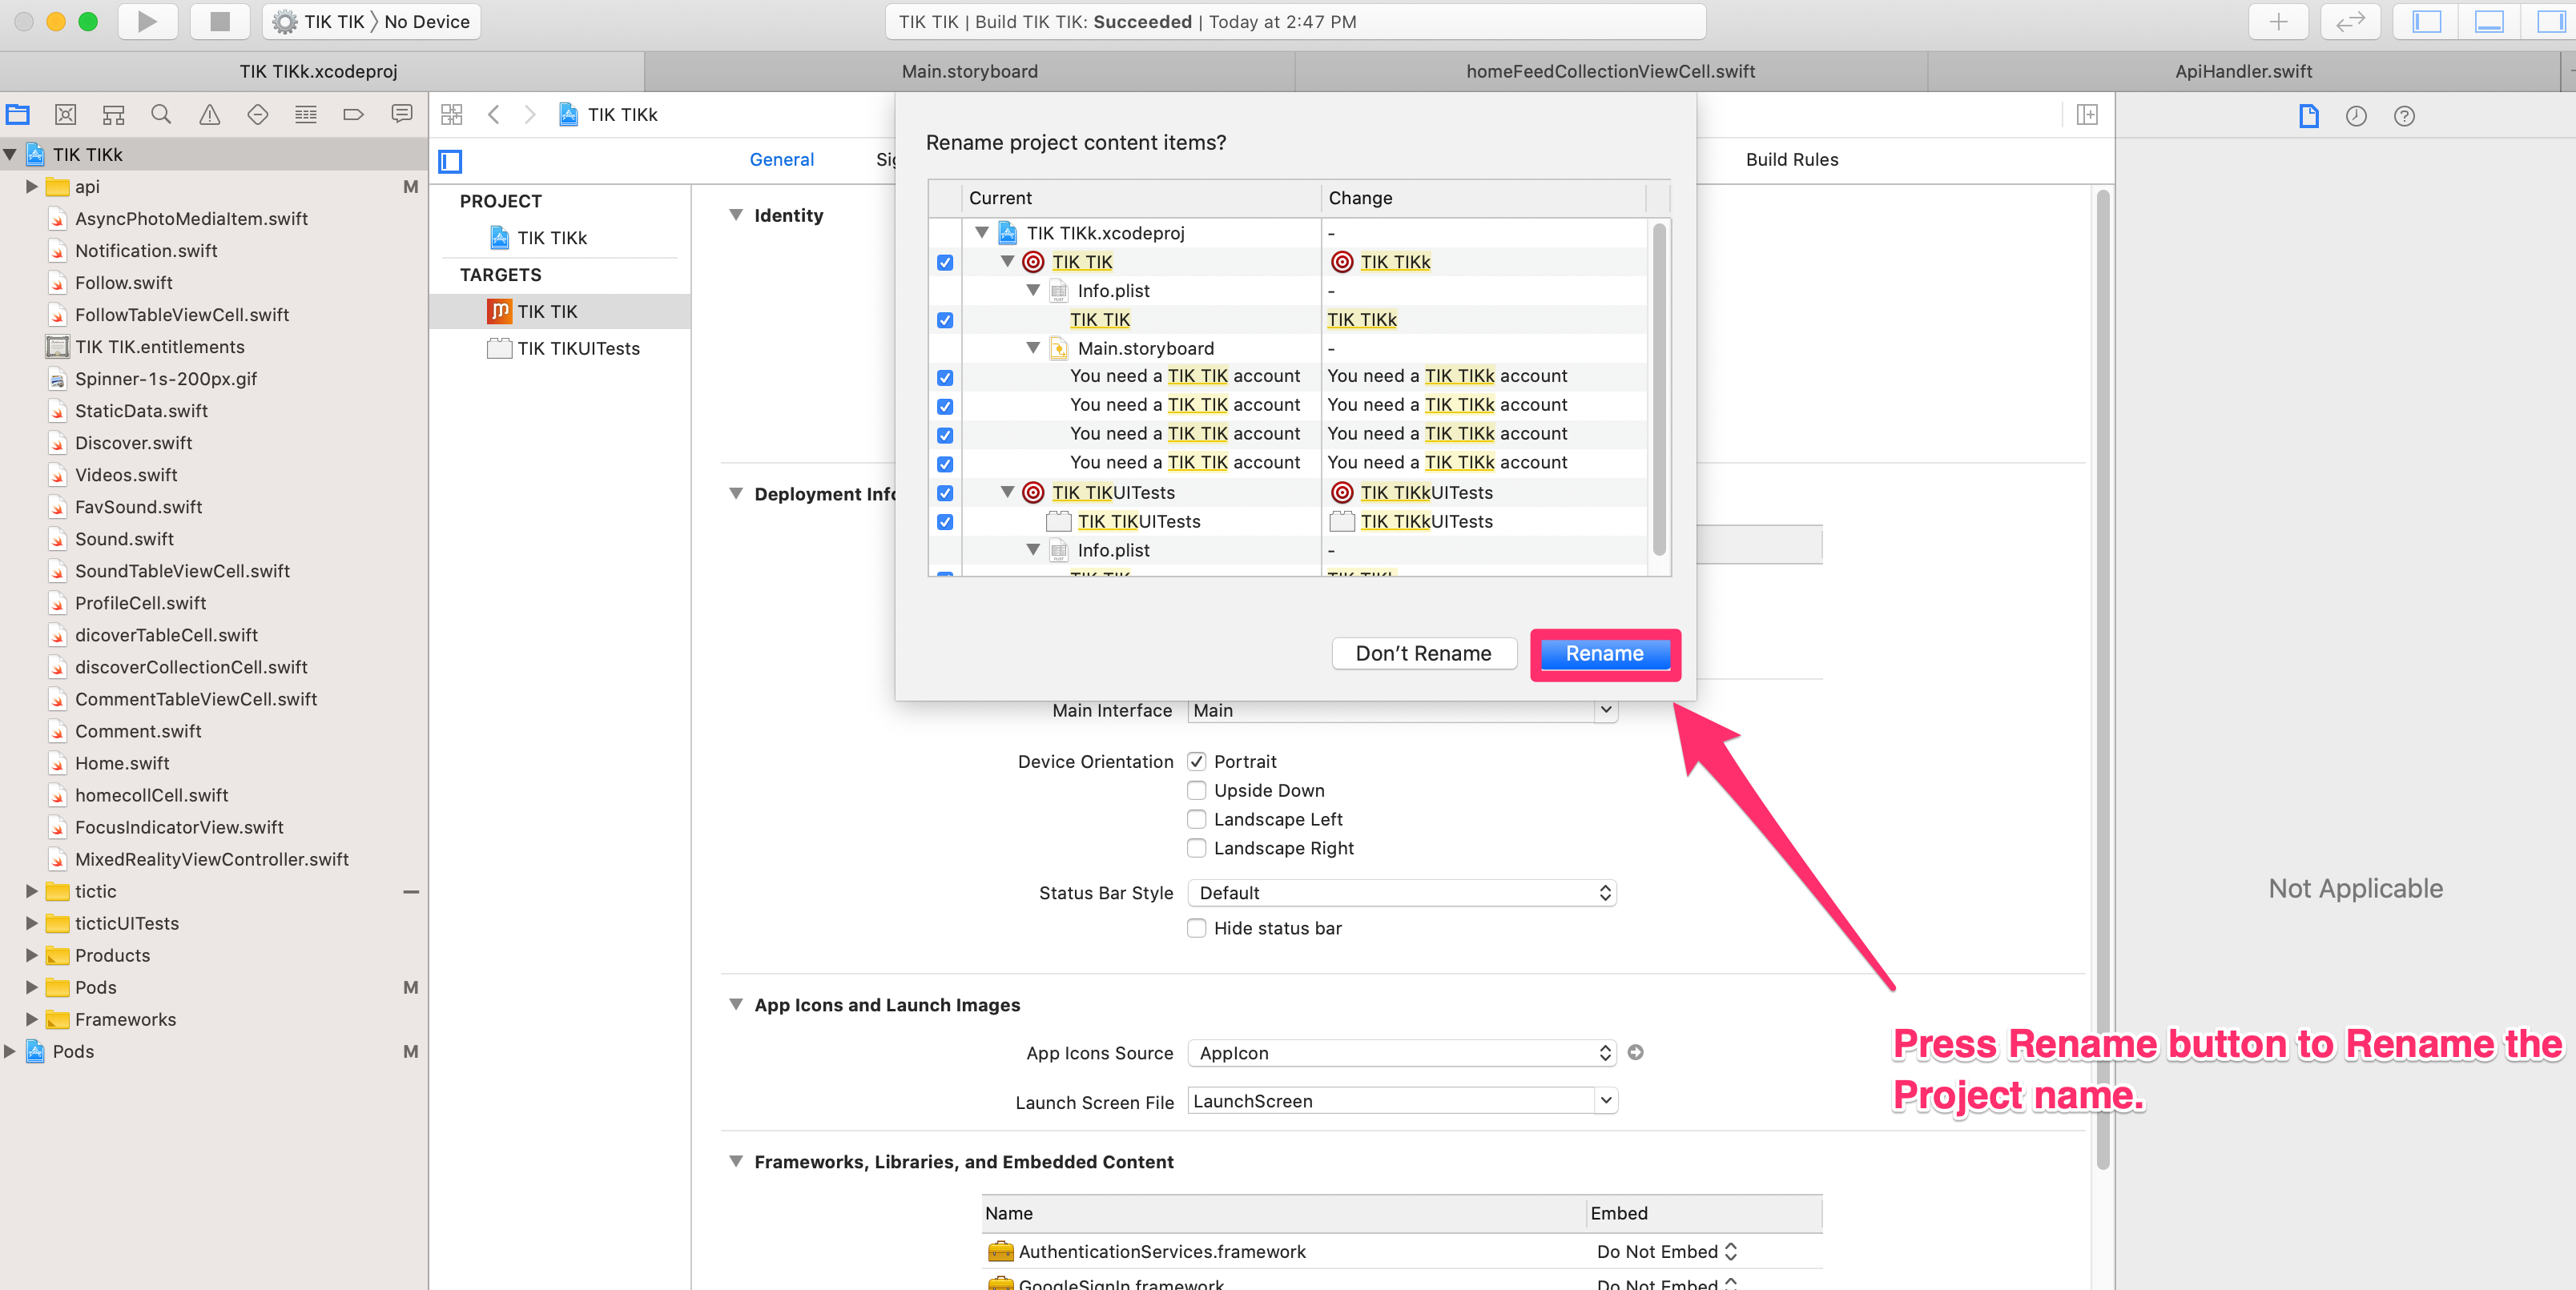
How to Change App name
Follow steps on images to rename project name
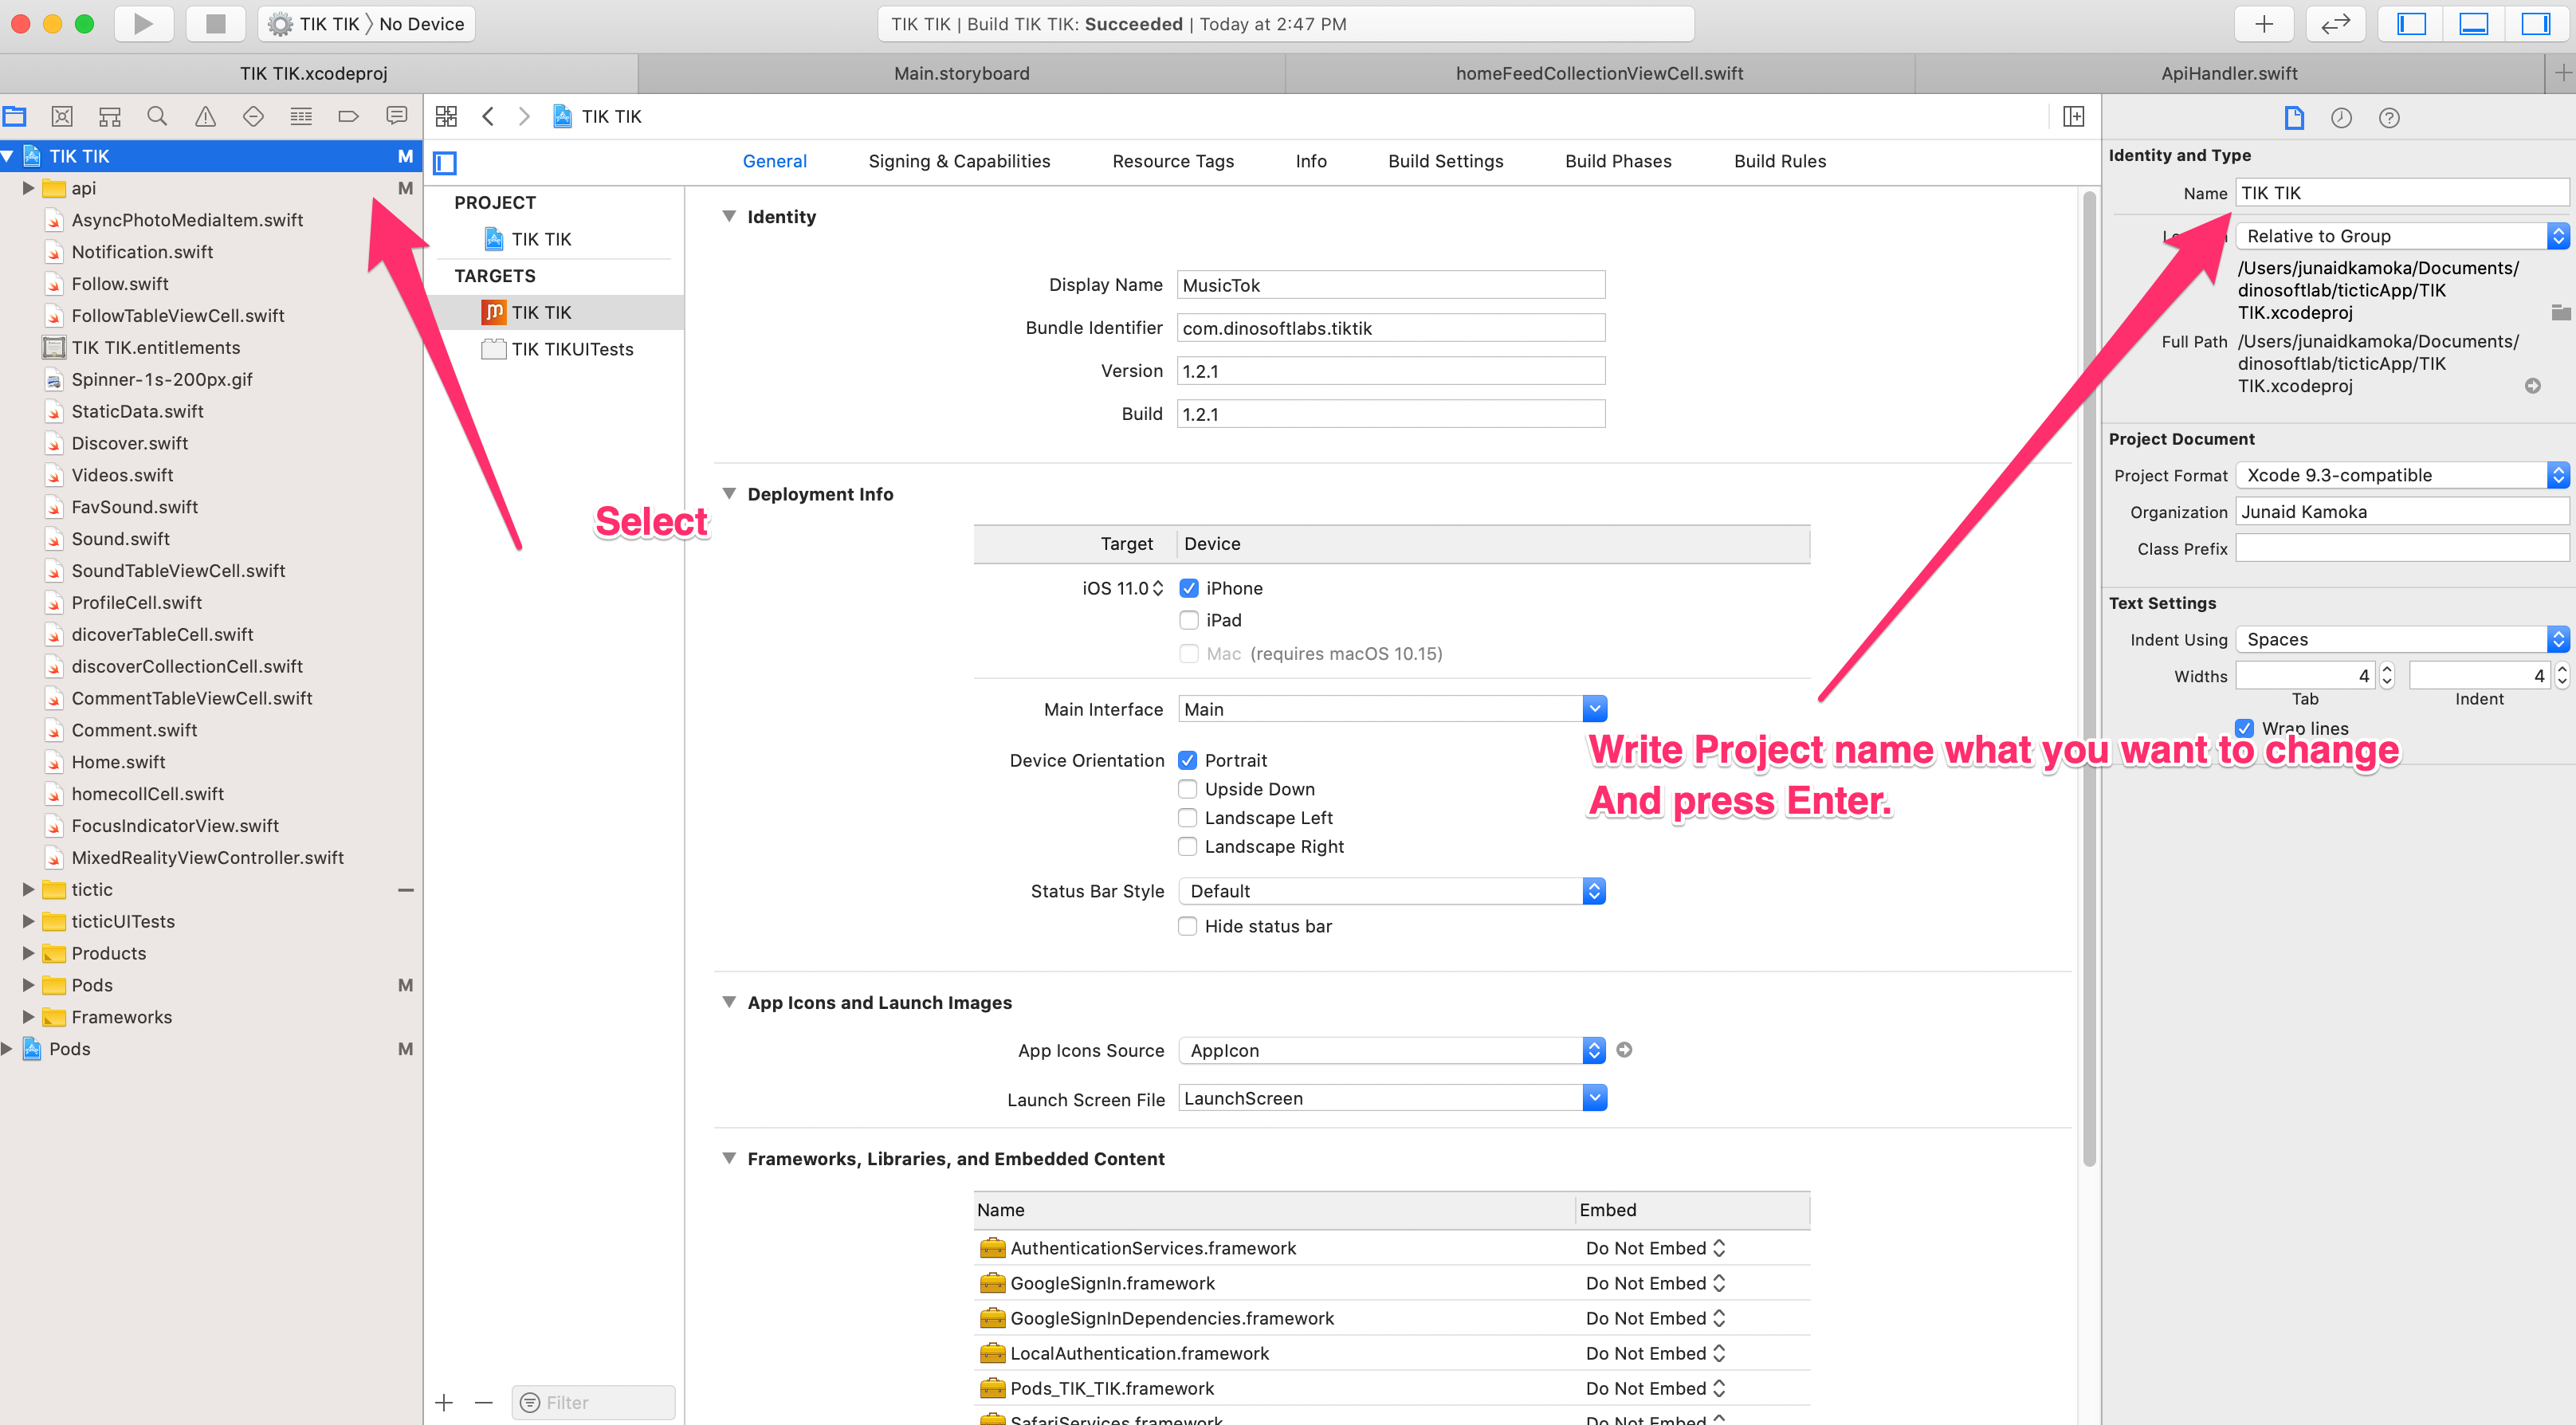
On rename button xCode automatically Rename the project name
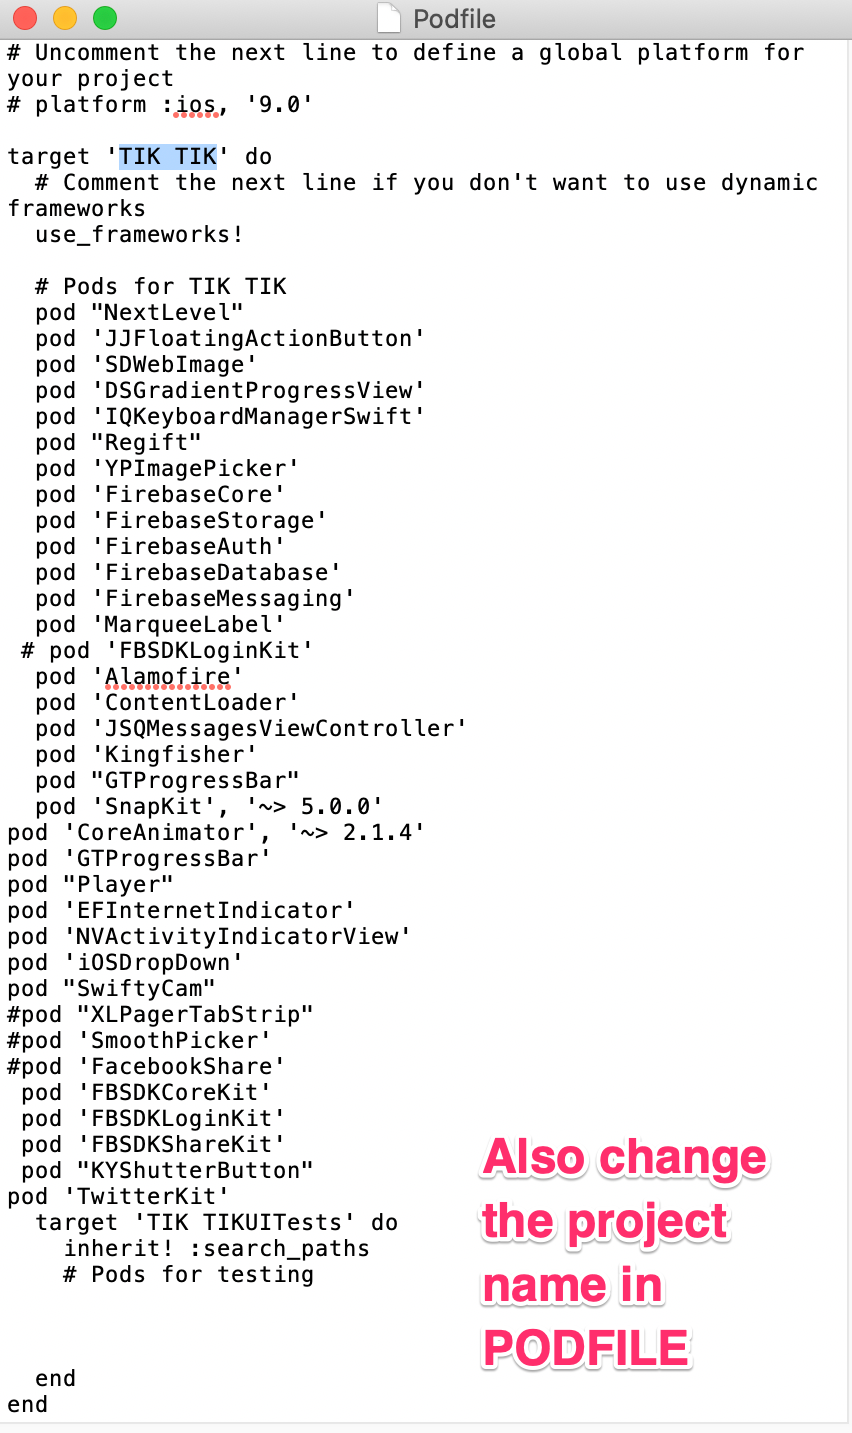
You can regenerate PODFILE folder by using command POD INIT in terminal of project path. And COPY/PASTE these PODs in new RENAMED PODs to generate new .XCWORKSPACE file. Or by Changing the name of Project in Targets
OR Follow these steps http://stackoverflow.com/a/35500038
How to get Bundle Identifier
Bundle Identifier
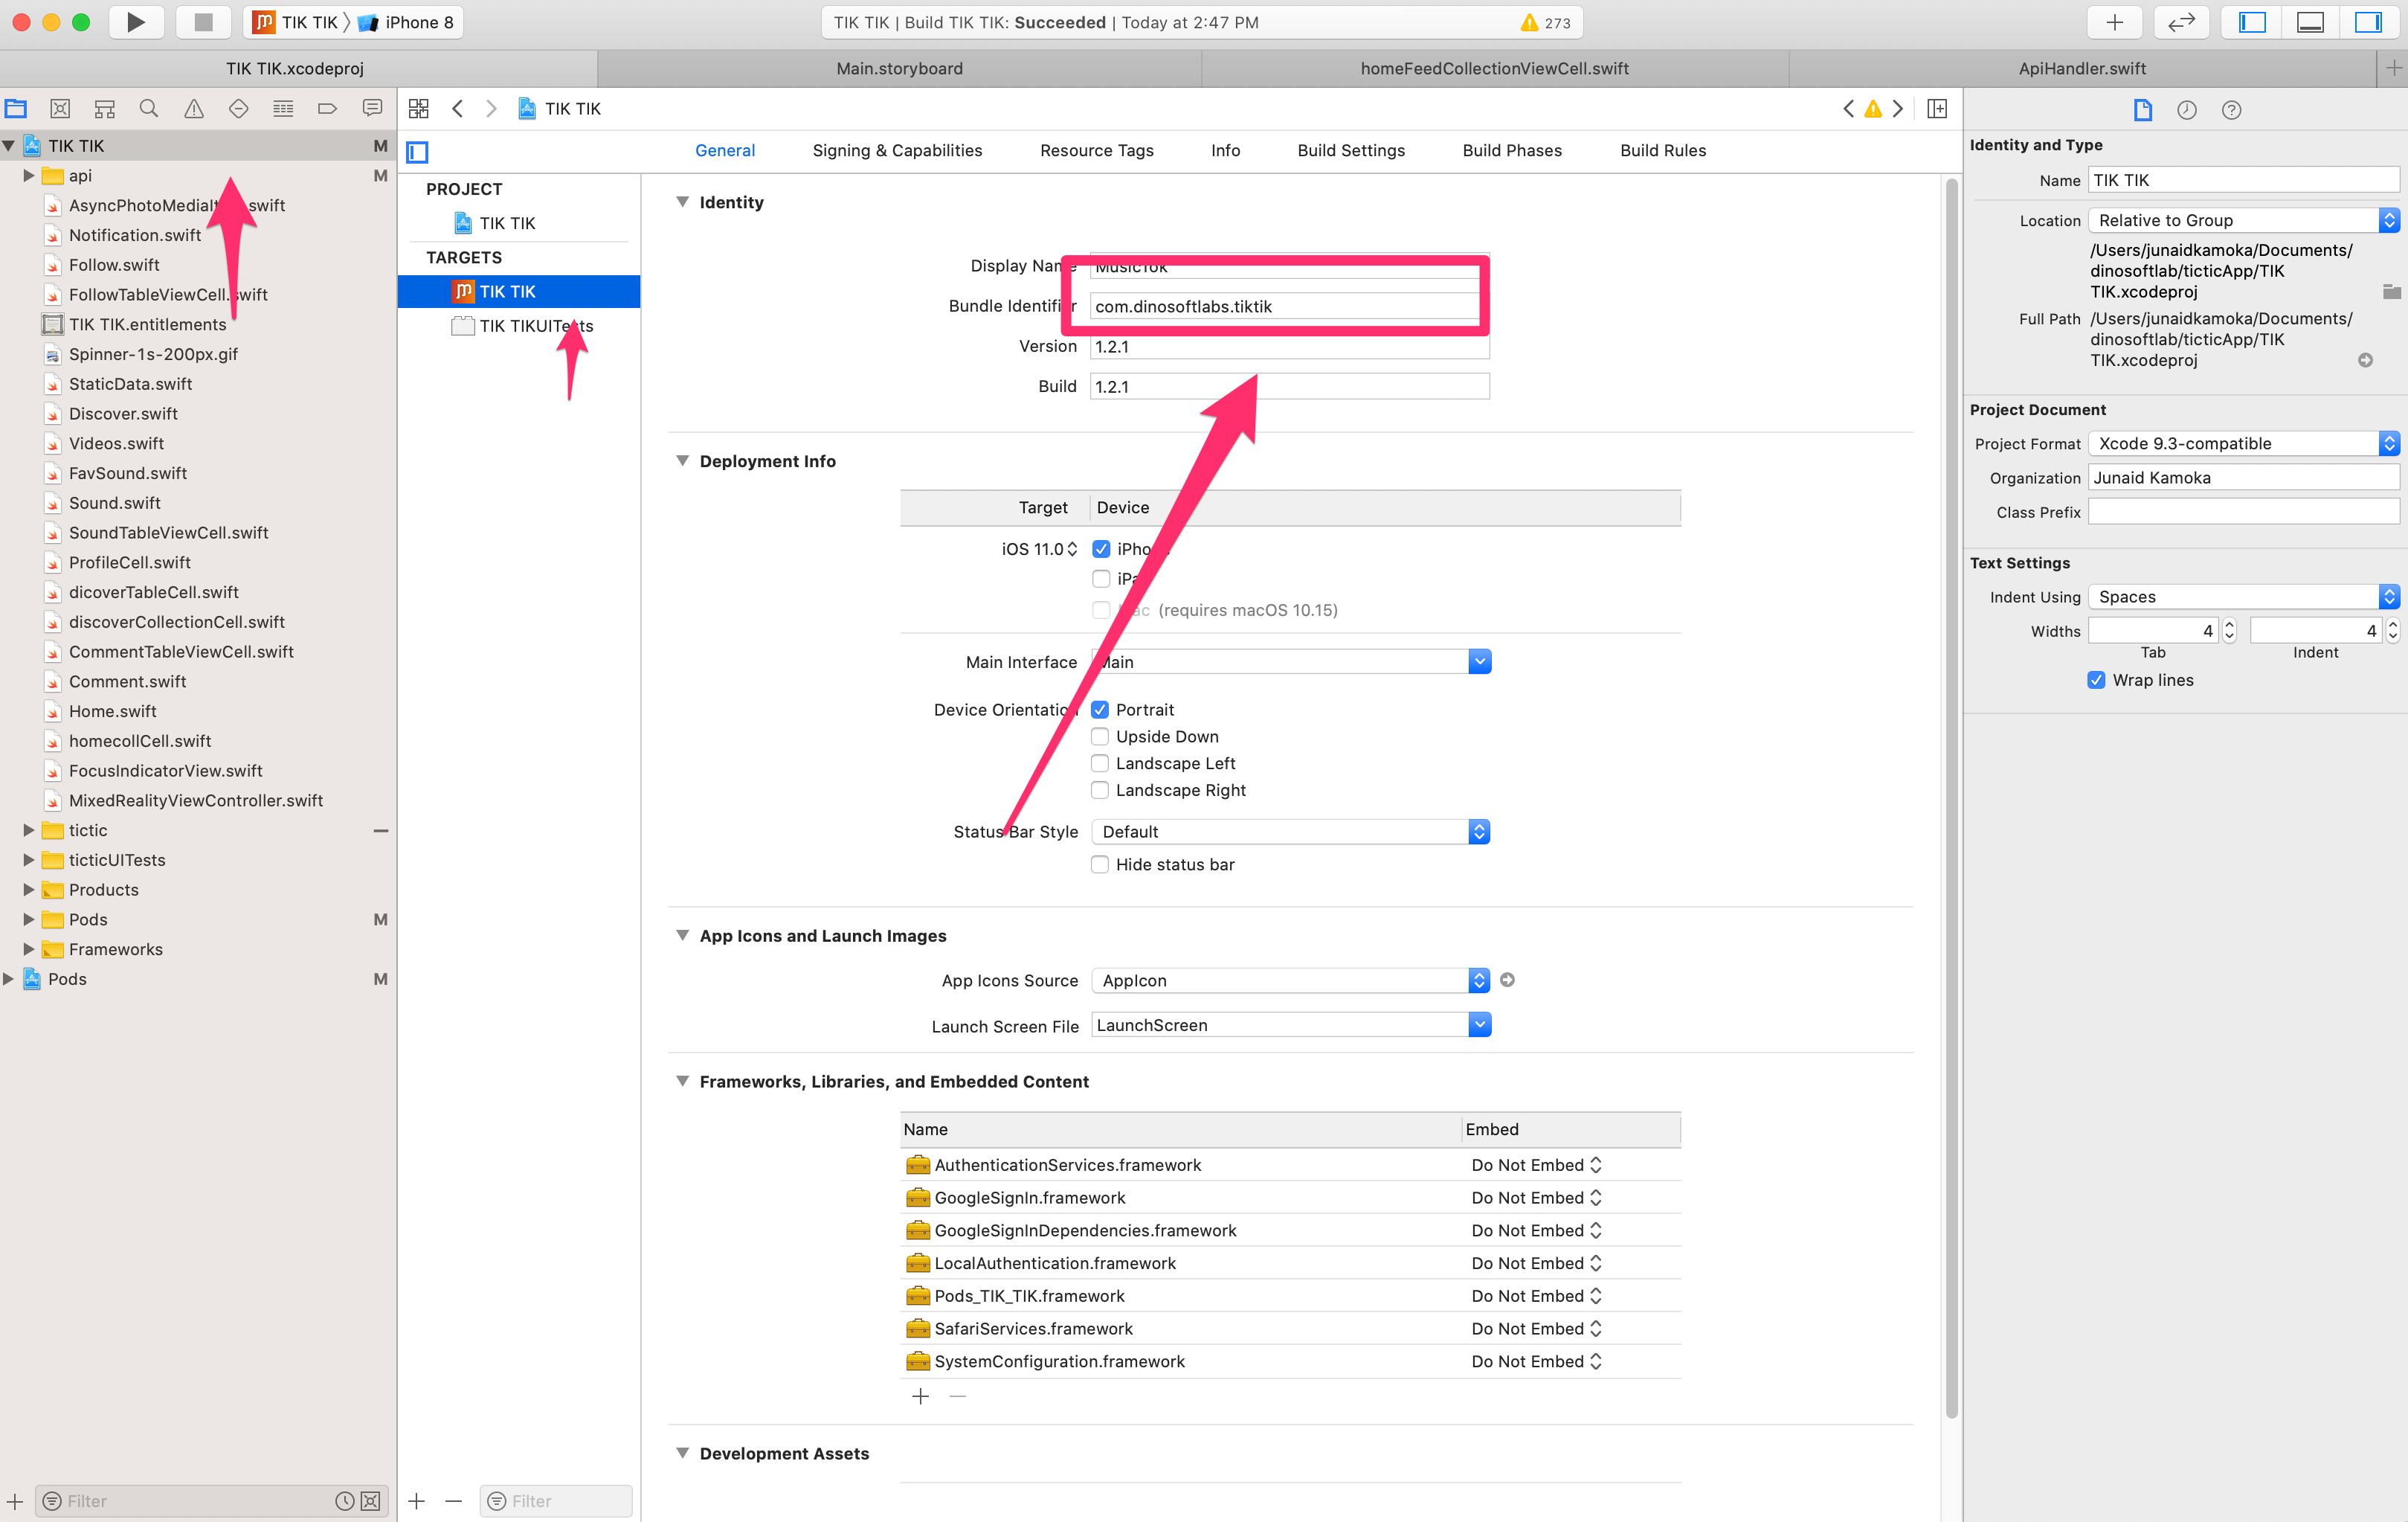
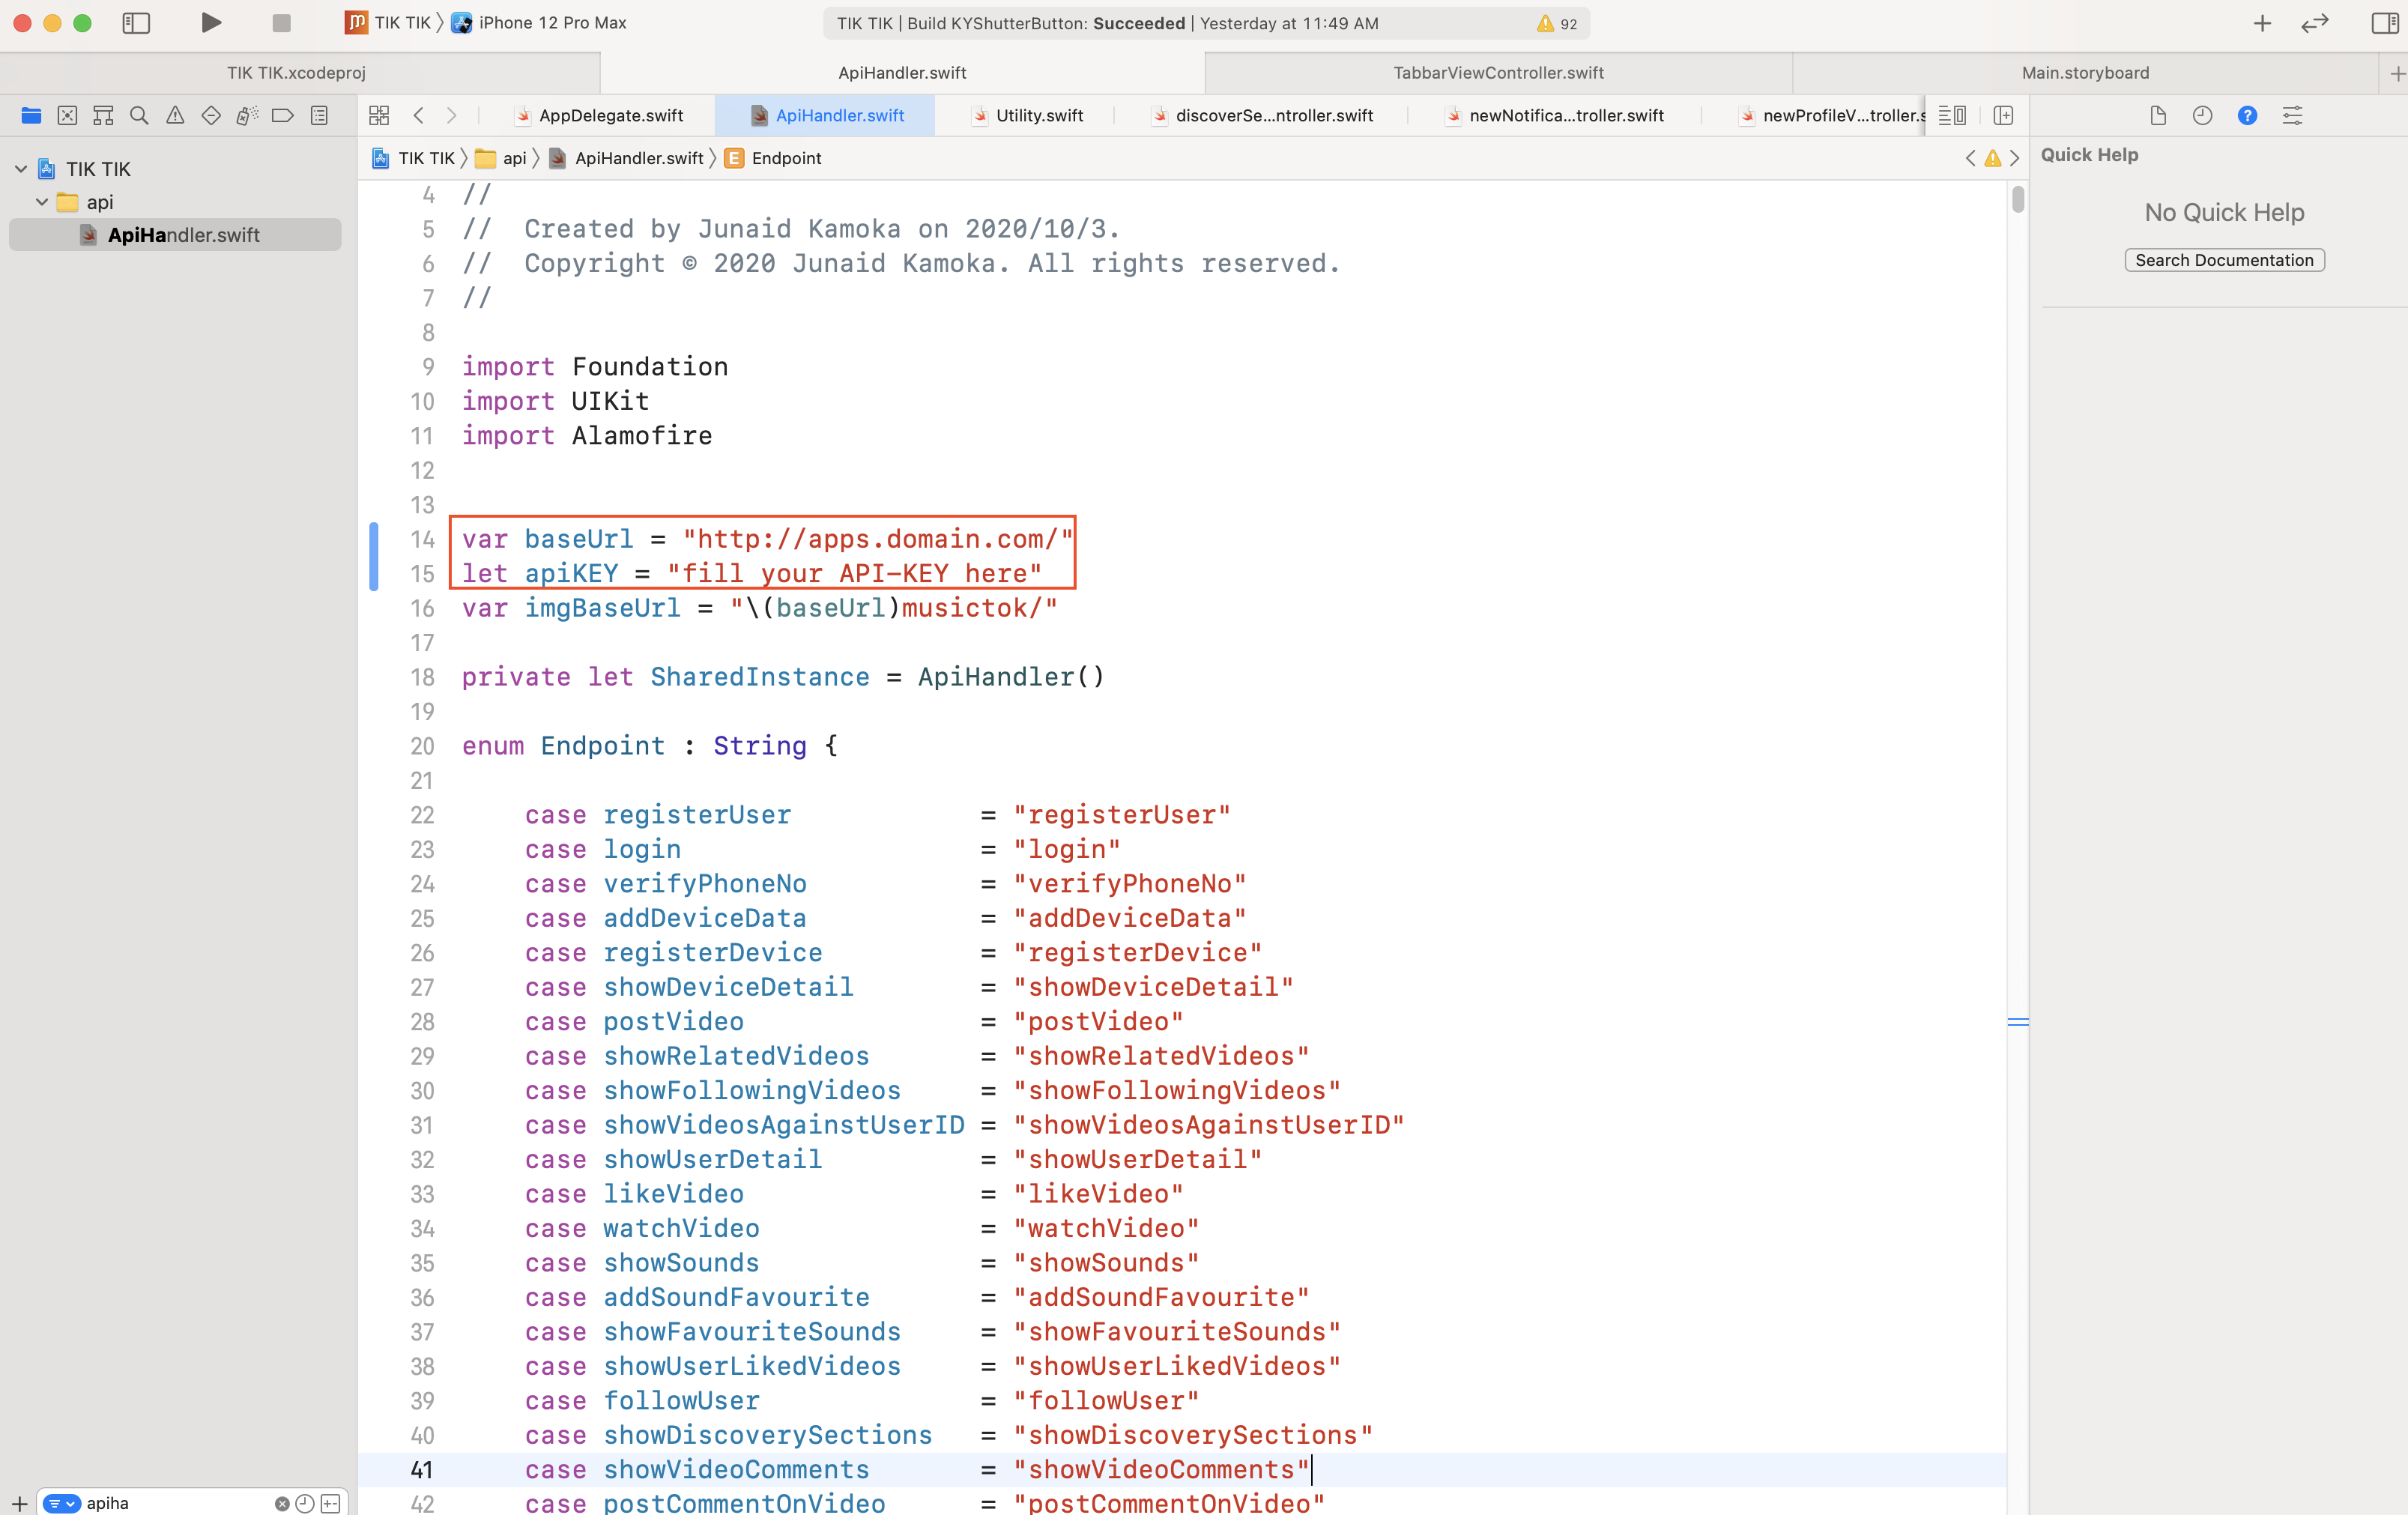
How to Setup API URL
Just go there App Delegate file and Change BaseURL of your API and set API-KEY
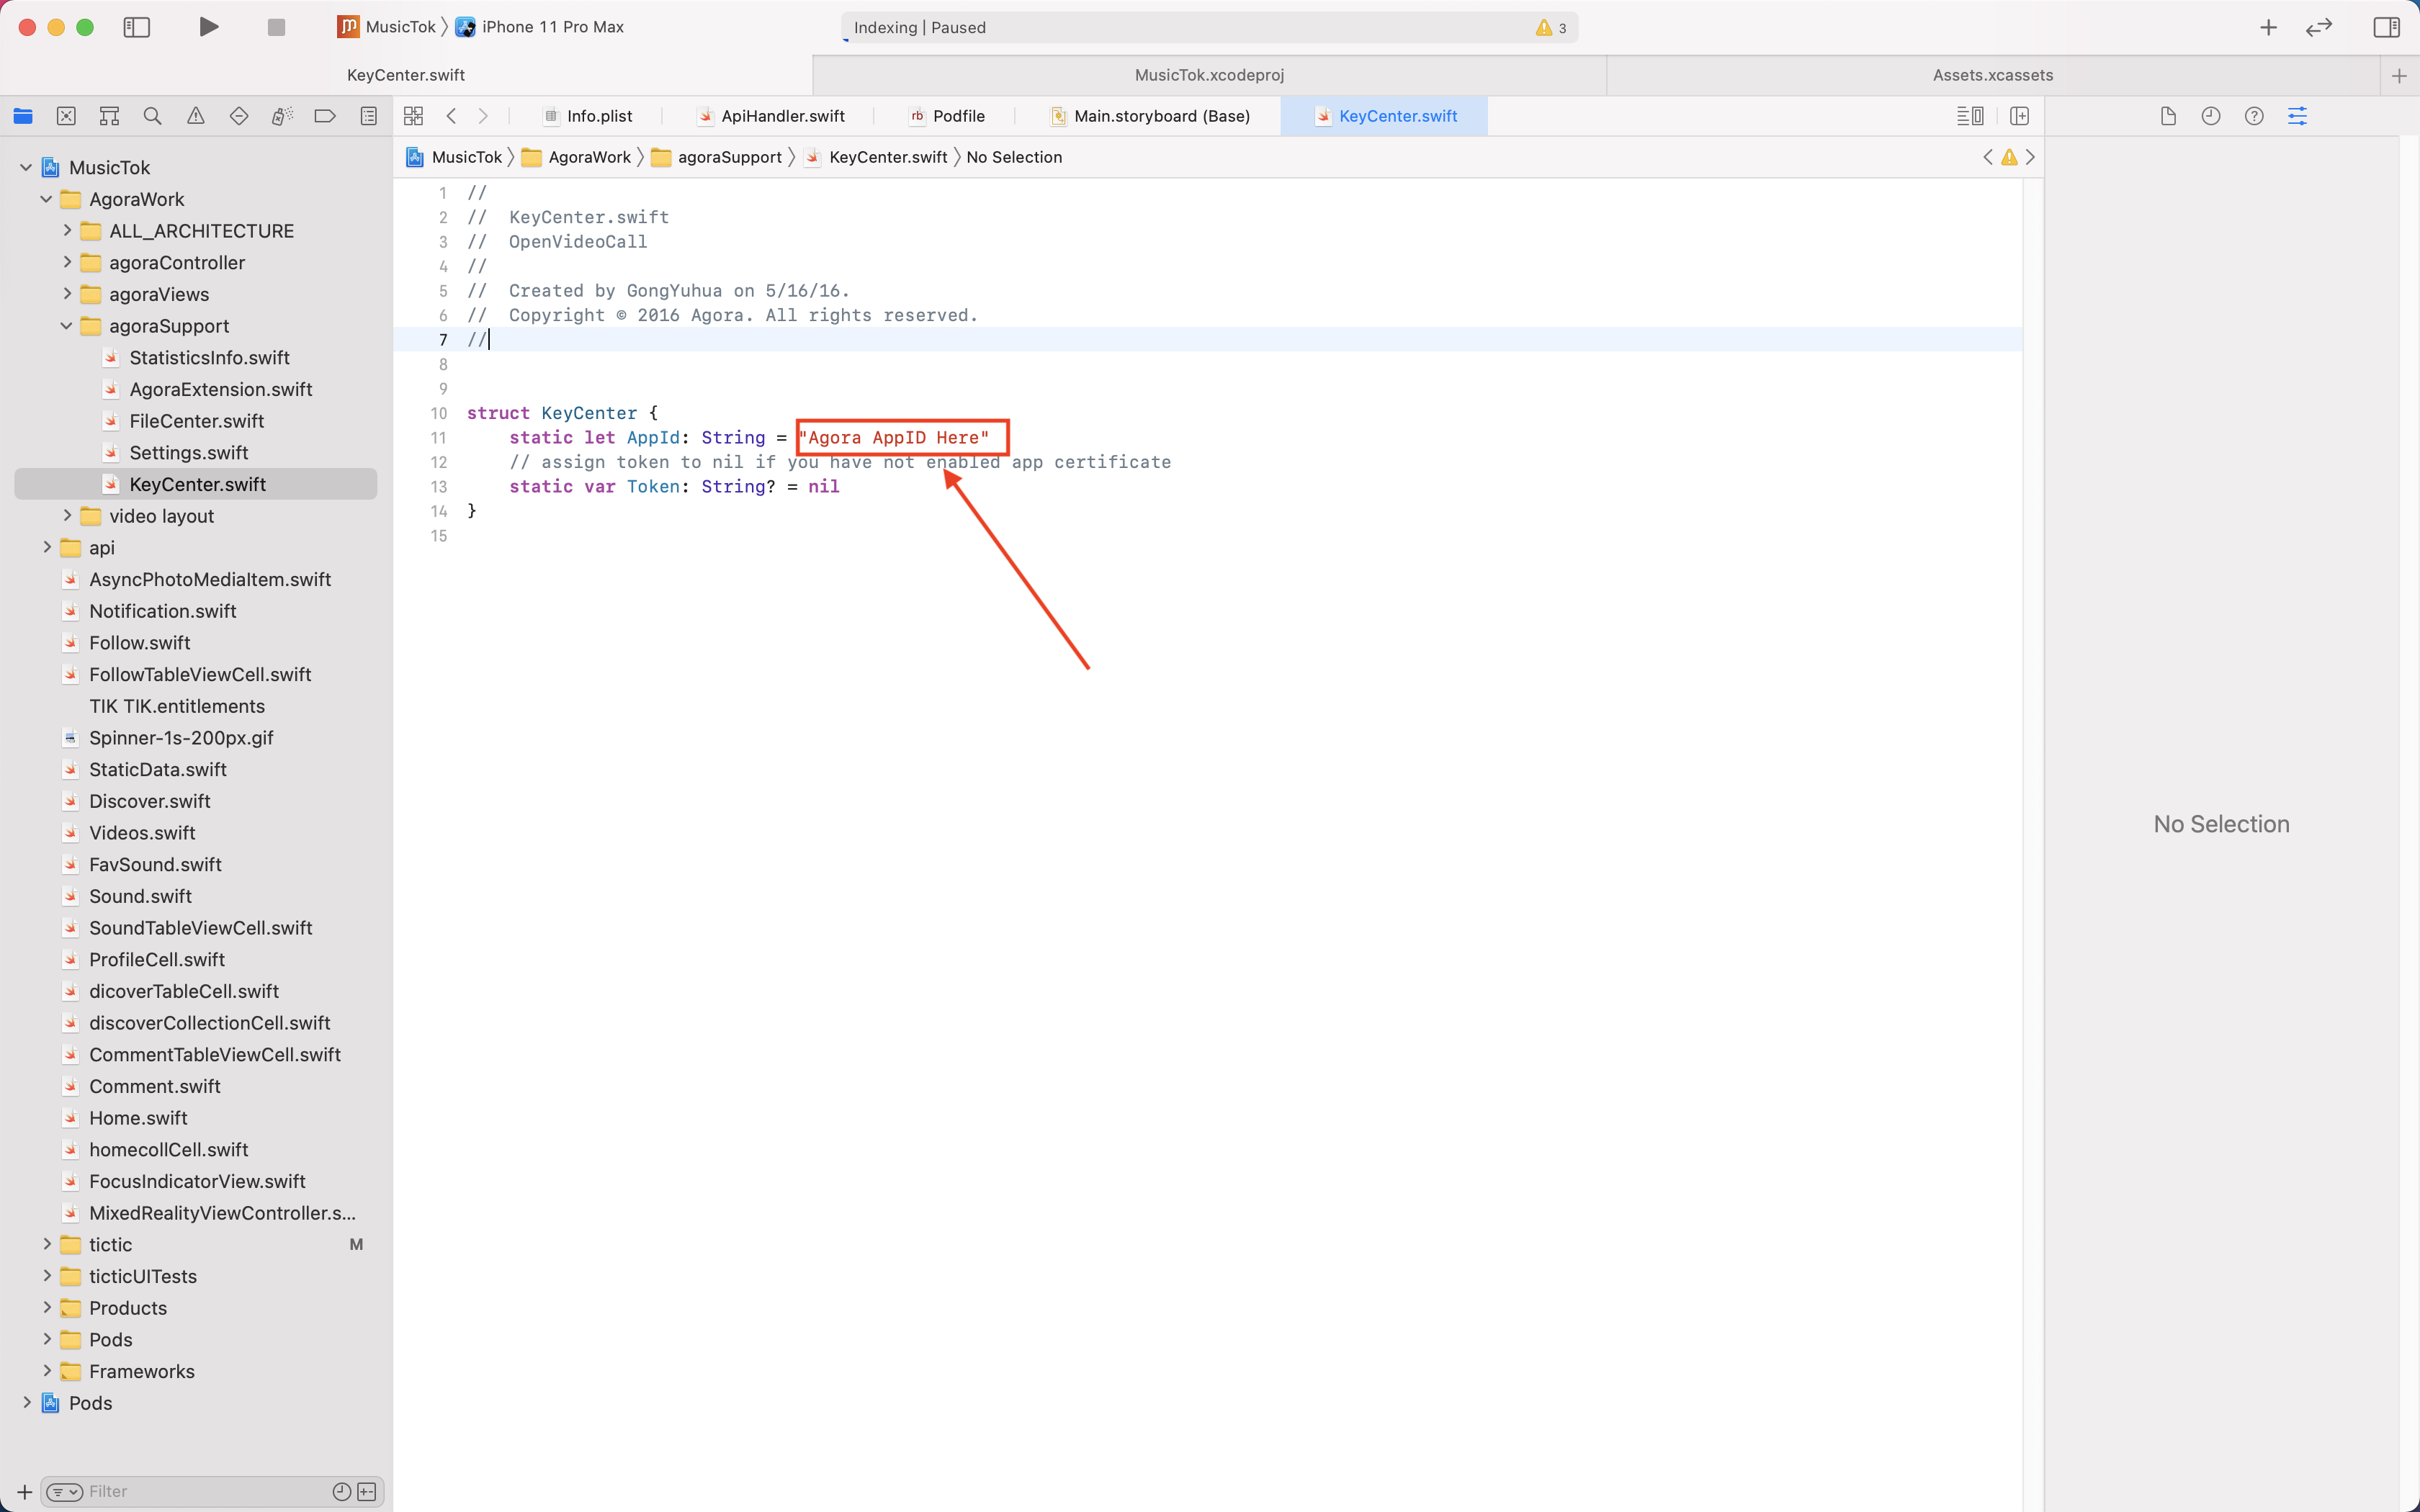
Live Stream Setup
Place Key
Just Place Agora App ID
In App Purchase
How to enable In App Purchase
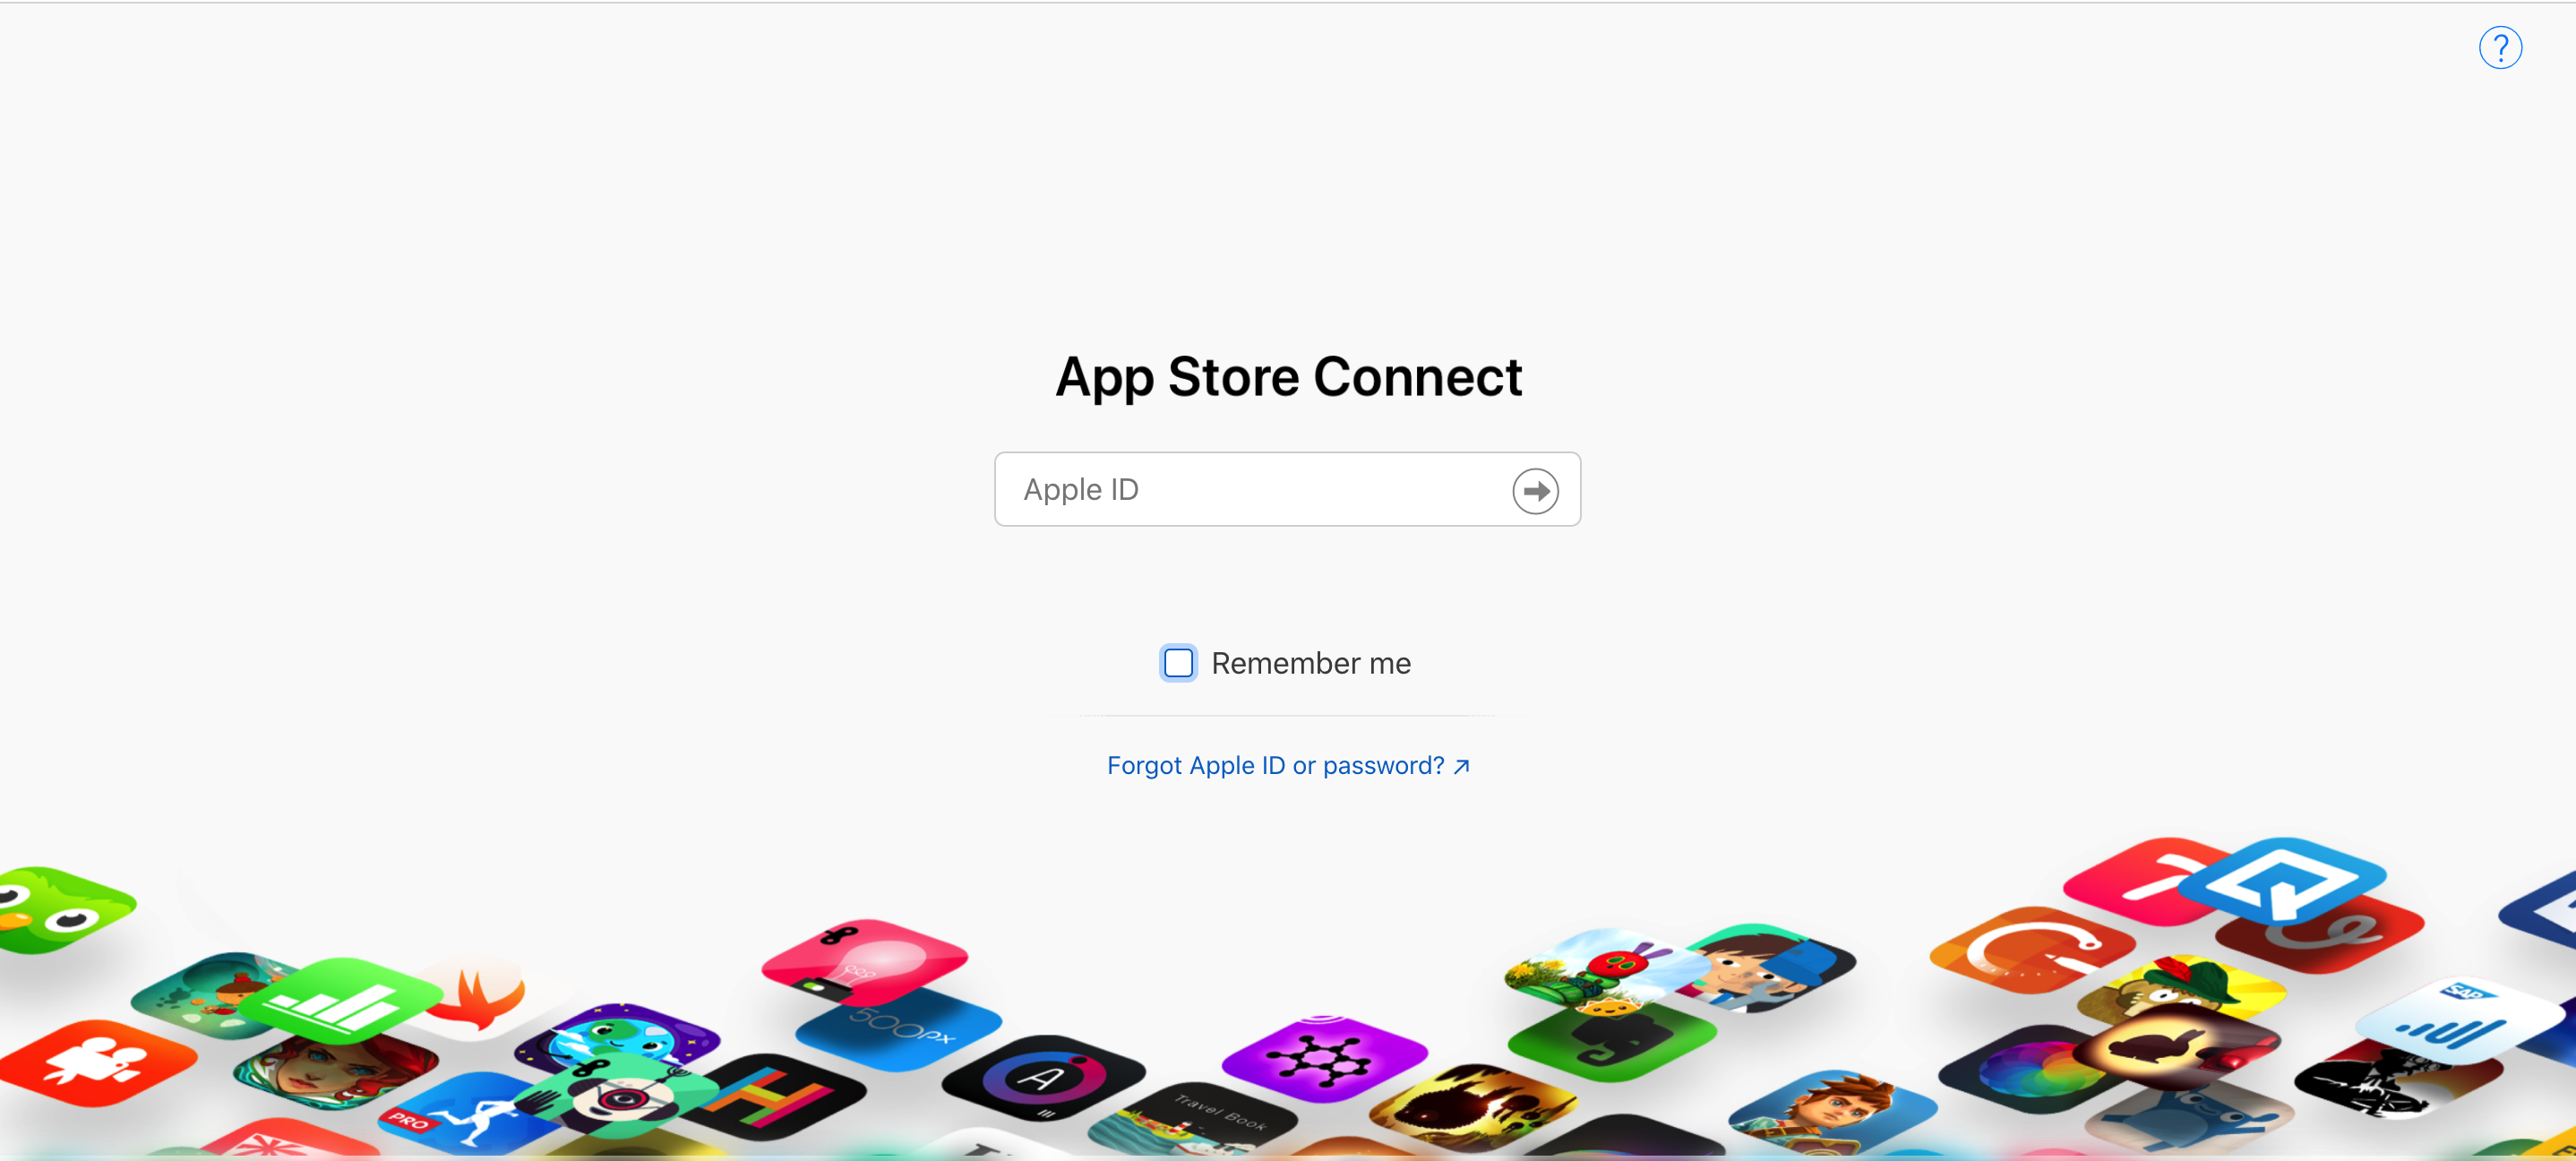
Open your Apple developer account by using this link: https://appstoreconnect.apple.com Apple Store Connect enter login credentials
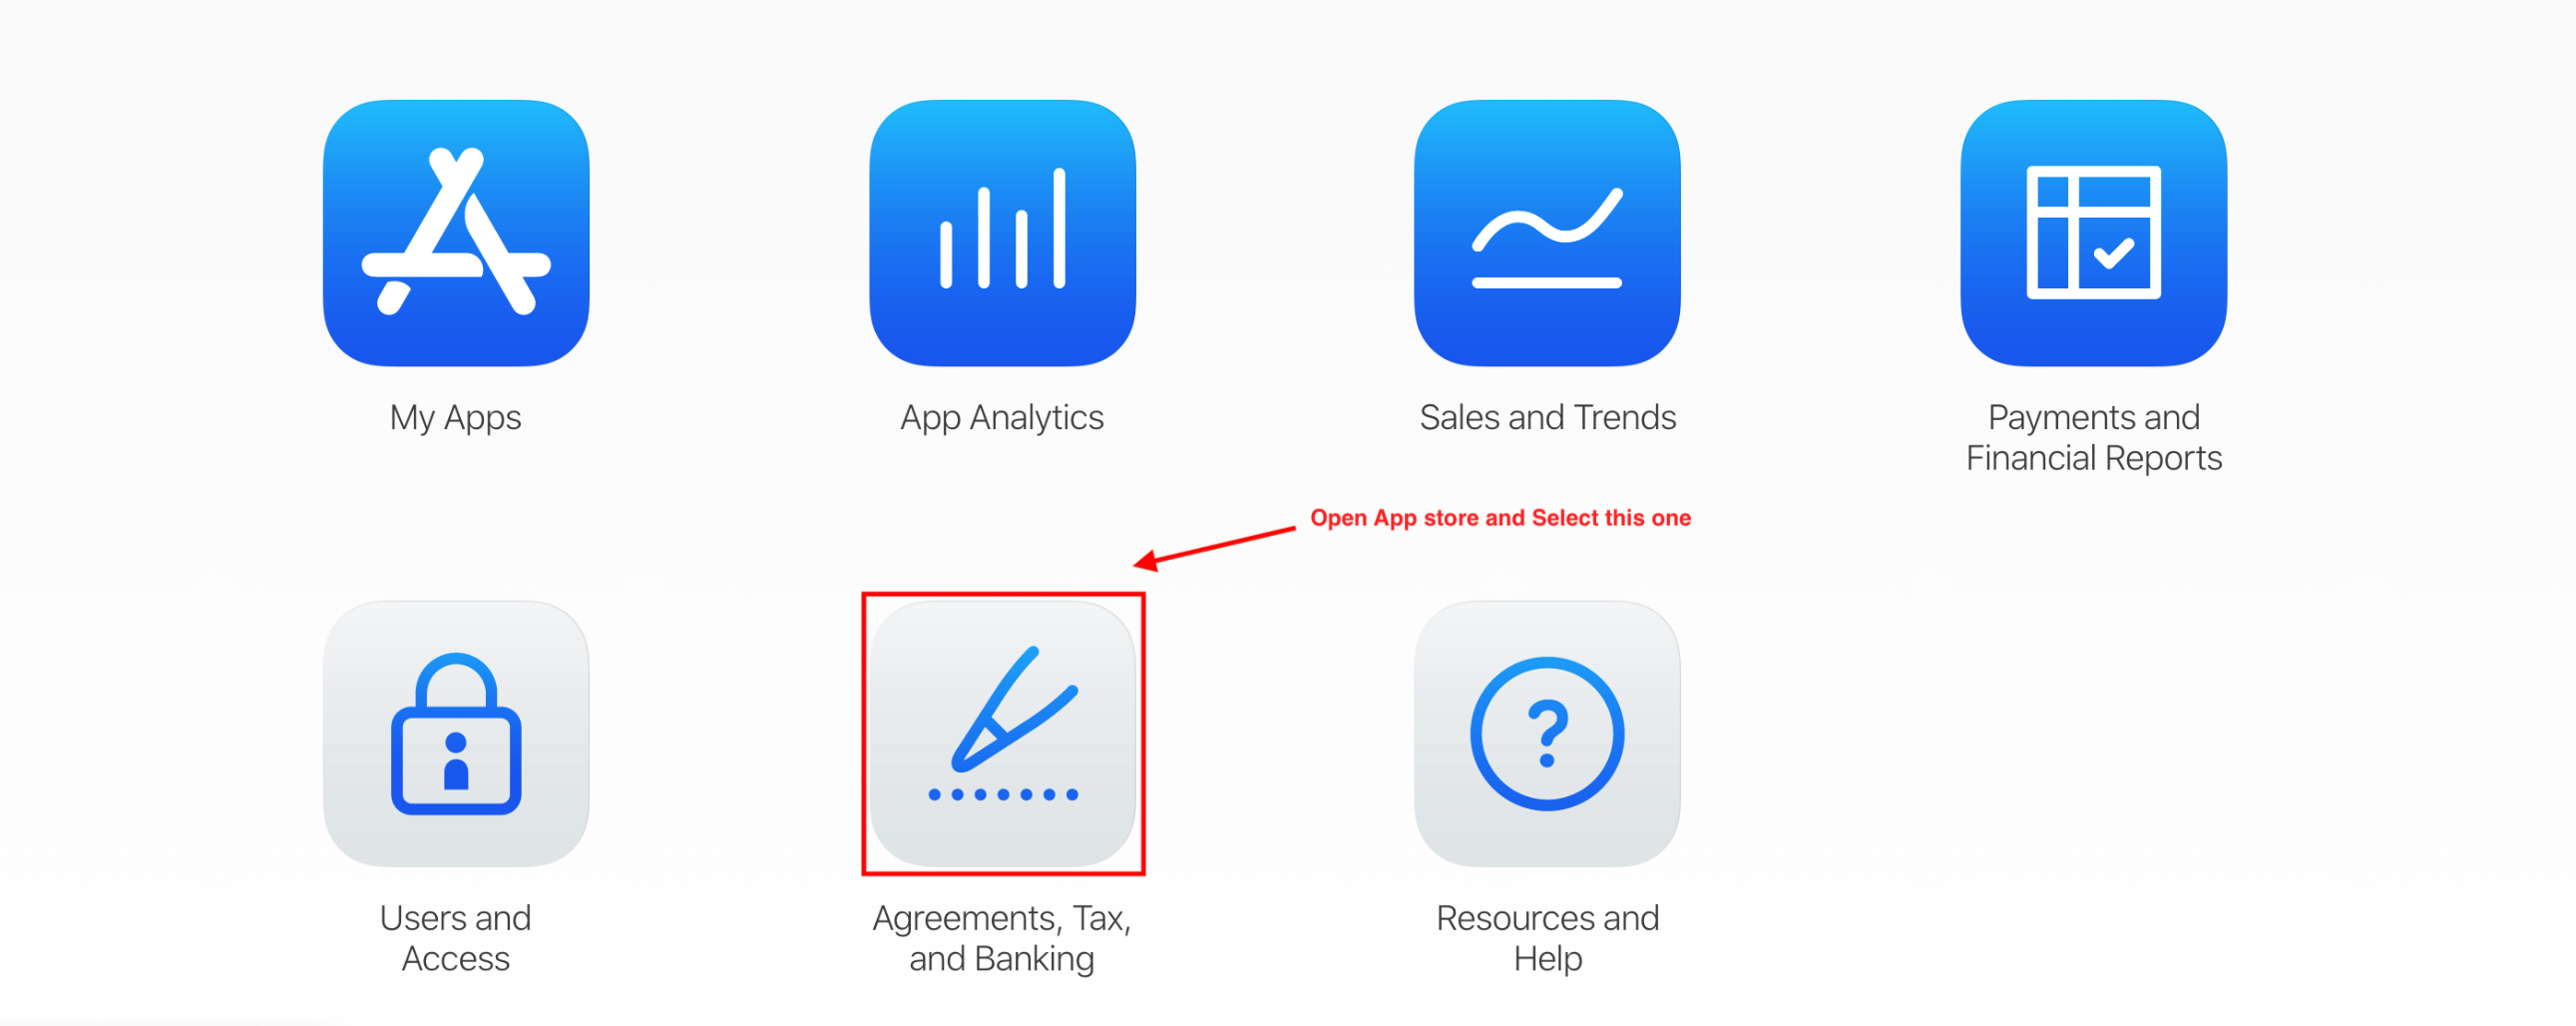
After login , such screen appear and click on the Agreement,Taxs and Banking option
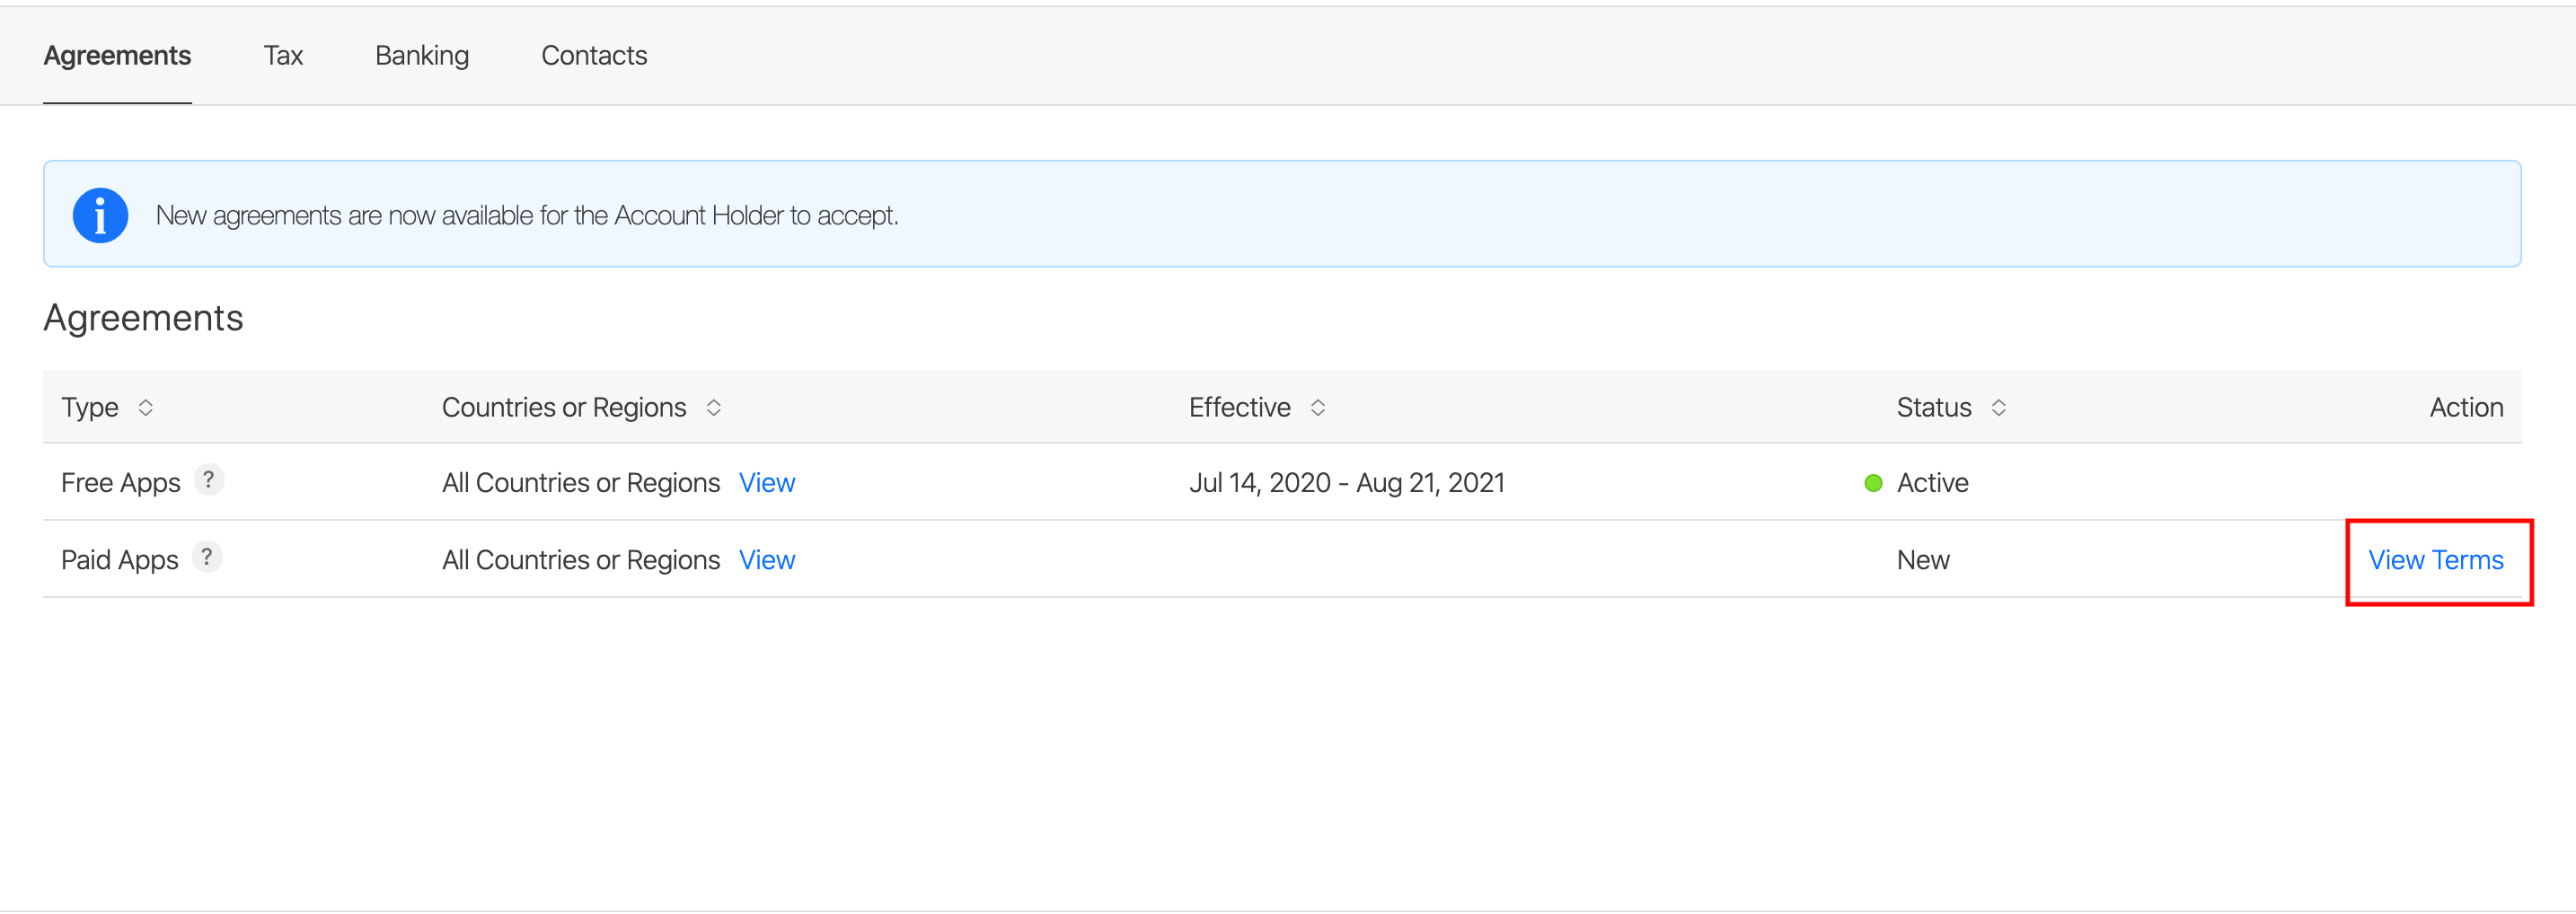
then click on terms in Paid apps after that provide secret informaton
How to setting In App Purchase in Uploaded App / Register App on App Store
After complete all stuff then again back to main screen and select My Apps and select your app on which In App Purchase enable

Move on right side then section show In App Purchase and click on Manage

Generate a Secret Key by click on App-Specific Shared Secret and then click on Plus button

Then select any one option and click on Create

Fill all required fields and then click on Save

Note : Now you can use InAppPurchase
Wallet
How to get your coins
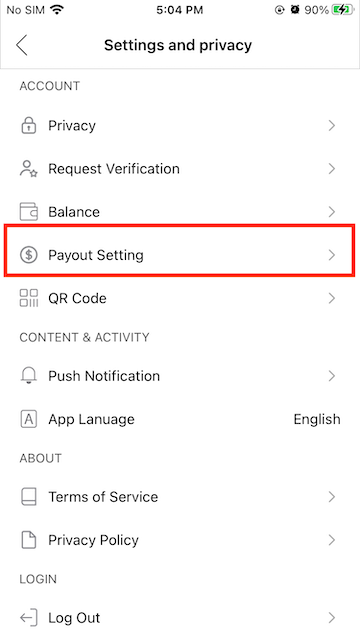
you can easily get your coins just click on profile that shown in bottom tabbar

Click on top on the right side 3 dots and then a list appear select Wallet option


User can also cashout his coin by click on Cash out button

Then such screen appear click on CashOut Button then money transfer to your assoicated account

How to Buy coins
If user have no enough coins then no need to worried, just click on any coin that user wants to buy in "section 2"
Then such popup appear fill his information in providing fields

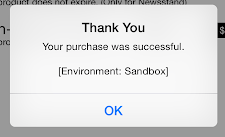
After providing correct information then success alert show and you successfylly buy coins
Payout(Paypal)
How to add Payapal
click on profile that shown in bottom tabbar
Click on top right corner 3 dots and then a list appear select Payout option
After that click on Plus Button on right corner of the screen
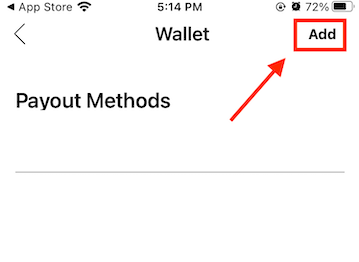
Then add your paypal email and click on save button

Web API Configuration
installing Tictic PHP API is an easy process and we will guide you through it .
Before getting started, please make sure your web server meets all the requirements:
- Latest PHP Version 7.0
- MySQL extension (enabled on all hosts by default)
Step 1 - Upload the mobileapp_api files which we have provided in your downloaded package from codecanyon
Step 2 - Login in your hosting cpanel Navigate to File Manager , upload the mobileapp_api.zip , then extract it
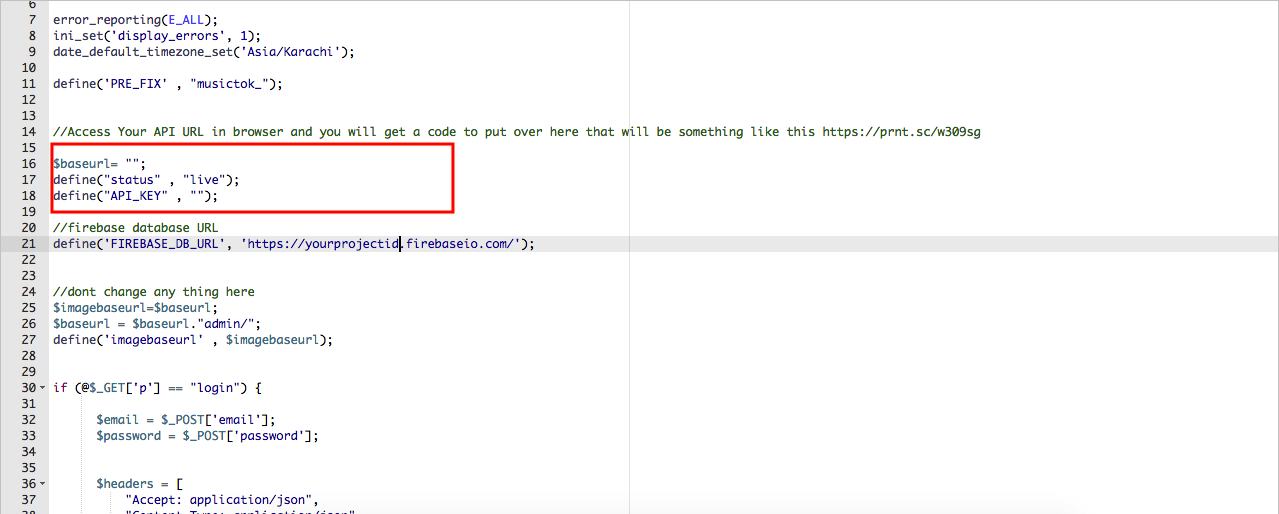
Step 3 - For Database & 3rd party API configurations edit constant.php file which is located at "mobileapp_api/app/Config/constant.php"
if you dont have htaccess file?
Make sure .htaccess file exist in the directory mobileapp_api/. If not then create the file .htaccess and copy the below code in it
										<IfModule mod_rewrite.c>


										    RewriteEngine On

                                            RewriteCond %{REQUEST_FILENAME} !-d

                                            RewriteCond %{REQUEST_FILENAME} !-f

                                            RewriteRule ^(.*)$ index.php [QSA,L]


										</IfModule>
SQL Database Setup
Step 1 -Import the SQL file which we have provided in your downloaded package from codecanyon
Step 2 - edit constant.php file which is located at "mobileapp_api/app/Config/constant.php"
Fill the database details in "mobileapp_api/app/Config/constant.php"
define('DATABASE_HOST', 'localhost');
define('DATABASE_USER', '');
define('DATABASE_PASSWORD', '');
define('DATABASE_NAME', '');
Step 3
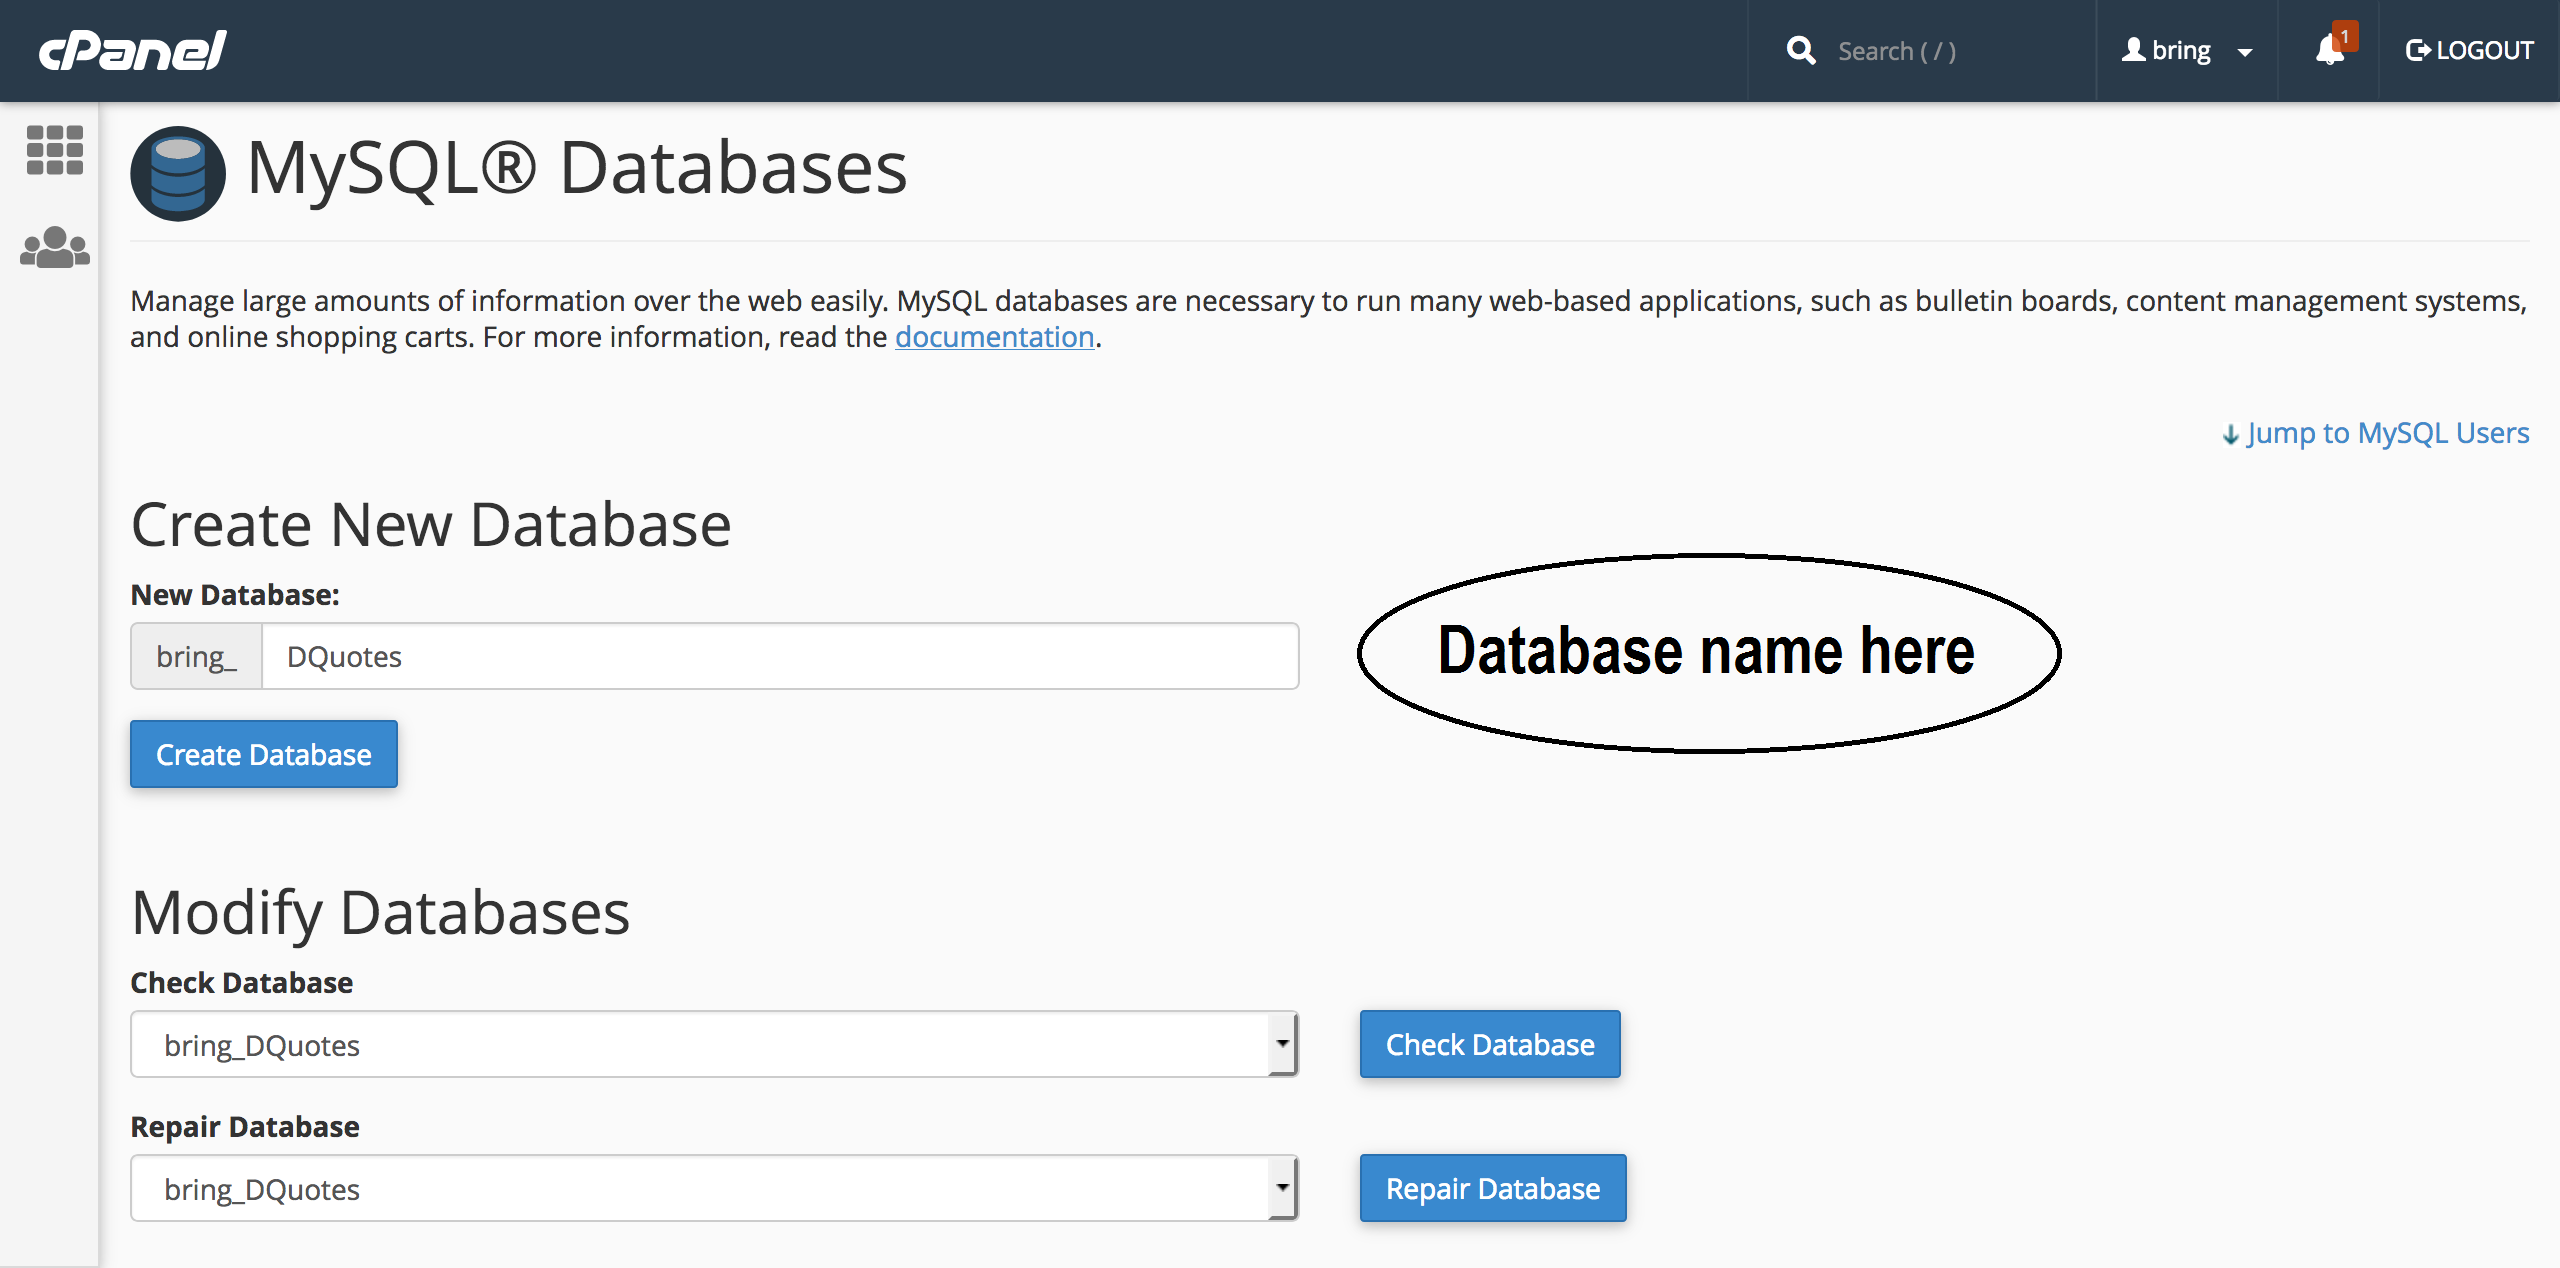
- Create Database in mysql databases ( in cPanel ) with the name of "Tictic" you can write what ever you want
- Create a new user

- Assign that user to database
Step 4
- Edit the file "constant.php" and update the Database information that you setup above
Twilio Setup
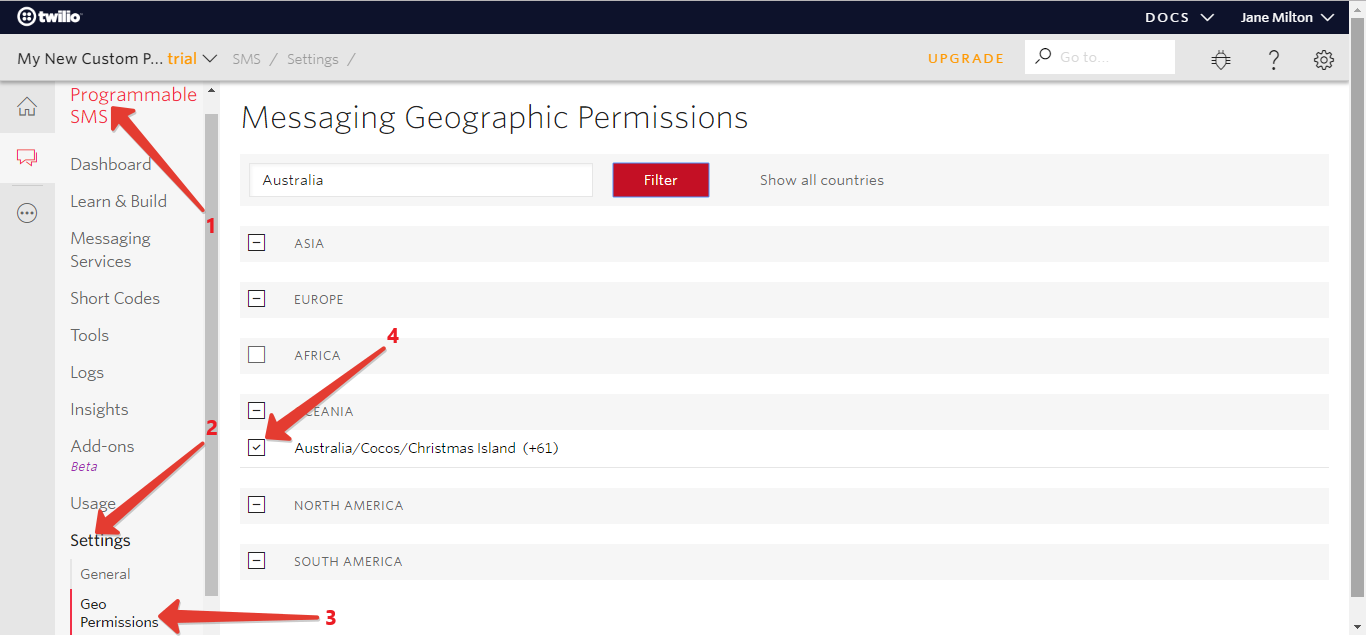
Step 1 - Get twilio keys by Create an account on twilio and buy a number as well which is required for the Programmable SMS You can find the API KEY and auth token in: twilio.com
Step 2 - You have to allow geo permissions for sending sms Click here
Fill the Twilio ACCOUNT ID , AUTH TOKON and PURCHASED NUMBER which twilio has provided you in "mobileapp_api/app/Config/constant.php"
//Twilio
define('TWILIO_ACCOUNTSID', '');
define('TWILIO_AUTHTOKEN', '');
define('TWILIO_NUMBER', '');
Admin Panel Configuration
- You have to open your API URl and copy the code from here Click Here and paste it in your portal/config.php
Setup AWS s3
Go to this url https://console.aws.amazon.com/
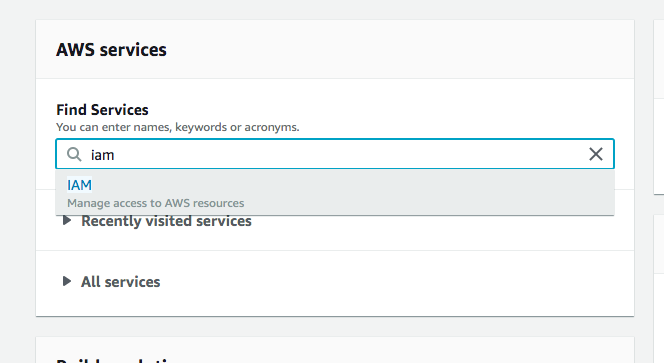
Search services "IAM"
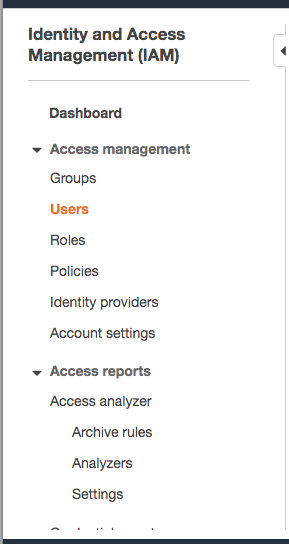
Click On Users
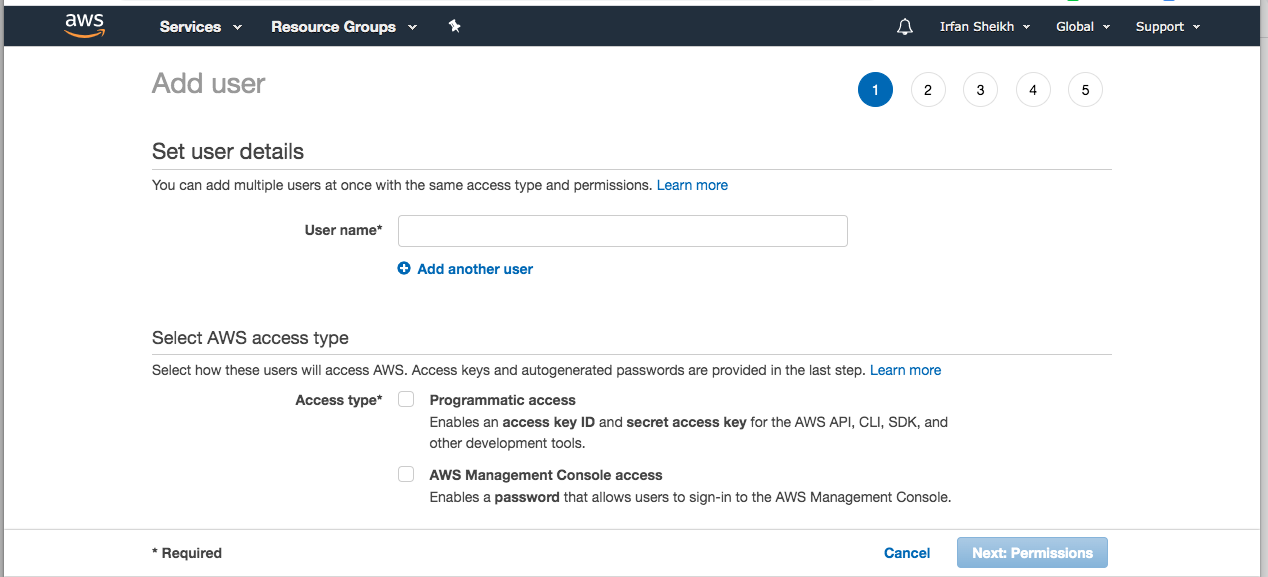
Add Users
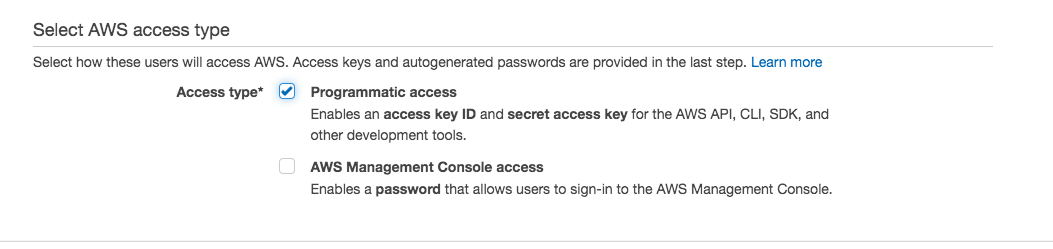
add username and check field "Programmatic access"
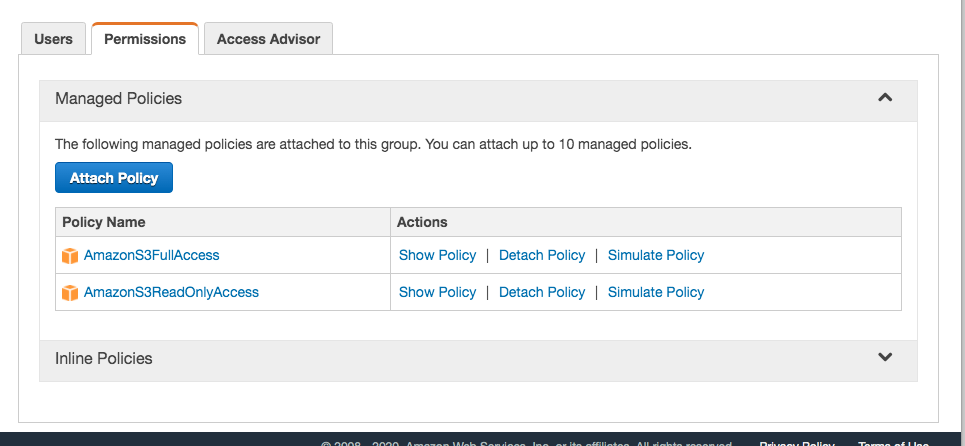
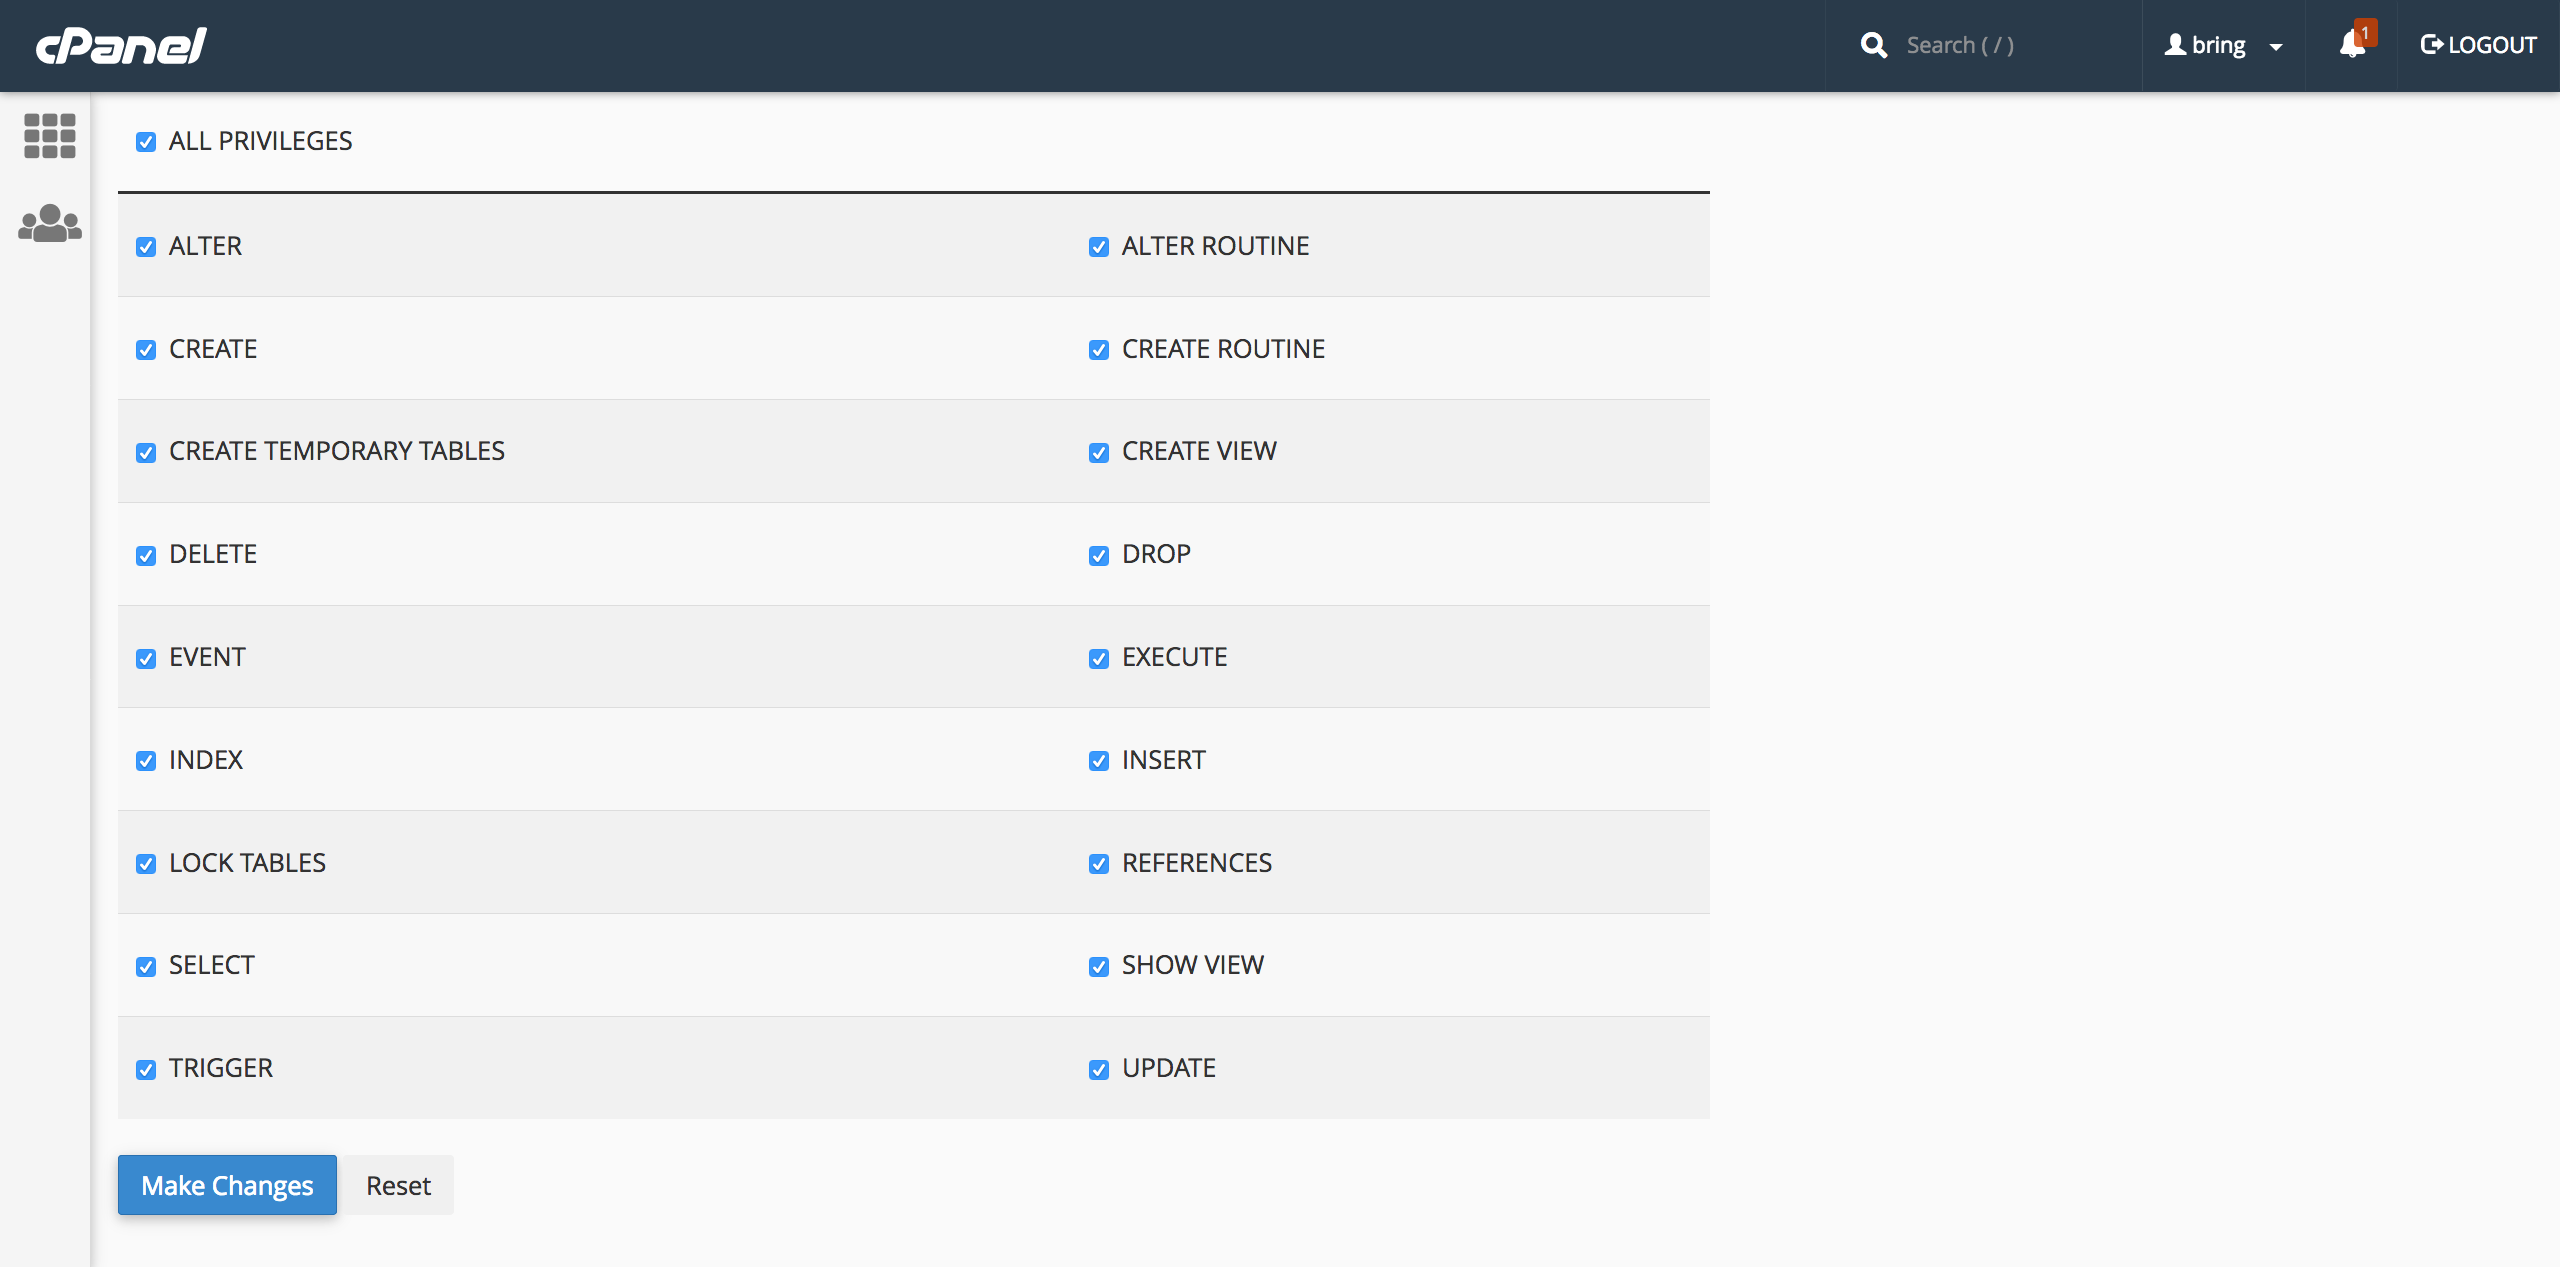
Create a group and add these two policies in that group (Amazons3fullaccess, Amazons3readonlyaccess)
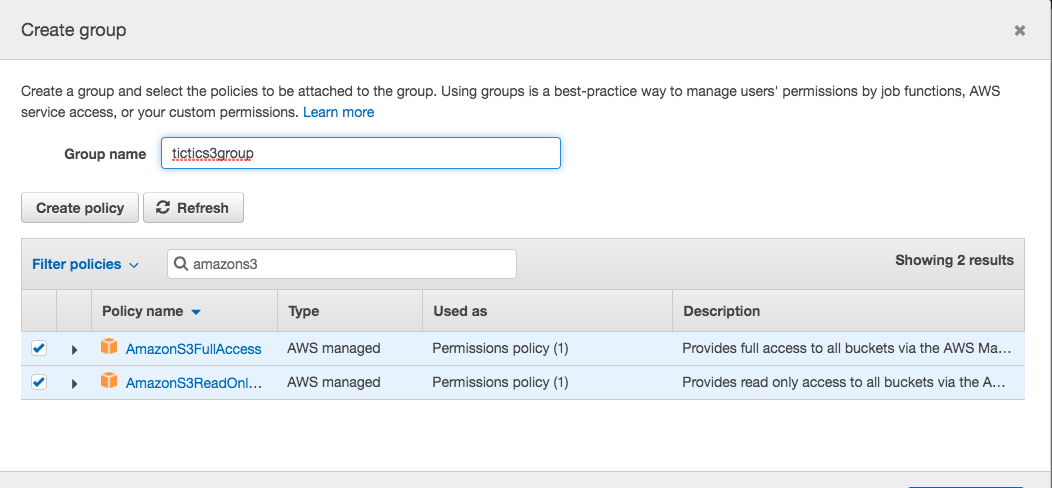
tags are optional - you can skip that and hit Create user button
Not down access key id and secret key and download the file and save it.

Then go to https://console.aws.amazon.com/ and search “S3” or go directly here https://console.aws.amazon.com/s3/
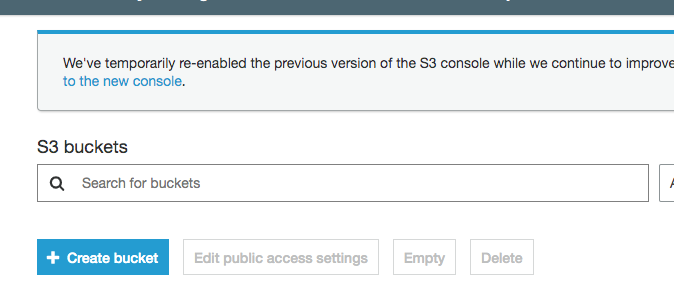
And create a Bucket. Set a name and choose options according to your choice and you are done. Use this bucket name in the code.
Note. These are the steps which you need to do to setup aws. You can also find on google a lot of tutorials for this. Amazon also updates the interface time to time. So please don’t ask us questions here regarding what region to choose or what name to choose etc etc. These are the basic steps we have mentioned here. So you should need to read aws documentation as well. We would try our best to help you as we can
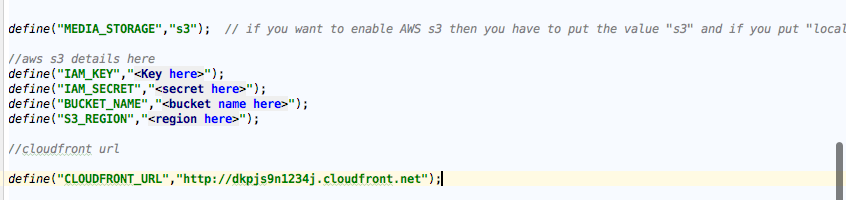
Now you have to fill the information in app/Config/constant.php , if you donot have the files then you have to contact us for the AWS files this feature is only for extended license customers
 How you find bucket region on amazon S3?
You can get the bucket region by clicking on your bucket name. Your region will show up in the url for example our bucket name is qboxus_bucket and once we clicked on it this shows in the url

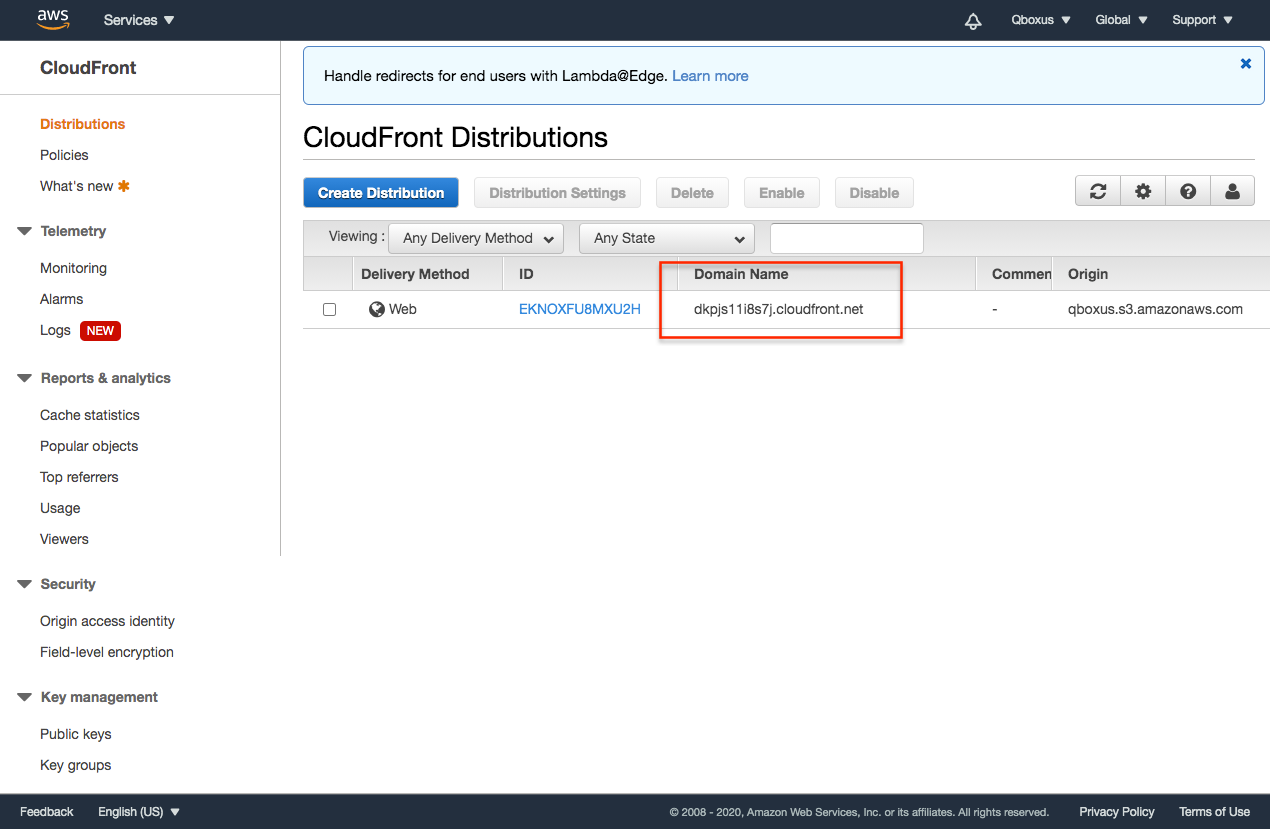
Setup a CloudFront?
Click on get started Under Web Section
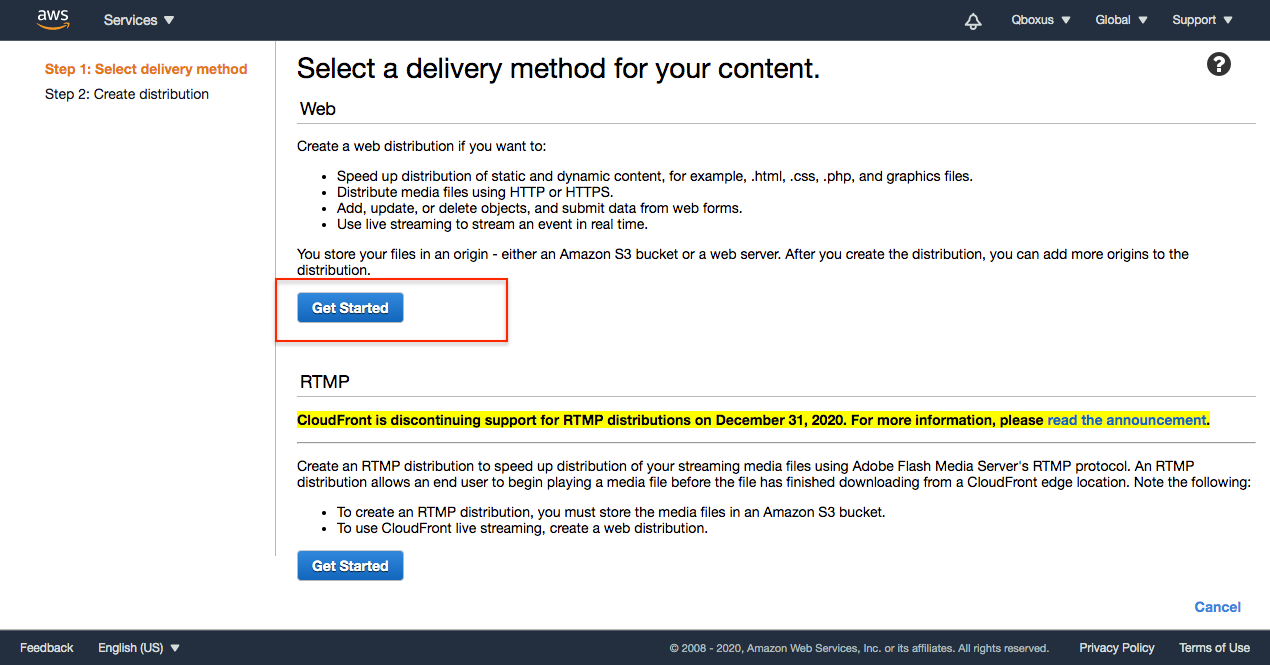
Select s3 folder in the domian section and click create distribution
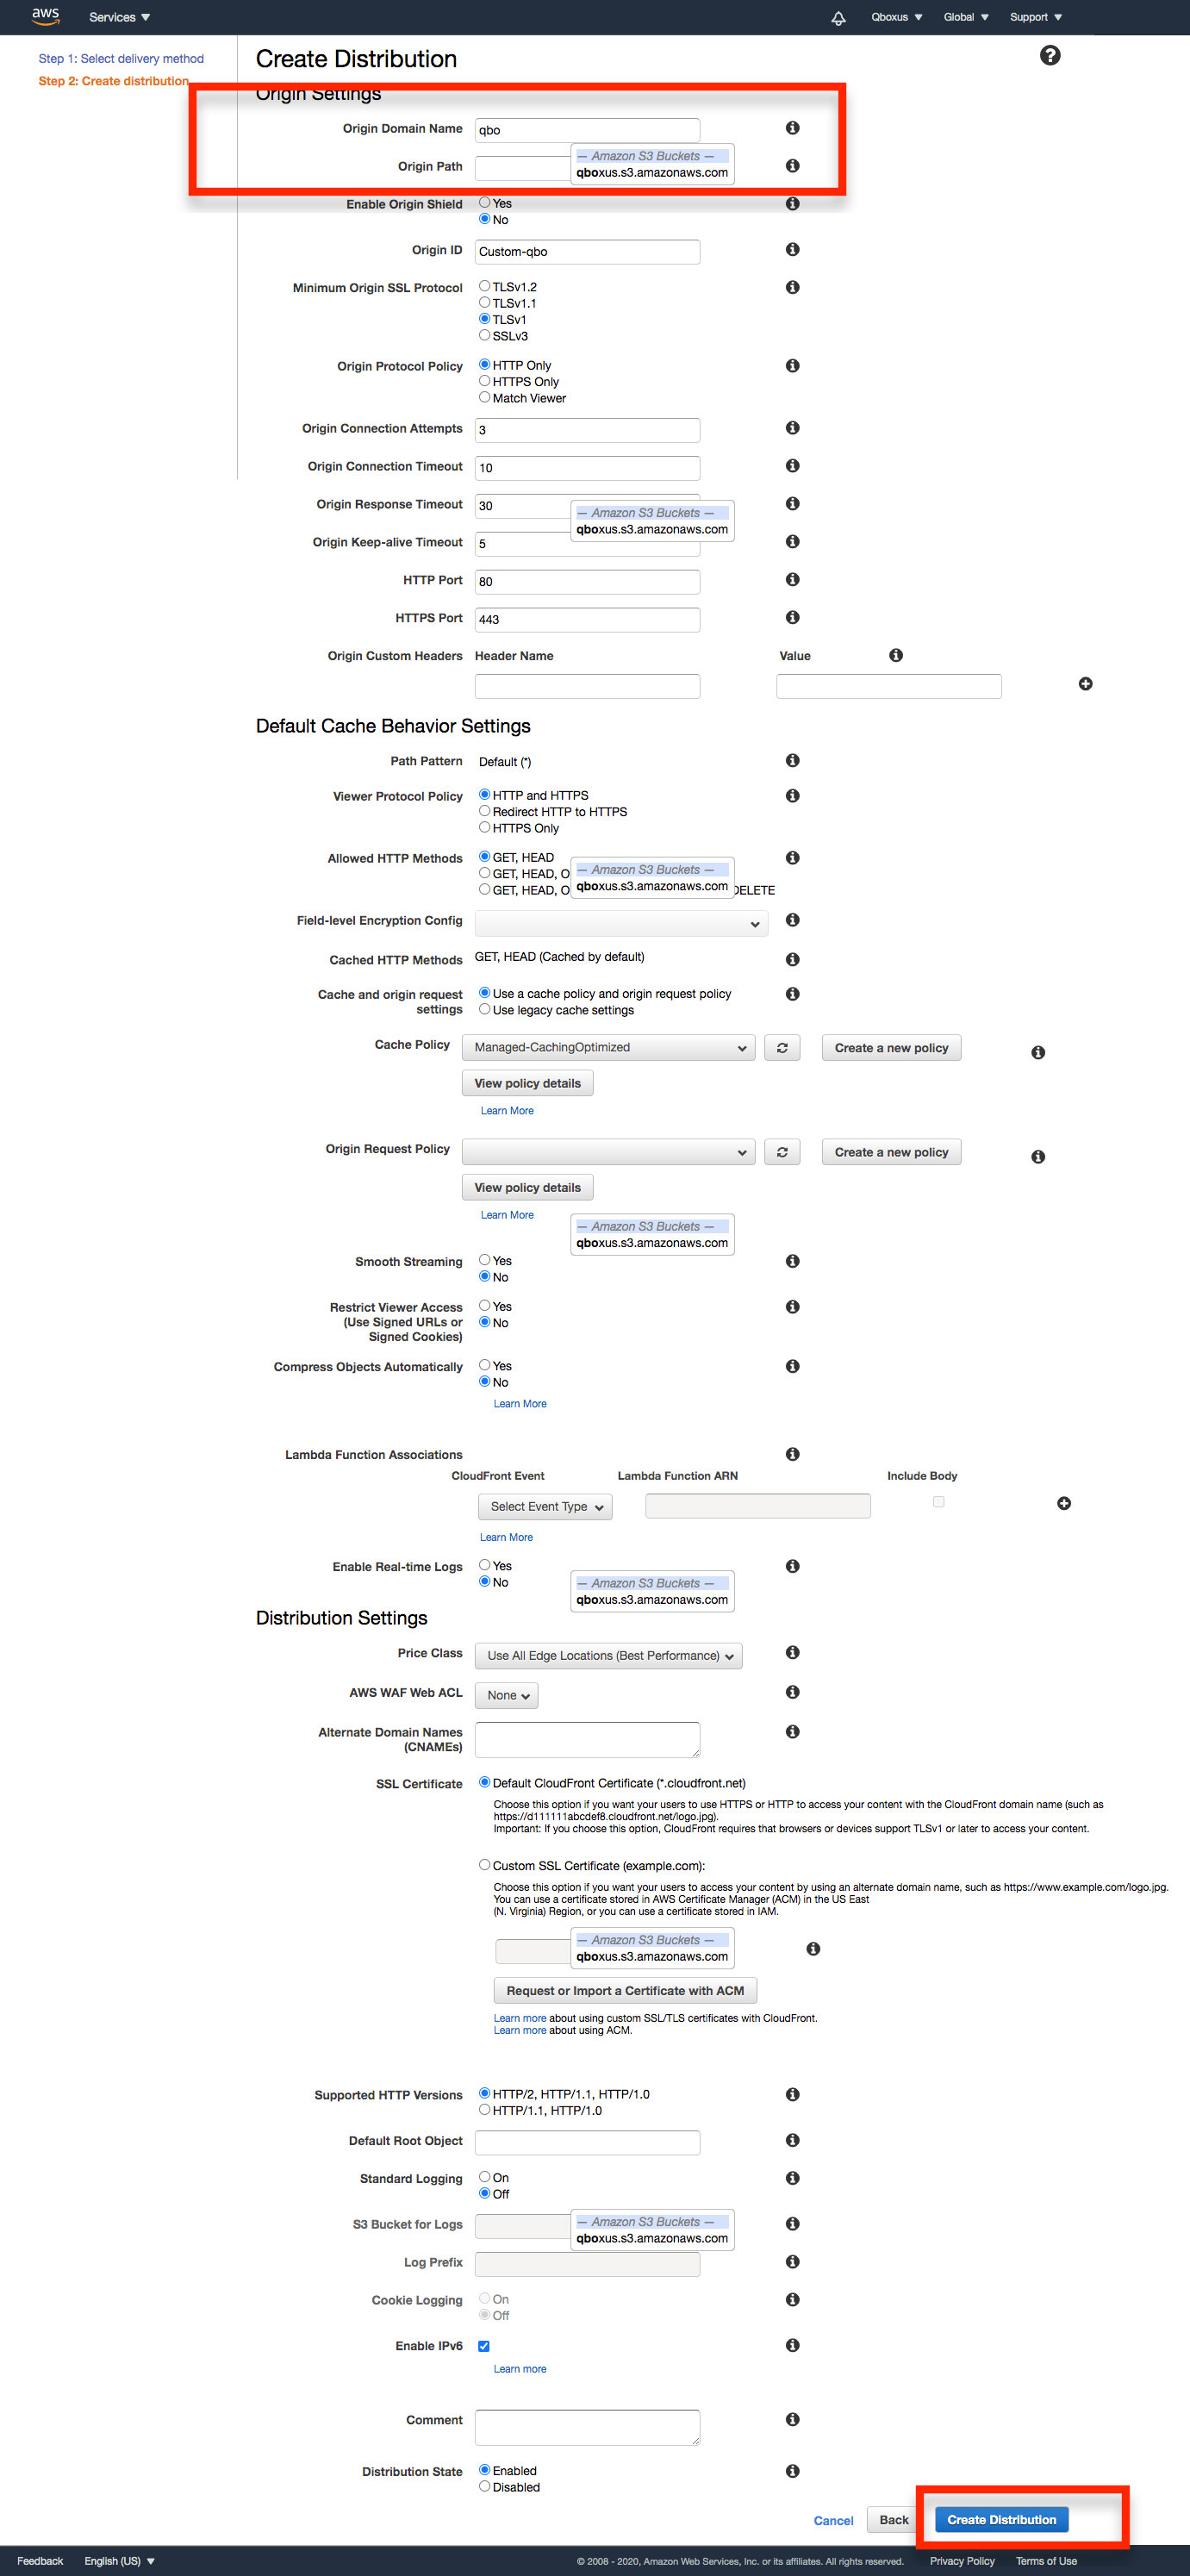
Copy domain link and enter in app/Config/constant.php
You can get the bucket region by clicking on your bucket name. Your region will show up in the url for example our bucket name is qboxus_bucket and once we clicked on it this shows in the url
Thank you & Support
I'd like to thank you again for your purchase and I hope you where able to successfully install the app and using it in your future business . If you need support or have some questions. You can visit our support resources here at hello@qboxus.com
What support does include- Answers to (technical) questions about the item's features
- Assistance with reported bugs and issues
- Answers to questions about importing and setting up the item as is described in the docs.
- Customization & adding new features
- Installation Services
- Support for 3rd party software and/or plugins
- Content related rejections and violations from Google