
Get Started
Thank you for purchasing our app
Please read the documentation carefully , and if you have any question check us . Most pages are accompanied by a video tutorial , it's recommended to check both , the video and the written Documentation .
Must Read this:
Web API is in PHP 7.0 and it will work on any kind of hosting packages
Recommended Hosting (Free Life Time Support)
Customers who host their files with hostrever.com will receive free support for life
Why free support?
Having a hosting platform that our support team is familiar with makes it easier for them to assist you
Web API configuration
installing Foodies PHP API is an easy process and we will guide you through it .
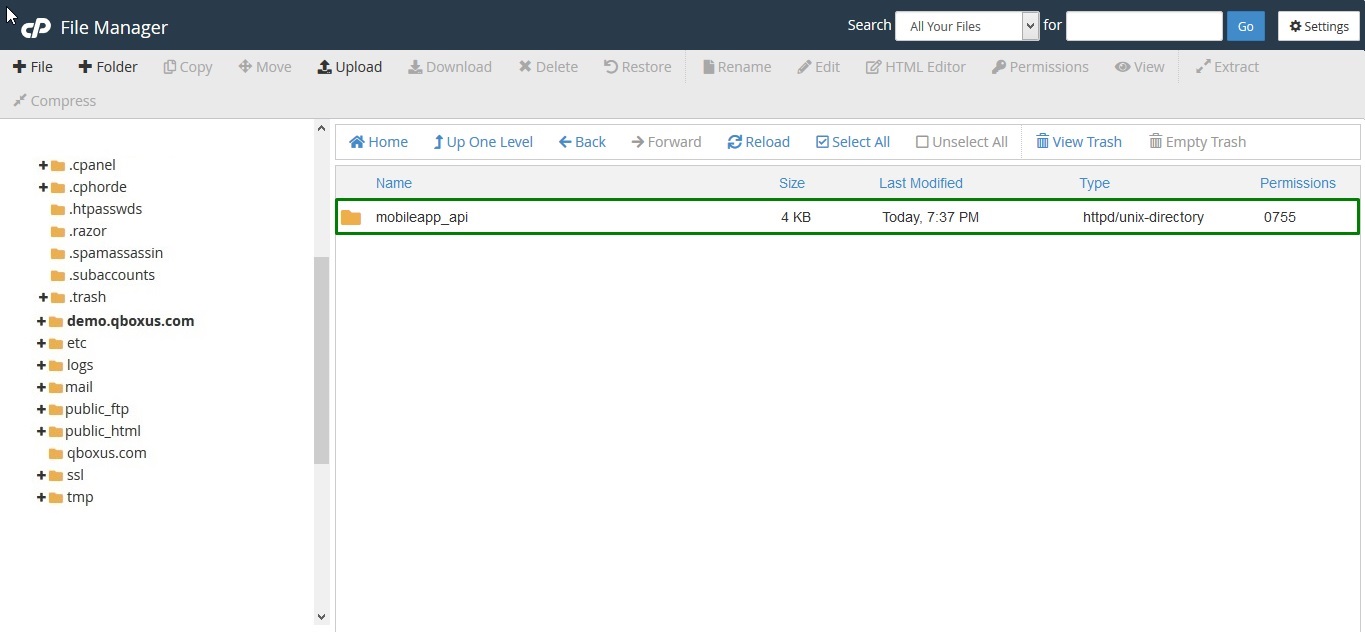
Step 1 - You have to upload the mobileapp_api files which we have provided in your downloaded package from codecanyon
Step 2 - Login in your hosting cpanel Navigate to File Manager , upload the mobileapp_api.zip , then extract it
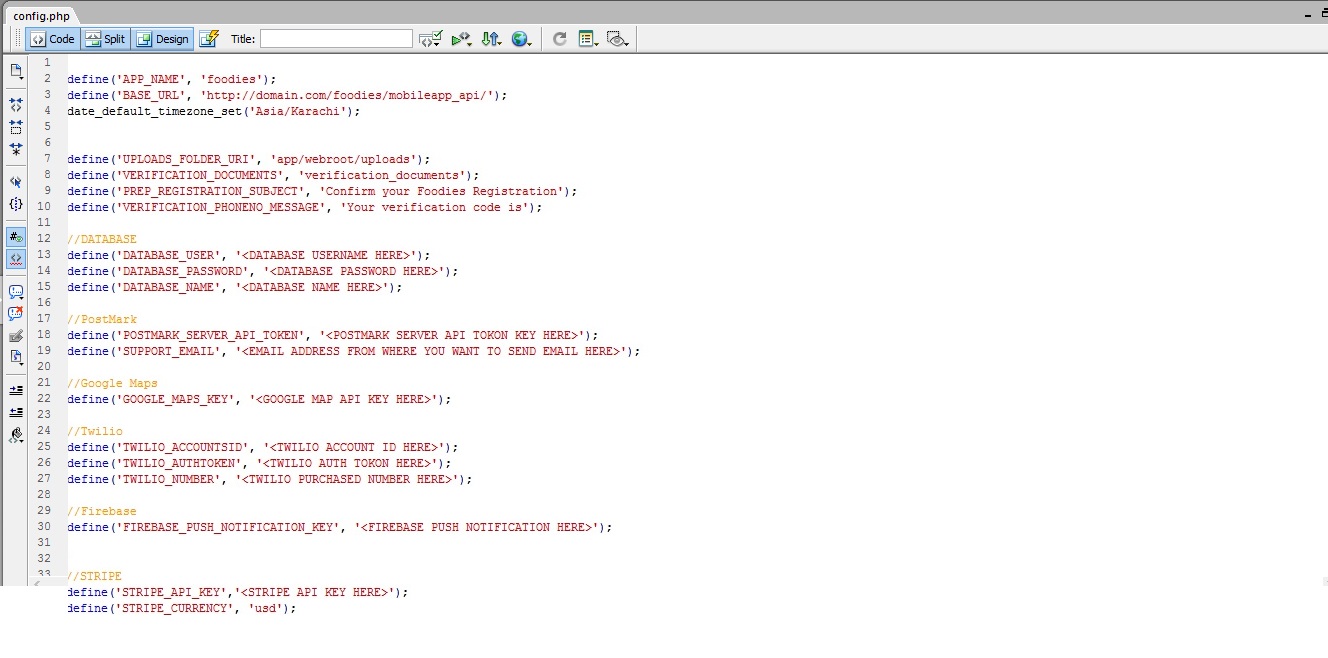
Step 3 - For Database & 3rd party API configurations You have to edit variables.php file which is located at "mobileapp_api/app/lib/variables.php"
SQL Database Setup
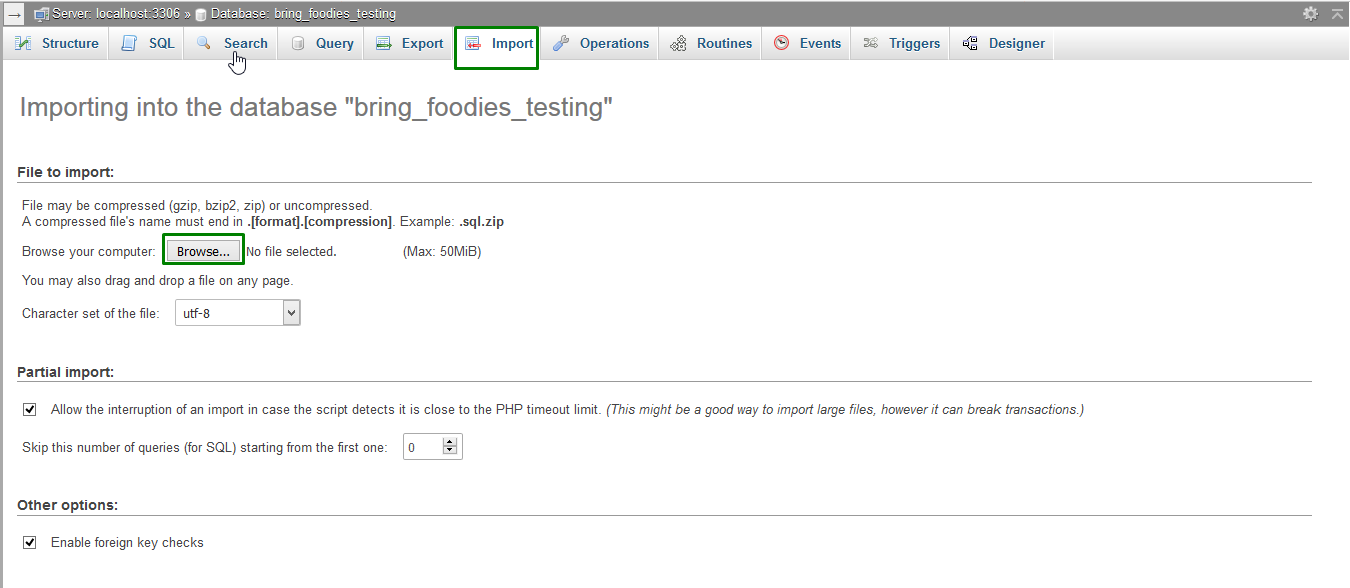
Step 1 - You have to import the SQL file which we have provided in your downloaded package from codecanyon
Step 2 - You have to edit variables.php file which is located at "mobileapp_api/app/lib/variables.php"
Fill the database details in "mobileapp_api/app/lib/variables.php"
define('DATABASE_USER', '');
define('DATABASE_PASSWORD', '');
define('DATABASE_NAME', '');
PostMark Setup
Step 1 - Sending Emails to Create an account here postmarkapp.com & Copy the server key
Fill the PostMark POSTMARK_SERVER_API_TOKEN & SUPPORT_EMAIL in "mobileapp_api/app/lib/variables.php"
//PostMark
define('POSTMARK_SERVER_API_TOKEN', '');
define('SUPPORT_EMAIL', '');
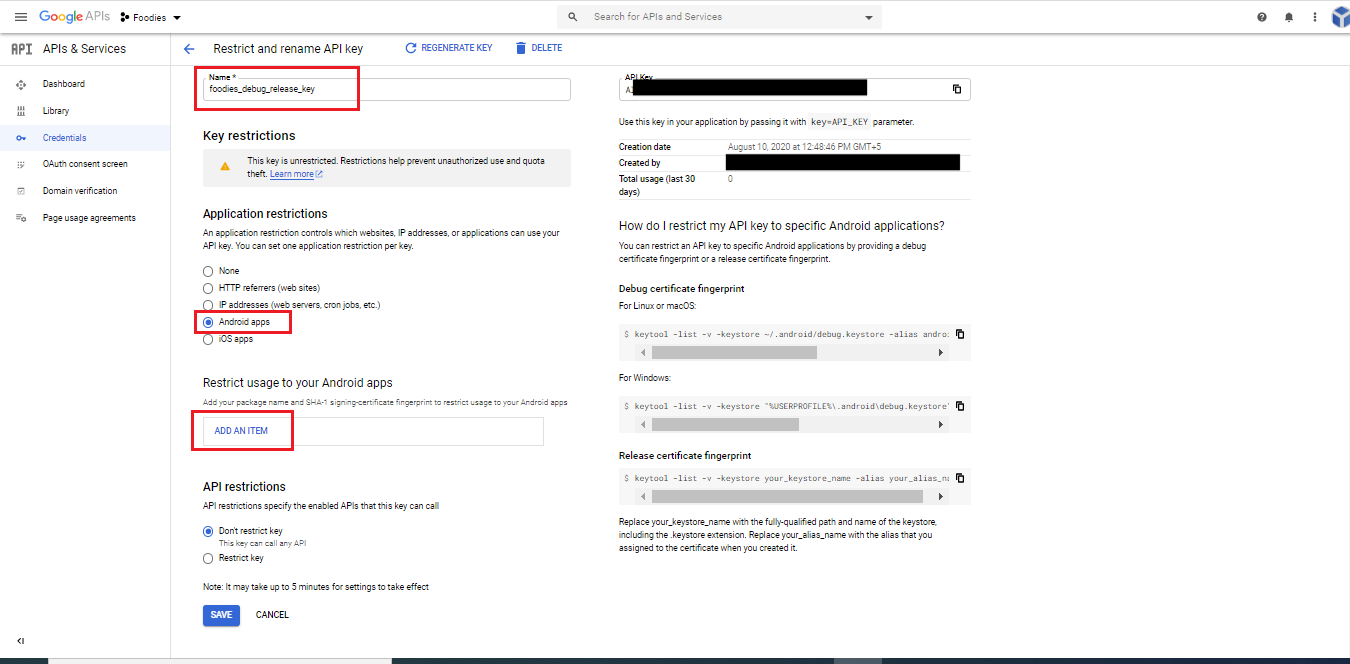
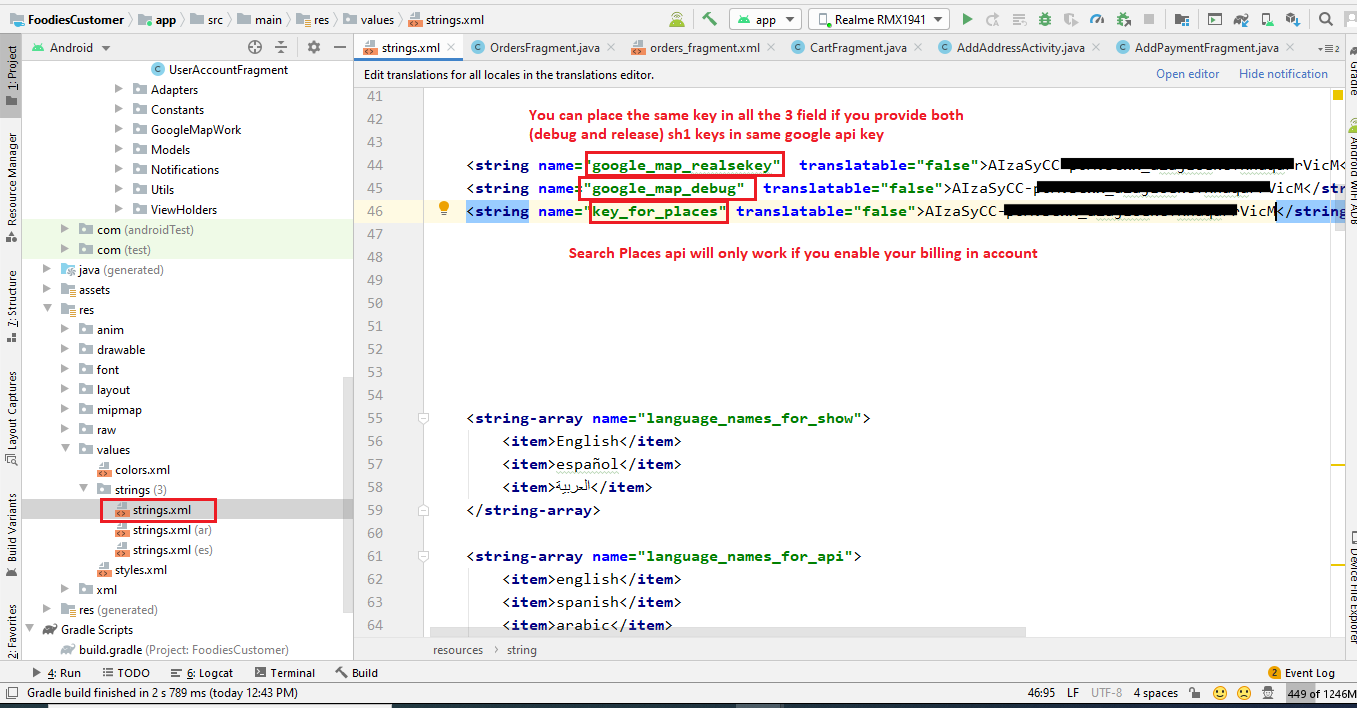
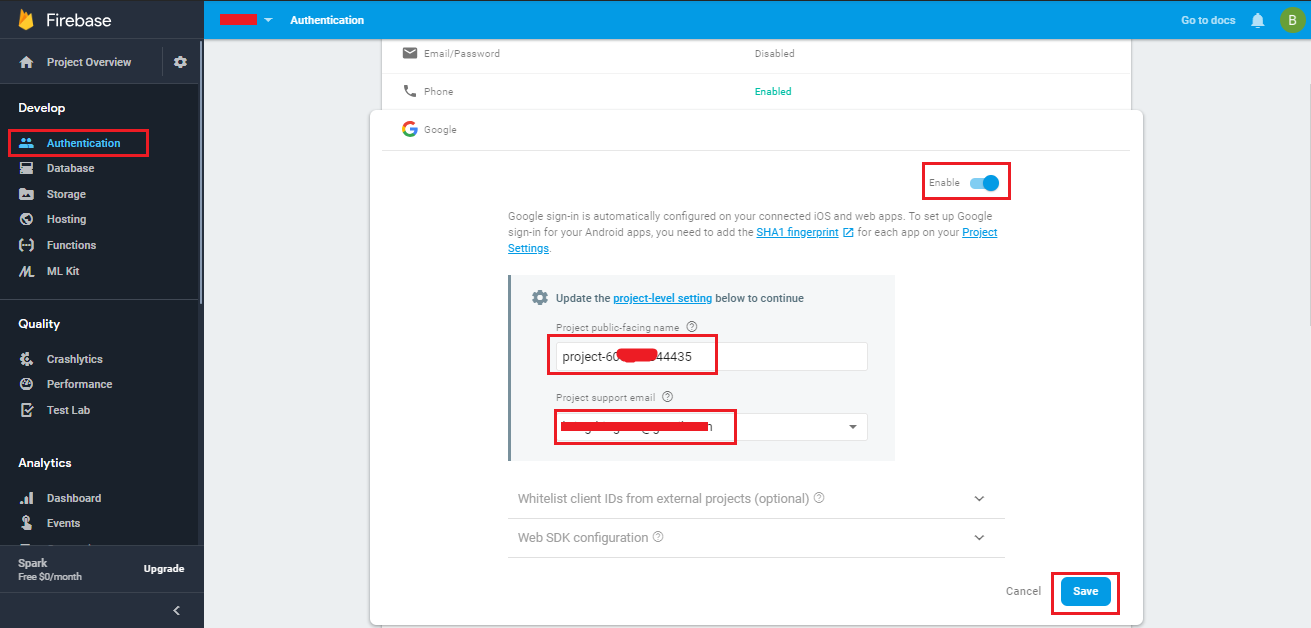
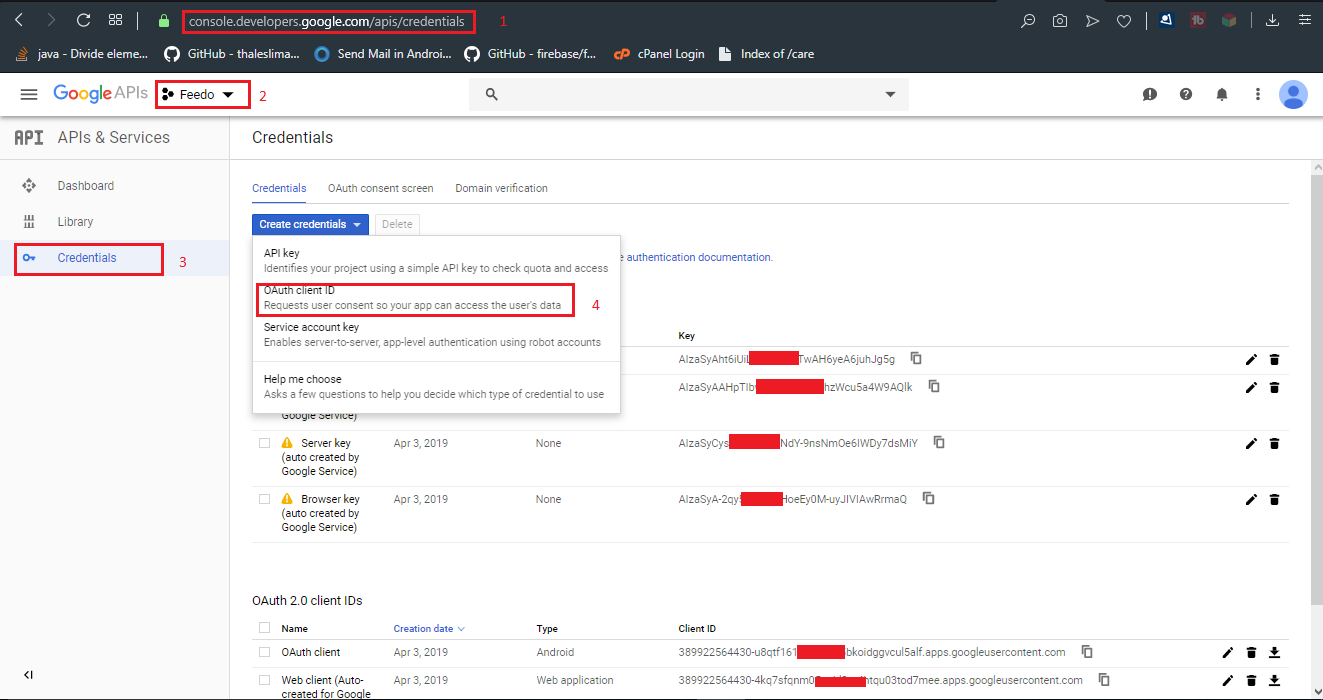
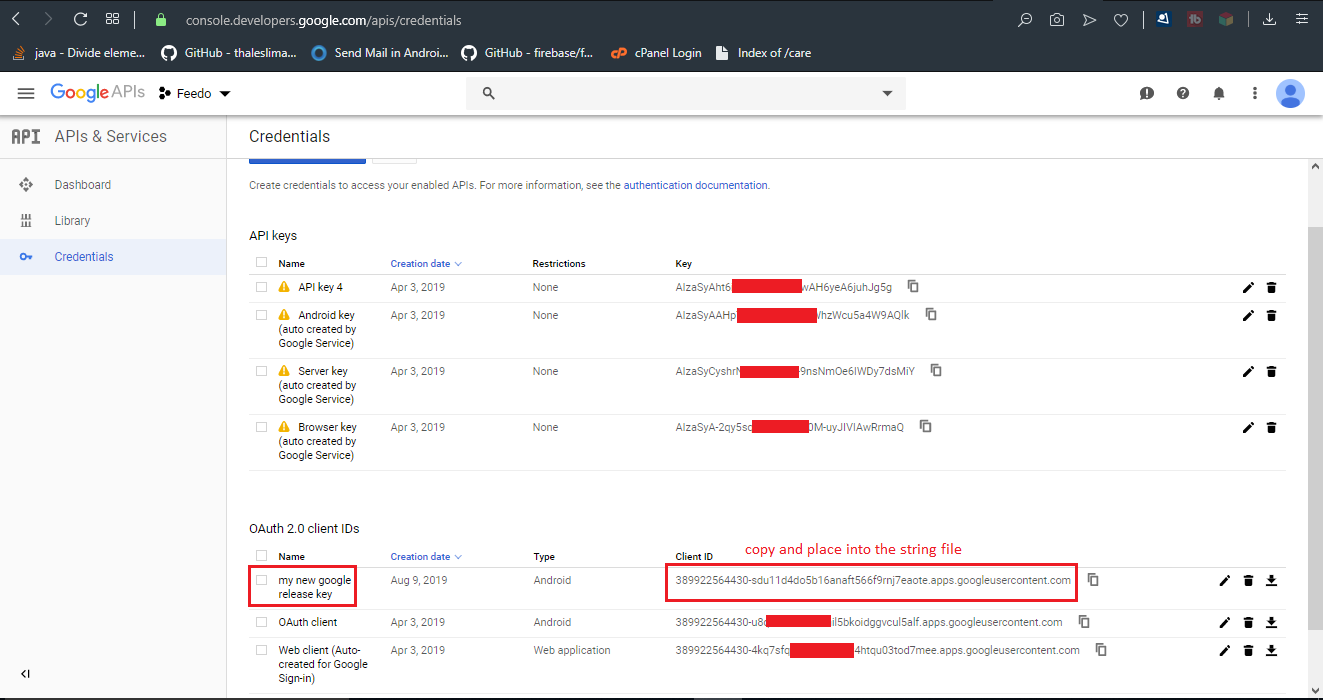
Google Maps Setup
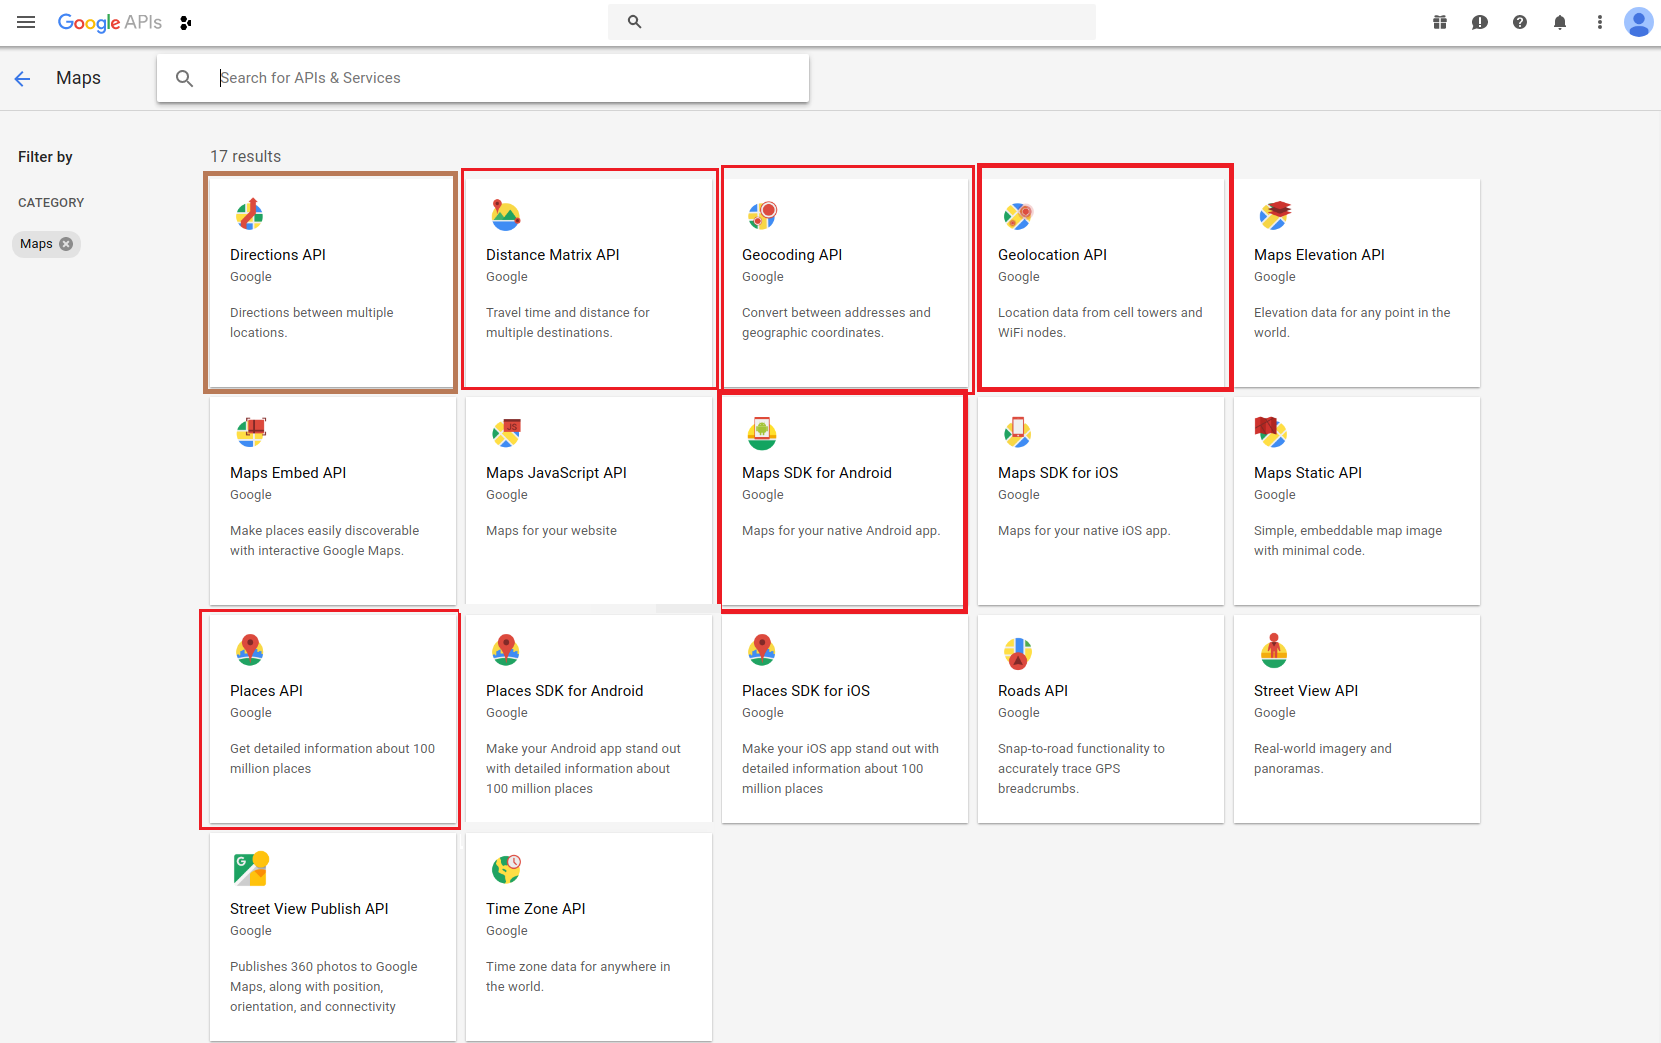
Step 1 - Setup API Keys , Get Google Maps Api keys Console Cloud Google Make sure to enable this API in Android and in PHP
- Google Maps distance matrix
- Google Maps Places
- Google Maps Geocoding
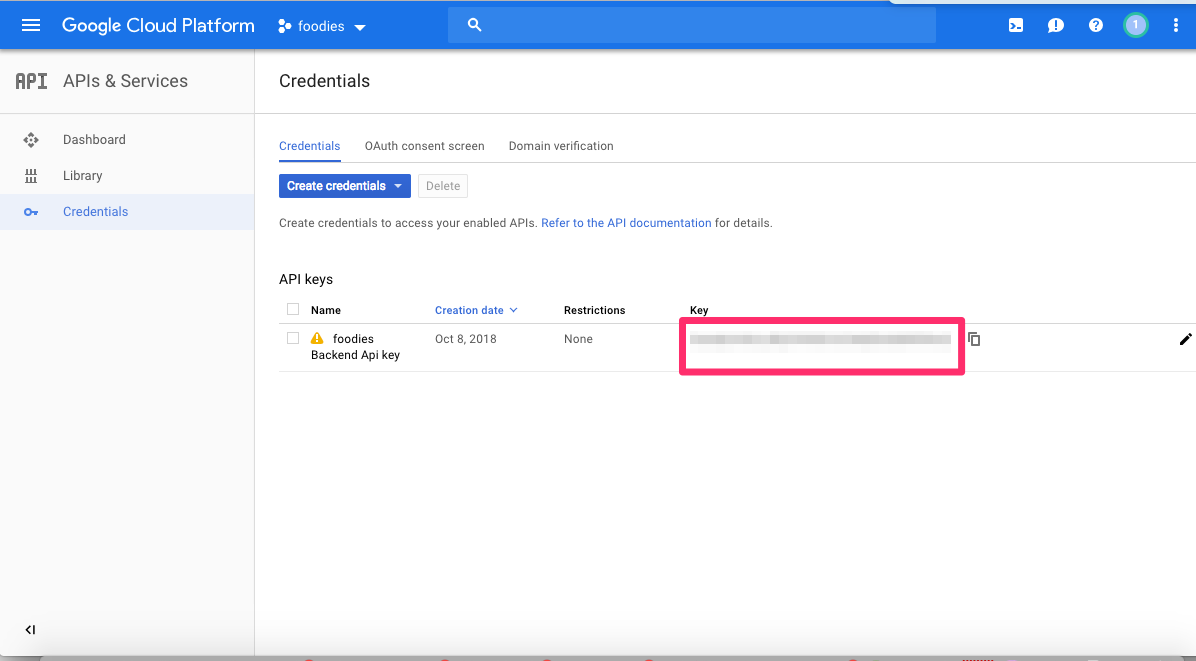
Fill the Google Maps key in "mobileapp_api/app/lib/variables.php"
//Google Maps
define('GOOGLE_MAPS_KEY', '');
Make sure to enable this API in Android and in PHP
Twilio Setup
Step 1 - Get twilio keys by Create an account on twilio and buy a number as well which is required for the Programmable SMS You can find the API KEY and auth token in: twilio.com
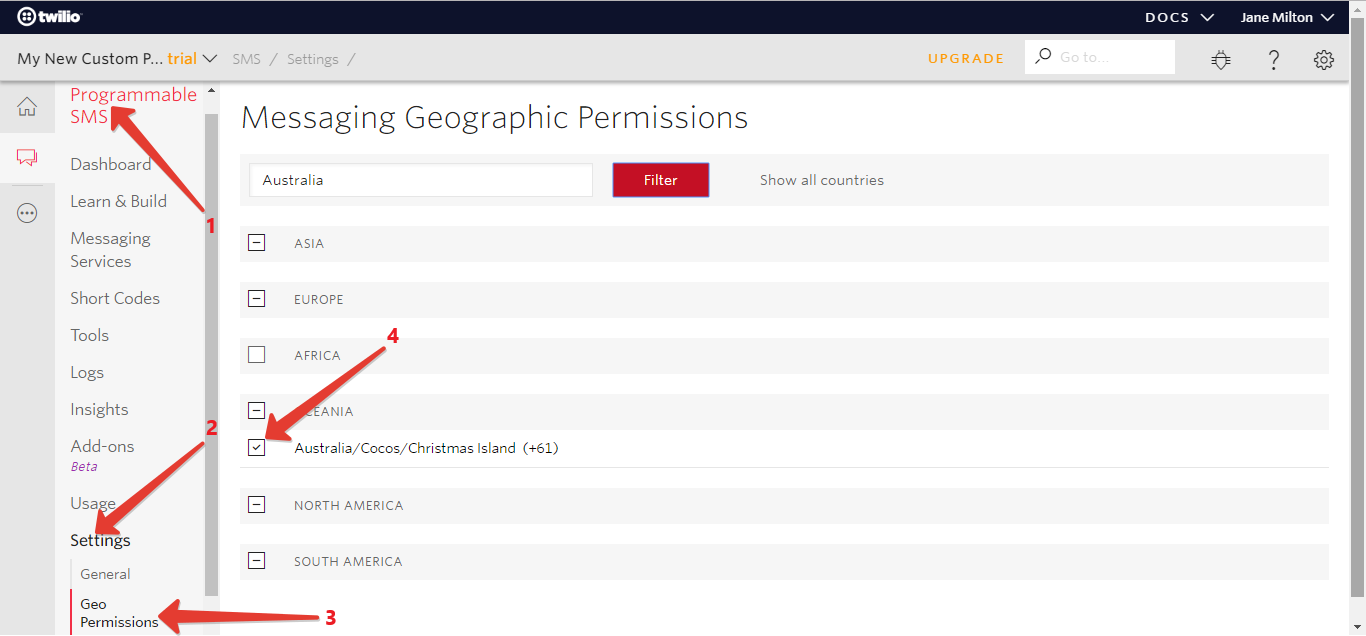
Step 2 - You have to allow geo permissions for sending sms Click here
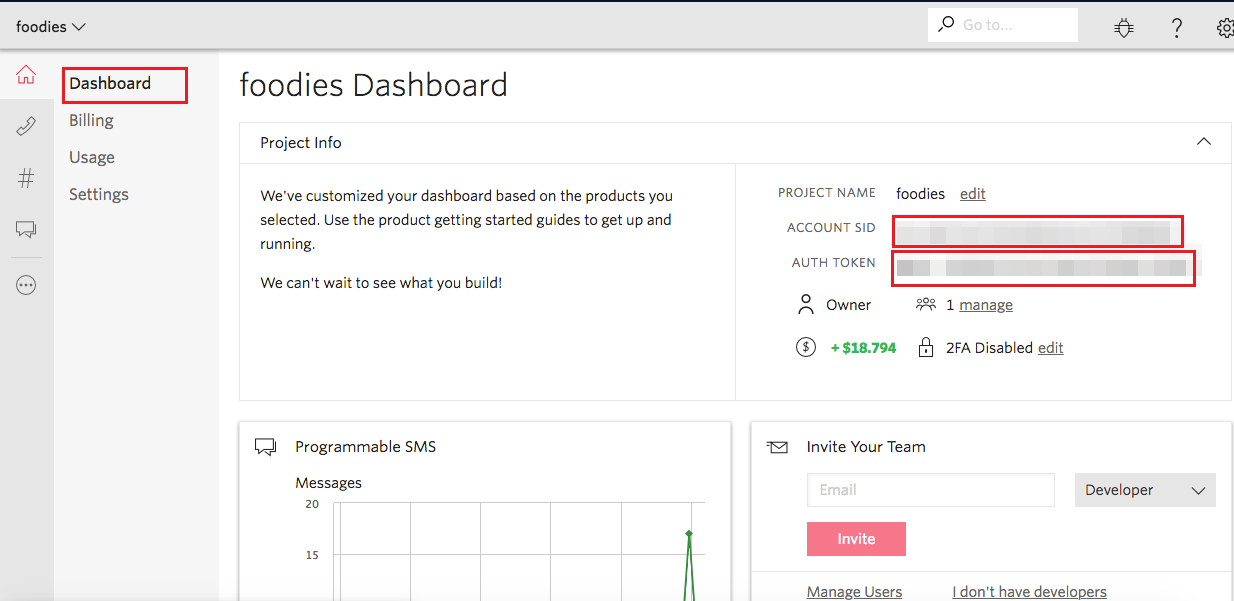
Fill the Twilio ACCOUNT ID , AUTH TOKON and PURCHASED NUMBER which twilio has provided you in "mobileapp_api/app/lib/variables.php"
//Twilio
define('TWILIO_ACCOUNTSID', '');
define('TWILIO_AUTHTOKEN', '');
define('TWILIO_NUMBER', '');
Firebase Setup
Step 1 - you need to create your project first Console Firebase Google
Step 2 - You can find the API KEY in: (gear-next-to-project-name) > Project Settings > Cloud Messaging
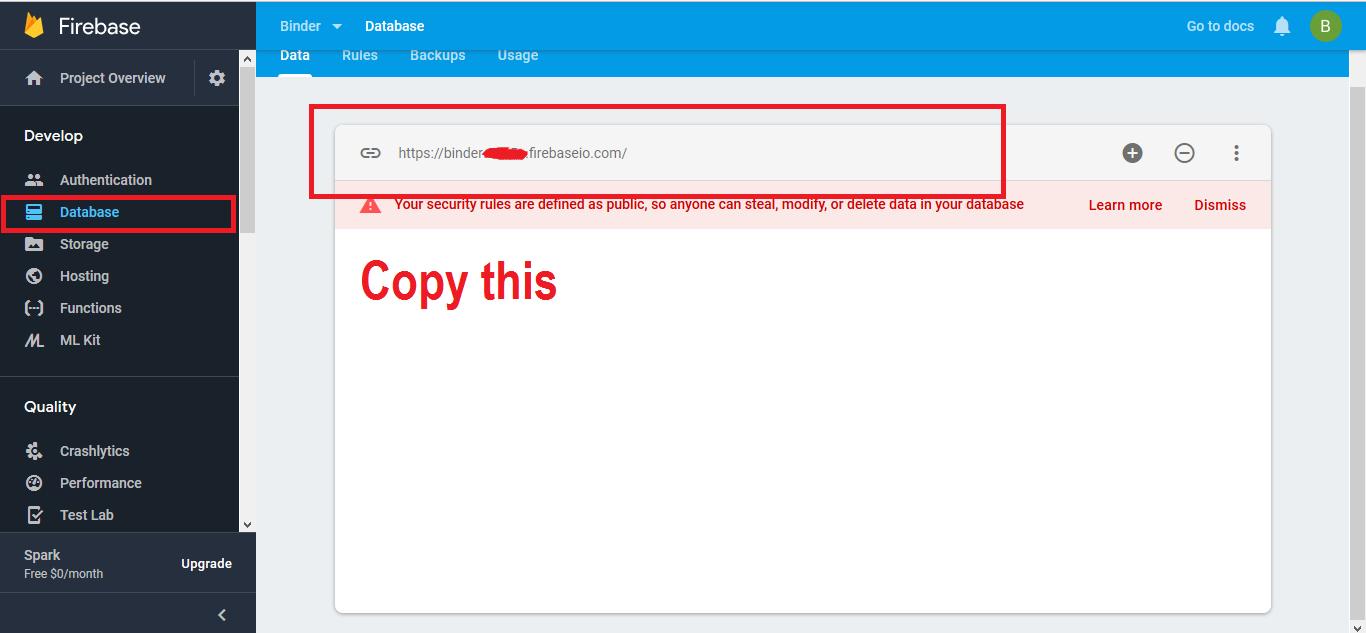
Step 3 - You have to put firebase real time database url FIREBASE_URL example "https://foodies-abcd.firebaseio.com/"
Fill the Firebase push notification server key which google firebase has provided you in "mobileapp_api/app/lib/variables.php"
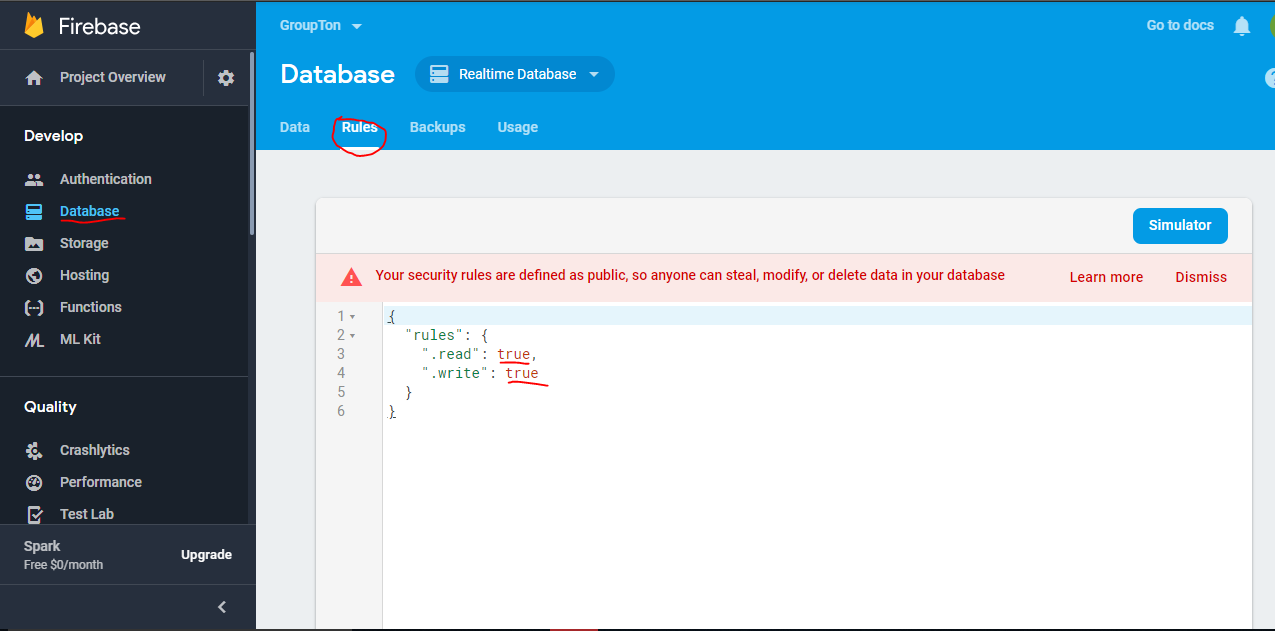
You have to change the database permissions
//Firebase
define('FIREBASE_PUSH_NOTIFICATION_KEY', '');
define('FIREBASE_URL', '');
Stripe Setup
Step 1 - For getting payments you have to setup stripe follow screenshort
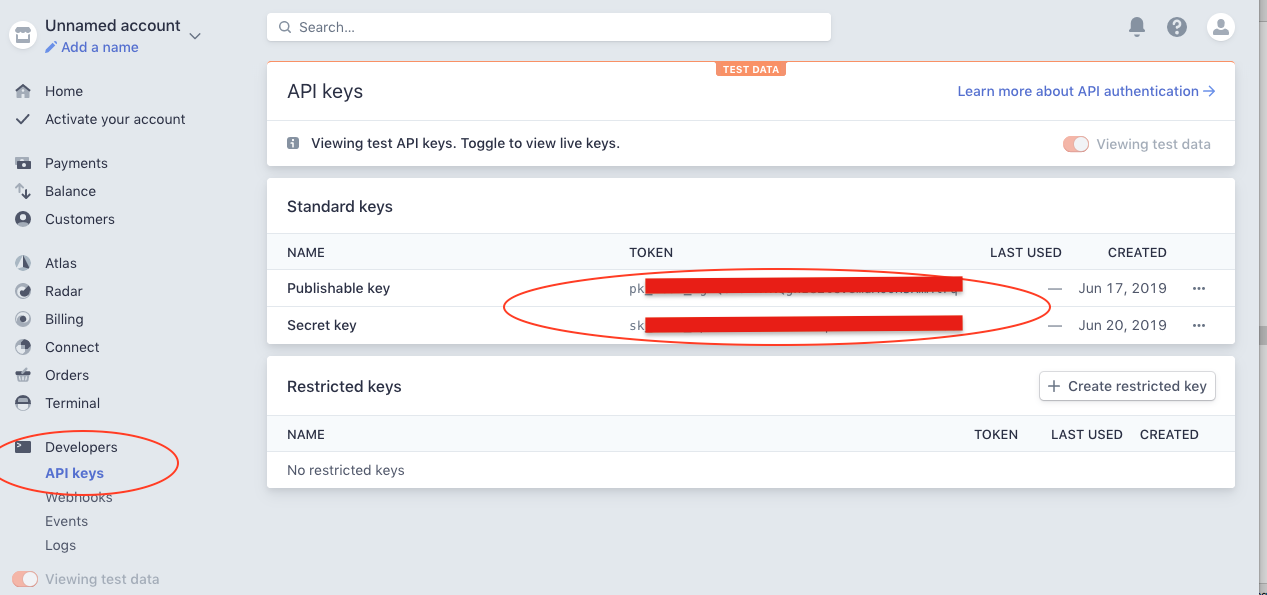
Fill the Stripe STRIPE_API_KE which twilio has provided you in "mobileapp_api/app/lib/variables.php"
//STRIPE
define('STRIPE_API_KEY','');
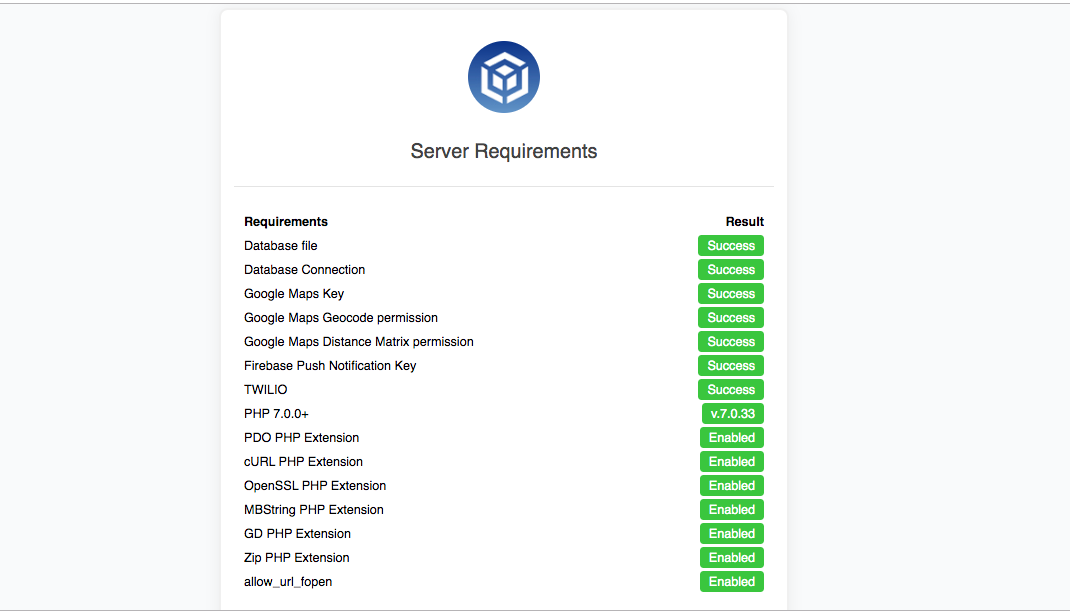
Before getting started, please make sure your web server meets all the requirements:
*Note you have to open your api url http://domain.com/foodies/mobileapp_api
Note: All the steps mentioned above is explained in the above video clearly. Please go through the video and follow the steps.
Admin Panel configuration
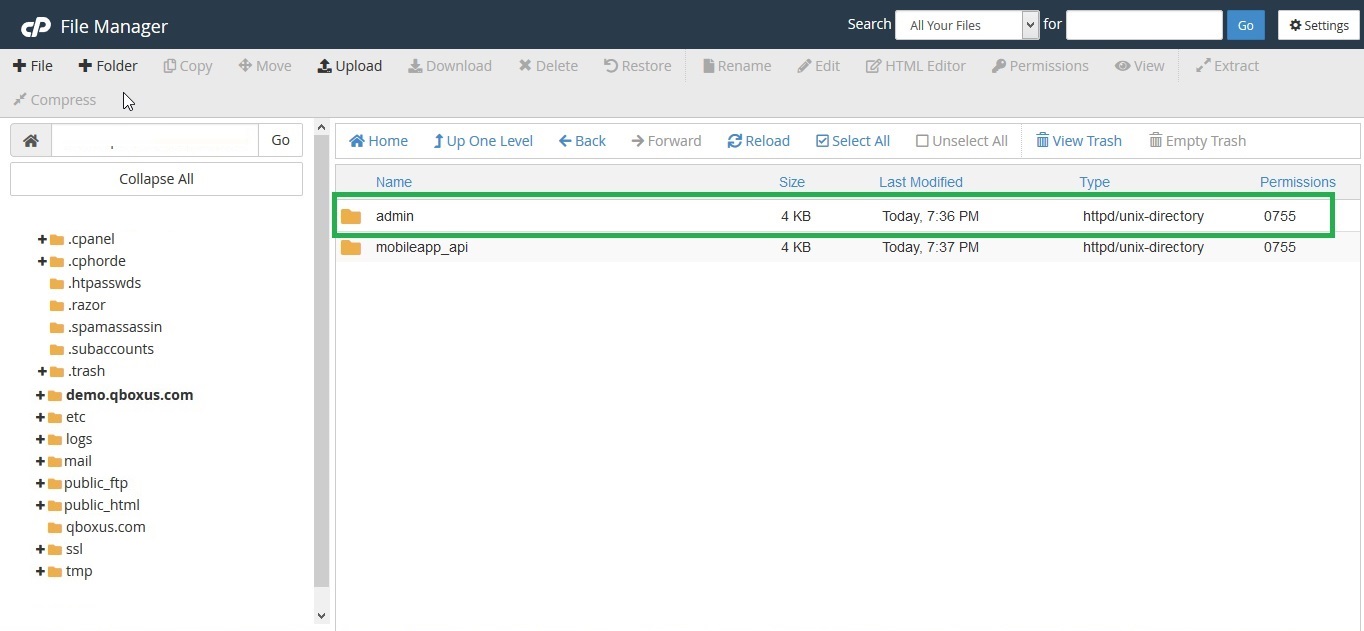
Step 1 - You have to upload the admin panel files which we have provided in your downloaded package from codecanyon
Step 2 - Login in your hosting cpanel Navigate to File Manager and Create a folder "admin" and upload the admin.zip files , then extract it
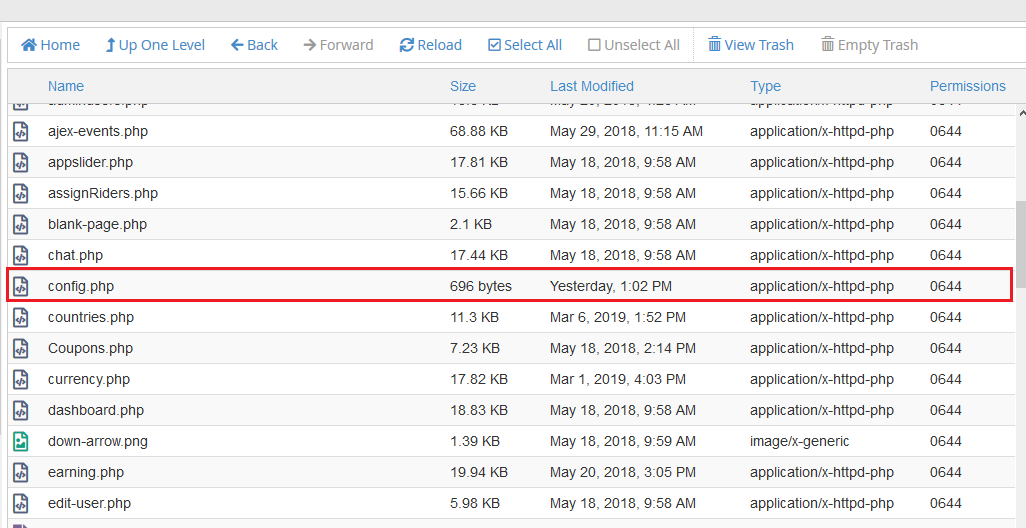
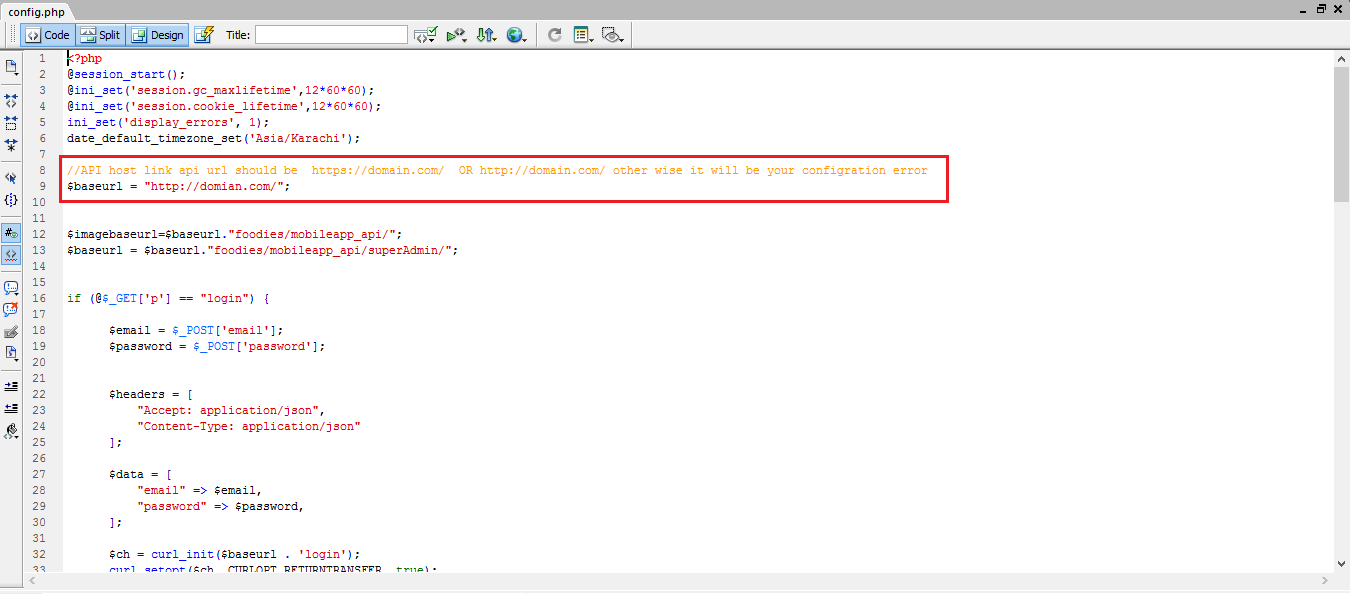
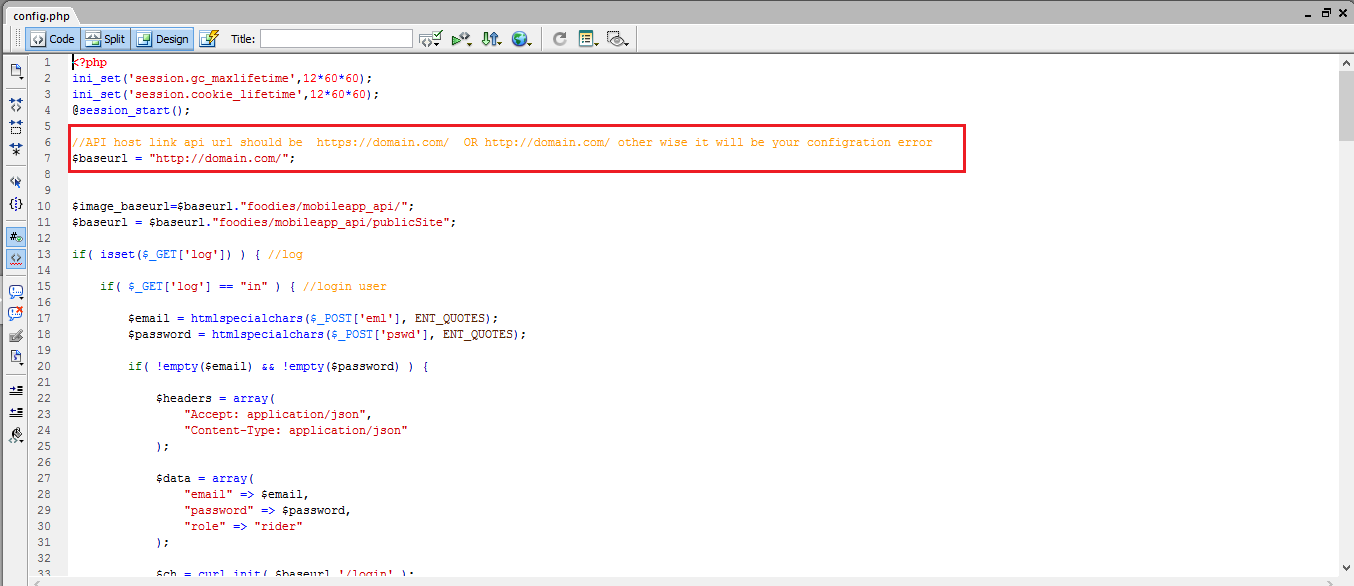
Step 3 - For API configuration You have to edit config.php file which is located at "admin/config.php"
Step 4 - You have to put your Domain URL here "http://domain.com/" if you have SSL then you have to use this "https://domain.com/"
Now open admin panel through your domain http://domain.com/admin and use login admin@admin.com and password is 123456
*Note: Make sure your SQL File has been imported & Database Connection successfully works
Admin Chat Setup
Step 1 - Open Firebase project and add a new project project setting

Step 2 - For enable real time chat with rider you have to fill this setting "admin/config.php"

//Firebase real time db configration
define('apiKey', 'Your apiKey here');
define('authDomain', 'Your authDomain here');
define('databaseURL', 'Your databaseURL here');
define('projectId', 'Your projectId here');
define('storageBucket', 'Your storageBucket here');
define('messagingSenderId', 'Your messagingSenderId here');
define('appId', 'Your appId here');
Rider Portal configuration
*Required: You can Purchase the rider app from here Purchase Now
Step 1 - You have to upload the rider panel files which we have provided in your downloaded package from codecanyon
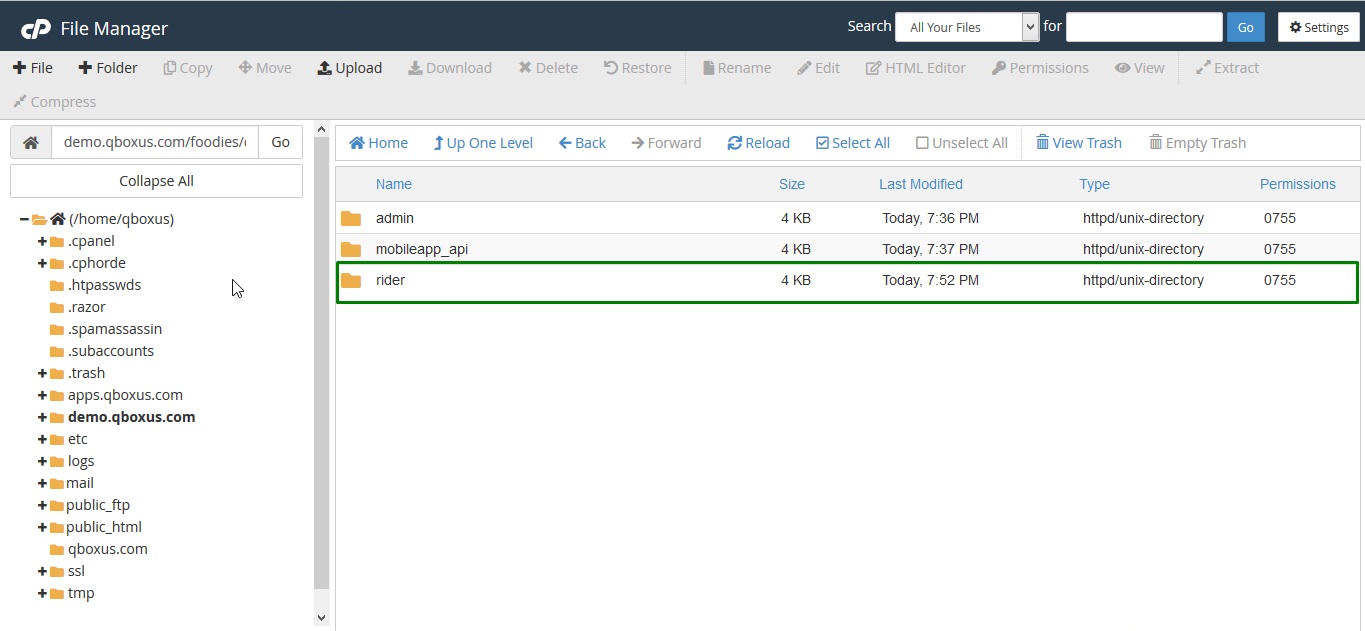
Step 2 - Login in your hosting cpanel Navigate to File Manager and Create a folder "rider" and upload the rider.zip files , then extract it
Step 3 - For API configuration You have to edit config.php file which is located at "rider/config.php"
Step 4 - You have to put your Domain URL here "http://domain.com/" if you have SSL then you have to use this "https://domain.com/"

Now open admin panel through your domain http://domain.com/rider and use login rider@gmail.com and password is 123456
*Note: Make sure your SQL File has been imported & Database Connection successfully works
Restaurant Portal configuration
*Optional: You can Purchase the Restaurant Tablet app from here Purchase Now
Step 1 - You have to upload the restaurant panel files which we have provided in your downloaded package from codecanyon
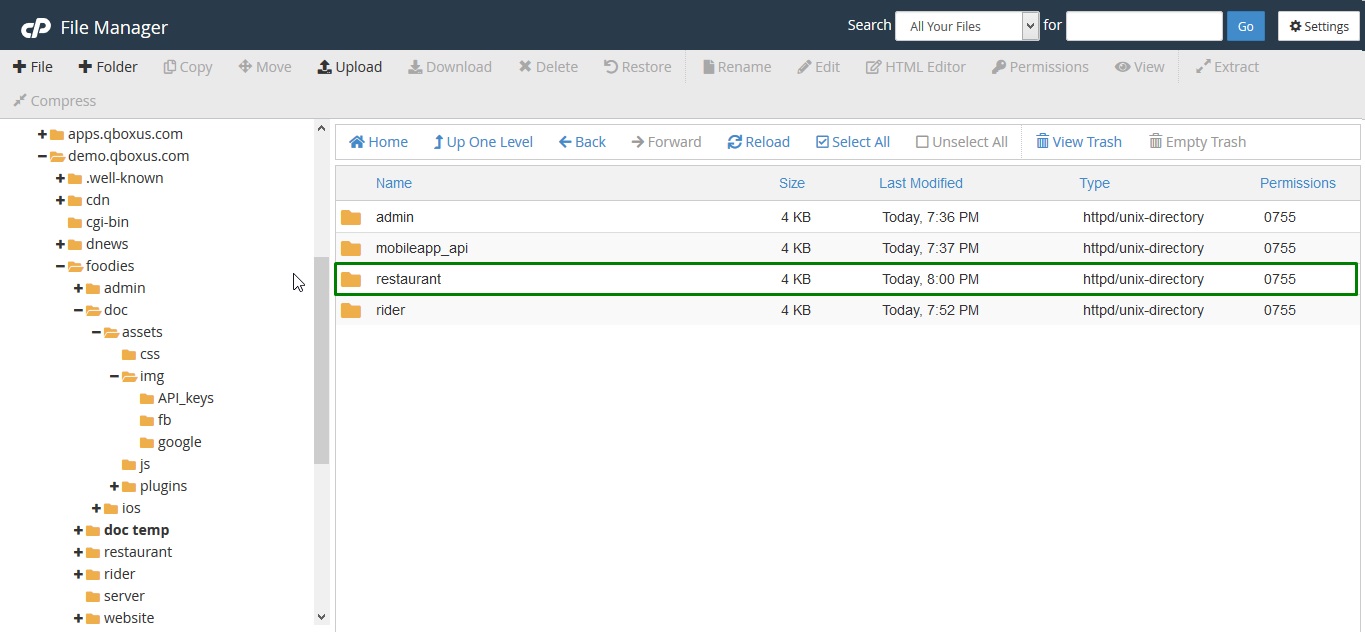
Step 2 - Login in your hosting cpanel Navigate to File Manager and Create a folder "restaurant" and upload the restaurant.zip files , then extract it
Step 3 - For API configuration You have to edit config.php file which is located at "restaurant/config.php"
Step 4 - You have to put your Domain URL here "http://domain.com/" if you have SSL then you have to use this "https://domain.com/"
Step 5 - You have to put your google map key

Now open admin panel through your domain http://domain.com/restaurant and use login scoma@gmail.com and password is 123456
*Note: Make sure your SQL File has been imported & Database Connection successfully works
Android configuration
In order to start configuring , you need to install Android studio and the 'Java SE Development Kit'. First download the android studio from here Android Studio
SDK Manager
The installer , as also shown in the video should automatically download and install all required components . if you want to do manual setup , download at least the following components using the SDK manager
- SDK tools
- SDK platform Tools
- SDK Build Tools
- Google Play Services
- Android Support Library
- Google Repository
- Google USB Driver
You can download these SDK , if not installed already , using the SDK manager SDK Manager After you're done, you can open Android Studio and continue.
Importing Android Project
To import the template, simply open Android Studio and import/open the template. Make sure to wait for all the processes (the Gradle Build) to complete before continuing to the next step
Addition steps
Addition steps Sometimes, the Gradle Build fails. In some cases additional components are needed, Android Studio will ask you to do download these additional SDK components in the 'messages' tab, simply follow the instructions provided to install and download the additional components.
Change Bundle ID
Change App Name
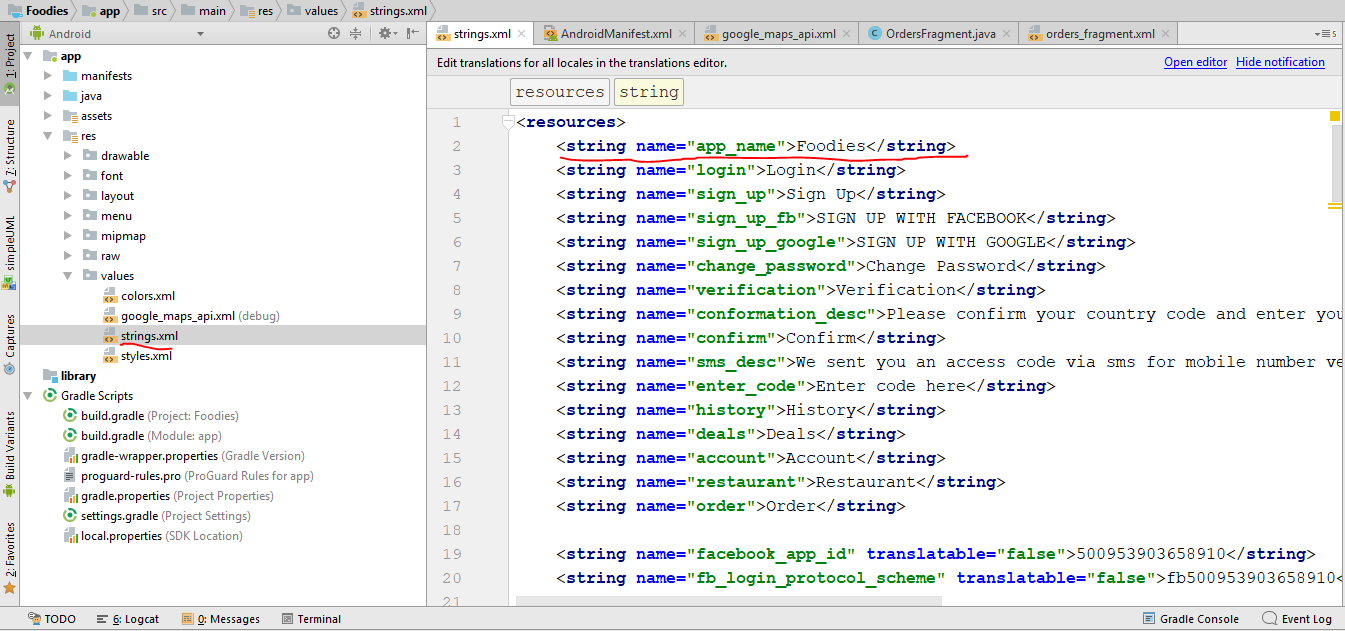
Above is illustrated how you can change the name of the application.
Change Color Scheme
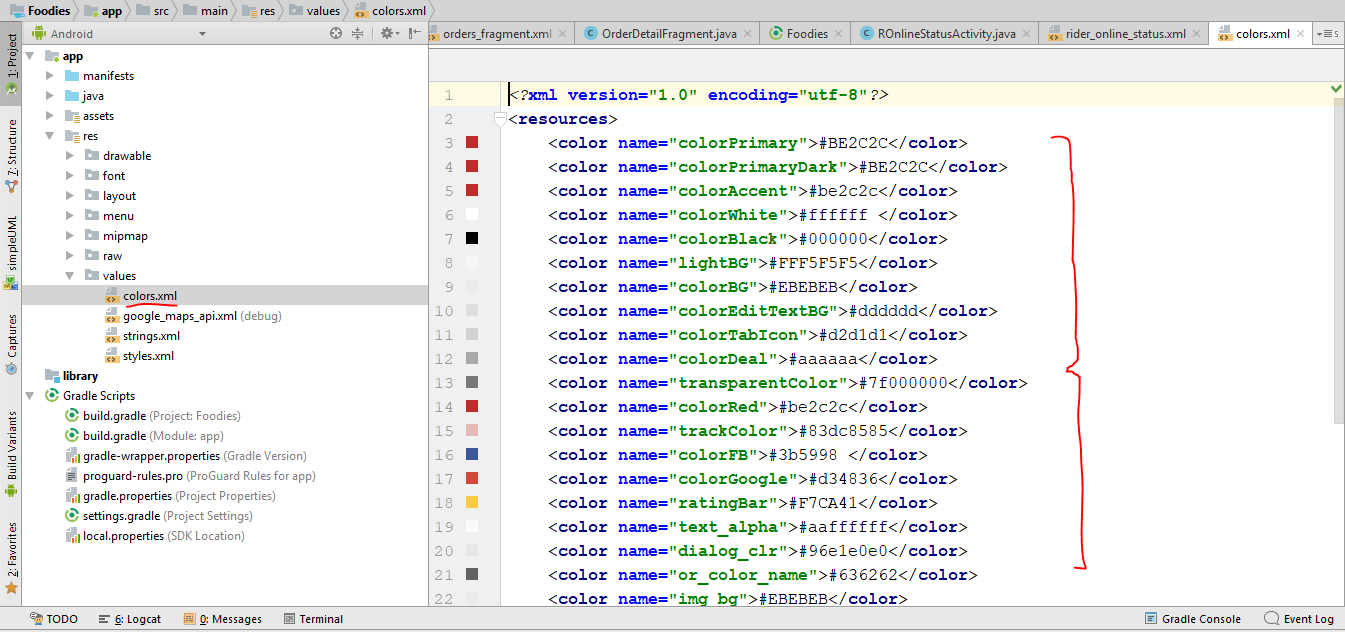
Above is illustrated how you can change the Colors of the application.
You can change your apps colors to create a custom look. The primary color is the color of the Toolbar, some buttons and headers. The primary dark color is used for e.g. the status bar. get more color from here material.io
Change Theme of Application
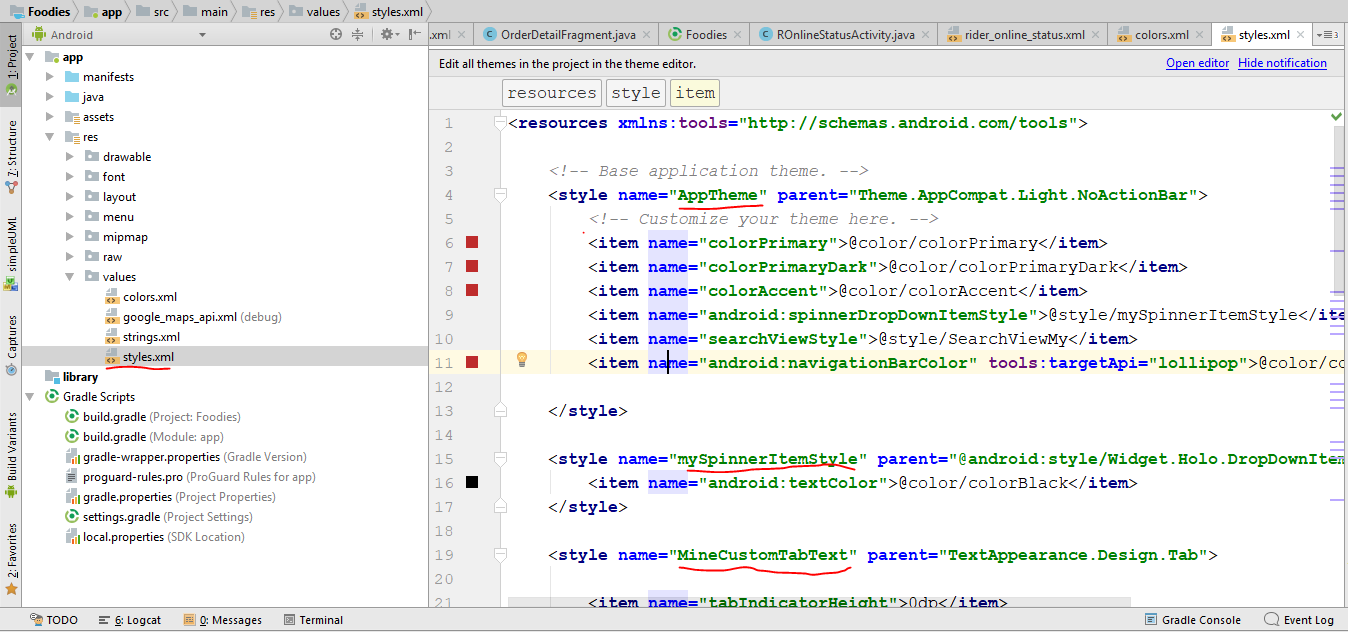
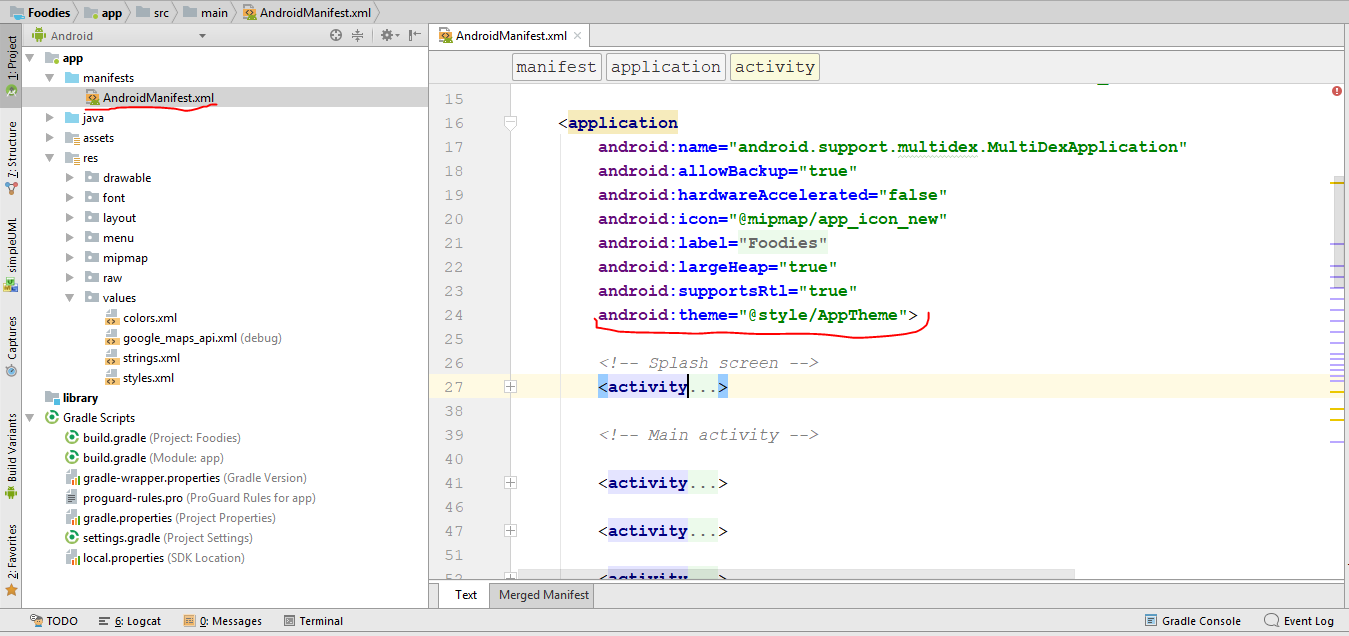
Above is illustrated how you can change the Theme of the application.
Change App icon
Now we need to put a png file with your icon named 'ic_launcher.png' in the following folders:
- res/drawable-mdpi - with a size of 48px x 48px
- res/drawable-hdpi - with a size of 72px x 72px
- res/drawable-xhdpi - with a size of 96px x 96px
- res/drawable-xxhdpi - with a size of 144px x 144px
this URL will help you resize your images or event create new icon to your app Launcher Icon Generator
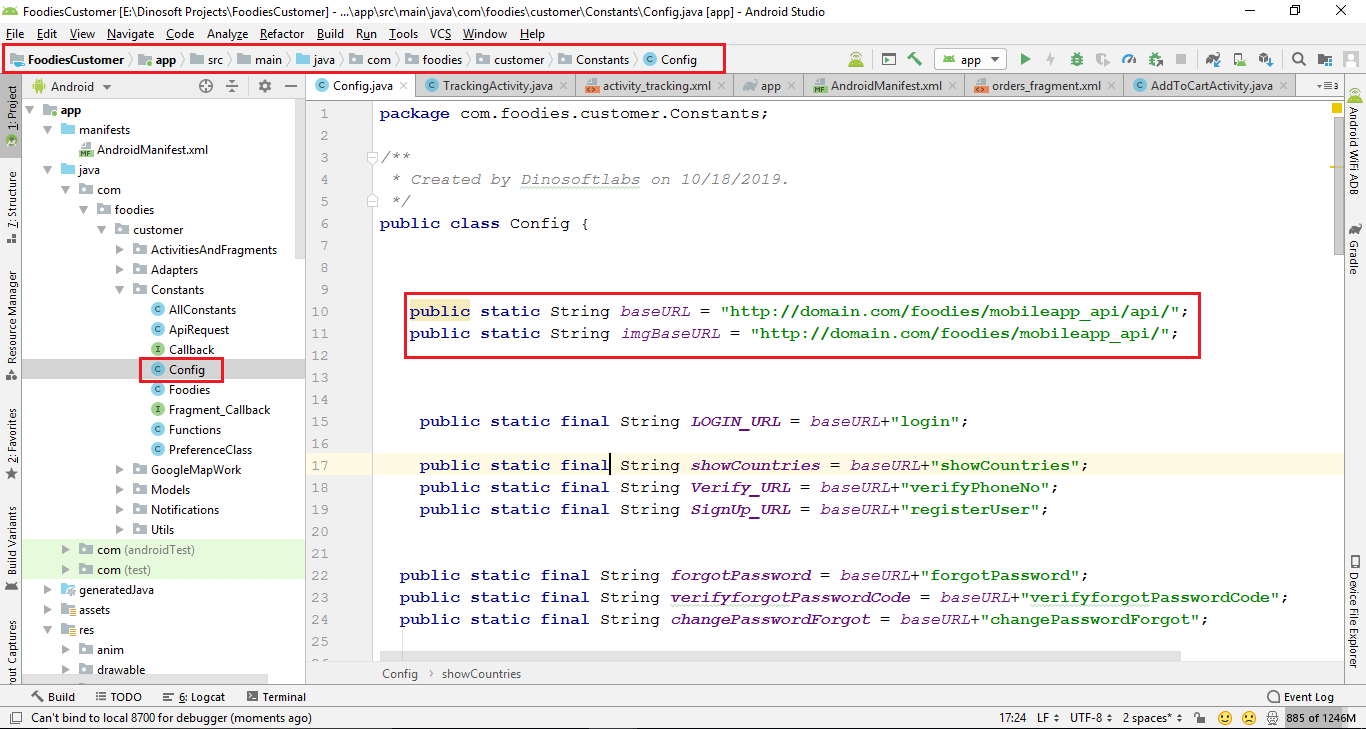
Change API Links
baseURL should be "http://domain.com/mobileapp_api/api/" and imgBaseURL should be "http://domain.com/mobileapp_api/"
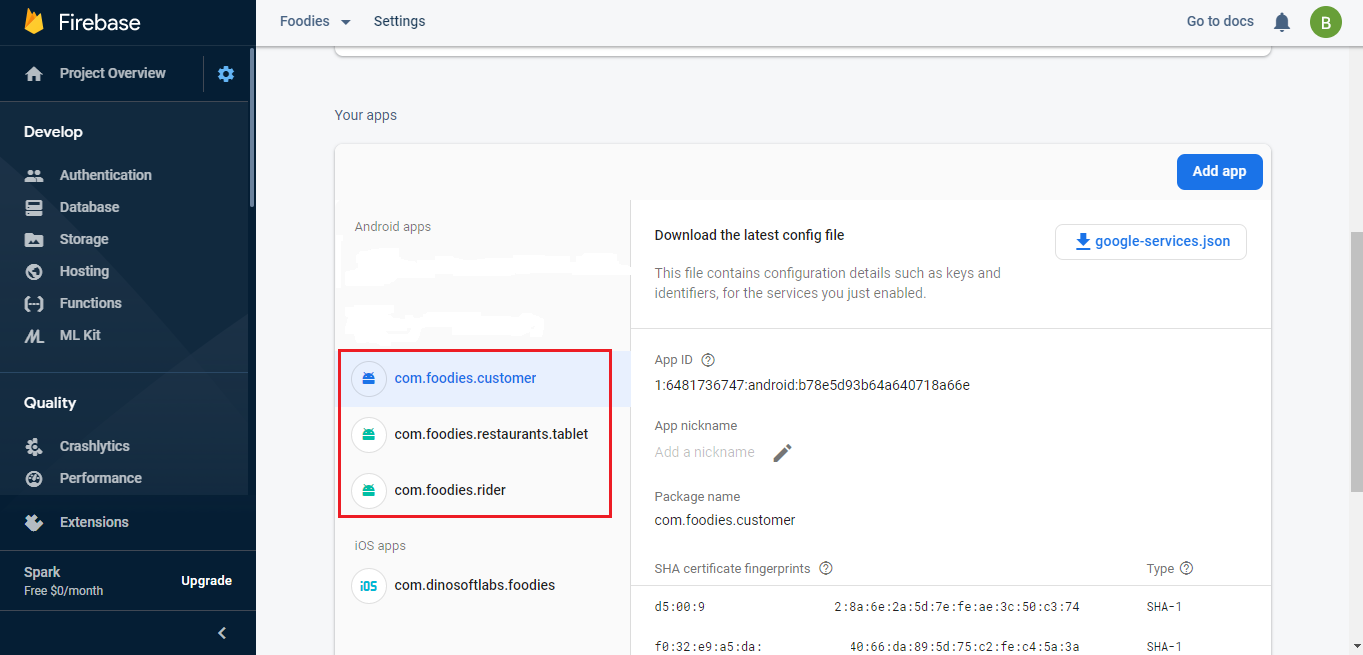
Firebase Configuring
Add all the application in one firebase project and keep in mind google json file should be download after you add the app into firebase.
Change Firebase Db Rules
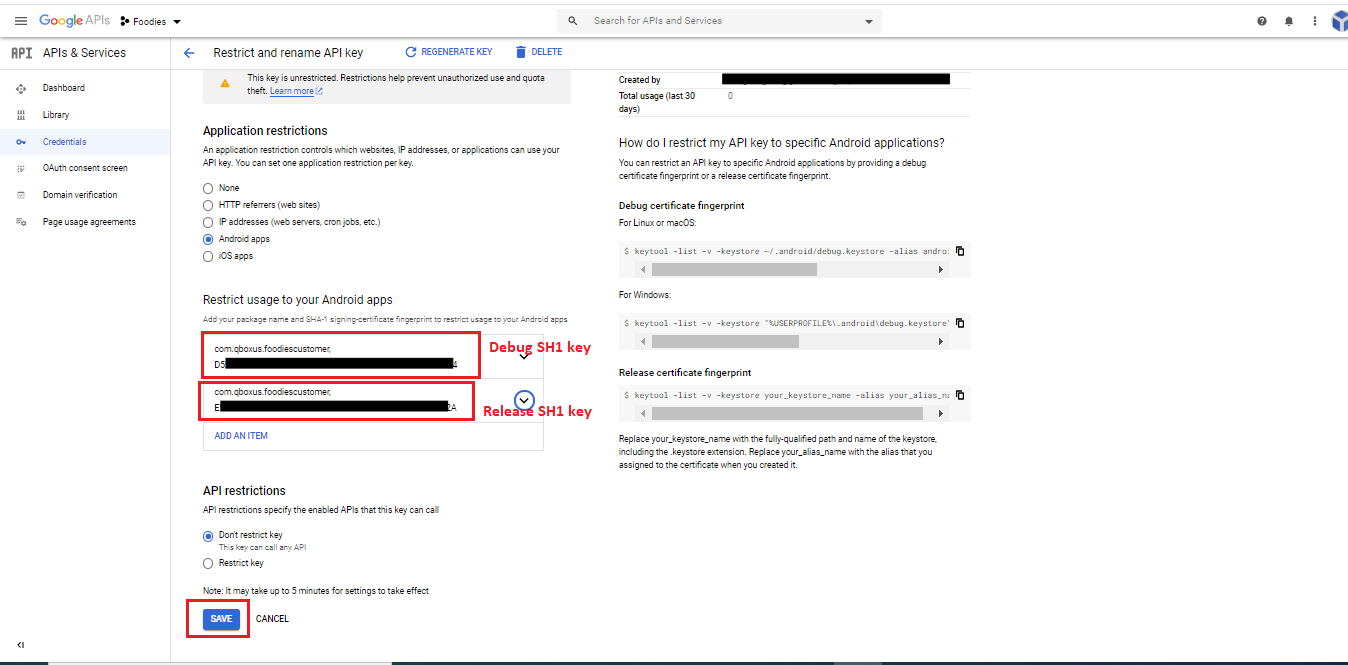
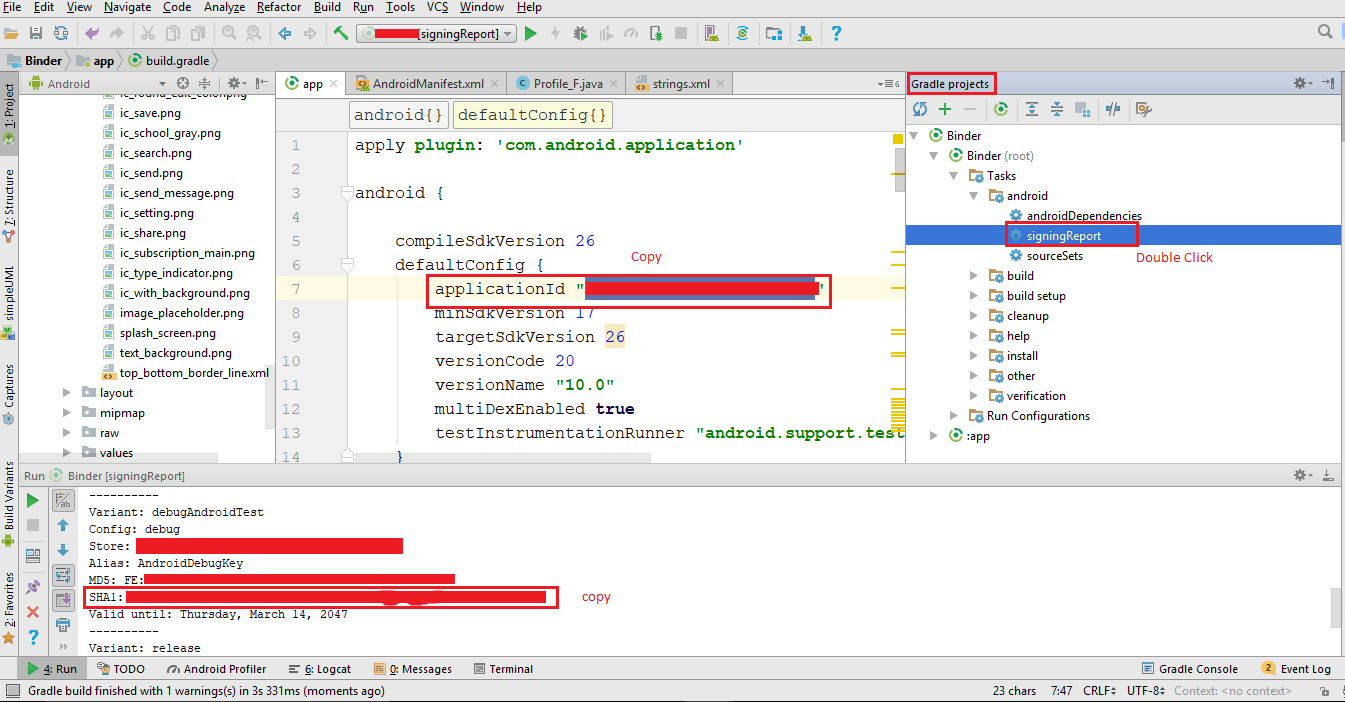
Debug and release Key
Before going to next you have to learn about the Sh1 key for both debug and release. if you are in the development mode then you will use the debug sh1 key but when you going to publish the app on playstore then you will have to use the sh1 key of Release key
Debug Key
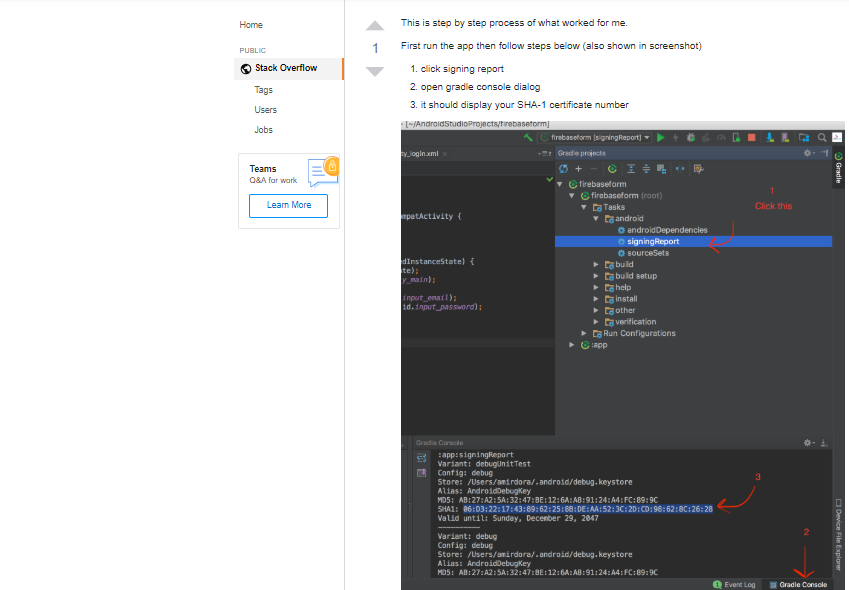
Method 1 How to get the SH1 key for the published app (Signed or release key)
To get realese sh1 contains two step.
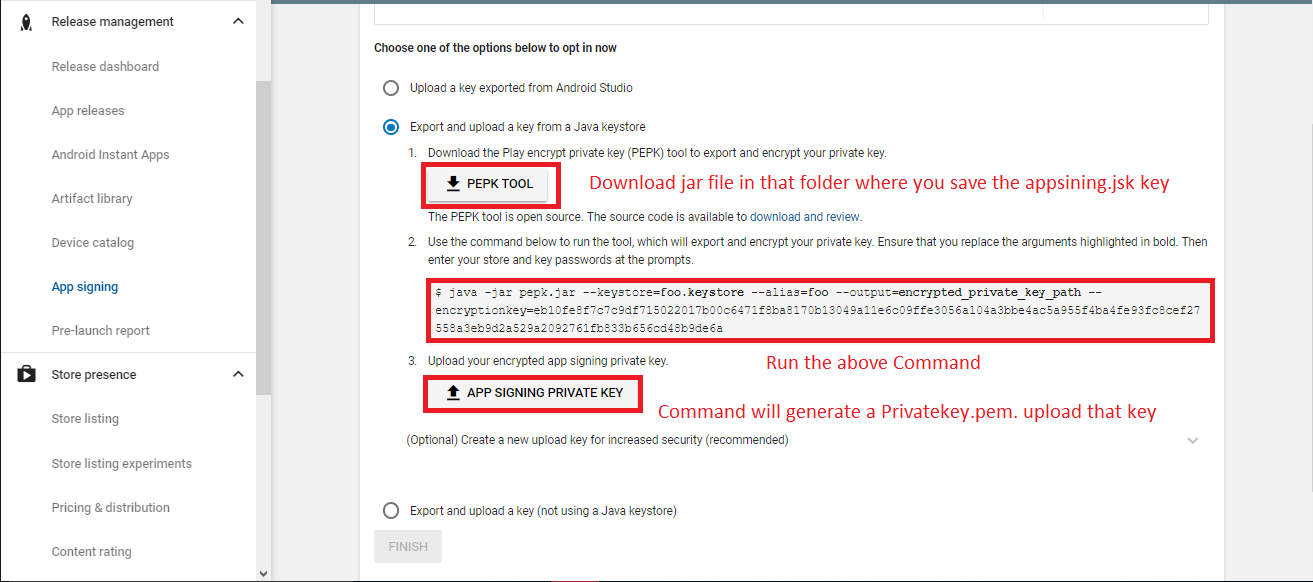
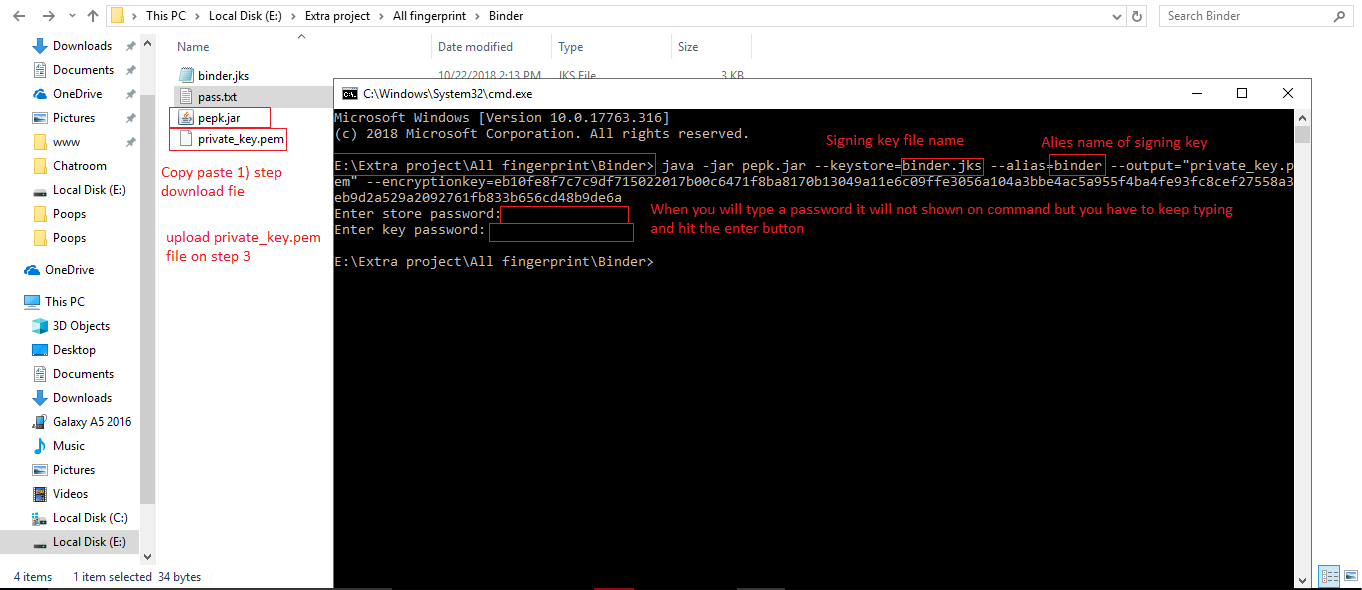
Step1: you will generate your own app signing key Create signing key
Step2: Get the Sh1 key of app signing key
Get the Sh1 key. Run the below command on Command Promt
Method 2 How to get the SH1 key for the published app (Signed or release key)
Follow the steps
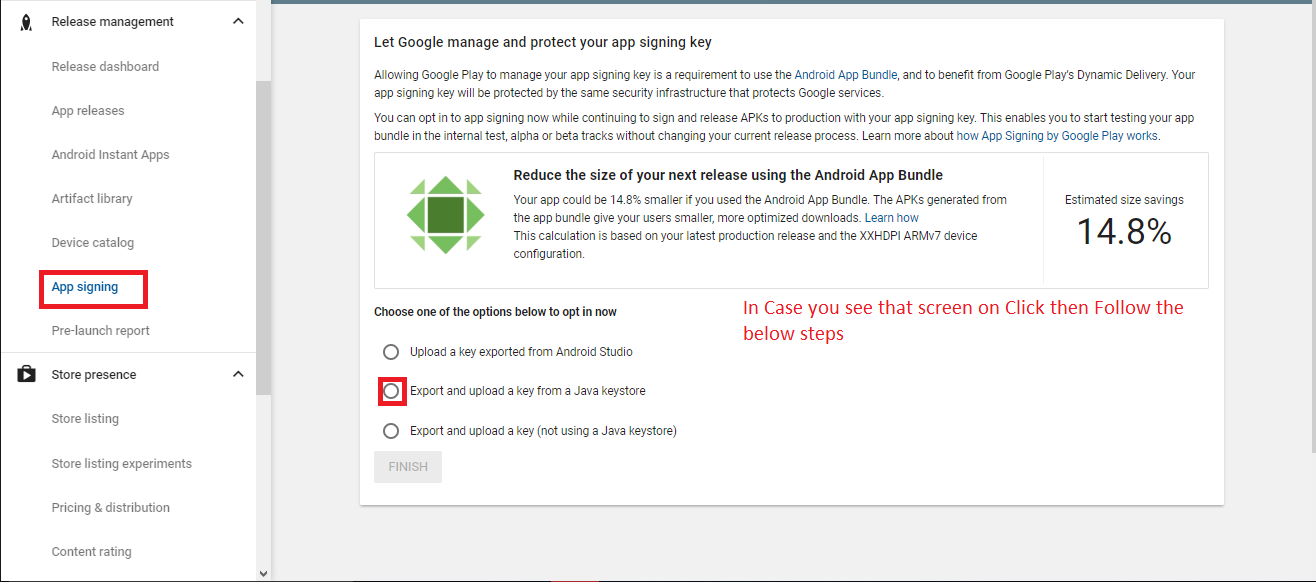
If you are see this screen that means you have the SS1 keys
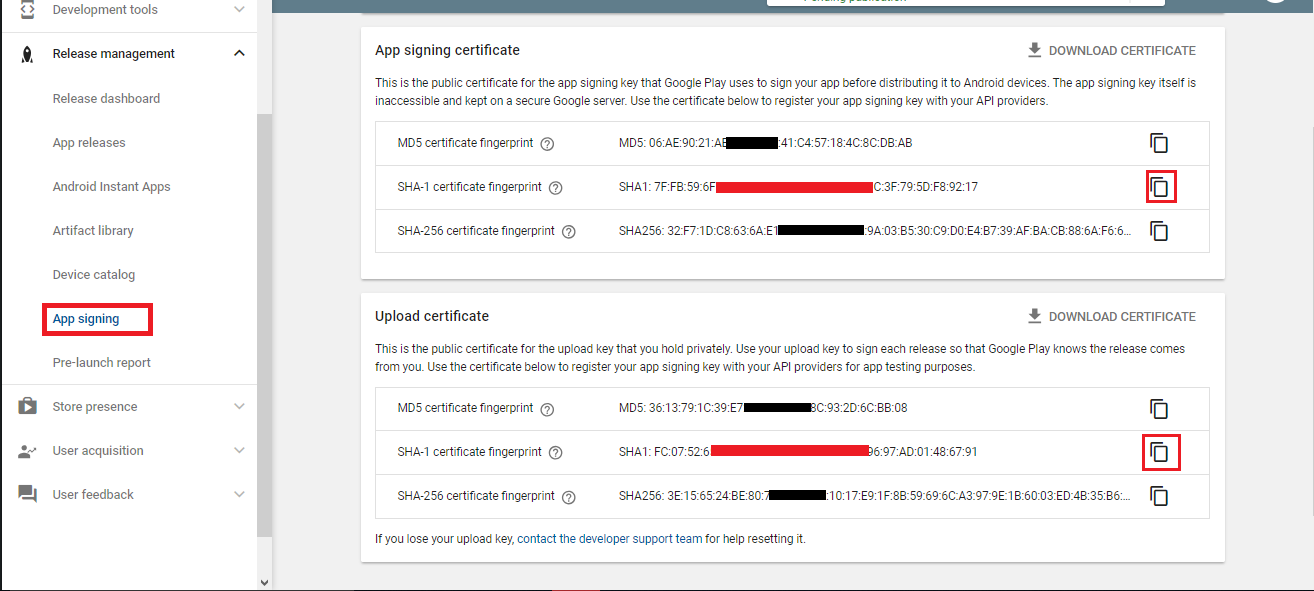
If you already have keys then you have to follow the phone number login step
Google Map configuration
Make sure you have add the firebase firbase first then you project on Google Api console will automatically show, means you don't need to create the project on Google api console if you created the firebase project
Step 1
Step 2
Step 3
Step 4
Step 5

Step 6
Facebook Login
You have to follow the steps
Here is the Helping video for setup facebook login
Step 1
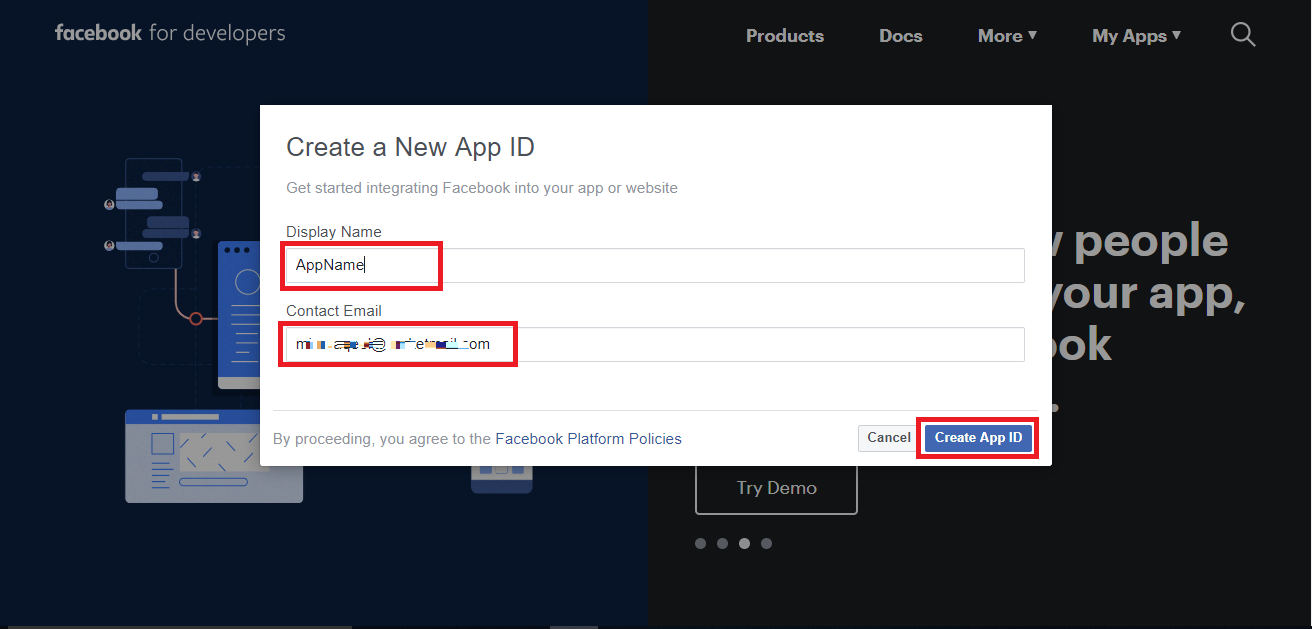
Go to "facebook Developer" the link is given developers.facebook.com and Create a new app
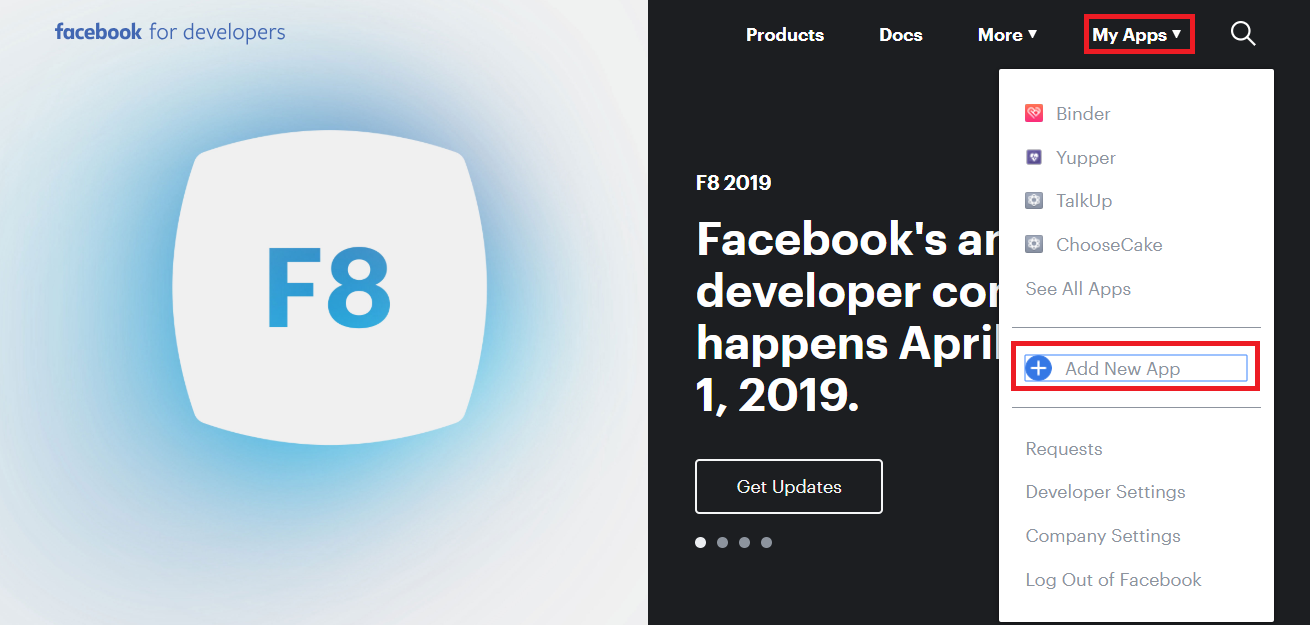
Step 2
Go to "facebook Developer" the link is given developers.facebook.com and Create a new app
Step 3
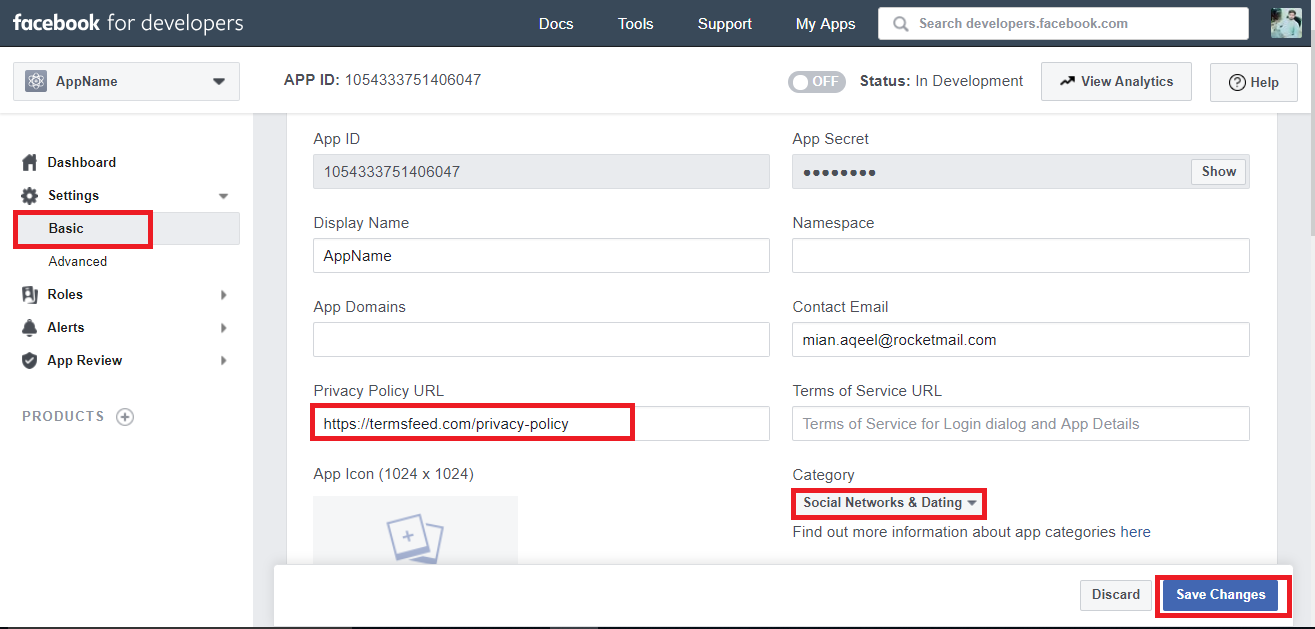
Then Go in Setting > Basic Fill privacy policy and application nature/cateogry and press save
Step 4
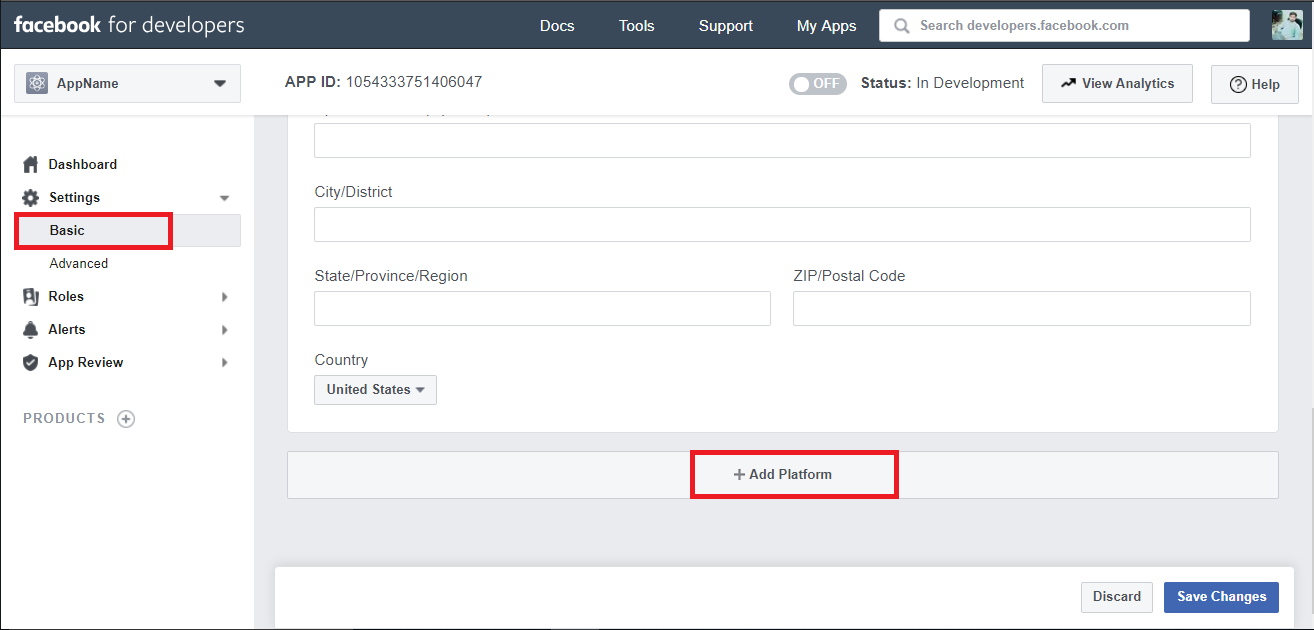
Then Go in Setting > Basic Add development palatform
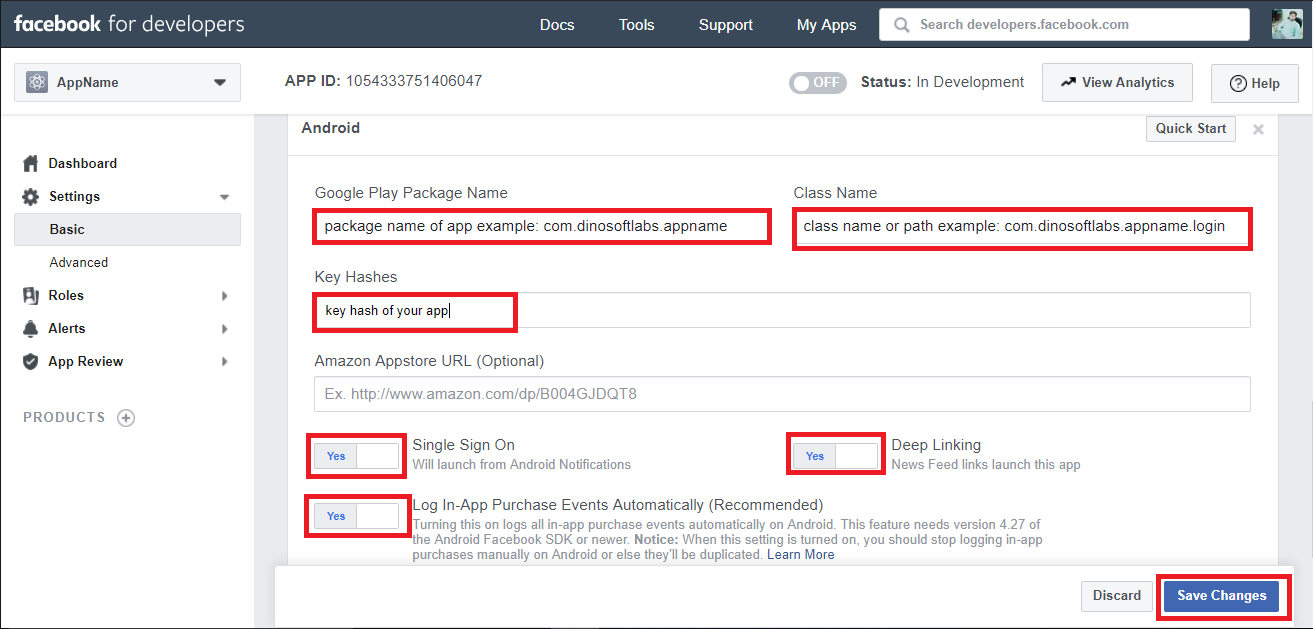
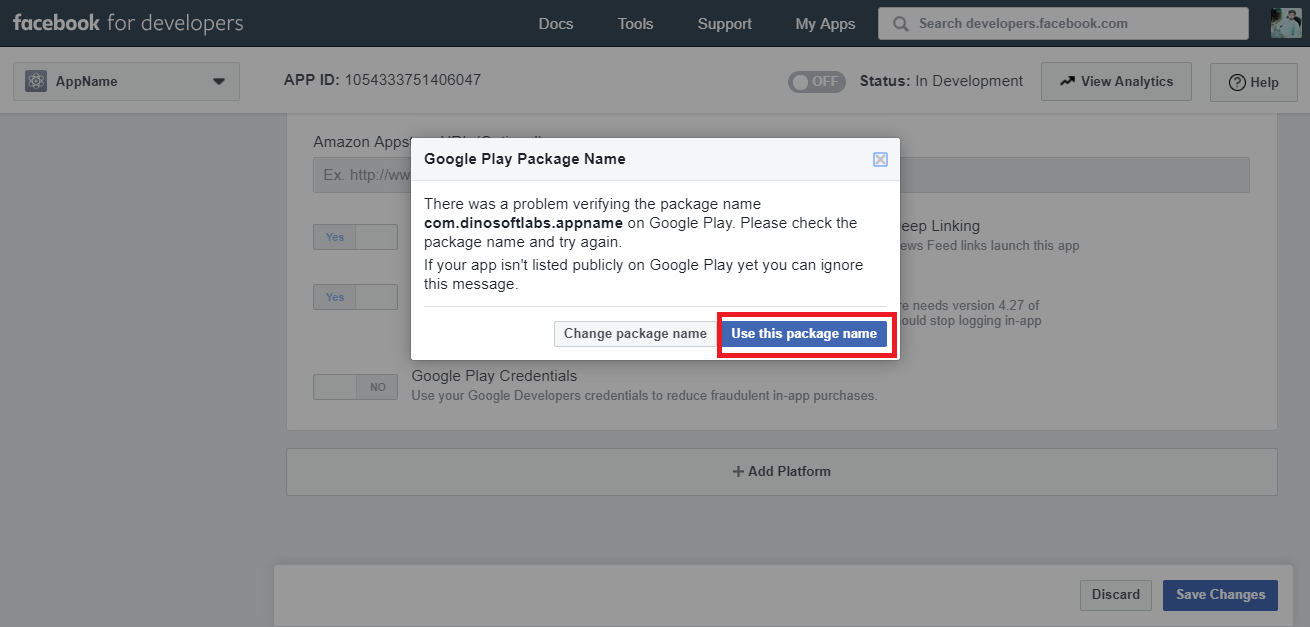
Step 5
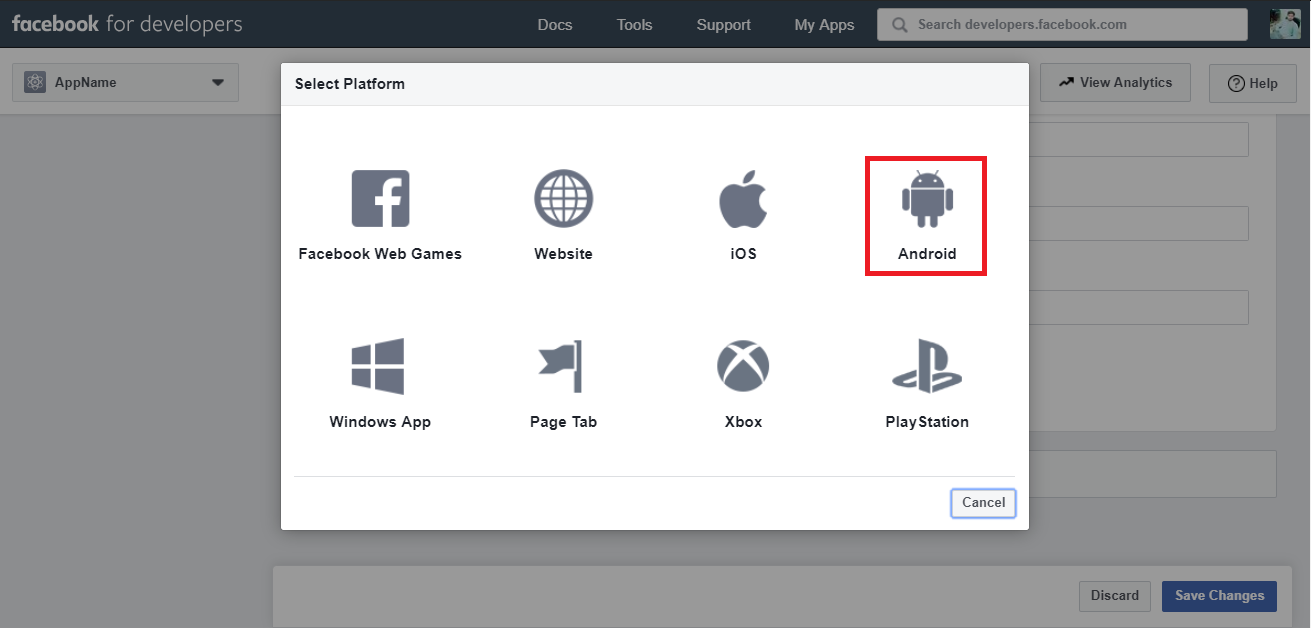
Then Go in Setting > Basic > development palatform Select Android
Step 6
Follow screenshort
Step 7
Follow screenshort
Step 8
Follow screenshort
Step 9
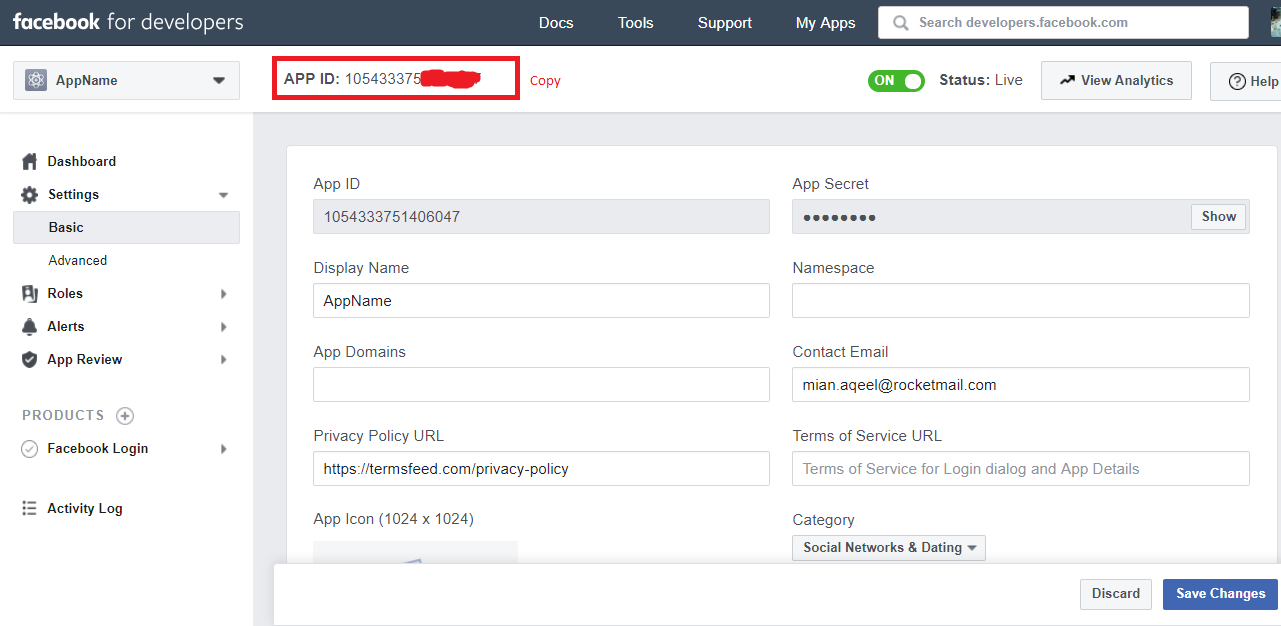
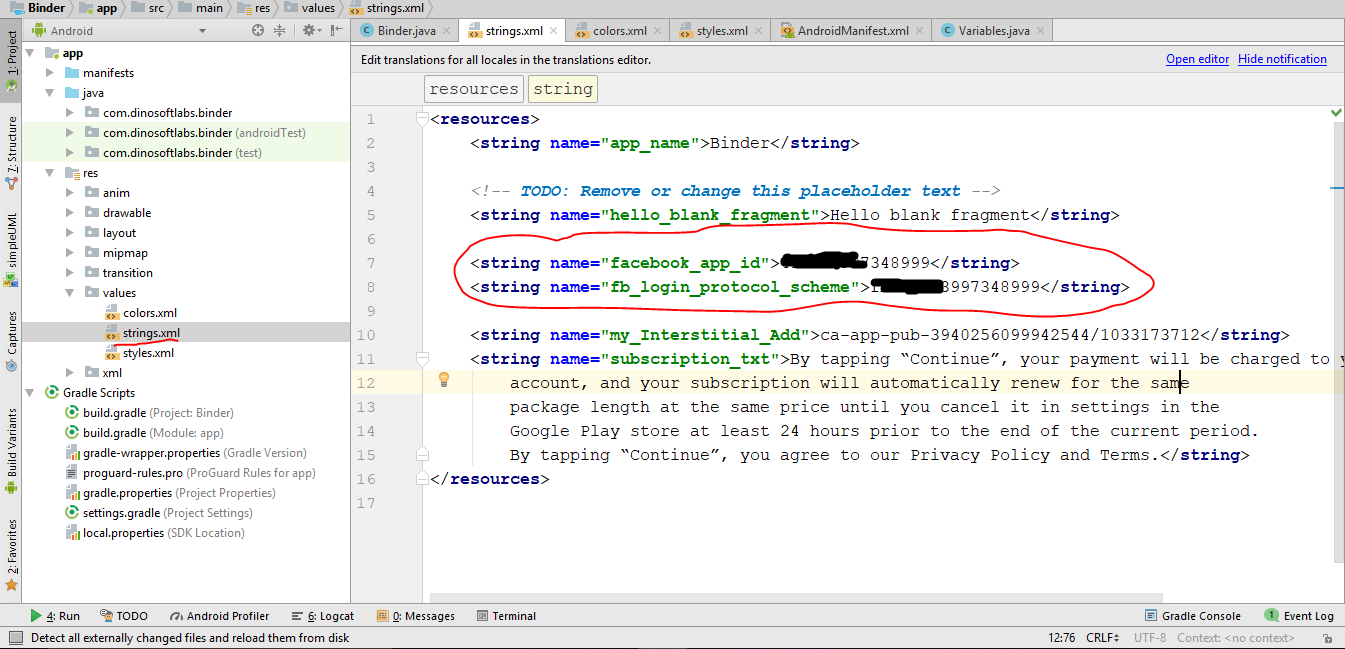
Copy APP ID Follow screenshort
Step 10
Follow screenshort
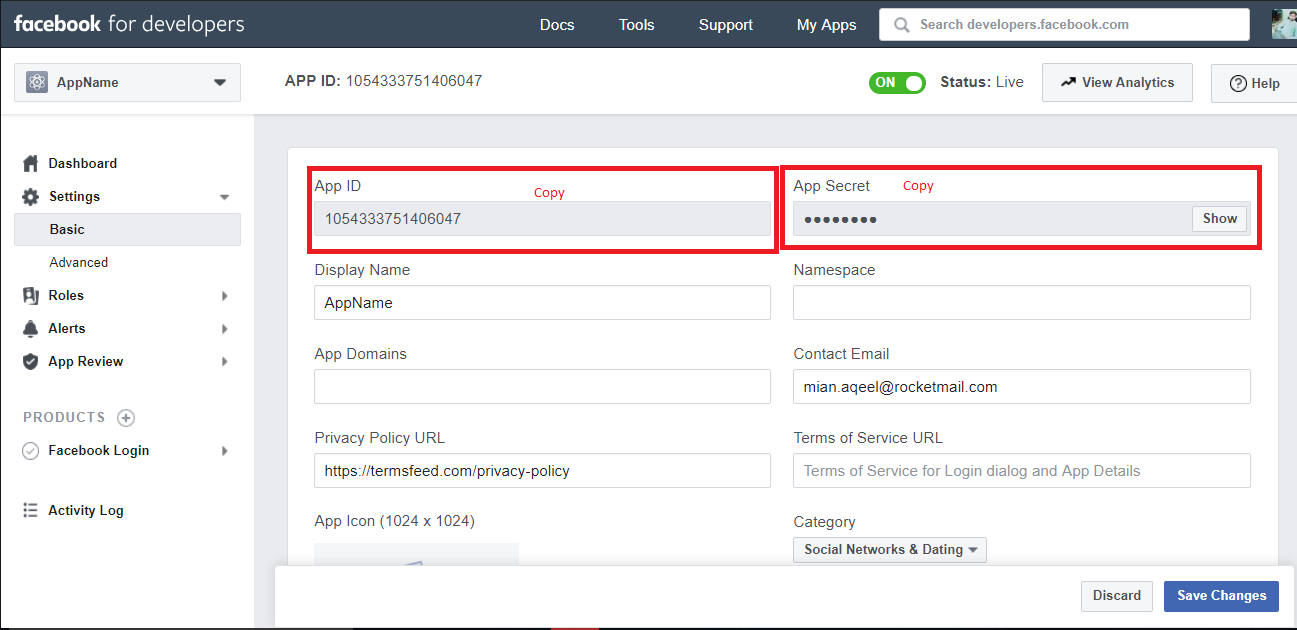
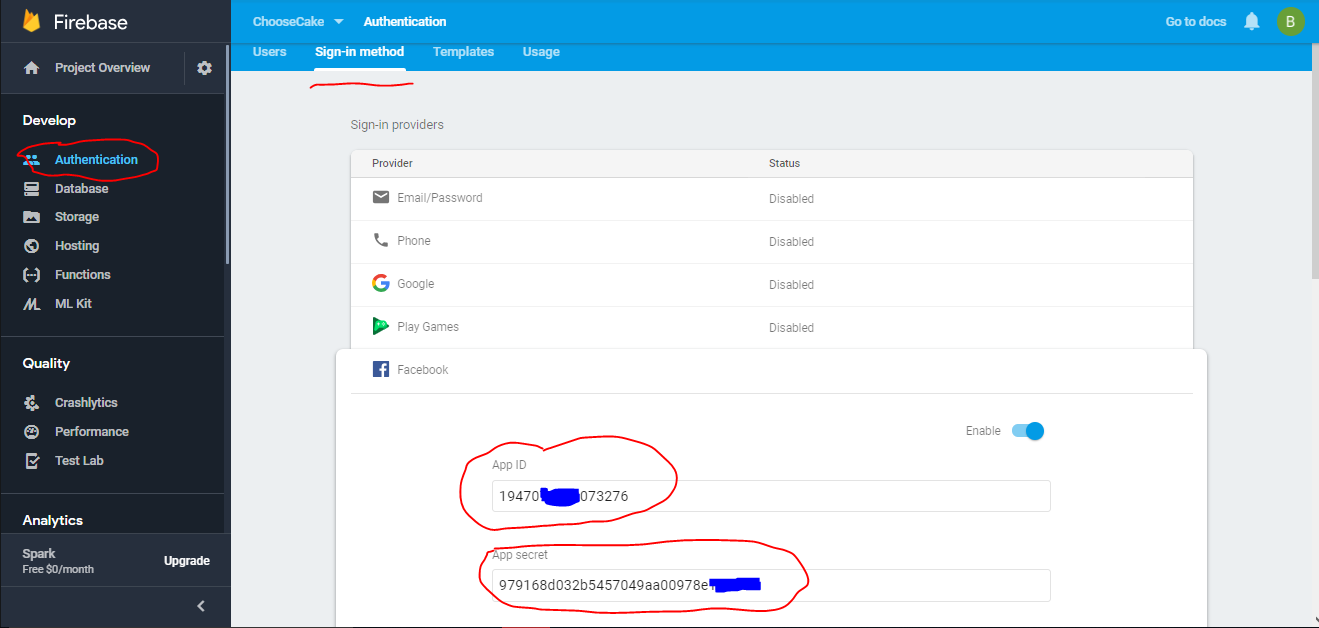
Step 11
Copy APP ID & APP Secret Follow screenshort
Step 12
Follow screenshort
Below related to Step 5
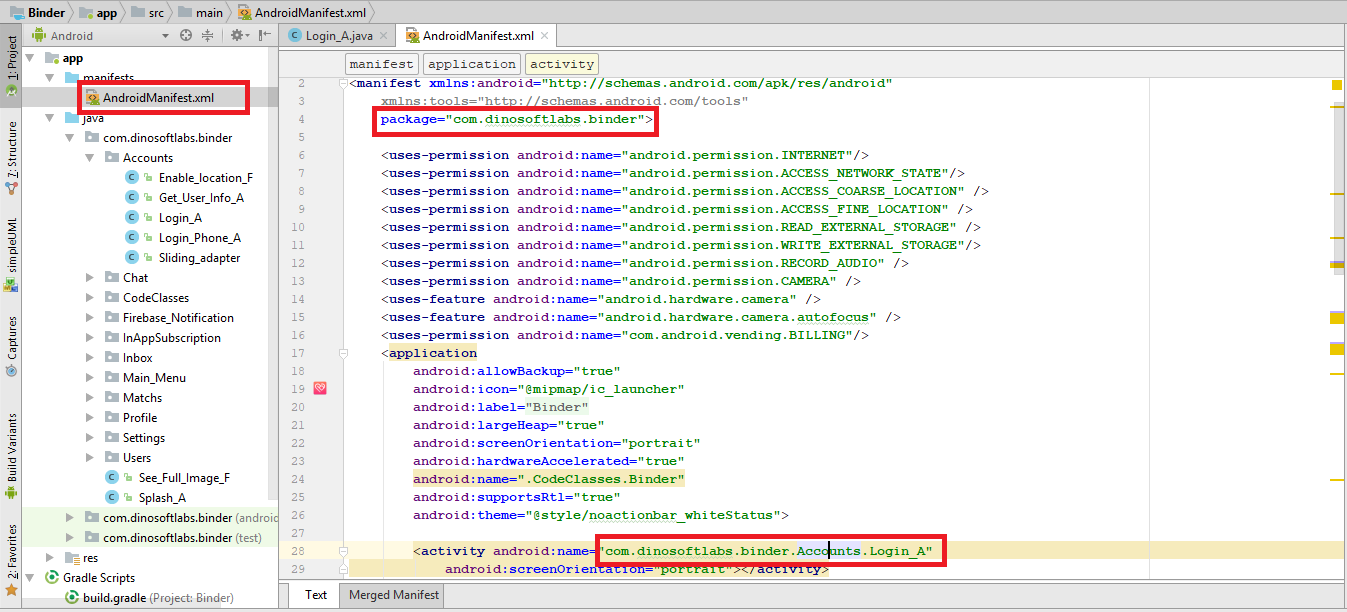
Package Name is com.dinosoftlabs.Foodies
Default Activity Class Name com.dinosoftlabs.Foodies.Accounts.Login_A
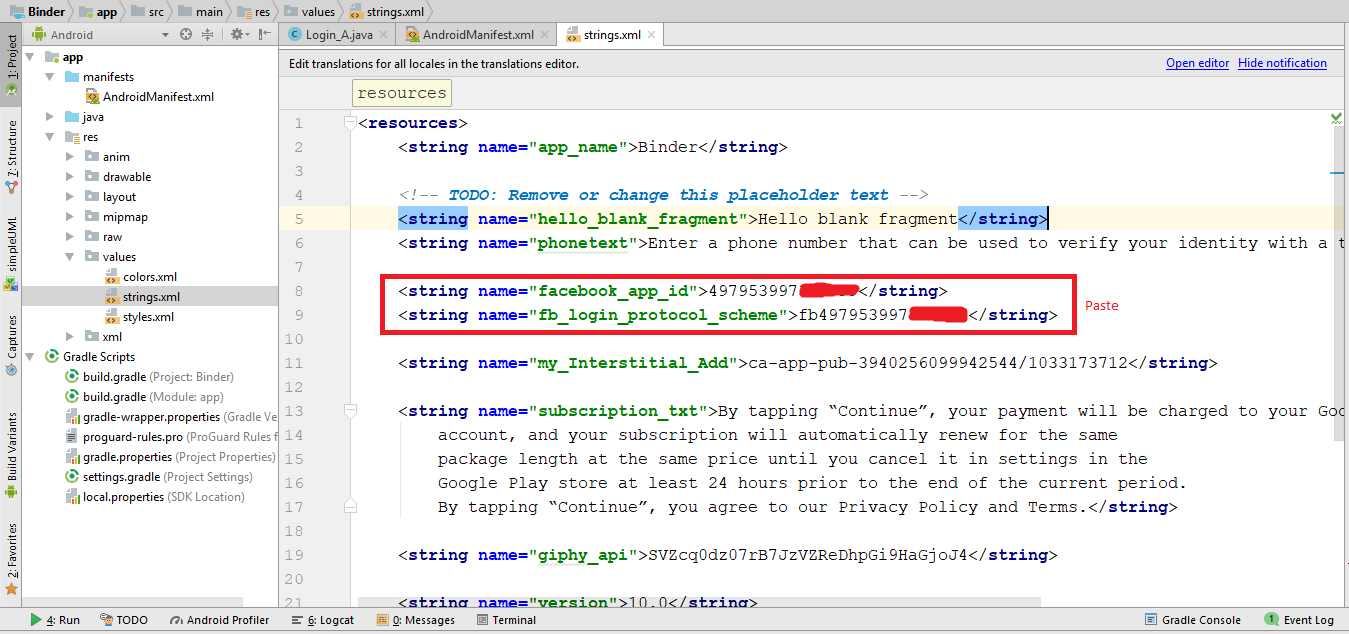
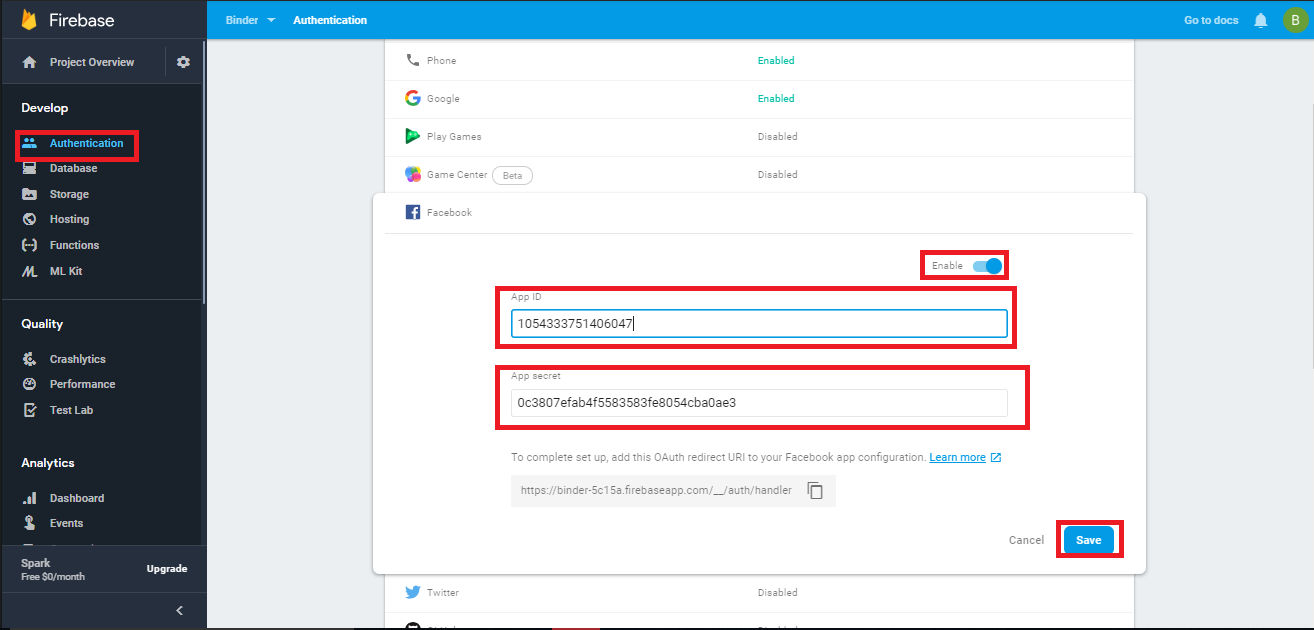
Give the App Id and App secret in firebase Authuntication
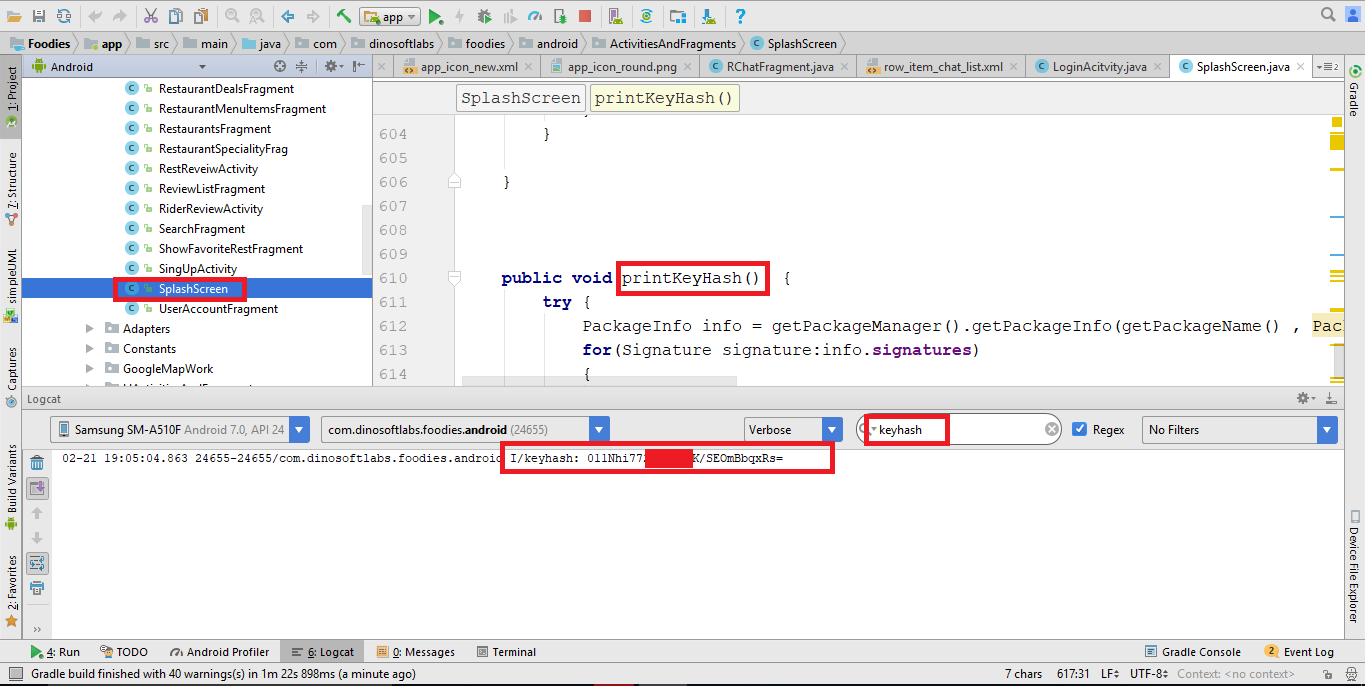
Step 13
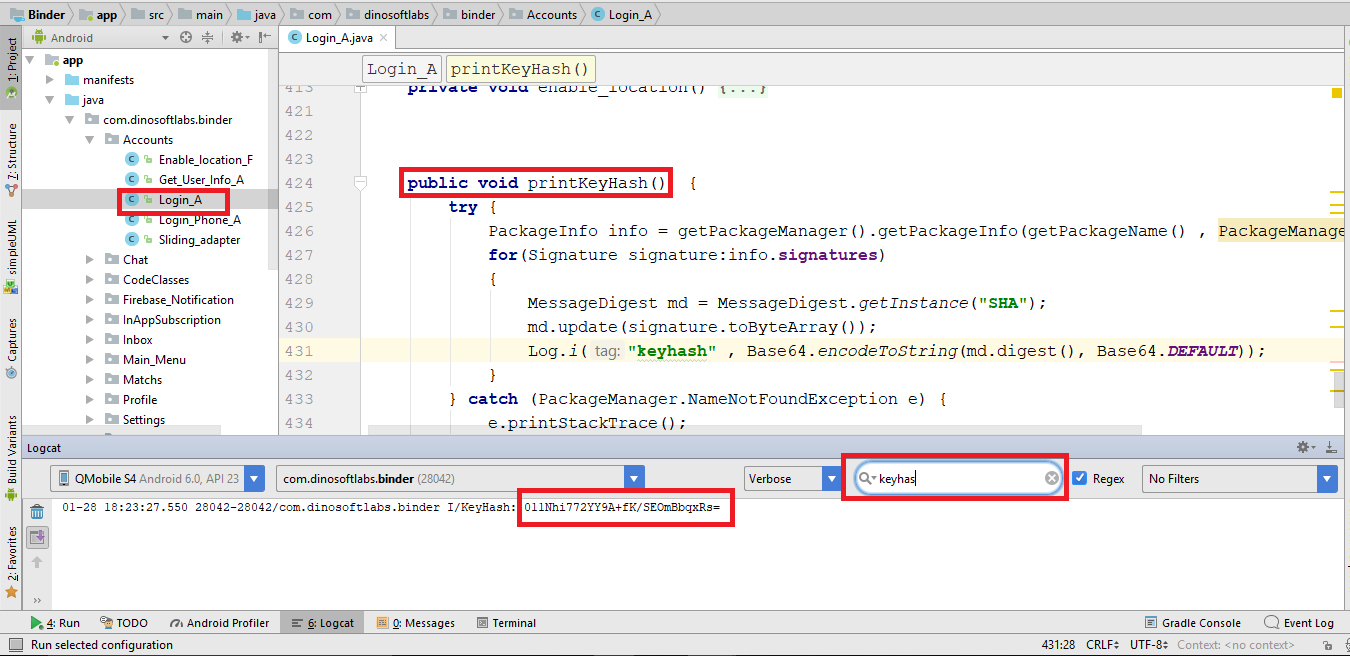
Generate KeyHash Follow screenshort
Step 14
Follow screenshort
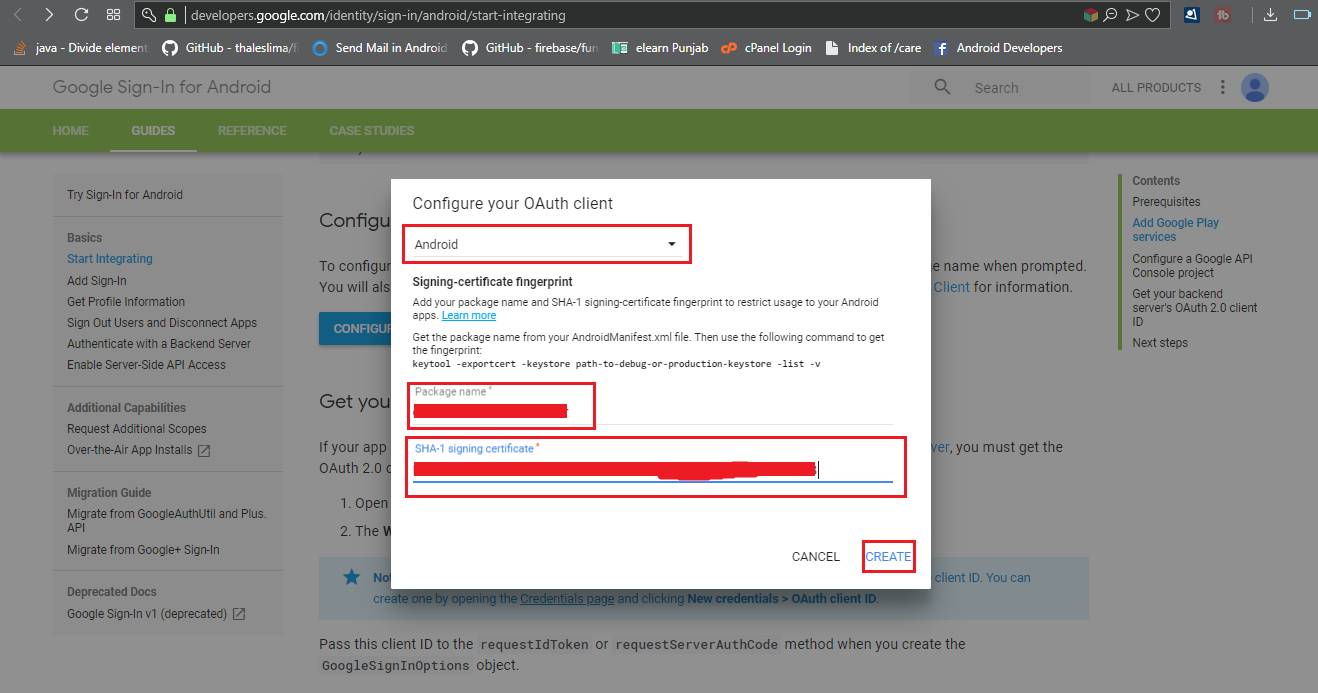
Google Login configuration
Here is the Helping video for setup google login
Step 1
Step 2
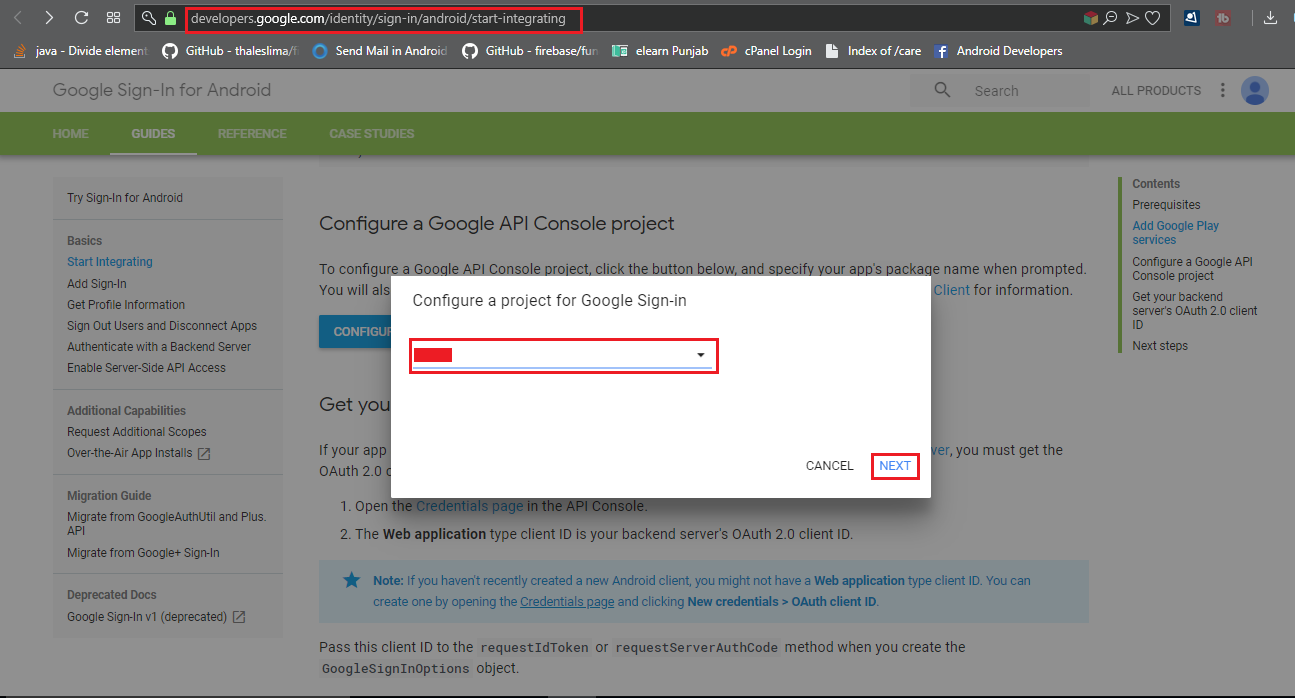
Step 3
Step 4
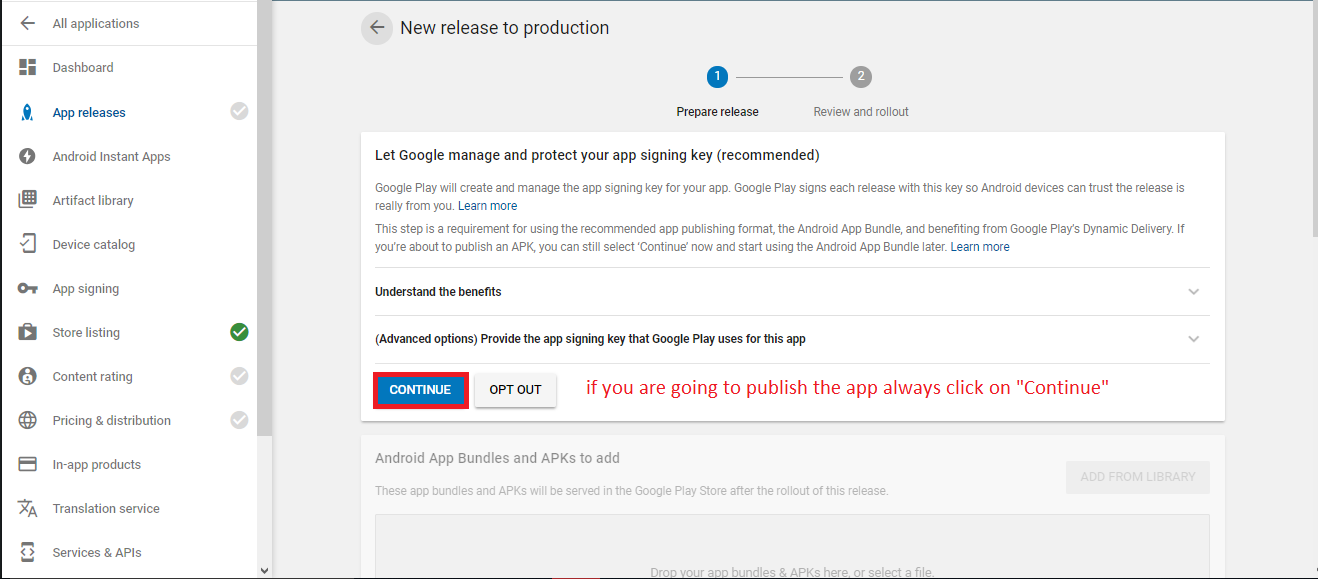
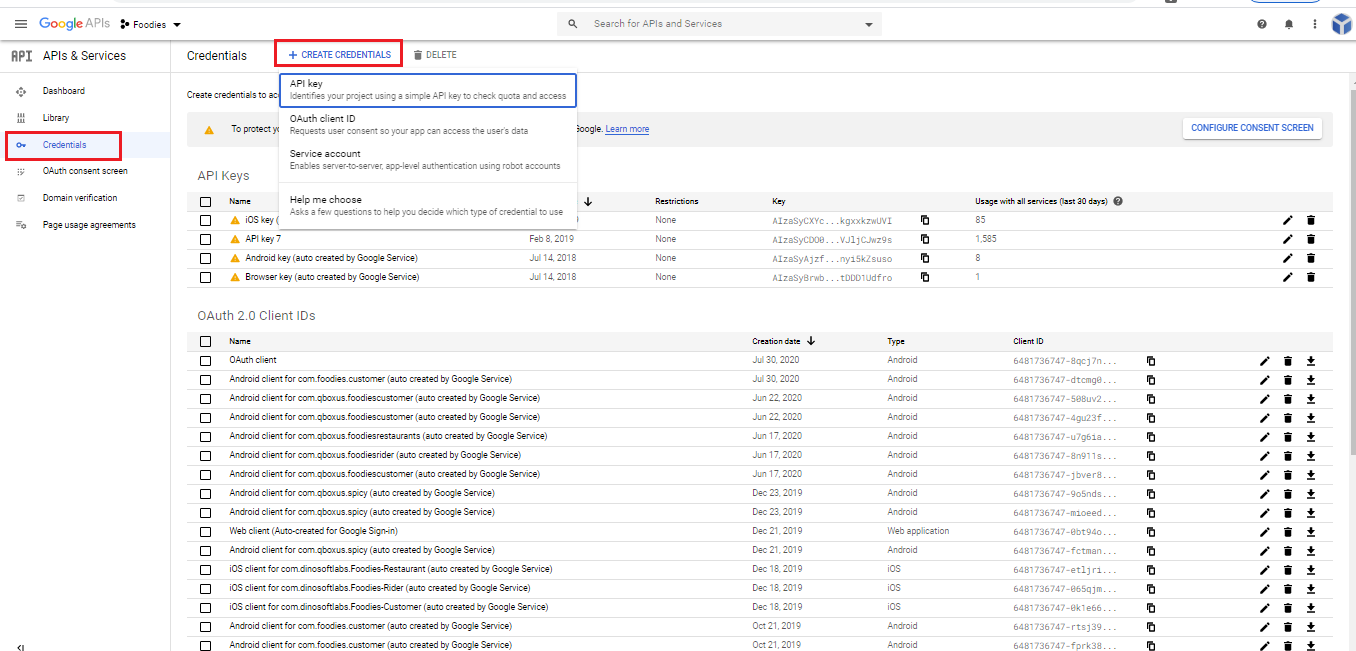
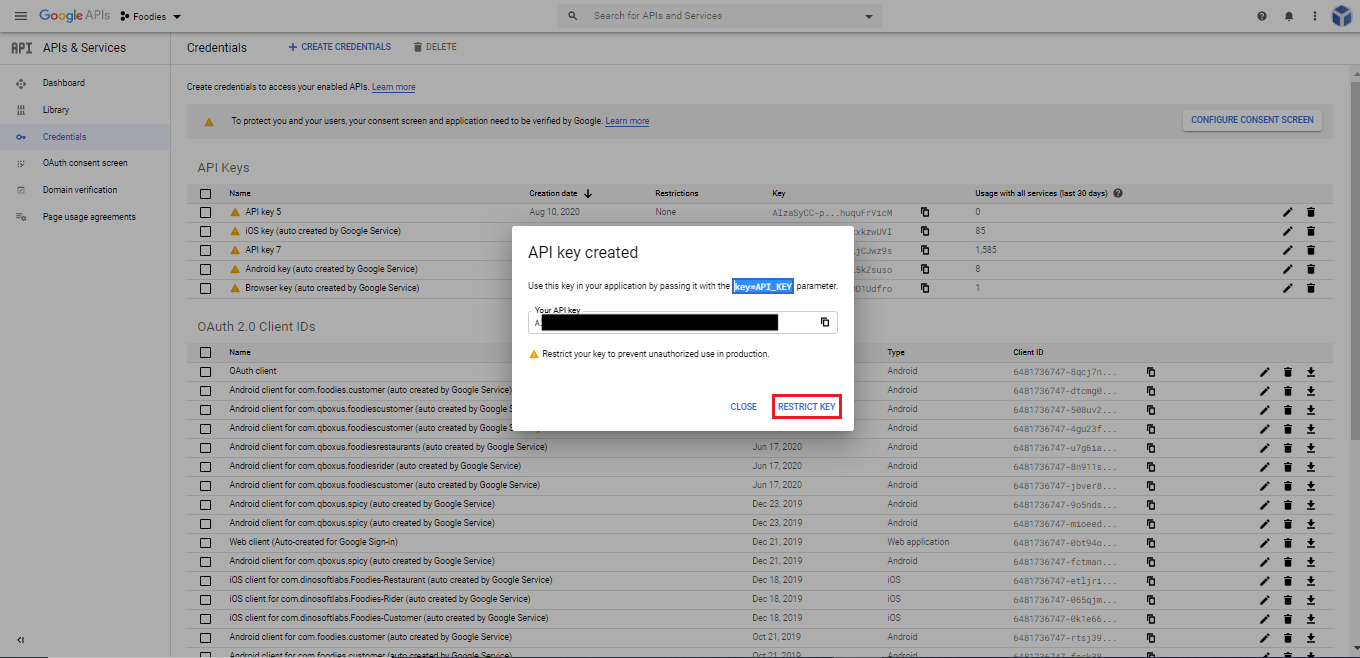
After publish app on Google Play Store
If your app is publish into the playstore then you have to make a seprate google auth client id.
the ways of gmail release key same like as we create for debug. The only difference is in release mode we get and use SH1 key from google playstore and create a new OAuth client Id

Hide Any Social Media Button
If you want to disable facebook login
if you want to disable facebook or google login button you have to hide the mentioned View/Button just add android:visibility="gone"

Change/Setup Country
You have to delete the table "tax" in from database follow the screenshort

After that you have to add tax info from your admin panel where you will see list of countries , you can select in which you want to setup follow the animiated picture you will see look like this
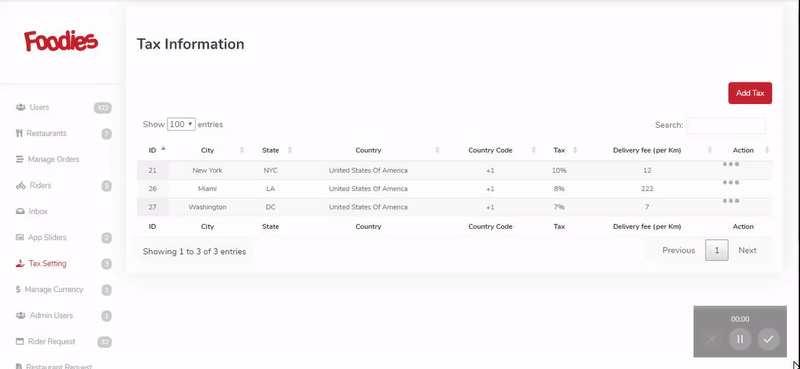 Note if you are using our demo database you have to follow this step for avoid app crash
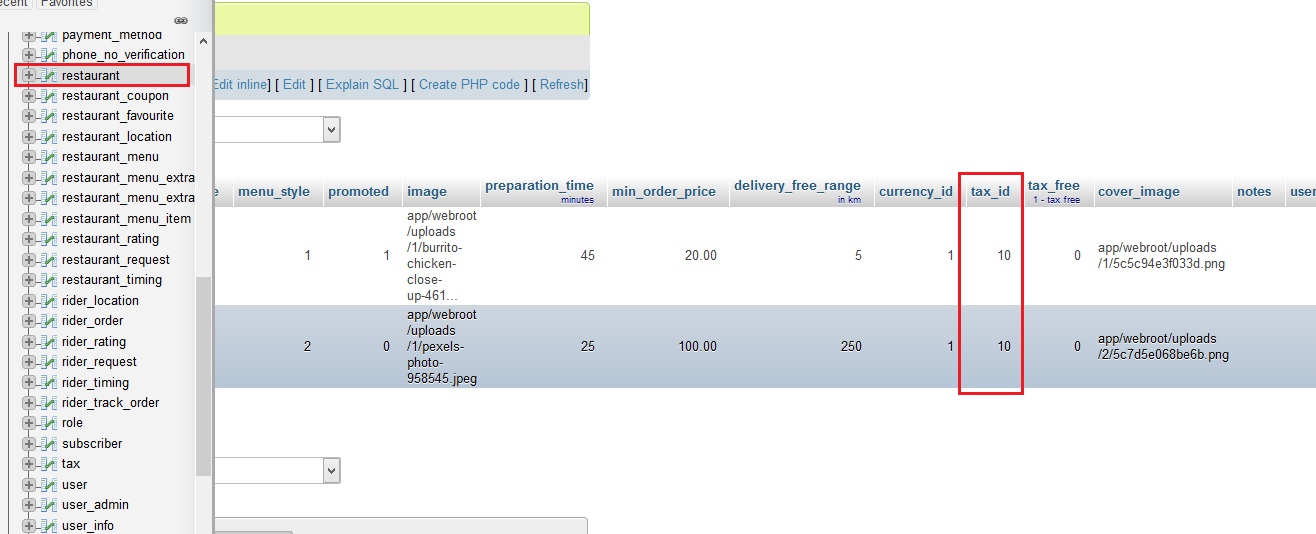
after add tax you have to see whats the tax id that you added from tax page and just replace that tax id in resturent table
FAQ
App Develope in native or not?
Yes app is in native coding
Which PHP version?
it will work on PHP 7.0
Which Database You are using?
We are using mysql database
Does Demo Data included (Demo data like on our app)?
Yes Test/Demo Data are inlucded in the package
Does it have 3rd party services?
Yes We are using these Thrid party services listed below
- Google maps
- Twillio
- PostMark (email server)
- Stripe Payment Gatway
- Firebase It has Firebase Thrid party for real time chat and send push notifications, Which is free but limited , after lot of users and usages you have to buy their packages there are have 3 packages Free , $25 monthly , Pay As you go See Firebase packages
Does it have Admin panel
Yes It has Three (Super portal , Rider , Restaurants) as well which is in HTML/CSS and connected with datbase via PHP API
Does it have Documentation
Yes it has Documentaion about android , web api setup , admin panel setup , firebase push notification setup
Which framework we are using for API
We are using cakePHP 2.7.8
Does it support other languages (RTL)
No its only support English language
API/Server/3rd party services setup will be free?
No we will not do any help to setup API/server/3rd party services
Do you provide customization?
Yes we do but there will be an extra cost , contact us on our email hello@qboxus.com
What it means when you see white page by going to this url http://domain.com/mobileapp_api/
If you see white page please make sure that your php version should be 7.0. you can change php version 7.0 by going into your hosting cpanel
Thank you & Support
I'd like to thank you again for your purchase and I hope you where able to successfully install the app and using it in your future business . If you need support or have some questions. You can visit our support resources here at hello@qboxus.com
What support does include- Answers to (technical) questions about the item's features
- Assistance with reported bugs and issues
- Answers to questions about importing and setting up the item as is described in the docs.
- Customization & adding new features
- Installation Services
- Support for 3rd party software and/or plugins
- Content related rejections and violations from Google